PlanetJune Craft Blog

Latest news and updates from June

Archive for Tutorials

Yarn for Amigurumi

This is the first of three information posts aimed predominantly at crocheters outside North America. For the rest of the series, see Crochet Hook Styles and Crochet Terminology.

Most amigurumi patterns are worked in worsted weight yarn. This is confusing for non-Americans because 1) it’s not called ‘worsted weight’ outside North America, and 2) this weight isn’t very popular on other continents, so it can be very difficult to find a nice ww yarn to crochet with! If you do find worsted weight yarn outside North America, it’ll be called aran weight or 10-ply yarn.

Note: The ’10-ply’ name does not refer to the number of strands (aka plies) that make up the yarn – worsted weight yarn typically has 4 ‘plies’, but it’s a very different thickness from a 4-ply yarn, as you’ll see in the list below!

International Yarn Weight Names

  • #0 Lace: lace weight, approximately 1-ply to 3-ply
  • #1 Super Fine: fingering weight, 4-ply
  • #2 Fine: sport weight, baby weight, 5-ply
  • #3 Light: DK, light worsted weight, 8-ply
  • #4 Medium: worsted weight, aran weight, 10-ply
  • #5 Bulky: bulky weight, chunky, 12-ply

The situation is slightly more complicated than this: as you can see from my worsted weight yarn comparison investigation, all yarns labelled ‘worsted weight’ (or any other weight) are not necessarily all the same thickness, so your yarn may not crochet up exactly the same as the sample, even if you do find an aran/10-ply yarn.

Substitutions for Worsted Weight Yarn

  • Some DK yarns are barely finer than the yarns at the fine end of my comparison post, so DK yarn may be a good choice, although, depending on your yarn and how tightly you crochet, you may find you need a smaller hook to make the best amigurumi; I typically use a 2.75/3.25mm (US C/D) hook for amigurumi made with DK yarns.
  • You can also substitute for worsted weight yarn by using multiple strands of finer yarns to approximate a worsted weight, for example you could try two strands of sport weight (5-ply) held together.

Importing Worsted Weight Yarn

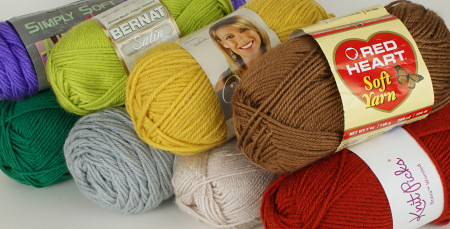
If you’d like to use a genuine worsted weight yarn, there are US-based online shops who ship worldwide, and some non-US online shops are starting to stock US brands (see a few examples below), so you may well be able to pick up some of my favourite yarns for amigurumi, or other worsted weight acrylics online.

Note: Do bear in mind that if you order from abroad, you may get landed with an additional fee for your package to clear customs. Check the customs rules for your country to avoid an expensive surprise!

worsted weight acrylic yarns

A Few Online Stockists:

Note: I have no affiliation with any of these stockists, but I have either used them personally or had them recommended by my customers who have used them successfully.

Using a Different Weight of Yarn

Of course, for amigurumi, there’s no requirement to use a worsted weight yarn – a different weight of yarn will just give you a different-sized finished amigurumi! Provided you use a hook in a suitable size to match the yarn you use, you can create perfect amigurumi with any weight of yarn you like and can find locally – see my Resizing Amigurumi article for details and examples.

Note: Although outside the scope of this article, I should point out that if you’re making something from a pattern where the finished size matters (for example, a garment), substituting a different weight of yarn is unlikely to be successful. Unless you’re comfortable calculating the difference in your gauge and adapting the pattern to match (or calculating which size in the pattern would give you the correct finished size in your gauge), you should use the International Yarn Weight Names list and/or my substitution suggestions above to find a yarn that closely matches the yarn suggested in the pattern.


I hope this article has given you some helpful information and resources, especially if you live outside North America. If you know of any more good online international sources of worsted weight yarn, please feel free to leave them in the comments!


Do you find my tutorials helpful? If so, please consider making a contribution towards my time so I can continue to create clear and concise tutorials for you:

Thank you so much for your support! Now click below for loads more crochet video and photo tutorials (and do let me know what else you’d like me to cover in future tutorials…)

See more helpful PlanetJune crochet tips and technique tutorials

Comments (12)

How to make ‘baby’ amigurumi animals

With the Baby Animals CAL in full swing in the PlanetJune Ravelry group, I thought I’d demonstrate a couple of simple methods to convert almost* any amigurumi animal pattern into a ‘baby’ with very little effort and no pattern modifications.

Method 1: Use Bigger Eyes

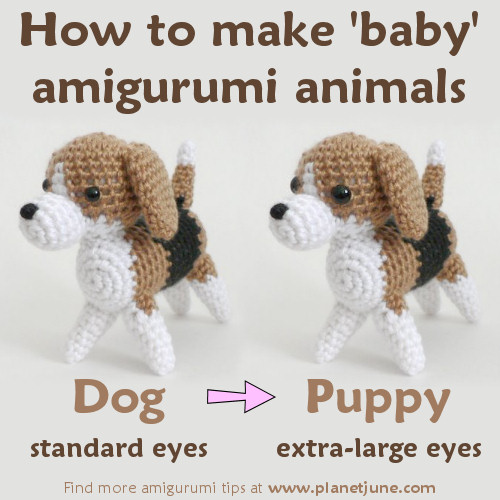
This couldn’t be simpler: to make an individual animal automatically look cuter and more babyish, all you need to do is use proportionally larger eyes than those recommended in the pattern. This works because baby animals (and humans!) are born with very large eyes in proportion to the rest of their bodies.

There are, of course, other differences (larger head, shorter limbs, larger paws, shorter muzzle, etc), but just making this one change can instantly turn an amigurumi dog into a puppy, for example:

how to make 'baby' amigurumi animals, by planetjune
Don’t you want a Beagle puppy now?

Method 2: Make a Mother & Baby

The other easy and effective way to make a ‘baby’ amigurumi is to crochet two of the same animal, and make one much larger or smaller than the other. You can do this with no changes at all to the pattern, simply by using a heavier yarn (and correspondingly larger hook) to make a larger adult, or a finer yarn (and correspondingly smaller hook) to make a smaller baby (see my Resizing Amigurumi tutorial for more details).

elephant crochet pattern by planetjune
The blue Elephant is definitely an older sibling to the tiny baby grey ones! 

aquaami polar bears crochet pattern by planetjune
Mama and baby Polar Bears

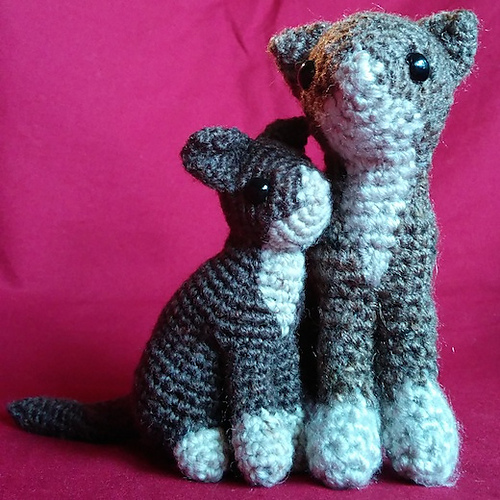
And here’s a gorgeous example from Amanda from Australia (via my Ravelry group), who made a Tuxedo AmiCat with her own little AmiKitten:

mama and baby planetjune tuxedo amicats by amanda
Awww! Amanda’s absolutely adorable AmiCat and kitten

Method 3: Do Both!

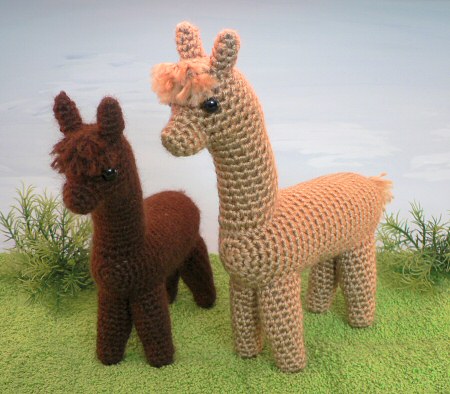
You can combine Methods 1 and 2: try using the same size eyes in both sizes of your amigurumi animal, and they’ll look even more realistically like a mama and baby! Just look at my little brown Alpaca and see how cute he looks with his smaller body and relatively big eyes:

alpaca crochet pattern by planetjune
Same size eyes in a smaller body: definitely a baby!

*Caveat

I said you can use these tips with almost any amigurumi animal pattern for a reason: these techniques only work for animals where the baby is essentially a miniature version of the adult. Some animals have very different looking young: most obviously, any that go through a metamorphosis (for example, a baby butterfly is a caterpillar, not a tiny butterfly, and a baby frog is a tadpole, not a miniature frog).

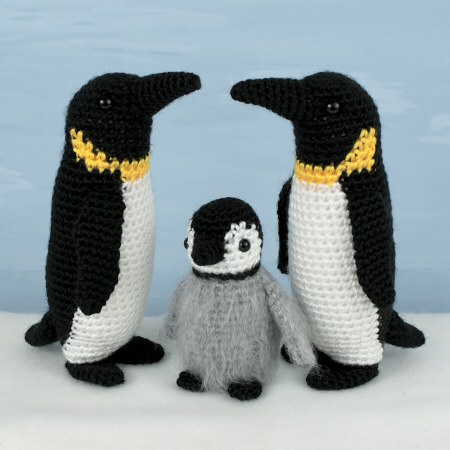
This also applies to birds, who turn from a bundle of fluff into a sleek-feathered adult. For example, using bigger eyes or a smaller hook/yarn combo with my (adult) Emperor Penguin pattern would definitely not give you a Baby Emperor Penguin!

adult and baby emperor penguin crochet patterns by planetjune
Remember, baby birds look nothing like their parents…

Aside from those few exceptions, these simple techniques are the easiest way to make a ‘baby’ animal without needing a whole new pattern. Give it a try and breathe new life into your animal patterns by making cute baby versions of them, or an adorable mama-and-baby pair!

(And, if you’re tempted to give it a go in the next couple of weeks, don’t forget to show off the resulting amigurumi by entering them in the PlanetJune Baby Animals crochet-along on Ravelry!)


Do you find my tutorials helpful? If so, please consider making a contribution towards my time so I can continue to create clear and concise tutorials for you:

Thank you so much for your support! Now click below for loads more crochet video and photo tutorials (and do let me know what else you’d like me to cover in future tutorials…)

See more helpful PlanetJune crochet tips and technique tutorials

Comments (1)

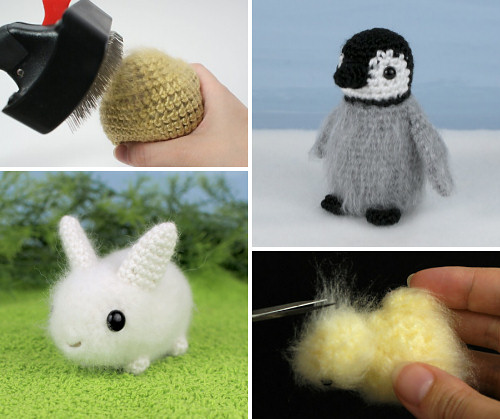
how to: Brushed Amigurumi

I’ve discussed the technique of brushing crochet several times before: I experimented with different yarns; I showed you how to convert my Fuzzy Friends patterns to brushed patterns; I told you about different brush options; and I’ve included more specific details of how to brush crochet within each of my patterns that uses the technique.

There’s lots of great information there, but having it all scattered around over several pages isn’t ideal, so I’ve combined the salient points from all my previous brushed crochet posts into a comprehensive tutorial: a guide to Brushed Amigurumi.

how to: brushed amigurumi by planetjune

You can now also find this tutorial in my Master List of crochet tutorials – your one-stop shop for help if you have any amigurumi questions! – and I hope you find it useful if you’re new to brushed crochet, or have questions about the technique.

PS – If you write your own crochet patterns and would like to link to this info in your pattern, please feel free. As with all my tutorials, you’ll find the easy-to-type shortlink – in this case, www.planetjune.com/brush – at the top of the tutorial page, for your linking convenience. 🙂

Comments (2)

knitted poinsettia

Before we go any further: don’t panic! This is not the start of a shift away from crochet and into knitting patterns – it’s just that my Poinsettia ornament happens to be knitted this year. As with my other Poinsettia designs, I’m making it available as a donationware pattern. Although I’m not ruling out the possibility of publishing other knitting patterns in future, it’s not part of my current plan 🙂

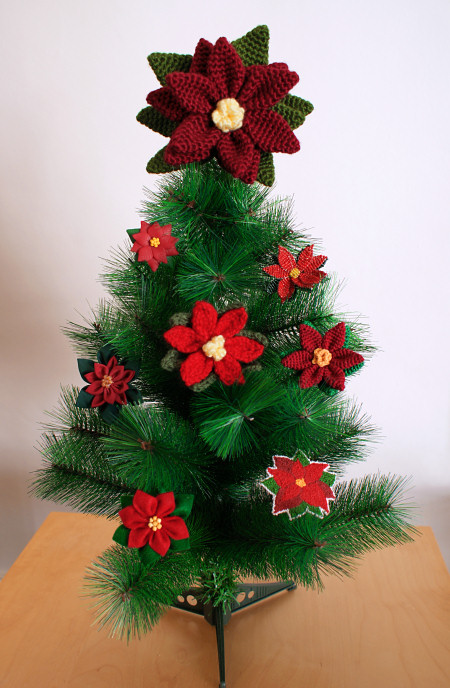
As you may remember, I have a little Christmas tradition of crafting a new Poinsettia ornament every year, and, although I’ve been madly busy this year, I’ve managed to squeeze in another poinsettia design so I can keep up the tradition. Now I’ve been doing this for 8 years, I have enough poinsettias to decorate a small tree! And that’s exactly what I’ve done for my Christmas decorating this year:

poinsettia christmas tree by planetjune
My poinsettia tabletop tree! Can you spot the new addition?

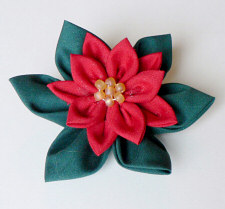
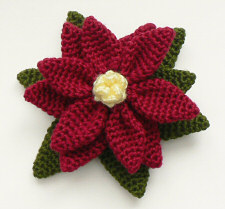
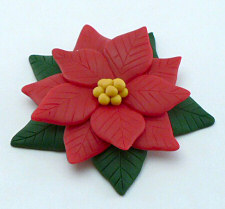
Here’s a closer look at the PlanetJune Poinsettia Collection to date:

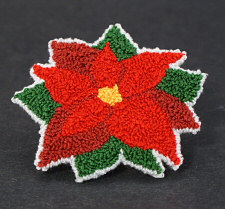
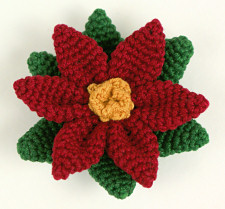
tsumami kanzashi poinsettia by planetjunecrocheted poinsettia by planetjune
polymer clay poinsettia by planetjunepunchneedle poinsettia by planetjune
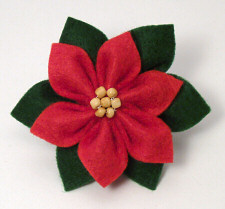
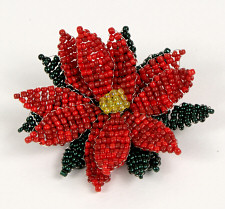
felt poinsettia by planetjunebeaded poinsettia by planetjune
thread crochet poinsettia by planetjunepunchneedle poinsettia by planetjune

Top (L-R): 2006 kanzashi poinsettia; 2007 crocheted poinsettia 
2nd Row (L-R): 2008 polymer clay poinsettia; 2009 punchneedle poinsettia
3rd Row (L-R): 2010 felt poinsettia; 2011 beaded poinsettia
Bottom Row: 2012 thread crochet poinsettia; 2013 …?

(You can find all my Poinsettia designs as PDFs in my shop, or use the links above for the free online versions.)

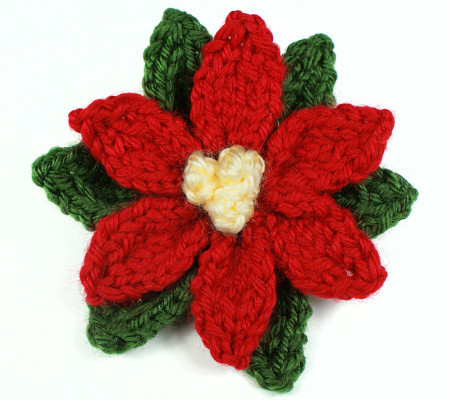
And now for the 2013 PlanetJune Poinsettia: the knitted poinsettia!

knitted poinsettia by planetjune

As I’ve been teaching myself to knit over the past couple of years, a knitted poinsettia seemed appropriate for 2013. This is a very simple pattern, provided you know how to cast on, make knit and purl stitches, and increase and decrease. If you don’t already know how, this is a nice small project for learning those skills! (And, although teaching you to knit is not something I can take on, there are many good books and tutorials, and I’ve linked to my favourite online tutorials in the pattern.)

I know we’re only a week away from Christmas, but this really is a speedy pattern, so I hope you’d like to try knitting one of your own – the link to the free pattern is below, and, as always, if you choose to thank me with a donation, you’ll get the handy printable PDF version 🙂

Go to the Knitted Poinsettia pattern >>

* * *
PS – I’ve just finished my book – yay! – and I’m going to take a much-needed break for the next few weeks. I’ll just be popping in for minimal maintenance on PlanetJune stuff, so please be patient if I don’t respond promptly to your emails etc. I’ll be back with exciting new things once I’m completely rested. In the meantime, I hope you have a wonderful festive season!

Comments (2)

open zip files on your Android device

This is a companion post to the iDownloads+ tutorial I wrote for iPad users.

Note: Now that tablets are so popular, I intend to convert my shop to use straight PDF files instead of zip files. It’s a big job to figure out how to do that for my 150+ (without losing your old orders from your account), and one I won’t even have a chance to start until well into next year, so zip files it is for the time being!

My patterns are instantly downloadable after purchase, as zip files. Unfortunately, Android tablets and smartphones have no native way to handle zip files, so you need to either download your patterns to your computer first, and then transfer them to your tablet/phone, or use an app that can open zip files for you and extract the PDFs.

There are many app options for Android and they all work in a similar way. I’ll give you a brief tutorial on one I’ve tested that’s free and easy to use, called ZArchiver. This is one (free) way you can download and open zip files from your PlanetJune account directly on your Android device.

(Please note: I can’t provide support for apps, so please don’t ask me if you have questions about this – I’m just providing this information as a service to Android users.)

To view your PlanetJune patterns on your Android device

  1. Download ZArchiver from Google Play.
  2. In your browser (e.g. Chrome), go to your PlanetJune account and tap the download link for your pattern. Your zip file will be saved into your Download folder.
  3. Open ZArchiver and browse to the Download folder. You’ll see your zip file in the list of files in that folder.
    open zip files on your Android device
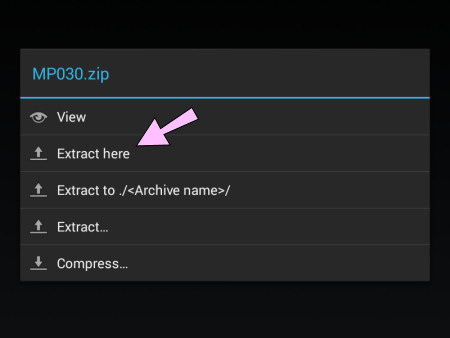
  4. Tap the file name (XXX.zip). A menu will pop up.open zip files on your Android device
  5. Tap Extract here and the contents of the zip file will be extracted and saved into your Download folder. You’ll see the pattern PDF.
    open zip files on your Android device
  6. From here, you can open the PDF by tapping it in ZArchiver, or however you usually open PDF files. It’ll still be saved in your Download folder when you need to view it again, or you can move it using your usual file management app.

If you’re an Android user, I hope you find this information helpful 🙂

Comments

Chains and Slip Stitches in Amigurumi

Link easily to this tutorial in your patterns: www.planetjune.com/tension

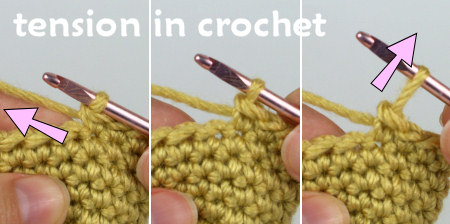
With all crochet, to keep your stitches even, you keep the yarn under tension, so a controlled amount of yarn forms each stitch and all the resulting stitches will be the same size. This is particularly true for amigurumi; if your stitches aren’t consistently tight, it’s very obvious.

tension on yarn when crocheting amigurumi
Tension is created by balancing the forward pull on the yarn from the hook (right) with the backward pull of your other hand on the yarn (left). Consistent tension keeps all your stitches the same size (middle).

Chains and slip stitches are different, though, because each stitch consists of only one loop. If you maintain the same tension as you use for single crocheting amigurumi, as well as tightening the stitch you’re forming, you’ll pull on the previous stitch and make that stitch much smaller and very difficult to work back into.

If you learnt to crochet the traditional way (working in rows to make scarves, afghans, etc) and then progressed to amigurumi, you’ll be familiar with making your starting chain loosely so you can easily work back into it (you can also achieve this by using a larger crochet hook, just for the foundation). But if you began your crocheting adventures with amigurumi, you may never have even made a starting chain foundation!

Problem: Too-Tight Stitches

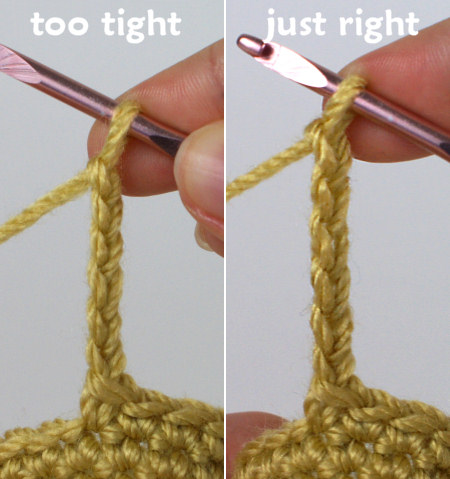
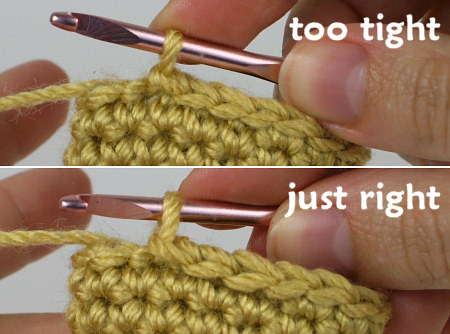
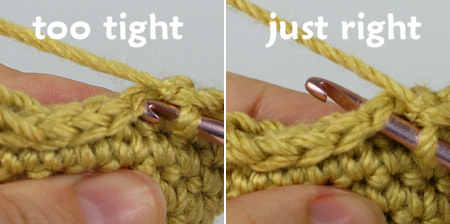
In the examples of chains and slip stitches below, the ‘too tight’ photos show the results of using the same tension I use for single crocheting amigurumi, while the ‘just right’ photos show how your chains and slip stitches should look:

Chains:
tension on yarn when crocheting amigurumi
Each example has 6 chains. The difference may not be clear for each stitch individually, but notice how short the overall length of the tight chain (left) is compared with the correct chain (right).

Slip stitches:
tension on yarn when crocheting amigurumi
Each example has 4 slip stitches. In the tight example (top), the sideways Vs along the top of each stitch are noticeably smaller and stretched more tightly than in the surrounding sc stitches. In the correct example (bottom), the Vs of the 4 sl sts are indistinguishable from those of the surrounding sc stitches.

Not only do these stitches not match the rest of my work visually, but they are very difficult, or even impossible, to work back into: the loops are smaller than the head of my hook and there’s no slack in the yarn. Here I’ll try to work back into the slip stitched examples:

tension on yarn when crocheting amigurumi
I can’t work back into the left slip stitches without a serious struggle! The right slip stitches are almost as easy to work into as a normal sc stitch.

Solution: Reduce Tension

The goal with chains and slip stitches is to have the sideways V shape of each stitch be exactly the same size as the sideways V along the top of a single crochet stitch (see the ‘just right’ examples above). That requires relaxing your tension considerably and may feel strange and wrong if you’re only used to tight amigurumi control. Here are some tips to practice:

  • Slow down and pay attention to your stitches when you make a chain or slip stitch.
  • As you form each stitch, don’t tug on the yarn with your hook; draw it through smoothly.
  • Check the size of your stitch by comparing it with the Vs at the top of your sc stitches.
  • Only draw the yarn back with your non-hook hand if the working loop looks too large; it should sit loosely on the throat of the hook so the hook can move freely within the loop.

Once you get used to it, chaining with low tension should become easy – it just takes a little practice to make your chains evenly sized. Slip stitching with low tension is slightly trickier when you’re used to amigurumi: the stitches are so similar to single crochet stitches that I still have to remind myself with every slip stitch to keep it loose, so my stitches don’t shrink and tighten.

If you’d like to practice these stitches, here are a couple of examples from my amigurumi pattern collection that make great use of chains and slip stitches:

examples of chains and slip stitches in crocheted amigurumi
These patterns use chains (Baby Cephalopods, left) and slip stitches (Magic Lamp, right).

With this low tension technique, you’ll no longer have to battle to work back into chains and slip stitches, and your work will look smoother, tidier, and more even. It’s one more step along the road to becoming an amigurumi expert!


Do you find my tutorials helpful? If so, please consider making a contribution towards my time so I can continue to create clear and concise tutorials for you:

Thank you so much for your support! Now click below for loads more crochet video and photo tutorials (and do let me know what else you’d like me to cover in future tutorials…)
See more helpful PlanetJune crochet tips and technique tutorials

Comments (7)
steam-relaxing yarn

When you unravel something you’ve crocheted, the yarn looks kinked up and squashed. Re-using this yarn can leave your crocheting looking noticeably different from starting over with fresh yarn. Wouldn’t it be nice if there was a way to refresh the yarn and return it to its unused state so you don’t have to waste it or put up with the re-used appearance? Guess what: there is!

steam-relaxing yarn
Can you turn ‘stressed’ yarn back into ‘relaxed’ yarn? Yes!

I first read about this technique at TECHknitting but I wasn’t really convinced it’d work on acrylic (although I really hoped it would), so I decided to put it to the test with the yarn recovered from one of my prototype pandas.

(You may be wondering ‘why bother?’ The nicer acrylic yarns are actually quite expensive, and, if you’re a crochet addict, the cost of yarn soon mounts up; if there’s an easy way to save money, why not take it? But, for me, the real reason is availability – now I have to import all my amigurumi acrylics from the US, they’re like gold dust to me, and I hoard every metre! Making 3 prototype pandas took a whole skein of white Red Heart Soft, and that’s not something I can easily replace. Reclaiming the yarn so I can use it to design another amigurumi would be ideal, but not if it’s going to look messy and obviously re-used.)

steam-relaxing yarn
A 65m length of kinked up acrylic yarn reclaimed from a prototype panda.

Steam-relaxing

You can steam yarn with a clothes steamer or ordinary steam iron, and it will magically relax, de-kinking and fluffing itself back up! And yes, as I discovered, you can even do this with acrylic yarn – you can see my results in the photos below.

Note: to reclaim an entire skein of yarn, it’s probably easier if you wind it into a hank (a large loop), soak it, and let it dry (for more details on this method, see Webs’ article: How to Recycle Yarn). But for the yarn length recovered from frogging amigurumi or other small projects, steaming is simpler and faster.

Steam-relaxing yarn really is like magic: the yarn wriggles about as it relaxes and it looks quite eerie, like a pile of snakes – watch TECHknitter’s video to see exactly what I mean – but soon the yarn will turn from a kinked tangle into strands of fluffy yarn spaghetti.

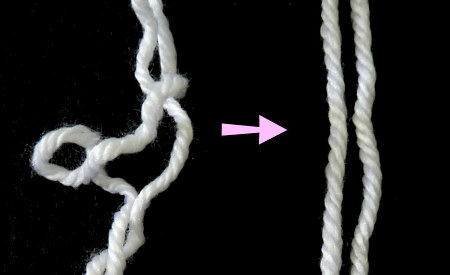
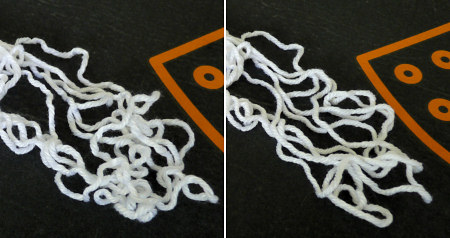
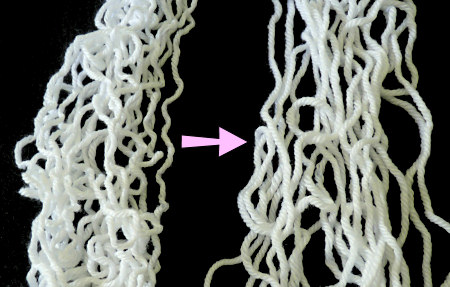
My iron doesn’t have a ‘shot of steam’ feature, so it took a fair while to steam the entire 65m pile you see above, but the method really does work. I didn’t touch the yarn at all between these two photos – this is how it moved, by itself, in reaction to the steam:
steam-relaxing yarn
Before (left) and after (right) comparison of a small section – you can see that the yarn has de-kinked and untwisted itself.

steam-relaxing yarn
Pre-steamed (left) and post-steamed sections of my big pile of yarn.

Top Tips

Learn from my experience!

  • It’s much more effective if you spread the yarn out so you’re only steaming one layer at once, and work over a small area.
  • Watch to see when the yarn stops wriggling about when the steam touches it – that’s when it’s fully relaxed and time to move on.
  • For acrylics in particular, it’s critical that you don’t ever let the iron touch the yarn. Sit so you’re at eye level with your ironing board, then you won’t have to bend to see what’s going on, and you’ll be able to keep an inch between your yarn and the iron (you do need to keep it close though, so the steam is most effective).
  • If you have the option to avoid it, don’t start with a big tangle of yarn (as shown in my photos) – once it’s de-kinked, you’ll still have to untangle it and wind it. I’d recommend you wind the yarn into a ball as you unravel your work, then unwind a couple of metres at a time and lay it in rows along the ironing board. Steam-relax that length of yarn, then wind it immediately into a new ball before pulling out the next kinked length. (Once it’s all relaxed, you can re-wind the yarn into a neater ball if you like.)

steam-relaxing yarn
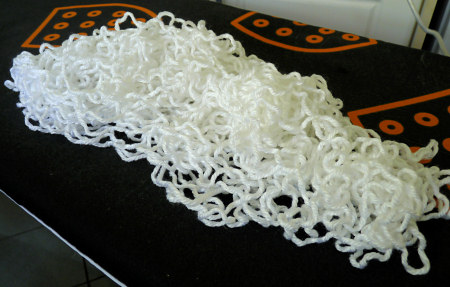
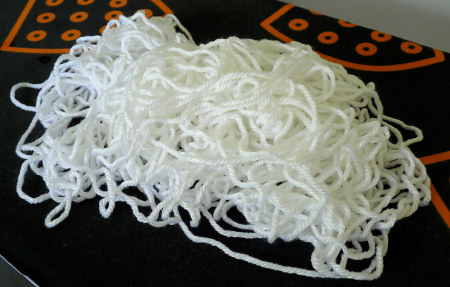
The 65m pile of yarn, post-relaxation. (Don’t leave it in a pile like I did here!)

I’m almost tempted to buy a handheld clothes steamer now, after seeing how effective this method is. And, as an added bonus, the yarn goes from feeling quite hard when it’s kinked up and squashed, to lovely and soft and bouncy again – it really does seem as good as new!

steam-relaxing yarn
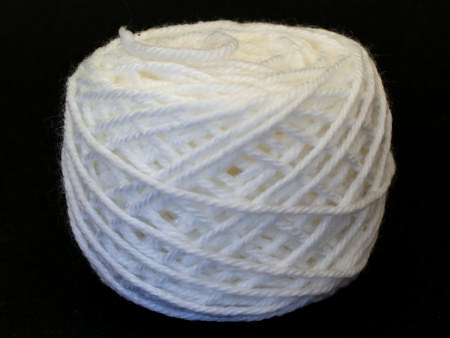
After winding it into a centre-pull ball it’s practically indistinguishable from new yarn and ready to use for another amigurumi design!

Steam-relaxing is a bit of a niche technique, but if you frog a project and want to reclaim the yarn, I highly recommend it. You’ll save money, you can re-use the yarn so it’s not wasted, and I promise you’ll have fun watching the yarn wriggle about – what’s not to like?

Comments (11)

Warning! Foam blocking mat colour transfer

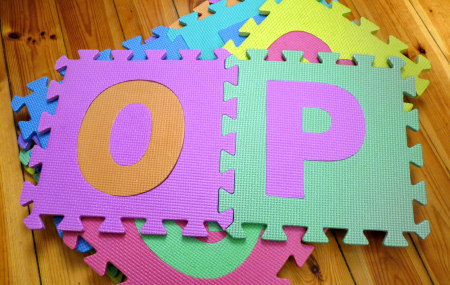
As I told you in my wet blocking tutorial, children’s play mats make an inexpensive and easy to find alternative to dedicated blocking mats. BUT, I’ve discovered a problem that you need to know about if you use these mats – please read this and learn from my experience!

foam play mats used for wet blocking

I’ve blocked all kinds of lace with these mats before with no problems, but my crocheted bamboo cardigan was a different story. My laceweight items felt practically dry by the time I pinned them to the mats, but thicker yarn retains much more moisture, so, even after rolling my cardigan in a towel to squeeze out as much excess moisture as possible, it still felt heavy and noticeably damp to the touch. It was still damp 24 hours later, and when I flipped it over so the underside could dry better, I was horrified to find areas of my beautiful cream cardigan were now bright, shocking pink.

I don’t have a photo, as my priority was trying to fix the disaster, not documenting it. Luckily, my story ended well; I’m not sure if it was because the yarn was still damp when I spotted the problem, or if the pink dye isn’t permanent, but after a few soaks in Soak wash, with some delicate but persistent agitation by hand in the sink, all the pink colour came out of my cardigan (phew). But you don’t want to take a chance that your mats may permanently dye your handiwork!

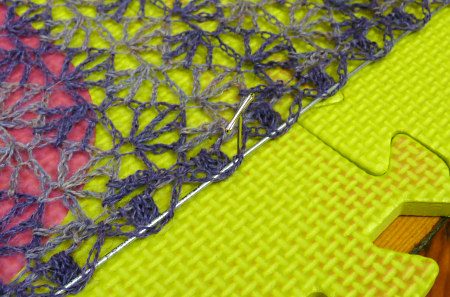
Looking back, I should have suspected that there may be a problem with colour transfer from the pink blocks – if you look at this photo from my blocking tutorial, you can see that some of the bright pink colour from a different mat has transferred onto the lower yellow block, at the right-hand side:

wet blocking on foam mats
My cream cardigan also had this pink colour transfer before I managed to soak it all out!

Foam Mat Colour Transfer Experiment

Although I assumed this colour came from the bright pink coloured blocks – the same colour as the pink stain – to be safe, I decided to conduct an experiment to figure out which of the blocks are the culprits. (I’m very glad I did, because the results surprised me!)

Method

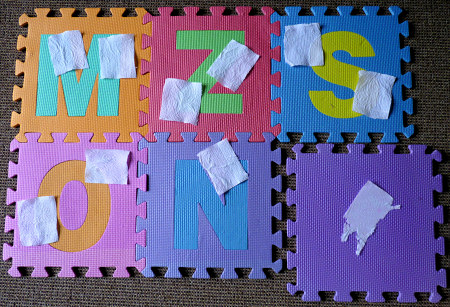
  1. Select enough blocks to have a sample of each foam colour: orange, yellow, green, blue-green, blue, purple, light pink, dark pink. (I also tested a solid purple mat I bought from a different source.)
  2. Lay a piece of paper kitchen towel over each colour of foam. Spray all the blocks with water until the paper towel squares are completely saturated.
  3. Leave overnight to dry.

foam mat colour transfer experiment
The setup for my experiment – wet paper towel squares on a sample of every foam colour

When the paper towel was completely dry, I numbered each piece as I removed it, so I could compare them with my reference layout photo (top row L-R: samples 1-6; bottom row L-R: samples 7-10).

Results

  • Samples 1 and 2 (orange and blue-green) were clear.
  • Samples 3 and 4 (dark pink and green) were stained in only the dark pink areas.
  • Samples 5 and 6 (blue and yellow) were clear.
  • Samples 7 and 8 (light pink and orange) were stained in only the light pink areas.
  • Sample 9 (purple and blue) was stained in only the purple areas.
  • Sample 10 (all purple) was stained all over.

Example of my results:
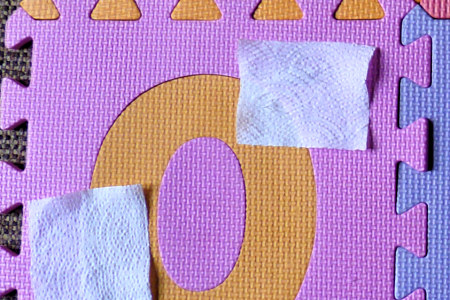
foam mat colour transfer experiment
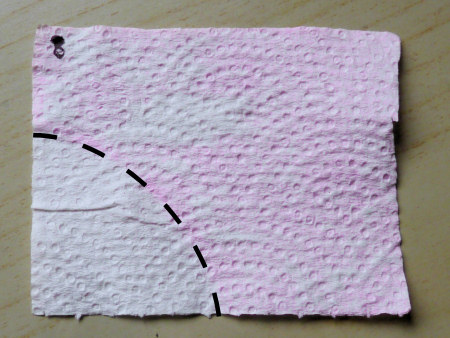
Sample 8 (top right in this photo) is mostly over the light pink foam, except the lower left corner which is over the orange O.

foam mat colour transfer experiment
Sample 8 clearly shows that colour has transferred from the background pink foam, but not from the orange O (dotted line added for clarity).

Conclusions
My samples clearly show that pink dye leaches out of light pink, dark pink, and purple foam when wet. The colour transfer seems to be equal between all these colours. All the other foam colours (orange, yellow, green, blue-green, and blue) appear to be colour-fast when wet.

This surprised me – I thought that only dark pink would be the problem, and possibly the light pink. I never even considered that purple foam might also leave pink stains, and equally badly as the over-saturated bright pink blocks! Note: My set didn’t include any red blocks, but I suspect they would suffer from the same problem. UPDATE: see the end of this post.

My Recommendations

If you haven’t bought foam mats yet, you may prefer to look for some that avoid the problem pinks and purples (and, probably, reds). I’ve seen all-grey sets sold as utility mats, and individual coloured blocks sold at dollar stores. Grey, blue, green, yellow and orange should all be safe.

If you already own foam mats, I’d recommend that you replicate my simple kitchen towel experiment – it’s easy to do, and then you’ll know for sure, one way or the other. If you do have the problem, you have some options to get around it:

Prevention Option 1: Only use the blocks with ‘safe’ colours that do not contain pink (safe: orange, yellow, blue, blue-green, green). Do not use light pink, dark pink or purple. Note: If your mats are different colours or types, test them to see which of your colours are affected.

Prevention Option 2: Lay out an old towel over your blocks, so any colour will transfer to the towel, not your precious handiwork. You can pin straight through the towel and into the foam.

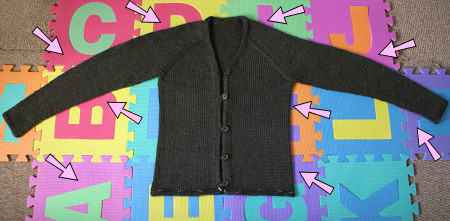
If there was any colour transfer when I blocked this cardigan (below), it doesn’t show against the dark grey yarn. Look at all the blocks that could have stained my yarn pink!
foam mat colour transfer experiment
Arrows mark ‘dangerous’ colours: light pink, dark pink, and purple.

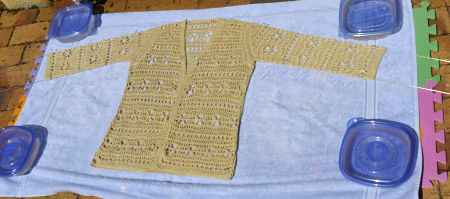
Below, you can see the second blocking for my miraculously-unscathed bamboo cardigan – now safely protected from any pink transfer by the towel. The underside of the towel was stained pink after this, but it all came out in the wash. (And, in case you’re wondering, the plastic containers at the corners of the towel are filled with water – I used them as weights to stop the towel from blowing away while I dried the cardigan outside!)
foam mat colour transfer experiment
Cardigan protected from colour transfer by a towel on top of the foam mats.

If you’re blocking lightweight yarn and you roll it in a towel before blocking so it feels almost dry when you lay it out to block, you shouldn’t have a problem with colour transfer, but you may wish to err on the side of caution – my results may not always apply. For anything that still feels damp/heavy after a towel squeeze, you should definitely be careful of potential colour transfer, and I’d recommend you test your mats and/or use one of the prevention options above, especially if you’re using light-coloured yarn. Why take the risk?


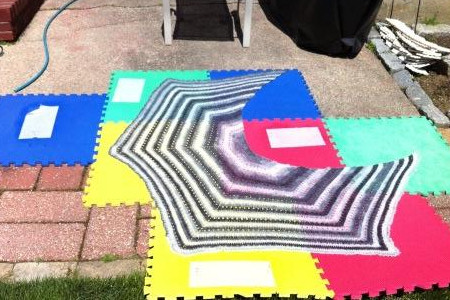
UPDATE: Thanks to Andrea Giattini (@SpringSplndr) for this update! Andrea has a set of 8 of the larger 2ft square foam mats that come in red, yellow, green and blue, and are sold for use in garages, playrooms etc. She has been using them for 3 years and had never noticed any transfer.

foam mat colour transfer experiment
Photo courtesy of Andrea Giattini

Andrea kindly agreed to try my test on her mats. She saturated white paper towels with water and left them to dry in the sun, as you can see above. She reports no colour transfer from any of these mats (even the red one, which I was most concerned about).

It appears that these red/yellow/blue/green mats are more colourfast than the sets that include purples, pinks, etc, which can bleed pink dye. However, I still advise caution – different brands may use different dyes, and manufacturing processes may change with time, so, for your own peace of mind, I’d still suggest you try the test on your mats too, just to be safe.

Comments (26)

Next entries » · « Previous entries
  • Quick Links: Crochet

    navigation: arrow

    buy crochet patterns and accessories from my online store

    'Everyday Crochet' and 'The Essential Guide to Amigurumi' crochet books by June Gilbank

    Crochet video tutorials and step-by-step photo tutorials

    Free PlanetJune crochet patterns

    Frequently Asked Questions

    Quick Links: Crafts

    navigation: arrow

    Punchneedle Embroidery information, ebook & patterns

    Papercraft ebook & tutorials

    Free PlanetJune craft projects & tutorials

  • Blog Post Categories

  • Blog Archives

  • Welcome to PlanetJune!

    June Gilbank

    Hi, I'm June. Welcome to my world of nature-inspired crochet and crafting. I hope you enjoy your visit!

    If you'd like to get in touch, you can contact me here.
    crocheted Canadian flag by PlanetJune
  • A fanned-out pile of the books Everyday Crochet and The Essential Guide to Amigurumi, with text 'The answers to all your crochet questions at your fingertips - find out more'
  • Support PlanetJune!

    Want to say thanks? You can send me money in seconds at paypal.me/planetjune (over $20) or paypal.me/planetjune2 (under $20) or send me a donation through my shop.

    Or simply click through from my links before you shop at Amazon, Etsy, KnitPicks, LoveCrafts or Crochet.com, and I'll make a small commission on your purchase, at no cost to you! Start here:

    ♥ Support PlanetJune ♥

    Tip: This link is also in the footer of every page!

    Thank you so much for your support!