PlanetJune Craft Blog

Latest news and updates from June

Archive for November, 2016

amigurumi Gingy

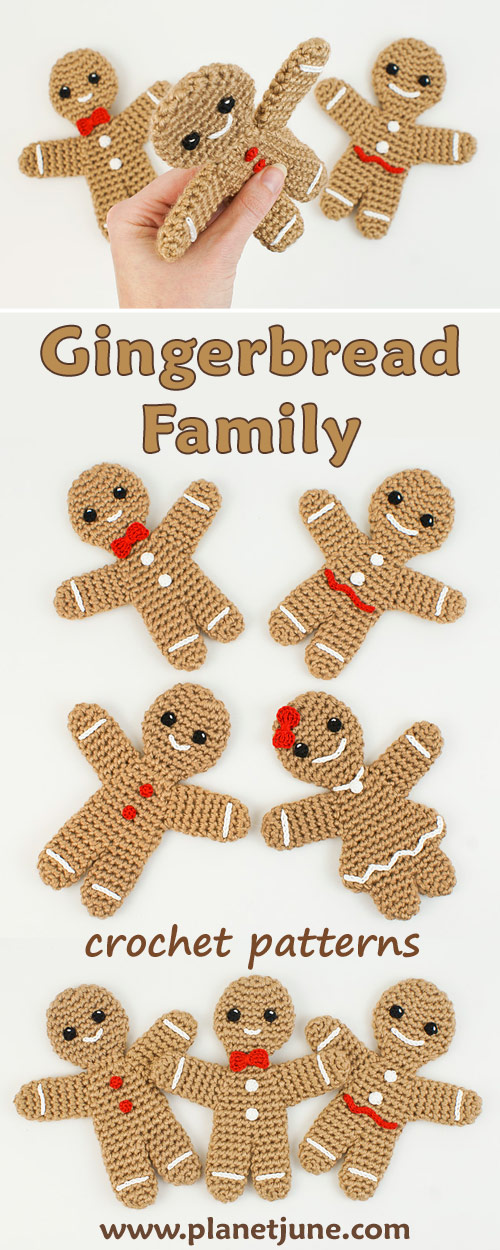
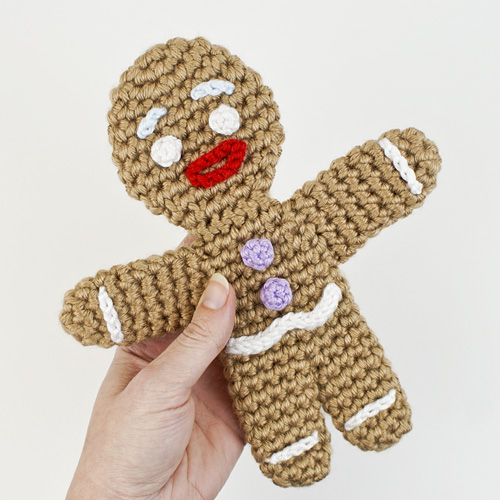
If you haven’t picked up my new Gingerbread Family patterns, you may not know that there are also instructions in there for making a Gingy character (based on the Gingerbread Man from Shrek)…

amigurumi Gingy - based on Gingerbread Man crochet pattern by PlanetJune

I made a super-sized Gingy, at over 8″ (21cm) tall, but, of course, you can also make a regular-sized Gingy using my pattern, or a super-sized regular gingerbread man – I just chose to demonstrate two options at once.

Gingy Embellishments

I took the opportunity to demonstrate how versatile the Gingerbread Man pattern is by decorating my super-sized sample as Gingy – you really can decorate your gingerbread men/girls however you wish, just like you do with real gingerbread!

amigurumi Gingy - based on Gingerbread Man crochet pattern by PlanetJune

I chose to leave off Gingy’s ‘broken leg’ icing, because I wanted to keep all the embellishments crocheted so you can clearly see how upsizing my regular-sized gingerbread men will look with no other changes. But if you embroidered the embellishments on your gingerbread man instead, you could make much finer lines than with crocheted chains, and add as much detail as you like.

(You can find the full details for the ‘Gingy’ embellishments I made on p9 of the Gingerbread Man pattern.)

Upsizing

I worked the extra-large gingerbread man by holding two strands of yarn together, with a larger hook. (See my Resizing Amigurumi article for my advice on choosing an appropriate hook size when you double your yarn.) This means you can make the embellishments using one strand of the same yarn (and a smaller hook) instead of the embroidery floss embellishments I used for the standard gingerbread men.

amigurumi supersized Gingy and regular size Gingerbread Man - based on Gingerbread Man crochet pattern by PlanetJune

A New Yarn Experiment…

Making these amigurumi gave me the opportunity to take some measurements, so now I have a much better estimate of how much additional yarn you’ll need if you hold two strands together. I already knew you’ll need more than just the obvious twice as much (2 strands means 2x yarn length), because each stitch is also larger, so uses more yarn, but how much more?

Single-strand Double-strand
Hook size E US/3.5mm I US/5.5mm
Finished height 5.75″/14.5cm 8.25″/21cm
Yarn quantity 18g 49g
Yarn length 36yds/33m 98yds/90m

So, by doubling the yarn and using a correspondingly larger hook, the finished piece was 44% larger, and took 2.7x more yarn – useful to know!

Although this won’t be an exact formula, because it depends on how tightly you crochet at each size, and how big your larger hook is compared with your smaller hook, it gives a good rule-of-thumb indication for yarn quantity when you scale up by doubling the yarn.

(I’ve added this new info to my Resizing Amigurumi article so you can refer back if/when you need it.)


Gingerbread Man crochet pattern by PlanetJune

If you’re making Gingerbread Men (or Girls) from my patterns, I’d love to see them! Please join the Christmas crochet-along in the PlanetJune Ravelry group, or post them on social media (and tag @PlanetJune so I can see your post).


Comments (1)

South Africa wildlife X: Kruger Safari

I have lots of safari photos to share with you today, from our trip back in July. Of all my experiences in South Africa, this is the one I’d been most looking forward to; Kruger National Park is one of the largest game reserves in Africa and is as large as some European countries! In our short visit, we saw only a tiny fraction of the park and still it was more amazing than anything I could have imagined – we saw dozens of different animals and birds, including all of the Big Five and lots more.

Kruger National Park and Cape Town, South Africa
Kruger is about 1800km (1100 miles) as the crow flies from Cape Town – South Africa is a big country!

I’ve taken quite a few of these selfies this year, with me looking dishevelled and slightly delirious at having such a wondrous wildlife experience:

me with wild elephants at Kruger National Park!

Can you see the reason for my delight, over my shoulder? (Keep reading and you can share my excitement – I have close-up photos and even a little video to share with you…)

So now let’s move onto my proper photos; I’ve spent months trying to choose from over 3000 so I could show you a reasonable number! These galleries have left out a lot, but I hope they give you a taste of the real wild Africa. I’ve split the galleries so you can click into the groups you’re interested in, to see the full-size photos, and skip any you aren’t…

__(‘Read the rest of this entry »’)

Comments (17)

Glinting Eyes for Amigurumi

Link easily to this tutorial in your patterns: www.planetjune.com/glint

Today I’d like to show you a technique that’ll bring your amigurumi to life when you don’t use shiny plastic eyes. This is particularly useful when you’re making baby-safe or pet toys, where plastic eyes may be a choking hazard.

example of embroidered catchlight on crocheted amigurumi eyes

The Power of the Catchlight

A catchlight is the highlight or glint of a light source reflected in an eye. Compare these kestrel photos I took a few months ago, and you’ll see how appealing a glint in the eye can be:

kestrel with glinting eye (by June Gilbank)
Where the eye has the magic glint, it brings a spark of life to the photo that makes it irresistible.

kestrel without glinting eye (by June Gilbank)
The same bird, only a couple of seconds later, but the angle is slightly different, and I didn’t catch a glint in the eye. Although the kestrel is still lovely, do you see how this photo looks dull and lifeless compared with the first?

Now, this principle doesn’t just apply to wildlife photography – the same concept applies in amigurumi! Two-part plastic animal (‘safety’) eyes are the ideal eyes for most amigurumi, because the shiny plastic replicates the shine of real animals’ eyes, giving a glint in the eye which helps to bring your amigurumi to life.

But plastic eyes aren’t always the best solution, especially if you’re making toys for very young children or pets, where plastic eyes may be a choking hazard and should be avoided. Non-plastic eyes can look dull and make your amigurumi feel lifeless, but there’s a simple way to add that spark of life back again.

Adding a Catchlight

If you crochet eyes for your amigurumi or make them from felt or embroidery, I highly recommend that you add a small white dot with white embroidery floss in the upper right quadrant of each eye, to simulate the glint. It makes the eye look more realistic and gives your toy that spark of life. All you need is a tapestry needle and a short length of white embroidery floss per eye.

Compare these two gingerbread men. Even before they have any features added beyond the eyes, there’s a huge difference in appeal:

Gingerbread Man (crochet pattern by PlanetJune) with and without a glint in the eye

Without a glint, the eyes have a dull vacant stare. With the glint, they have a sparkle of personality!

How to Add the Glint:

  • If you’re embroidering the eye directly onto your piece, you can stitch the catchlight on top of your other stitches.
  • If you’re attaching a felt or crocheted circle for the eye, you may find it easier to embroider the catchlight before attaching the eye, as you can then hide the thread ends beneath the eye. (If you plan to glue the eye in place, it’s essential to embroider the catchlight before you apply the glue, as it’s very difficult to embroider onto fabric that’s been hardened with glue!)
  • You can also add a catchlight with a dot of white fabric paint, but please do practice on a spare crocheted eye before adding paint directly to your amigurumi, to make sure you’re happy with the result.

illustration of good and bad glint positions for amigurumi eyes

Glint Size and Shape
The size and shape of the catchlights aren’t critical. A single stitch can be enough, or, if you prefer a more rounded/square shape, you can make a larger catchlight by making two or three stitches right next to each other. Whatever you decide, try to keep the glint the same size and shape on each eye.

Glint Position
You don’t have to use the upper right corner of the eye, but it’s very important that you add the glint in the same position on each eye – this is one situation where symmetry is definitely wrong! The idea of the catchlight is to suggest that the amigurumi is being lit from one side, and the side with the lamp/sun is the side that reflects that light as a glint. Light typically comes from above, so add the glint above the middle of the eye, but you can choose between the upper right or upper left side for both eyes.

Get Glinting!

This simple technique makes such a difference to any eyes made from fabric, yarn or embroidery floss. I hope you’ll use it every time you make crocheted, felt or embroidered eyes in future, to add an extra spark of life to your amigurumi!

Gingerbread Man crochet pattern by PlanetJune

Note: The samples used for this demo are made from my Gingerbread Family crochet patterns.


Do you find my tutorials helpful? If so, please consider making a contribution towards my time so I can continue to create clear and concise tutorials for you:

Thank you so much for your support! Now click below for loads more crochet video and photo tutorials (and do let me know what else you’d like me to cover in future tutorials…)

See more helpful PlanetJune crochet tips and technique tutorials

Comments (8)

Gingerbread Family crochet patterns

Gingerbread Family crochet patterns by PlanetJune - Gingerbread Man and Gingerbread Girl

Now it’s November, I’m so excited to finally be able to launch my new Christmas patterns that I’ve been developing for the past few months: a perfectly-shaped Gingerbread Man and Girl!

Chunky and flat, just like the edible version, my Gingerbread Family are crocheted amigurumi-style (in a continuous spiral) and are almost seamless, so you have minimal sewing to complete them. I can crochet and assemble a complete Gingerbread Man (minus the face and any other embellishments) in less time than it takes to watch a TV episode, so under 45 minutes – how’s that for speedy?!

Gingerbread Man crochet pattern by PlanetJune

I’m imagining an army of amigurumi gingerbread for sale at Christmas craft fairs etc, and easy seasonal gifts for everyone who appreciates a little handmade whimsy. And because they’re flat but double-layered, they make great toys – they’re sturdy to play with and even somewhat poseable!

Gingerbread Man crochet pattern

Gingerbread Man stands 6″ (15cm) tall when crocheted in worsted weight yarn. Add a loop to his head to hang him on the Christmas tree, or stand him up on your desk or the mantelpiece – as he’s flat and stiff, he’ll balance very well if he’s leaning against a wall.

Gingerbread Man crochet pattern by PlanetJune
All the embellishment options pictured above are included in the pattern, but Gingerbread Man is the perfect blank canvas for you to decorate however you want – just like the edible kind!

You can create all sorts of expressions and accessories, personalise them to match your family members, and match the embellishment colours to your seasonal decor. Or keep the decorations as simple and fast as you want – it’s completely up to you…

Gingerbread Girl Expansion Pack

The Gingerbread Girl Expansion Pack gives you all the modifications you need to make to the Gingerbread Man pattern to make a gingerbread lady.

Gingerbread Girl is also worked in just 4 pieces, so she’s as fast to finish as a Gingerbread Man. Her skirt is built right into her gingerbread body, and you can either keep her embellishments simple, or add fun little girly details like necklaces, hair bows and a trim on her skirt.

Gingerbread Girl expansion pack crochet pattern by PlanetJune

What is an Expansion Pack?

Expansion Packs by PlanetJune

  • An Expansion Pack is an add-on to an existing PlanetJune pattern.
  • The Expansion Pack lets you modify or add to the original pattern to create something else.
  • You cannot use the Expansion Pack alone – you must also purchase the original pattern in order to be able to complete the pictured items in the Expansion Pack pattern.

Choose Your Own Embellishments!

I’ve crocheted all the eyes and embellishments for my gingerbread people – and the patterns include all the details with lots of photos if you’d like to copy mine exactly – but you can also create features using your favourite crafty methods: embroider directly onto the gingerbread with yarn (for chunky details) or embroidery floss (for finer details), cut felt to shape and sew or glue it into place, sew on buttons or beads, use fabric paint, make polymer clay embellishments, and more…

Gingerbread Family crochet patterns by PlanetJune

Links to Buy & Launch Discount

As with all my Expansion Packs, you can buy the patterns separately (although please note that you do need the base Gingerbread Man pattern to be able to make a Gingerbread Girl), or there’s a discount when you buy both together.

For this first week of November 2016 only, you can save even more when you buy the Gingerbread Family combo pack for only $6.50 – let’s call that ridiculously low price my Christmas present to you! To get this deal, add the Gingerbread Family to your shopping cart and use code GINGY at checkout.

So, here are your options:

Or, if you’re not ready to buy yet, click through to Ravelry and favourite/queue them so you won’t forget about them!

Gingerbread Man on Ravelry:
Gingerbread Girl on Ravelry:

Gingerbread Family crochet patterns by PlanetJune
Please share pics of your amigurumi gingerbread people on Facebook, Instagram or Twitter (and tag me @PlanetJune so I’ll see them!) and in the PlanetJune Christmas crochet-along in our Ravelry group.

I can’t wait to see how you choose to decorate your crocheted Gingerbread Family!

Comments (1)

  • Quick Links: Crochet

    navigation: arrow

    buy crochet patterns and accessories from my online store

    'Everyday Crochet' and 'The Essential Guide to Amigurumi' crochet books by June Gilbank

    Crochet video tutorials and step-by-step photo tutorials

    Free PlanetJune crochet patterns

    Frequently Asked Questions

    Quick Links: Crafts

    navigation: arrow

    Punchneedle Embroidery information, ebook & patterns

    Papercraft ebook & tutorials

    Free PlanetJune craft projects & tutorials

  • Blog Post Categories

  • Blog Archives

  • Welcome to PlanetJune!

    June Gilbank

    Hi, I'm June. Welcome to my world of nature-inspired crochet and crafting. I hope you enjoy your visit!

    If you'd like to get in touch, you can contact me here.
    crocheted Canadian flag by PlanetJune
  • A fanned-out pile of the books Everyday Crochet and The Essential Guide to Amigurumi, with text 'The answers to all your crochet questions at your fingertips - find out more'
  • Support PlanetJune!

    Want to say thanks? You can send me money in seconds at paypal.me/planetjune (over $20) or paypal.me/planetjune2 (under $20) or send me a donation through my shop.

    Or simply click through from my links before you shop at Amazon, Etsy, KnitPicks, LoveCrafts or Crochet.com, and I'll make a small commission on your purchase, at no cost to you! Start here:

    ♥ Support PlanetJune ♥

    Tip: This link is also in the footer of every page!

    Thank you so much for your support!