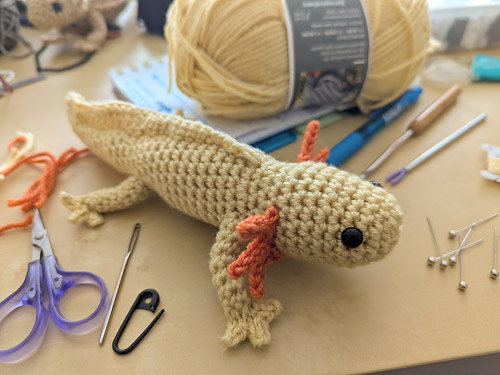
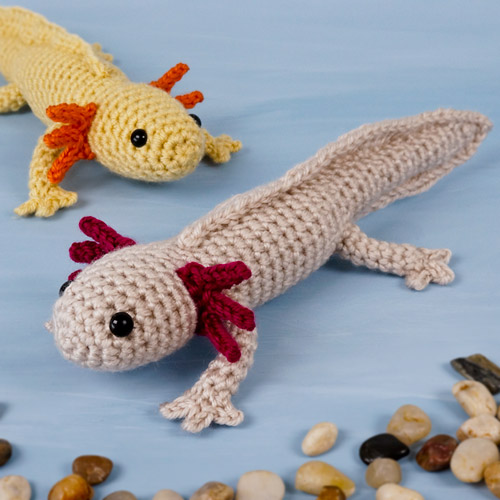
PlanetJune Craft Blog

Latest news and updates from June

Archive for Crochet

free pattern: Baby Snake

I didn’t plan to release any new patterns while I’m deep in the book-writing process, but I had a request in the PJ Discord group for a miniature snake to match my Temperature Snakes and… well, I couldn’t resist! And here’s the result:

Baby Snake amigurumi crochet pattern by PlanetJune

Baby Snake is small but perfectly proportioned no-sew baby snake. The narrow body makes it easy to pose in a variety of realistic positions, and you can make your snakes as long or short as you want.

Baby Snake amigurumi crochet pattern by PlanetJune


PlanetJune Snakes

I designed Baby Snake to be a perfect miniature version of the snakes in my Temperature Snake and Snake Collection patterns (see photos, below, for size comparison), and you can also use all the striping ideas from those patterns for your baby snakes.

Baby Snake and Temperature Snake amigurumi crochet patterns by PlanetJuneA Baby Snake looks so tiny compared with a Large Temperature Snake!

Baby Snake and Corn Snake (from Snake Collection) amigurumi crochet patterns by PlanetJuneChoose the right colour of variegated yarn and you have an easy baby Corn Snake to match the big one in the Snake Collection pattern!

And, if you’re making a Temperature Snake this year, you might also like this idea: a Baby Temperature Snake! Spectrum Jr (below) uses the Baby Snake pattern combined with the temperature snake concept for the body rounds: one round per week, using the ‘Most Extreme’ averaging option from the Temperature Snake pattern (max in summer, min in winter, avg in shoulder seasons). SJ has the same temperature readings and yarn colours as his mama, so he’s a miniature representation of my temperatures last year:

Baby Snake and Temperature Snake amigurumi crochet patterns by PlanetJune

Tip: 52 body rounds is the perfect length for a baby snake, although I think 102 rounds with 2 temp readings per week would have given more variety in the colours, so I’d recommend trying that if you want a more long and interesting baby temperature snake.


Make a Snake!

Are you tempted to crochet a super-poseable baby snake (or several)? As you can see, there’s a lot you can do with this simple but well-shaped pattern, just by choosing different yarns to crochet with – and it works up so quickly, with no sewing!

Baby Snake amigurumi crochet pattern by PlanetJune

As I like to reward people who choose to donate for my donationware patterns, the PDF version of the Baby Snake pattern also includes additional tips that you’ll only find in the PDF version (instructions for managing the tiny eyes and choosing variegated yarns), and the crochet instructions are all included on one printer-friendly page, so you can save paper and ink by printing only that page.

As always, the pattern is free for you to use online, and you need only donate if you’d like to thank me for my time in creating it, or if you’d like the easy-to-print PDF version with the bonuses.

Go to the free Baby Snake pattern >>

Or jump straight to donate:

Order the Baby Snake pattern >>

Not ready to make one yet? Add this pattern to your Ravelry queue:


I can’t wait to see your baby snakes! Don’t forget to share them in the PlanetJune Community groups, and tag me (@planetjune) whenever you post pics on social!

Comments (1)

Turtle Beach Seafoam & Edging expansion pack crochet pattern

Until now, the puffy seafoam and squared-off edging additions for my Turtle Beach Blanket patterns have been exclusive to the paid version of the original donationware pattern. That’s been confusing people, so I’ve separated out the 3D seafoam and edging instructions into their own PDF.

Now, you can buy the Turtle Beach Seafoam & Edging instructions bundled as an optional add-on when you buy any of the Turtle Beach Blanket patterns, or pick them up as a separate Expansion Pack in the shop. Much simpler!

About the Pattern

Turtle Beach Seafoam & Edging is an Expansion Pack for any of the Turtle Beach Blanket crochet patterns, and includes all the modifications required to add a puffy 3D seafoam effect and/or a squared-off edging to any of the PlanetJune Turtle Beach Blanket crochet patterns.

Turtle Beach Seafoam & Edging Expansion pack crochet pattern by PlanetJune

Both these modifications can be added to a completed Turtle Beach Blanket, so if you’ve already finished your blanket, you can add the seafoam and/or edging at any point in the future!

  • Puffy Seafoam: Add a 3-dimensional effect to your Turtle Beach blanket with the puffy seafoam add-on. This includes right- and left-handed instructions in the pattern, and an exclusive video demonstration (with right- and left-handed versions), so you can watch it in action – you’ll find the video links in the pattern!
  • Squared-off Edging: Use the edging instructions to square off the rippled top and bottom edges of your blanket, to give it a rectangular shape. (This edging can also form the base row for any deeper crocheted border.)
turtle beach seafoam and edging crochet expansion pack pattern by planetjune

What is an Expansion Pack?

Expansion Packs by PlanetJune

  • An Expansion Pack is an add-on to an existing PlanetJune pattern.
  • The Expansion Pack lets you modify or add to the original pattern to create something else.
  • You cannot use the Expansion Pack alone – you must also purchase the original pattern in order to be able to complete the pictured items in the Expansion Pack pattern.

Links to Buy

You can buy the Turtle Beach Seafoam & Edging Expansion Pack for only $2 individually from the shop, or, if you haven’t yet bought any of the Turtle Beach blanket patterns, you can now add it for $1.50 as an optional add-on, just before you add the blanket pattern(s) to your cart.

If you’ve already bought the Classic Blue and/or Teal Ombre Turtle Beach blanket pattern and want to add the seafoam or edging to your blanket, email me (june@planetjune.com) and I’ll send you a discount code to get that extra 50c off your purchase of the new Expansion Pack!

About The Turtle Beach Collection

You can mix and match crochet patterns within my Turtle Beach Collection to make your own custom blanket.

  • Mix and match colour schemes and stripe patterns with the Classic Blue and Teal Ombré blankets.
  • Add custom details (an edging and puffy 3D seafoam effect) with the Seafoam & Edging Expansion Pack (or the original donationware blanket pattern).
  • Add any combination of the original 3D stuffed baby sea turtles, the new flat appliqué turtles, and puffy or flat starfish.

Tip: For the best price, buy the multipacks of both blanket patterns and both sea turtle options!

See the entire Turtle Beach crochet pattern collection here >>

Turtle Beach Collection crochet patterns by PlanetJune
Left: Classic Blue blanket; stuffed 3D turtles
Right: Teal Ombre blanket; flat appliqué turtles

Turtle Beach Collection crochet patterns by PlanetJune
Clockwise from top left: 3D seafoam, puffy starfish, flat starfish, squared-off edging


The patterns in the Turtle Beach Collection continue to be among my most popular designs, and it’s wonderful to see so many beautiful ocean-themed blankets based on my patterns being made all over the world.

Please keep tagging me (@planetjune) whenever you post pics of things you’ve crocheted from my patterns, or, if you’re not active on social media or in the PlanetJune community groups, email a pic to me (june@planetjune.com) – I always love to see what you’ve been making!

Comments

Welcome Simply Crochet readers!

If you’ve just found PlanetJune from the article about my Temperature Snake CAL in the latest issue of Simply Crochet magazine, I’m so glad you’re here! Please take a look around my site and let me know if you have any questions.

Simply Crochet magazine issue 136: cover and article about PlanetJune Temperature Snake CAL

If you’d like to jump into the crochet-along with us, you can learn more about how it works and pick up the Temperature Snake pattern here, then start choosing your yarn colours!

Temperature Snake crochet pattern (large and small snake options) by PlanetJune

If you’re new to amigurumi-style crochet, you can find crochet tutorials for all the techniques you’ll need (the magic ring and invisible decrease are the two absolute essentials) on my Crochet Tutorials page. And there are links in the pattern to more help and tutorials (like my Ultimate Stripes technique, which is optional, but I recommend it if you want to make the most perfect stripes for your snake).

You’ll find Temperature Snake CAL threads in both the PlanetJune community groups (on Ravelry and Discord – see details for how to join the PlanetJune community here) or, if you prefer to share on Facebook or Instagram, remember to tag me @PlanetJune whenever you post an update so I can see your progress!

Temperature Snake crochet pattern by PlanetJuneTemperature Snake crochet pattern by PlanetJune

This is a low-key, supportive CAL. Make progress on your snake whenever you have time, and we’ll cheer you along as you go! If you want to make a 2023 snake, the pattern includes a link to a website with historical temperatures, so you can get the data for the temperatures in your area back to the start of the year (or use any source you prefer – for example, I like to use my local weather TV channel’s website!)

There are two ways you can get your snake caught up:

  • Once you get used to the pattern, you’ll be able to fly through a few weeks of stripes in a single session, so enjoy a couple of good catch-up sessions and you’ll be caught up in no time.
  • Or, you can make two or three rounds per day instead of one for the rest of the year – you’ll be playing catch up for a while this way, but you’ll still be ready to finish your snake in December with the rest of us.

Take it at your own pace, and enjoy watching your snake’s colours change with the seasons as it grows throughout the year.

Temperature Snake crochet pattern by PlanetJune

Welcome to PlanetJune, and welcome to the crochet-along!

Comments

How to Fix Uneven Stuffing: The Pinch-and-Push Method

I have a new tutorial for you today that you’ll probably find especially useful if you’re working on a Temperature Snake (although it isn’t just for snakes!)

Is your stuffing less smooth and even than you’d like? I can help with that!

tutorial: fix lumpy stuffing in amigurumi; the pinch and push method

With my ‘pinch-and-push’ technique, you can manipulate the stuffing of an amigurumi from the outside of the piece, by using both hands to encourage the stuffing to shift into the desired area. This method will save you from having to pull out all the stuffing and start again (which may not even be possible if you have a snake that’s already several feet long!)

I’m demonstrating on a snake because it’s easiest to see what’s happening with a long thin tube, but you can also use this method to pinch-and-push stuffing into a different area of any long or large amigurumi, as long as you still have an opening so you can add extra stuffing to replace the quantity you move.

Note: This technique will help to redistribute stuffing that’s uneven, but it can’t help much with actual lumpy stuffing. Always fluff your stuffing by teasing it apart into light fluffy layers before you use it; if you add stuffing in clumps, it will form lumps inside the amigurumi.

The Problem

For the purposes of this demonstration, I’ve intentionally under-stuffed my in-progress Temperature Snake in a couple of places.

Below, you can see both dark blue sections aren’t stuffed as much as the rest of the body, giving my poor snake a bit of a lumpy, uneven appearance when straight:

tutorial: fix lumpy stuffing in amigurumi; the pinch and push method

It’s especially important to try to even out the stuffing in something long and thin like an amigurumi snake. You need enough stuffing inside to fully support the crocheted fabric in any position you’ll use it, as these areas will tend to crease or buckle when you try to curve the snake’s body, and that’s definitely not the look you want!

Method

The idea of the pinch-and-push process is to move stuffing forward (away from the open end – i.e. toward the head in this case) to fill any under-stuffed areas.

Note: In all the photos below, the snake’s head is on the right, and the open end of the snake on the left, so we’ll be shifting the stuffing from the left to the right.

Here’s the first under-stuffed area:

tutorial: fix lumpy stuffing in amigurumi; the pinch and push method

We’re going to move some of the stuffing forward from the well-stuffed purple area to the under-stuffed dark blue area.

Pinch-and-Push Instructions:

  1. Grasp the work loosely in front of the under-stuffed part, leaving your thumb and forefinger free, and pinch the piece firmly behind the under-stuffed part.
  2. Push the pinched part forward. (The rounds of your crochet will be forced closer together, and all the stuffing in that part will be squashed together more firmly.)
  3. Pinch the squashed part with your other hand to hold the squashed stuffing in place.
  4. Release your push.

tutorial: fix lumpy stuffing in amigurumi; the pinch and push method

As you can see below, after just one pinch-and-push, some of the stuffing has been moved a little further forward (to the right in this photo), leaving most of the dark blue section nicely stuffed and a new under-stuffed section (marked by arrow) a little closer to the open end.

tutorial: fix lumpy stuffing in amigurumi; the pinch and push method

But you won’t be doing this just once! Repeat the pinch-and-push process over and over, as many times as necessary, inching your way back toward the open end as you persuade the stuffing to move forward with each push:

"tutorial:

Note: You can’t shift stuffing forward from an area that’s already under-stuffed – if you end up with an empty section, move further back and pinch-and-push more stuffing forward to fill the gap.

Once you get close enough to the open end, you can add more stuffing through the opening to replace the quantity you’ve shifted forward.

Below, you can see that I’ve shifted the under-stuffed section to be much further back. Now it’s close enough to the open end of my snake that I can add additional stuffing to fill that area properly, instead of continuing with more pinch-and-push movements.

tutorial: fix lumpy stuffing in amigurumi; the pinch and push method

Confused?

Don’t worry, this method is easier to do than to explain! Once you’ve tried it a couple of times, you should understand how it works and be able to do it instinctively.

If you’re still having trouble grasping the concept, imagine dropping an orange into a sack. You can grip the orange through the sack fabric, and then use both hands to move the sack fabric around the orange from the outside, allowing you to shift the position of the orange inside the sack.

This is basically what we’re doing here – moving the stuffing (the orange) around through the crocheted fabric (the sack).

Finishing Touches

When you’ve finished shifting the stuffing, squeeze and squash the amigurumi to further even out the stuffing. For something long like a snake, you can also combine that with bending it back and forwards in several directions a few times, to encourage the stuffing to compress and settle into its final state. Repeat until you’re happy with how your amigurumi looks and feels.

Here’s the result – fairly smooth, with no lumps or under-stuffed areas!

tutorial: fix lumpy stuffing in amigurumi; the pinch and push method

I hope you’ll find this technique useful, whether you’re participating in the Temperature Snake CAL, or making a different long/large amigurumi where you realize that you haven’t stuffed the front end of your amigurumi enough.

Give my pinch-and-push technique a go before you resort to removing all the stuffing to start again, or decide to put up with an unevenly-stuffed amigurumi – with a bit of patience, you can probably fix it!

Comments (4)

Spectrum and Kelvin: my 2022 Temperature Snakes

Just a heads-up: I need to take a few days away from PlanetJune due to health issues. I’ll be mostly offline for the next week, but don’t worry – if you have any questions that other members may be able to help you with, you can post them in one of our community groups. As for customer support, I’ll do my best to keep up, but please bear with me if it takes a little longer than usual for me to get back to you. Thanks for your understanding 🙂


I’ve just realised that with the flurry of excitement surrounding the start of the year-long Temperature Snake 2023 CAL, I never showed you the photos of my finished 2022 sample snakes. All my pre-release photos strategically omitted the tail-ends of my snakes, as, well, they didn’t have tails until I knew the final temperature for the year on December 31st and could crochet their last stripes!

So, please allow me to introduce my two beautiful crocheted Temperature Snakes that depict the daily high temperatures in Waterloo, ON throughout 2022…

Spectrum is a Large Daily Snake using the Rainbow colour scheme from the pattern:

Temperature Snake crochet pattern by PlanetJuneSpectrum is named for her colour scheme – the colours of the rainbow.

Kelvin is a Small Every-Other-Day Snake using the Red-to-Blue colour scheme from the pattern:

Temperature Snake crochet pattern by PlanetJuneKelvin is named for the temperature scale used to measure the colour temperature of light, from warm red to cool blue.

All three of those options (size, length and color scheme) are mix-and-matchable within the pattern – I crocheted Spectrum and Kelvin throughout 2022 so you could see an example for each of the options.

Temperature Snake crochet pattern (large and small snake options) by PlanetJune

Temperature Snake crochet pattern by PlanetJuneTemperature Snake crochet pattern by PlanetJune

If you’re making a Daily snake for the CAL, this is the approximate snake length you can look forward to by the end of the year:

Temperature Snake crochet pattern by PlanetJuneSpectrum is by far the longest amigurumi I’ve ever made!

Temperature-wise, 2023 is shaping up to be quite different from 2022, so nobody else will ever have a snake that looks quite like these two… but then that’s part of the fun of the Temperature Snake pattern (or any temperature project): you don’t know in advance which colour you’ll be using for each day, and your final snake will truly be one-of-a-kind.

If you’d like to join the 2023 Temperature Snake CAL, there are well over 700 of us participating now, we’re sharing our progress and chatting in the PJ community online groups, and you’re very welcome to jump in now and catch up on all the daily temperature readings from the start of the year using the online resource included in the pattern. Plus, there are plenty of others who are just starting out or playing catch-up, so you won’t be alone!

I’m aiming to get back online and feeling better in a week or so. I look forward to seeing all your snake update pics and catching up on what I’ve missed!

Comments (2)

Temperature Snake CAL starts soon!

There are just 4 days remaining until the 2023 Temperature Snake CAL begins in earnest on January 1st – have you picked up the Temperature Snake crochet pattern yet? If not, now’s the perfect time: you’ll need a little time to plan your colours and buy your yarn!

Note: If you’re reading this after January 1st, it’s definitely not too late to join in: you can look up any temperatures you missed online, and it’s easy to catch up on a couple of weeks of stripes in a single crochet session. Please do come and join the fun!

We’ve had lots of planning going on in both PlanetJune groups (on Ravelry and Discord) since I released Part 1 of the pattern a couple of weeks ago, and I thought I’d give you a taste of that today.

Although my pattern includes complete and specific instructions for making a snake that records the daily maximum temperature over 2023 using a palette of 10 colours (plus a bonus colour for the head and tail), it’s great to see how some CAL participants are planning to truly customize their snakes too! We have colour palettes planned that range from 6 colours to over 20 – just look at these stunning combos:

Temperature Snake colour palettesIt’s going to be so interesting seeing how differently all these lovely snakes will turn out…

Note: If you’ve already started but haven’t posted to either of the groups yet, we’d love to see how you’re doing too! See how to join the PJ Ravelry or Discord groups here.

In the PJ community, we have members planning to:

  • Make a temperature worm (for those who don’t like snakes – just leave off the tongue!)
  • Make a pair of snakes: one for the daily maximum temperature and one for the daily minimum
  • Use historical temperature records from a birth year
  • Use a home weather station to log extremely local temperatures
  • Log the change in temperature each day
  • Carry along a sparkly thread on special occasion days (like birthdays, anniversaries, etc)

…and much more! So many great ideas – I can’t wait to watch all these snakes growing throughout 2023.

If you haven’t picked up the pattern yet, I just released Part 2 of the instructions yesterday, so you can jump right in and start your snake’s head today if you want!

I’ll be crocheting along with you all year, and I’m about to start making Sophie Jewel, my 2023 snake. These are the colours I’ve chosen for her (if you’re curious, they’re all shades of Lion Brand Heartland yarn, and I’ll be using the warm grey on the right for her head):

Temperature Snake colour palettes

This time I’ve chosen to make a Small Daily snake i.e. she’ll be very long and thin! Between those options and the rich heathered jewel tone colours I’ve chosen this time, she’ll look totally different from Spectrum and Kelvin (the snakey samples I’ve been making this year, who you can see at the top of this post).

Ready to join in too? Here are some handy links for you:

I’m really looking forward to crocheting along with you throughout the upcoming year. See you in the 2023 Temperature Snake CAL!

Comments

Giant Crocheted Christmas Tree

Would you like to see something amazing? Loooook what I made!!

giant crocheted Christmas tree by planetjuneMy giant crocheted Christmas Tree is 108cm (42.5″) tall!

Everything you see here is made from a PlanetJune Christmas-themed crochet pattern – including the tree! – so this truly is a PlanetJune Christmas Tree.

There’s quite a story to how I brought this project to life – I really didn’t know if it was going to work, and had some setbacks along the way – so please settle in and I’ll share the whole adventure with you now…


For my giant tree, I decided to use the Narrow Tree from my Christmas Trees 2 pattern, so it could be impressively tall without getting too wide.

Christmas Trees 2 crochet pattern by planetjuneThe standard Narrow Trees are on the right here, but this project would be a little larger than all these other Christmas Trees!

I started with the Secure Magic Ring from my Complete Guide to Giant Amigurumi. Together with my trusty 15mm hook and 2 strands of Bernat Blanket yarn, I was ready to begin, but I really wasn’t sure how well this would work: my tree design supports itself without any stuffing, and is completely hollow inside. This is an advantage (I’d like to be able to fold up my Giant Tree for storage when it’s not on display), but giant amigurumi aren’t as sturdy as regular amigurumi – the squish factor is part of their appeal! – and that, plus the weight of the yarn, might lead to some structural problems in the tree, with no stuffing to support it.

So, I started by making a ‘small’ giant tree as proof of concept – just a test project using blanket yarn I had on hand. This tree uses just one ball of blanket yarn, and it worked beautifully! The olive green colour was a little drabber than I’d like for a tree, but it served its purpose: it showed that a giant tree is still sturdy enough to support itself.

With one ball of blanket yarn the tree ended up being 15″ tall (or almost as tall as a small dog):

giant crocheted Christmas tree by planetjune

And I also tried quickly stringing some LED lights on the tree – I could see that, with a little more care in arrangement, that could look nice, but the foliage is pretty chunky on a giant tree, and many of the tiny LEDs in my string were completely hidden, so larger lights seem like the way to go here.

giant crocheted Christmas tree by planetjune

Now that I knew this idea could work, I bought a garbage bag full of yarn (yeah, that’s a standard quantity now!) to bring my vision of a giant crocheted tree to life:

giant crocheted Christmas tree by planetjuneEach of those balls is 300g (10.5oz) of yarn!

My original plan was to make a 4ft tree (120cm), but once I started crocheting my white tree, I quickly noticed how floppy the tree was becoming. I couldn’t remember if my olive-coloured tree had been the same before I added the foliage, or if it was the additional height and weight that was making this one flop, so I started to worry that this supersized version wasn’t going to work at all….

After using 1.25 big balls of blanket yarn, the tree base was 30″ tall, and I decided to pause and add the foliage to the part I’d already crocheted, to see if it would hold itself up with the foliage added, or if I’d need to come up with a way to stabilise it without stuffing – I really don’t have the space to store a huge stuffed tree!

giant crocheted Christmas tree by planetjuneMmm, this texture looks like giant popcorn kernels to me…

Once I’d finished adding the foliage, the 30″ tree could almost stand up by itself. It was a bit like a wibbly wobbly jelly – it stayed upright, but it was too heavy to hold its shape properly at this size, so I came up with a great (and easy) idea for support: a cone made from poster board inside, exactly like I did for my Pom-Pom Tree but much bigger.

The cone worked perfectly to support the tree, so I decided to keep going. I used the Taller Trees instructions in the pattern to continue as far as Rnd 50, which I calculated would use 6 balls of yarn and make the tree about a metre tall.

In the end I actually used 5.9 balls, and the final height of the tree is 108cm (42.5″ tall) – not quite as tall as the 120cm (48″) I’d originally planned, but still pretty impressive, and plenty tall enough!

giant crocheted Christmas tree by planetjuneThe extra height between the 30″ version and the final 42.5″ version made a big difference!

The next problem was that I didn’t have any poster board large enough to make a cone for the taller tree! In the above photo there’s a cardboard box sitting inside the base of the extended tree, with the poster board cone on top, but that made the tree look square at the bottom. I played around with cardboard cones and disks to support the tree, and eventually hit on the idea of using bamboo plant stakes to make a hidden tent that the crocheted tree could slip over.

giant crocheted Christmas tree by planetjuneOne of several prototype support systems that didn’t work very well…

My original bamboo + cardboard disks plan wouldn’t hold together securely without taping it all together. I wanted the structure to be completely collapsible so I can dismantle it at the end of the season and reassemble it next year, so I enlisted Dave’s help to design and 3D-print some rings to hold the poles in place and at the correct angle based on my measurements.

giant crocheted Christmas tree by planetjunePrinting in progress

The bamboo doesn’t have an even thickness, so we had to make the holes large enough to fit the thickest parts of the bamboo through. To stop the poles from sliding straight through the rings, I thickened them up with masking tape at the points where they meet the rings. It may not be pretty, but it does the job, and it doesn’t need to look nice as it’s all going to be covered up.

giant crocheted Christmas tree by planetjune

But my concept plus Dave’s experience in designing and printing in 3D made for a winning combination – I’m thrilled with our joint project! The bamboo tent works perfectly; it’s lightweight and sturdy and the crocheted tree slips over the top:

giant crocheted Christmas tree by planetjune

At the end of the season, I’ll be able to remove the crocheted tree and fold it up, then remove the poles from the rings to store everything away neatly for next year!

I’ve just realised that now I have these rings, I could buy longer bamboo poles and make my tree even taller for next year! I still have 4 more balls of yarn, and the tent concept means there’s no problem of the tree becoming too heavy as I add more yarn… But then I’d need more lights, and more decorations, and… maybe I should just leave it as-is… 🙂

I bought a string of 500 LED lights, and after a false start figured out how to wrap them so I didn’t run out. The nice thing about a white tree is you can totally change the look of the tree with different coloured lights. My string can toggle between warm white and various multicoloured options, so I can make the tree look classy or fun at the touch of a button!

giant crocheted Christmas tree by planetjuneThe colours don’t photograph very well, but at least you can see that they do change!

And then it was just a case of decorating the tree, and I just happen to have dozens of PlanetJune crocheted decorations just waiting for a home. I’ve never seen them all together before, and I’m delighted by the result!

giant crocheted Christmas tree by planetjune

This tree represents 15 years of PlanetJune Christmases, and I think you can see that my design style ties everything together even though they don’t all match – that’s pretty amazing.

I stepped back to admire my work and I realised there was still one thing missing: a tree topper. Oops…

I thought that would have to wait for next year, but I couldn’t leave the top of the tree empty, so I spent the last couple of days playing with prototypes for a star topper and I hit on a style I really like:

giant crocheted Christmas tree by planetjune

I just finished designing the star today, and this is just a prototype, but it could be the start of next year’s PJ Christmas design..?

So, here it is, my finished giant tree, with and without decorations:

giant crocheted Christmas tree by planetjune

I’m so happy with it!

Apart from the star topper, if you’re looking for any of the patterns for my Christmas Trees or decorations, you can find them all at www.planetjune.com/xmas

And if you’d like to make a giant tree too (maybe not as large as this one!) – or upscale any other amigurumi pattern – my Complete Guide to Giant Amigurumi ebook includes everything you need to know to upscale an amigurumi-type pattern to giant size!

(By the way, the only reason I had to make a scaffolding for this tree project is because it’s not really an amigurumi, as it’s not stuffed – a stuffed giant ami wouldn’t need this level of support!)

giant crocheted Christmas tree by planetjune

I hope you’ve enjoyed seeing how my Epic Christmas Tree project came together! I’m still amazed that I pulled it off – there were a couple of moments there where I really thought it wouldn’t come together – but now I have a beautiful handmade tree that can light up our living room with a warm and cozy glow for years to come.

Wishing a very Happy Christmas to you and your family! ♥

Comments (13)

Snake Collection crochet pattern & Temperature Snake CAL

Guess what? It’s time! The Temperature Snake CAL is now ready to launch, as well as my brand new Snake Collection pattern, and if you buy both the CAL pattern and the Snake Collection pattern together, you’ll get a special bundle deal! For the CAL details, see my Temperature Snake CAL blog post, and for links to both patterns and the bundle, go to the end of this post!

Snake Collection crochet pattern by planetjune

About the Snake Collection crochet pattern

My new Snake Collection pattern includes 4 different snake designs with markings loosely based on real-life non-venomous snakes:

Unmarked (single colour) e.g. Green Snake, Black Snake:
unmarked snake from the Snake Collection crochet pattern by planetjune

Dual-Banded (two-colour stripes) e.g. Ground Snake, Kingsnake:
dual-banded snake from the Snake Collection crochet pattern by planetjune

Tri-Banded (three-colour stripes) e.g. Milk Snake, Kingsnake:
tri-banded snake from the Snake Collection crochet pattern by planetjune

Spotted (diamond-shaped blotches or patches of colour) e.g. Corn Snake, Rat Snake:
spotted snake from the Snake Collection crochet pattern by planetjune

Difficulty
Although the markings and colour patterns of my sample snakes are based on specific real-life snakes, I’ve kept the colour patterns simple so they’re easy to memorise and fun to crochet.

  • The unmarked snake is a quick and easy project – try it with a variegated or self-striping yarn to easily add some fun colour.
  • For the two striped snakes, I recommend my new Ultimate Stripes technique, but I offer additional alternatives in the pattern too.
  • The spotted snake has frequent colour changes throughout, but I’ve included a colour chart as well as the written instructions for the body patterning, and I give instructions for how to manage the yarns with no cutting or tying yarn throughout the snake’s entire body!

I’m especially delighted with how the diamond-shaped markings turned out – the complication of the biased (slanted) stitches in amigurumi meant it was incredibly challenging to come up with a simple repeating pattern that would actually work, and another challenge to continue the spots while decreasing for the tapered tail… But I did it! And now I’ve worked it out for you, it’s a very effective and fairly easy pattern to crochet.

Customizing your Snakes:

  • You can make dozens of different snakes by choosing different colours that match other real snakes, getting creative with fun colour choices, and/or mixing different marking patterns in a single snake!
  • It’s easy to customize the length of your snake – each design has a repeating body section, and you can choose how long to make your snake by including more or fewer repeats of the body section before you continue to the tail instructions.
  • I’ve made friendly PlanetJune-style snakes with solid black eyes, but you can make them look more realistic by using coloured eyes or cat eyes with a slit pupil.

spotted snake from the Snake Collection crochet pattern by planetjune

Snake Fun Facts

  • Snakes are reptiles that are found all over the world. They mostly eat small animals like rodents, birds, lizards and frogs.
  • There are over 3000 species of snakes in the world, and less than 20% of them are venomous – most snakes are completely harmless to humans.
  • Snakes have poor vision and hearing, so they see the world primarily through their sense of smell and taste, by flicking their tongue around to ‘taste’ the air.
  • Just like your two ears let you tell which direction a sound is coming from, a snake’s forked tongue lets it detect which direction a scent is coming from.

Snake Collection or Temperature Snake?

There’s obviously quite a bit of overlap between these two patterns, so if you buy both, you’ll get a big bundle discount! But they each include plenty of unique features and loads of value, so here’s a rundown so you can decide which snake pattern(s) is/are for you:

Snake Collection:
Snake Collection crochet pattern by planetjune

  • FOUR complete patterns for snakes with different markings based on real snakes
  • ONE size of snake (it’s the same as the 3/4 size in the Temp Snake CAL)
  • All the patterns have a repeating body section, so you can add more repeats before continuing to the tail instructions to make your snake as long as you want!
  • Make a complete snake immediately

Temperature Snake CAL:
Temperature Snake crochet pattern by planetjune

  • Year-long crochet-along with the pattern and instructions released in parts as you need them throughout the year
  • Online community group for sharing your progress along the way and asking any questions (it’ll be so much fun to see all our snakes growing in different colours!)
  • TWO sizes of snake
  • Detailed instructions for finding the temperature range in your area, choosing yarn colours, and creating your custom temperature scale
  • Full assistance with getting set up, help selecting your colours, etc in the community groups (or directly from me if you don’t want to enjoy the community aspect of this CAL)
  • Printable worksheets for filling in your custom temperature scale and colour code, and logging your temperatures and yarn colours throughout the year
  • The worksheets are also fillable PDFs so you can log your temperatures digially if you prefer
  • In early 2024, the final, complete, non-CAL Temperature Snake pattern will be released as a stand-alone pattern PDF, including any tips and FAQs that came up throughout 2023, and you’ll automatically receive a copy of that pattern too, in case you’d like to make more temperature snakes in the future!

I hope that’s all clear, and you know which (or both) patterns are right for you. If so, here are the links to buy:

But if you still have any questions about either of the patterns or how the CAL will work, please leave a comment below (or email me), and I’ll be happy to help!

Happy Snake-making 😉

Comments (9)

« Previous entries
  • Quick Links: Crochet

    navigation: arrow

    buy crochet patterns and accessories from my online store

    Everyday Crochet, and the Idiot's Guides to Crochet and Amigurumi by June Gilbank

    Crochet video tutorials and step-by-step photo tutorials

    Free PlanetJune crochet patterns

    Frequently Asked Questions

    Quick Links: Crafts

    navigation: arrow

    Punchneedle Embroidery information, ebook & patterns

    Papercraft ebook & tutorials

    Free PlanetJune craft projects & tutorials

  • Blog Post Categories

  • Blog Archives

  • Welcome to PlanetJune!

    June Gilbank

    Hi, I'm June. Welcome to my world of nature-inspired crochet and crafting. I hope you enjoy your visit!

    If you'd like to get in touch, you can contact me here.
    crocheted Canadian flag by PlanetJune
  • Support PlanetJune!

    Want to say thanks? You can send me money in seconds at paypal.me/planetjune (over $20) or paypal.me/planetjune2 (under $20) or send me a donation through my shop.

    Or simply click through from my links before you shop at Amazon, Etsy, KnitPicks, LoveCrafts or Crochet.com, and I'll make a small commission on your purchase, at no cost to you! Start here:

    ♥ Support PlanetJune ♥

    Tip: This link is also in the footer of every page!

    Thank you so much for your support!