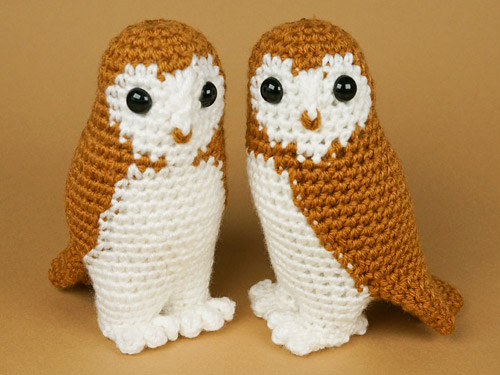
PlanetJune Craft Blog

Latest news and updates from June

Archive for Crochet

review: Susan Bates Twist + Lock crochet hook set

Have you heard of the new Twist + Lock crochet hook sets from Susan Bates?

Susan Bates Twist + Lock crochet hooks

Yarnspirations (the company behind the Susan Bates brand) say:

Crocheting just became easier with the Susan Bates Twist + Lock interchangeable crochet hook tool. Select the desired hook size and insert into the opening of the oversized soft touch handle. With a simple Twist and Lock, your crochet hook will fit snugly in place whether in action or in storage. Purchase additional sizes to build your custom crochet hook set.

But is this a helpful addition to our crochet toolset, or just a solution looking for a problem? Coats & Clark kindly sent me a set to test out and see what I think…

About the Set

The Twist + Lock kits are available in various configurations:

  • 1 handle and 2 hook heads
  • 1 handle, 1 hook head and a cutter
  • 2 hooks and a cutter
  • the Deluxe Set that includes 2 handles, 2 cutters, and all 6 hook heads (sizes F, G, H, I, J, K – that’s 3.75-6.5mm).

So you can choose your preferred hook sizes and add on additional pieces later, or jump straight in with the complete set.

First Impressions

The hook heads are standard Susan Bates in-line hooks (my favourites). A hook head or cutter can be inserted into each end of the spring-loaded handle, and twisted to lock it in place:

Susan Bates Twist + Lock crochet hooks

As there’s no thumbrest on the hooks (where the hook size is usually embossed), the size is printed on the back of each hook:

Susan Bates Twist + Lock crochet hooks

With a hook at each end, the handle becomes quite long:

Susan Bates Twist + Lock crochet hooks

You can also reverse any of the heads and insert them facing into the handle, for portability:

Susan Bates Twist + Lock crochet hooks

My Testing Process

For my test, I’ve been crocheting my Cozy Cables Earwarmer using Bernat Satin yarn and a J US/6mm hook. I crocheted a full 4-row repeat of the stitch pattern with my usual Susan Bates bamboo-handled hook and then another repeat with the Twist + Lock hook, so I could really feel the difference the hook makes to the process.

Susan Bates Twist + Lock crochet hooks

I also tested the cutter out. The blade is so well protected inside the plastic casing that I couldn’t get it to work at all at first, but once I figured out you have to loop the yarn over the cutter and then pull back fairly hard, it worked well enough:

Susan Bates Twist + Lock crochet hooks

The Importance of Honest Reviews

I’m a big fan of Susan Bates hooks and I really wanted to love this concept, but it didn’t really work for me. I’m uncomfortable writing this, a less-than-positive review, but I think it’s important for people to hear both good and bad points to help inform their purchases. That’s why I’m not an ‘influencer’ – I never accept payment for reviews; you’ll always hear what I truly think.

All the other reviews I’ve seen of this set have said nothing but positive things, and I don’t know if that’s because the reviewers didn’t actually use the hooks before they reviewed them, or whether they truly love them, and it’s just me that doesn’t! Either way, it’s important for me to tell you the truth as I see it, so here goes…

Pros

Let’s start out with the reasons I do like this set!

  • It’s nicely made – the heads push and nicely into the spring-loaded body and twist securely closed.
  • I really like the idea of always having a cutter to hand!
  • You can store your hook head and cutter inside the handle, making it easy to throw into your project bag without worrying about snagging your yarn. Just push and twist and the head pops out, ready to re-attach facing outwards and start crocheting. This would be very convenient for travel.
  • The handle is reversible so you can have a hook at either end, or a hook at one end and a cutter on the other, and just flip the handle around when you want to use the other end.
  • As with all Susan Bates hooks, these hooks have the inline head shape I love. This shape head makes it far easier to form perfectly regular stitches.
  • The soft touch handle is substantial and comfortable to hold in the palm of your hand, and I think it’d be especially useful for those with larger hands or who have grip difficulty.

Cons

Now for the downsides… I have two main problems with this hook that ruin the crocheting experience for me. To make a fair comparison, I got out all my Susan Bates J hooks so you can see what I’m talking about.

Susan Bates Twist + Lock crochet hooks
Susan Bates J hooks, top to bottom: Twist & Lock, bamboo-handled, Soft Touch, Quicksilver.

Firstly, the grip position. As with all interchangeable hooks I’ve seen (from any brand), there’s no thumbrest on these hooks, and because of the shape of the handle, you have to hold it below the section where the head is inserted.

Susan Bates Twist + Lock crochet hooks
The standard thumbrest position is between the dotted lines; the Twist + Lock hold is below the bulge in the handle, below the lower dotted line.

This is about an inch below my usual position, and it feels like I have less control of the hook as a result. If you have difficulties forming a tight grip and prefer to grip a larger comfort handle instead of a thin thumbrest, this may be a benefit to you, but personally I much prefer the control of holding the hook closer to the head.

Susan Bates Twist + Lock crochet hooks
Top: my usual hand position; bottom: my hand is much further away from the hook head.

Secondly, the weight. It was immediately noticeable to me how heavy this hook was in use. I tried taking the cutter out from the base of the handle and that helped slightly, but it still felt much heavier. In case I was biased, I weighed all my Susan Bates J hooks to compare:

Hook (all Susan Bates size J) Weight/g
Twist + Lock plus cutter 32.9
Twist + Lock plus 2nd hook 37.3
Twist + Lock, empty end 31.0
Bamboo-handled 11.5
Soft Touch 10.4
Quicksilver 10.1

It wasn’t my imagination – all my other J hooks weigh between 10 and 12g, and the Twist + Lock weighs 31-37g, depending on what you have installed in the other end. That’s around three times the weight of a standard hook, and if you do a lot of crocheting, you’ll definitely start to feel that difference!

Verdict

Susan Bates hooks are my all-time favourites, because of the head shape, and that’s the same with this new set as much as all their other hooks. But, while I love the concept of the ‘portable toolkit’, carrying your toolkit in the handle of your hook maybe isn’t the best thought-out idea…

There are some plus points: the handle material is comfortable, and the wide grip in the palm of your hand is an advantage for knife-grip crocheters, especially for those with larger hands. Being able to flip the head inside the handle for easy and safe transportation in your project bag is genius, and the idea of always having a safe cutter to hand is very appealing!

If you travel a lot with a crochet project at your side, or have large hands, or your top priority is a wide comfortable grip, and/or you don’t mind the added weight, the Twist + Lock set may be a good fit for you. But, for me, the hugely increased weight and the lack of a good thumbrest position for controlling the hook make this a miss.

If you’re looking for crochet hooks, I’d recommend instead any of the other Susan Bates aluminum hooks:

  • The bamboo-handled hooks (if you can still find them), are my favourites.
  • The Soft Touch handled hooks are also very nice – the grip isn’t as wide as the bamboo handle, but the material is very comfortable to hold, and the new-style pointier tip is growing on me too.
  • The classic Silvalume hooks are just one-piece anodized aluminum, but you can always add a comfort grip if you need a wider handle.

All of these also have the same aluminium hook with the in-line head style as the Twist + Lock, and I’d guess that smaller-handed people like me would probably have a better crocheting experience with any of these than the Twist + Lock set.

(And I’ve reviewed all the other Susan Bates hooks here, if you’d like to know more about those options!)


What do you think? If you tend to like heavier hooks and larger handles with no thumbrest, or you’ve tried a Twist + Lock hook, I’d love to hear about your experience – especially if you disagree with me! Am I missing something here?!

Comments (8)

Christmas Trees Set 2 crochet pattern

My 2009 Christmas Trees pattern has been a bestseller for years, but this year I decided I wanted to design a more realistic crocheted conifer that you can mix-and-match with my classic bobble trees in a display, or use alone. And here’s what I came up with: Christmas Trees Set 2!

Christmas Trees Set 2 crochet pattern by PlanetJune

For this collection, I’ve designed trees with three different styles (Narrow, Standard and Wide) so you can choose your favourite shape and make multiples of the same type of tree, or create a display with lots of variety in shape, size and colour, like mine.

I love how detailed and realistic the foliage looks on these trees – you won’t believe how simple they are to make!

Christmas Trees Set 2 crochet pattern by PlanetJuneThe three tree styles, L-R: Narrow, Standard, Wide

I’ve crocheted samples in 2 or 3 heights for each tree style (and the pattern includes the complete instructions for all 7 of the pictured trees, if you want to replicate them exactly), but these are any-height patterns: you can keep going with the base until the tree is as tall as you want it to be, and then stop to add the foliage.

Christmas Trees Set 2 crochet pattern by PlanetJune

I encourage you to experiment with different heights for each of your trees – they make a more realistic display when each tree is slightly different!

If you don’t want to use too much yarn, I recommend making your larger trees in the Narrow and Standard styles, and save the Wide style for your smaller trees (the Wide style is a bit yarn-hungry – my taller wide tree is only 5.5″ tall, but uses 120 yds of yarn!)

But there’s no need to worry that you’ll run out of yarn: I’ve included a very simple calculation in the pattern so, if you only have a certain amount of yarn, you’ll know how big you can make your tree without any danger of running out of yarn partway through adding the foliage. All you’ll need is a scale that weighs accurately in grams.

Mix-and-Match Patterns

Christmas Trees Sets 1 & 2 crochet pattern by PlanetJune

As you can see, the new trees can mix nicely with my original Christmas Trees pattern (now renamed Christmas Trees Set 1!) – in this photo, the two decorated trees are from Set 1, and the others are all from the new Set 2.

I love the look of the new trees as a natural mini forest, but you can also use the star and decorating ideas from Set 1 with the new Set 2 trees to make them look more festive. 🙂

Purchasing Options

You can buy Christmas Trees Set 2 individually, or bundle it with Set 1 pattern for a special price:

And, until the end of November 2022, if you’ve already bought the original Christmas Trees pattern, email me with your order number and I’ll email you back with a $1 discount code to use towards Set 2! To find your order number:

  1. Login to your PlanetJune account, then go to My Account > My Patterns
  2. Look through the alphabetical list of your pattern purchases to find Christmas Trees and click it to go through to the order – your 5-digit order number will be right there!

Not ready to get started yet? Add it to your Ravelry queue or favourites so you don’t forget:


Christmas Trees Set 2 crochet pattern by PlanetJune

I hope you’ll enjoy making these cute trees as part of your holiday decorating this year, and if you’d like to make them along with the rest of the PJ community, please come and join us in the PlanetJune Ravelry group for our end-of-year Reindeer Games crochet-along.

I’ll be joining in with the CAL too – this pattern is so much fun, I have plans to make more of these trees, including a giant version! Just how big will my tree get? I’m not sure yet, but join me in the Ravelry group to keep up with my progress!

Comments

Everyday Crochet and the Reindeer Games CAL

June Gilbank holding her new book, 'Everyday Crochet'

It’s book launch day! Today is the day that my new book, Everyday Crochet, is released – so exciting!

Thanks to your preorders, Everyday Crochet had been rising up the ranks in the amazon crochet category, and now it’s (temporarily) out of stock on amazon! ? So that’s an unexpected blow, but I hope it’ll climb higher once they restock, and as the preorderers start to leave reviews after they receive their copies.

UPDATE: Amazon (.com and .ca) completely underestimated the number of preorders they’d receive from all of you (thank you!) and it went out of stock as soon as it launched. It’s now back in stock in the US, but still temporarily out of stock in Canada.

If you haven’t bought Everyday Crochet yet, you can read about it here or order from amazon here (although you may have to wait for it to come back into stock!) – or find it in your favourite bookshop. And order a signed bookplate from me here 🙂

Now, if you’ve already bought Everyday Crochet – or are just about to – we’re starting a crochet-along (CAL) from today until the end of the year for all the patterns in the book in the PlanetJune group on Ravelry, and I hope you’ll join us!

PlanetJune Reindeer Games 2022 - logoPlanetJune Reindeer Games 2022 - Reindeer Village

I’ve rolled this CAL into the Reindeer Games – the annual PlanetJune end-of-year CAL and online community event that also starts today – and there’s a special bonus virtual medal waiting for you if you make a project from Everyday Crochet…

Reindeer Games 2022 CAL

Crochet anything PlanetJune as part of the PlanetJune Reindeer Games 2022 (Tuesday, Nov 1 – Saturday, Dec 31). This is a Team PlanetJune event, hosted in the PlanetJune Ravelry group, with a similar concept to the Ravellenic Games: the idea is to challenge yourself by starting and finishing crochet project(s) before the end of the year.

It’s just for fun, like a CAL but you get to choose your projects – anything PlanetJune, including projects from my books – and earn virtual awards! During the Games, we all cheer each other on to complete our chosen projects. Our team captains will award you with your Reindeer Village medals and Antlers as you complete your project(s).

Santa and all 9 reindeer have set up their stalls in the Reindeer Games Village:

  • Santa’s Toy Shop – toys
  • Rudolph’s Gingerbread House – home/dĂ©cor
  • Dasher’s Scarf Stand – scarves
  • Dancer’s Winter Wear – hats and mitts
  • Prancer’s WIPs Wrapping – any project started before the Games
  • Vixen’s Shawl Stall – shawls and wraps
  • Comet’s Closet – sweaters and other garments
  • Cupid’s Cowl Corner – cowls and neckwarmers
  • Donner’s Blanket Bazaar – blankets and afghans
  • Blitzen’s Bag Bonanza – bags and purses

You’ll receive the medal for the stall you ‘visited’ once you’ve finish your project! And you can also receive bonus Antler awards for your projects:

  • Cozy Reading – make a project from Everyday Crochet
  • Secret Santa – make a project from the Buried Treasure pattern list
  • Santa’s Helper – showing team spirit
  • Angel – charity project
  • Carolling – crochet in public
  • Cookie Decorator – colourwork
  • Deck the Halls – embellishments
  • Heirloom – using a PJ pattern you’ve owned for more than a year
  • Ice Sculptor – techniques: cables, lace, Tunisian, etc
  • Snowman – modifying or combining patterns
  • Ho! Ho! Ho! – completing a project in each of 3 different categories
  • Master Wrapper – complete 3 WIP projects
  • Super Elf – complete any 3 projects
  • Bah! Humbug! – complete a project on Christmas Eve
  • Fireworks – complete a project on New Year’s Eve
  • Have a Cookie – a special antler for those of us who don’t quite get to the finish line

Whether you’re crocheting your favourite PlanetJune patterns as Christmas gifts, items to sell at craft fairs or online, toys for charity, or projects for yourself, we’re ready to encourage you to complete your goals and to celebrate your successes with you!

And, even if you think you may not have time to complete a project, you’re very welcome to join the team for the community spirit and friendly chat. There’s something about PlanetJune that attracts the kindest and most supportive people, and, if you enjoy PlanetJune patterns, you’re already part of our community – do come over to our Ravelry group and say hello! (And if you’d join if this event was hosted elsewhere instead of Ravelry, please email me or leave me a comment to let me know, so I can take that into account for next year.)


'Everyday Crochet', a book by June Gilbank

Whether you join the CAL or not, I really hope you’ll enjoy Everyday Crochet, and that you’ll email me (june@planetjune.com) or tag me (@planetjune) on your social media so I can see what you’re making from my book! (And, if you love it, please recommend it to everyone you know who might like it too, and a 5-star review on Amazon would be very much appreciated…) ?

Comments

Everyday Crochet

What an amazing birthday present – look what just arrived!

June Gilbank holding her new book, 'Everyday Crochet'

I’m delighted to announce that my new crochet book, Everyday Crochet, will be published on November 1st 2022 and is now available to preorder from Amazon and all good bookshops.

Preorders make a world of difference to how well a book does long-term, as the preorder numbers send a signal to booksellers, libraries and reviewers that the book is valuable and worth stocking, so if you’re thinking about buying Everyday Crochet, please place your pre-order right now (that’s an amazon link, but you should be able to preorder from your local bookstores too), before the November 1 publication date! Thank you so much ?

The Path to ‘Everyday Crochet’

When I wrote my 2015 book Idiot’s Guides: Crochet, I didn’t set out to write an ‘Idiot’s Guide’ – I wanted to write the definitive crochet reference book that I wished I’d had when I was learning to crochet, with projects to practice what you’ve learnt along the way, simple instructions with clear close-up photos for every technique, beautiful photographs, and a wide variety of patterns, stitch patterns, and motifs.

I’m happy to say that my publisher, DK, agreed with my assessment that the book I wrote for them transcended the unfortunately-named Idiot’s Guides brand, and now that IG: Crochet has sold out, we’re republishing it as a revised version with a new idiot-free name. (Thank goodness!)

Introducing: Everyday Crochet!

'Everyday Crochet', a book by June Gilbank

'Everyday Crochet', a book by June Gilbank

Fully Updated and Revised

I completely revised the old book to create Everyday Crochet, and we’ve given it a new clean easy-to-read format. I’ve combed through it page by page and added lots of little touches, such as:

Page references for all the new techniques you’ll need for each practice project:

'Everyday Crochet', a book by June Gilbank

A gorgeous visual table of contents so you can see the projects you can make as soon as you open the book:

'Everyday Crochet', a book by June Gilbank

A left-handed reference section at the end of the book that shows you all the basics. Lefties now get step-by-step left-handed photos for every step from learning how to hold a hook and yarn through to completing their first project.

'Everyday Crochet', a book by June Gilbank

I’m most excited about this last point – I campaigned hard for this, and I think it may be a first for a craft book! (I had to fight to even get one page for left-handers in IG: Crochet, and I know that wasn’t enough.) As a lefty myself, I understand the struggle of trying to learn everything from a right-hander’s perspective, so it was important for me to have this available for others like me – we lefties make up 10% of the population, but are rarely catered for.

With my 16-page left-handed reference section, you, a fellow left-hander, can go from picking up a hook for the first time to completing your first crochet project (a single crocheted dishcloth) without ever having to consult a right-handed photo and trying to mirror it so you can figure out what you need to do. Once you’ve got those basic crochet skills down, adding on new stitches and techniques will be much easier, even in this world of right-handed instruction. (And you can always come back to PlanetJune too, where I always provide additional instruction to lefties where it’s needed!)

What’s New (and What’s Not)

I should make it clear: although it has a new name and has been fully revised, Everyday Crochet is not a substantively different book from IG: Crochet – all the patterns, projects and tutorials are the same. If you’ve bought IG: Crochet, you already know that it’s a high-quality book packed full of useful tips, beautiful photos and my original patterns, and nothing has changed there.

There were only a few tiny errata in IG: Crochet that have now been corrected. Other than that, and a couple of errant arrows that had previously turned up in the wrong place, the changes are in clarity and clarification only.

But wow, it is so much clearer now!

'Everyday Crochet', a book by June GilbankOld (left) vs new (right) – see how much clearer it is to read now?

Design: You may have noticed that the old font was very thin and pale and not the easiest thing to read. The new text design is modern, clean and super-clear – it’s so much easier on the eyes! And I’ve replaced all the arrows that point to specific stitches in the tutorial photos to make them clearer – the old coloured arrows were pretty, but clean black arrows are much easier to see.

Content: I’ve made little tweaks and improvements throughout the entire book that make it a better experience to use. I’ve fully edited the content, breaking up long paragraphs into lists, highlighting keywords, and clarifying anything that wasn’t phrased exactly how I wanted it to be in the previous book.

Do I Need This Book? (Yes!)

I had three goals for (both versions of) this book, because I wanted to make an ambitious 3 books in 1 volume:

  • The complete beginner’s guide: To create the clearest, most comprehensive learn-to-crochet tutorials, with ultra close-up photos of every single step, so people really can learn to crochet from my book.
  • The crochet tips guide: To distill all the knowledge and tips I’ve picked up over my crocheting life into clear, easy to follow instructions.
  • The beautiful pattern book: To create a collection of stylish original accessories and home decor patterns that would make perfect gifts, so you’ll want to make everything in the book! The patterns need to be simple to work (but not boring for experienced crocheters) and show some of the variety possible in crochet, so you’ll learn more as you make each pattern.

And that’s what you’ll get in Everyday Crochet! This book is different from every other crochet book on the market and excellent value for money, whatever your crochet skill, as it’s perfect for both beginners and more experienced crocheters. I hope you’ll find it a valuable resource, whether your goal is to learn to crochet, to improve your crochet skills and knowledge, to find a selection of clean, timeless designs to crochet, or all of the above.

(Want to know more about the content? The patterns, tutorials etc are all the same as in the previous version of the book (IG: Crochet), and you can read my posts about the old version where I talk about everything that’s in the book!)

  • If you never got around to buying IG: Crochet or were put off by the name, this is the perfect time to pick up my refreshed and revised book, Everyday Crochet!
  • While you don’t need to buy Everyday Crochet if you already have IG: Crochet, it’s a lovely update if you’d like to treat yourself (or put it on your Christmas list).
  • And I hope that, even if you don’t buy it for yourself, you’ll buy a copy of Everyday Crochet as a gift for every beginner or intermediate crocheter you know!

'Everyday Crochet', a book by June Gilbank

I’m so proud of this book. Everyday Crochet truly is the crochet reference book I always wished existed, and I hope it’ll earn a permanent place on your bookshelf.

Everyday Crochet will be published on November 1st 2022 and is now available to preorder from Amazon and all good bookshops.

Comments (14)

How to Attach Crochet Appliques [video tutorial]

If there are other crochet techniques you’d like me to cover in future videos, please leave a comment below, or email me (june@planetjune.com) with your suggestions!

Crocheted appliques are small flat embellishments that you can attach to larger crocheted pieces as decorative elements. I’m often asked for my recommendation on how to fix appliques to their background. There are different ways to tackle attaching an applique to a crocheted background, and the best method depends on what you’re making:

  • Will the reverse side of the background be hidden – for example, on a cushion or a hat?
  • Will the reverse side be visible – for example, on a blanket or a scarf?
  • Or if you’re attaching the applique to an amigurumi – for example adding crocheted eyes or spots – is it a decorative piece, or will it be played with?

thumbnail image for the crochet video tutorial 'How to Attach Crochet Appliques'

In my latest video, I’ll show you the three different methods I use to attach crocheted appliques, and the pros and cons of each. You’ll learn how to attach appliques with fabric glue, and two methods for stitching down appliques: the faster variation (for when the back of the piece won’t be seen) and a neater method (for when the back will be seen).

Although there’s no actual crocheting in this video, I’ve made right- and left-handed versions anyway, so you can see the shape of the crochet stitches and the way to sew them down exactly as you’ll see them when you do it yourself! (I’ve also added text instructions with photos for those of you who prefer to read written instructions.)

I know this question will come up even more frequently as I add more applique patterns to my catalogue, so having a helpful guide is going to come in very handy, and I hope you’ll find it useful!

Go to the How to Attach Crochet Appliques video tutorial >>

Comments (4)

Fall woodland crochet photoshoot

I spent most of the day yesterday setting up this scene in the PlanetJune forest (no regrets!) and I couldn’t wait to share it with you! This photo captures the essence of what I love about fall – the gorgeous colours and the cozy warm feeling of the season. I hope you love it too…

fall woodland crochet patterns by planetjune

What do you think? Does it give you a warm and cozy feeling?

To set up this woodland scene, I used 5 different PlanetJune designs (find them all at www.planetjune.com/fall!):

Can you spot them all (except the Canadian flag – that didn’t quite fit this theme!) in the scene?

Behind The Scenes

Why did it take me so long to capture one photo? I thought you might enjoy a glimpse into my process here…

First I collected the elements I thought I might include in this photo – a big pile of leaves, mushrooms, acorns, pine cones and squirrels.

amigurumi and applique crochet elements for the woodland photo scene

I set up the empty PlanetJune forest scene with a fleece fabric floor and my painted green backdrop.

painted green backdrop and brown fabric ground for the woodland photo scene

Fun fact: I’ve been using the PlanetJune forest since 2008, when I launched my AfricAmi patterns and realised my white rhino wouldn’t show up well against a white background! The ‘ground’ is a piece of fleece fabric, and the mottled green backdrop is a sheet of white poster board that I painted to look generically leafy. I’m amazed that my painted backdrops have survived my round-the-world travels and I’m still using them 14 years later!

Then it was time to arrange all the elements, light the scene so everything shows up clearly, and start photographing!

two softboxes light the woodland photo scene

I currently use two softboxes to light my photos. They make it possible for me to shoot at any time of day or night and have my pictures always look consistent. Look at the difference they make to the scene: in the above photo the lights are off and in the one below they’re turned on:

two softboxes light the woodland photo scene

After snapping the first photo, I copied it to the computer and checked it on my big monitor. Then came many rounds of tweaking. I’d change the exposure or depth of field on the camera, or moving elements around while hoping I didn’t knock any pieces over or jog the camera tripod (it’s tricky maneuvering around the tripod and light stands to reach into the scene, and my poor mushrooms fell over multiple times!)

two softboxes light the woodland photo scene

After each change, I’d snap another photo and check it again, and repeat over and over. In the end, to create the square photo I was looking for, I had to raise the height of the ground at the back by slipping a roll of extra fabric under my base fleece. And, of course, doing that made allll the mushrooms fall over and I had to start positioning them all again…

But finally, I had the raw photo I wanted, and all that was left to do was to crop and process it into the final image!

fall woodland crochet patterns by planetjune

It’s a long process, but to me it’s like a little art project, and it’s very satisfying when it all comes together into a finished piece I can be proud of. I hope you’ll love my adorable little woodland scene!


a selection of Fall-themed PlanetJune crochet patterns

If you’d like to crochet any of these patterns, or any of my other autumn-themed designs (including some freebies, if crochet patterns aren’t in your budget right now) I’d love it if you’d join the PlanetJune ‘Fall into Autumn’ CAL (crochetalong).

You can find the CAL in the PlanetJune groups on Ravelry and Discord, and you can also join in by posting what you’re making to any of your social media accounts and tagging me (@PlanetJune) so I can see them and leave you a comment.

I don’t usually announce CALs here on the blog unless I’m already writing a related post like this one, so if you’d like to be notified about new crochetalongs, please join one or both of the PlanetJune community groups where our CALs take place, or sign up for my monthly newsletter – I’ll always keep you in the loop!

Comments (5)

Oak Leaf Collection and Life-Sized Acorn crochet patterns

Autumn is my favourite time of year, when the weather starts to cool and the leaves turn glorious colours, and I’m celebrating that now with the second addition to my autumn leaf designs: the Oak Leaf Collection (with a bonus matching tiny acorn design!)

Oak Leaf Collection and Life-Sized Acorn crochet patterns by PlanetJune

Oak Leaf Collection & Life-Sized Acorn includes two different sizes of oak leaf to crochet, and a realistic life-sized acorn pattern. Each leaf is worked in one piece, with a clever construction that gives a realistic shape and the suggestion of veins. The acorns are worked amigurumi-style, with an ingenious no-sew construction. So the entire project has no sewing – you’ll only need your needle to weave in the yarn ends!

Ideas for Use

  • Make a pile of acorns as a tasty snack for an amigurumi Squirrel
  • Use a single crocheted oak leaf as an appliquĂ© on a hat or sweater, glue it onto a greetings card, or add a pin back and an acorn to make a brooch
  • Make a simple ornament by adding a hanging loop to a pair of oak leaves and one or two acorns.
  • Crochet lots of leaves in a variety of colours and add a handful of acorns: scatter them on your mantelpiece or Thanksgiving table, or group them together into a beautiful fall garland or wreath.

Oak Leaf Collection and Life-Sized Acorn crochet patterns by PlanetJune

About the Patterns

Although they are only available together, I’ve separated the oak leaves and acorns into two separate PDF files, as the crochet and construction techniques are completely different for each, so there’s no info that’s common to both patterns. Here’s a brief intro to each:

Oak Leaf Collection

Oak Leaf Collection and Life-Sized Acorn crochet patterns by PlanetJune

  • This pattern includes large (9-lobed) and small (7-lobed) realistically sized and shaped oak leaves.
  • For each leaf size, you’ll find both the written instructions and a complete stitch diagram on a single easy-to-print page.
  • For more detailed assistance, the pattern also includes general instructions with photos to help you understand the construction of the leaves, and separate appendices for right- and left-handers including row-by-row photos and stitch diagrams for each leaf.

Life-Sized Acorn

Oak Leaf Collection and Life-Sized Acorn crochet patterns by PlanetJune

  • This acorn is approximately life-sized (only 1.5″/4cm long) and realistically shaped, and has an ingenious no-sew construction.
  • The pattern is fully illustrated throughout with lots of step-by-step photos to explain the unique one-piece construction.
  • For ease of printing, it also includes a single-page text-only printable version at the end of the pattern.
  • Note: This is a completely different acorn from my Amigurumi Acorn design from 2007! That one is cute, round and vastly oversized, with the cap and stalk as separate pieces that need to be sewn together.

About the Designs

I’m really pleased with the work I’ve been doing on applique design in recent years. I’m evolving a new style of applique where I shape the piece with single crochet stitches, which gives a sturdy result without any holes – it’s the 2D version of my amigurumi style! As I develop this style, I’m learning how to create different shapes and angles with each new design, and the oak leaves are the epitome of my work so far in this field.

Oak Leaf Collection and Life-Sized Acorn crochet patterns by PlanetJuneSpot the difference! Real and crocheted oak leaves

It’s fascinating to me – to have the lobes of the leaf sit at realistic angles and create a symmetrical leaf, the number and position of the stitches has to be different on each side of the leaf… It’s not at all obvious how to do this, but the beauty of it is that once I’ve created the design and written and charted the pattern for you, you can simply follow it to make perfectly-shaped leaves without having to understand any of that!

And the acorn was a different sort of design challenge: making a realistic size and shape when you have so few stitches to work with – even one stitch makes a huge difference! I tried many different ideas (there are well over a dozen green-and-purple acorn prototypes still littering my desk…)

Oak Leaf Collection and Life-Sized Acorn crochet patterns by PlanetJune

This no-sew method, although unconventional, was by far the best in terms of a good result. After you’ve made the first one and learnt how it comes together, it’s not difficult at all and they’re quick to crochet with no assembly at the end – you’ll love it!

Buy Now

Ready to get started? Pick up the Oak Leaf Collection & Life-Sized Acorn crochet patterns from my shop right now.

Oak Leaf Collection and Life-Sized Acorn crochet patterns by PlanetJune

Or, if you’re not ready to make them just yet, add them to your Ravelry queue or favourites so you don’t forget:

I hope you’ll love these new seasonal designs and that they’ll spark ideas for your Fall, Thanksgiving and Halloween decorating! And they’d be even more spectacular if you combine them with my Maple Leaf Collection and Pine Cone Collection patterns… I can’t wait to see what you do with them!

Comments (2)

Turtle Beach: Puffy Seafoam video tutorial

Trying something new today: I’ve created my first pattern-exclusive video tutorial: a quick video demonstration that’s only available to purchasers of a specific pattern, and that demonstrates a specific part of the pattern that might trip you up.

In this case, I’m demonstrating the optional Puffy Seafoam add-on for my Turtle Beach blankets, found in the donationware version of the Ribbed Ripple/Turtle Beach pattern.

3D crocheted Puffy Seafoam addition for any Turtle Beach blanket by PlanetJuneIsn’t it a lovely effect?

This addition lets you add a row of 3-dimensional seafoam to any of my Turtle Beach blanket patterns. It’s crocheted as an afterthought directly onto the completed blanket, so if you’ve already made a turtle beach blanket, you can add the puffy seafoam at any time!

A Little Background…

Turtle Beach Collection is my most popular pattern set, having gone viral multiple times since I first released the original donationware blanket pattern to accompany my baby sea turtles in 2016, and I’ve been improving and expanding the collection ever since then, with more blanket patterns, flat and stuffed turtles, starfish, and additional modification ideas.

In 2019 I first added a brief explanation for the Puffy Seafoam at the end of the basic Ribbed Ripple/Turtle Beach Donationware pattern. It’s a fast and fun addition with a realistic 3D effect, but the construction is a little unusual, so I thought it deserved a bit more detail to help you make it!

Now, I’ve updated the tutorial in the pattern (it now includes full right-handed and left-handed instructions) and I’ve created an exclusive video tutorial (with right- and left-handed versions) to accompany this, so you can watch it in action – isn’t that cool?

video tutorial for 3D crocheted Puffy Seafoam addition for any Turtle Beach blanket by PlanetJune

How to Get the Video

If you’ve ever donated for the Ribbed Ripple/Turtle Beach blanket pattern, you can log back into your PlanetJune account and download the new Ribbed Ripple pattern PDF from ‘My Patterns‘.

On page 9 of the PDF, you’ll find the updated Puffy Seafoam add-on instructions, including the links to both the right-handed and left-handed versions of the new video.

Turtle Beach Collection crochet patterns by PlanetJuneLeft: Classic Blue blanket; stuffed 3D turtles
Right: Teal Ombre blanket; flat appliqué turtles

You can also add the seafoam to my Classic Blue (above, left) or Teal Ombré (above, right) Turtle Beach blankets, so if you haven’t bought the Ribbed Ripple pattern too, you might like to think about grabbing it now!

For your minimum $2 donation you’ll get the Puffy Seafoam add-on – including the video links – and also an optional edging you can use if you’d like to square off the edges of your finished blanket, to turn it into a rectangle or use as a base to add any fancy crocheted edging. These options work with any of my Turtle Beach blanket patterns.

Turtle Beach Collection crochet patterns by PlanetJune3D seafoam, squared-off edging

Pattern-Exclusive Videos: Good Idea?

This project was an experiment for me in two ways:

  1. To see if I can make a ‘quick’ video that doesn’t take hours of my time to produce and edit (the answer to that is no!)
  2. To see how well this idea of making bonus pattern-exclusive video content works – and that’s where you come in…

Please watch the video and let me know what you think!

  • Is the video demo a valuable addition to a pattern?
  • Is it useful to have the video link on the same page, so it’s right there as soon as you get stuck?
  • Would you like to see more patterns with private video tutorials for any tricky bits?

Please email me or comment below with your feedback!

What’s Next

I hope you’ll enjoy the new video! It’s a novel method with a lovely 3D result, and I think the video will really help you to visualize what you’ll be doing as you crochet the seafoam, and how it comes together.

If this ‘pattern-exclusive video’ idea is popular, I’ll start keeping an eye on my customer support requests for any other common questions that would benefit from a quick video tutorial, and then update the relevant pattern with the link once I’ve made the private video.

Tip: From now on, I’ll notify you of any pattern updates in my monthly newsletter, so if you don’t already subscribe, please sign up to make sure you know about any bonus content and improvements I’ve added for the patterns you own!

Comments (3)

Next entries » · « Previous entries
  • Quick Links: Crochet

    navigation: arrow

    buy crochet patterns and accessories from my online store

    'Everyday Crochet' and 'The Essential Guide to Amigurumi' crochet books by June Gilbank

    Crochet video tutorials and step-by-step photo tutorials

    Free PlanetJune crochet patterns

    Frequently Asked Questions

    Quick Links: Crafts

    navigation: arrow

    Punchneedle Embroidery information, ebook & patterns

    Papercraft ebook & tutorials

    Free PlanetJune craft projects & tutorials

  • Blog Post Categories

  • Blog Archives

  • Welcome to PlanetJune!

    June Gilbank

    Hi, I'm June. Welcome to my world of nature-inspired crochet and crafting. I hope you enjoy your visit!

    If you'd like to get in touch, you can contact me here.
    crocheted Canadian flag by PlanetJune
  • A fanned-out pile of the books Everyday Crochet and The Essential Guide to Amigurumi, with text 'The answers to all your crochet questions at your fingertips - find out more'
  • Support PlanetJune!

    Want to say thanks? You can send me money in seconds at paypal.me/planetjune (over $20) or paypal.me/planetjune2 (under $20) or send me a donation through my shop.

    Or simply click through from my links before you shop at Amazon, Etsy, KnitPicks, LoveCrafts or Crochet.com, and I'll make a small commission on your purchase, at no cost to you! Start here:

    ♥ Support PlanetJune ♥

    Tip: This link is also in the footer of every page!

    Thank you so much for your support!