PlanetJune Craft Blog

Latest news and updates from June

Archive for September, 2017

Farmyard Goats crochet pattern

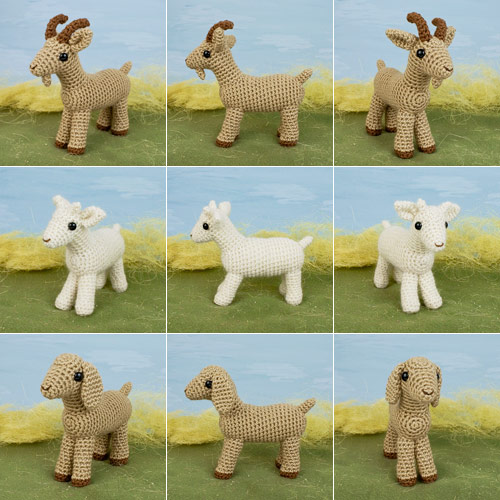
It’s here! My final commissioned pattern, Farmyard Goats, is now available to purchase!

Farmyard Goats amigurumi crochet pattern by PlanetJune

Farmyard Goats is a mix-and-match pattern that lets you choose the options you want, to make many different types of goat:

  • Ears – floppy, upright, or none?
  • Horns – long and curved, shorter, tiny nubs, or none?
  • Beard, or no beard?
  • Contrast-coloured horns and hooves, or not?

Farmyard Goats amigurumi crochet pattern by PlanetJune

You choose! Make any of my three pictured options in any colour(s), or assemble your own custom goat from all the included options – it’s up to you. 

Fun Fact: It can sometimes be tricky to tell a sheep from a goat, especially as some breeds of sheep are smooth-coated, and some goats are fluffy. Here’s the trick: if the tail points up, it’s a goat! Sheep tails always point downwards.

Meet the Goats

Farmyard Goats amigurumi crochet pattern by PlanetJune

My billy goat has upright ears, long horns, and a beard.

I invented a fun new technique to make the curved horns – it’s almost magical how it works, and yet it’s super-simple to achieve! I think you’ll enjoy it 🙂

To me, this is the definitive goat, but I know that’s not the case for many people, so I decided to include other options in the pattern, so you can make lots of different goats…

Farmyard Goats amigurumi crochet pattern by PlanetJune

My little kid goat has upright ears, short horn nubs, and no beard.

He’s a bit smaller than the other goats because, although I used the same pattern and hook size, I used mohair [goat!] blend yarn that was slightly finer than the worsted weight yarn recommended for the pattern, and 9mm eyes.

Farmyard Goats amigurumi crochet pattern by PlanetJune

My Nubian goat has floppy ears, no horns, and no beard.

But, of course, you can make a Nubian with any length horns and/or a beard, just by mixing and matching the pattern elements – this is a very versatile pattern 🙂

Ready to Crochet?

If you were one of the commissioners of this pattern, or had early access through the crochet-along, I hope you’ve been enjoying the pattern over the past few weeks!

If you’ve been waiting for the goat pattern, you can pick it up from my shop right now – and then join our Farmyard CAL in the PlanetJune Ravelry group 🙂

Or, if you’re not ready to buy just yet, please add my Farmyard Goats to your queue or favourites on Ravelry, so you don’t forget about it:

I hope you’ll enjoy my Farmyard Goats pattern! Which type of goat is your favourite?

Comments (11)

Tutorial: Attaching Legs Evenly on a Standing Amigurumi Animal

Stitching the various pieces of an amigurumi together is arguably one of the least enjoyable parts of amigurumi-making. I have a wealth of knowledge gleaned from making hundreds of amigurumi, and I’d like to share those tips with you, to make your amigurumi assembly less frustrating!

Today I’m going to share my tips on how to best attach the legs evenly on a standing 4-legged amigurumi animal, so the joins look neat and the animal can stand straight with all four feet touching the ground.

For more tips to make your amigurumi look even better, check out the new Perfect Finish category on my crochet tutorials page!


1. If They Touch, Pre-Join the Legs

Depending on how wide the legs are and how wide the body is, the legs may meet in the middle. Check your pattern’s cover photos to see if this applies, or test it out by positioning a pair of legs at the correct position beneath the body and seeing if the legs need to touch each other at the top to fit underneath the body.

Tip: If you place the legs too far apart, the feet will tend to splay outwards and the legs won’t support the body. That’s a look you’d probably like to avoid!

If Legs Don’t Meet:

amigurumi animals whose legs are separate at the point where they join the body (patterns by planetjune)
If there’s a space between the tops of the legs (as with the animals pictured above), skip down to Step 2, below.

If Legs Do Meet:

amigurumi animals whose legs touch at the point where they join the body (patterns by planetjune)

If you determine that the pair of legs will meet in the middle (as with the animals pictured above), you can stitch them together first, before attaching them to the body. This helps to attach them evenly and makes it easier to stitch the inner edge of the second leg to the body.

To do this, simply hold the pair of legs together, and stitch the tops together where they touch. (The number of stitches to attach will depend on the diameter of the legs.)

attaching legs evenly on a standing amigurumi animal

Repeat the check for the second pair of legs (remember, the body and leg shaping may mean that one pair of legs meet while the other doesn’t). If they do touch, stitch the pair of legs together as described above.

2. Attaching the First Pair of Legs

I prefer to stitch the front legs to the body first, as it’s easier to position them in relation to the head, to make sure the legs are centred beneath the body.

First, stitch just the middle of the joined pair of legs (or just the inner edge of each separate leg) to the underside of the body (below, left), making sure they are lined up with the head (or other means of recognising the top/bottom of the body).

Stop and check: is the middle of the pair of legs exactly at the bottom of the body (below, right)? If not, pull out your stitches, adjust the leg positions, and try again. Once they are centred, you’ll know that the pair of legs will be joined to the body symmetrically, without having had to pull out many stitches!

attaching legs evenly on a standing amigurumi animal

Next, move to each leg in turn and begin to stitch around the remainder of the open edge, using the Seamless Join technique (below, left). To create the smoothest join, when you reach the outer edge of the leg, try positioning your stitches onto the body slightly further out than usual, so the leg is stretched slightly as you pull each stitch tight.

When you’ve finished, the pair of legs should sit directly beneath the body (below, right).

attaching legs evenly on a standing amigurumi animal

3. Attaching the Second Pair of Legs

Move to the second pair of legs. Turn the animal upside down, and position the pair of back legs so their midpoint is in line with the midpoint of the front legs:

attaching legs evenly on a standing amigurumi animal

Again, stitch just the middle of the joined pair of legs (or just the inner edge of each separate leg, to the body, then pause and test the amigurumi to make sure the second pair is straight in relation to the first.

To do this, stand the amigurumi up on a flat surface and make sure both pairs of legs can sit squarely at the same time:

attaching legs evenly on a standing amigurumi animal

If the back legs are skewed slightly to one side or the other, only one back foot will be able to touch the ground. If this has happened, pull out your stitches, adjust the leg positions, and try again. Checking this now has just saved you from potentially having to undo all the stitches later!

As before, move to each leg in turn and begin to stitch around the remainder of the open edge, using the Seamless Join technique. To create the smoothest join, when you reach the outer edge of the leg, try positioning your stitches onto the body slightly further out than usual, so the leg is stretched slightly as you pull each stitch tight.


Congratulations! Now your amigurumi should have nice looking leg joins, and be able to stand stably on a flat surface, with the legs neatly beneath the body and all four feet making contact with the ground:

Farmyard Goats crochet pattern by PlanetJune

Give it a try on your next four-legged amigurumi and see if my technique makes the task a little less daunting for you! Let me know how it goes…


If you’re looking for my Farmyard Goats pattern, it’ll be going on general release in a couple of weeks. But if you join the Farmyard CAL in the PlanetJune Ravelry group, you can have exclusive early access to the pattern! See the Farmyard CAL thread in the group for full details 🙂

UPDATE: The Farmyard Goats crochet pattern is now available to purchase 🙂


Do you find my tutorials helpful? If so, please consider making a contribution towards my time so I can continue to create clear and concise tutorials for you:

Thank you so much for your support! Now click below for loads more crochet video and photo tutorials (and do let me know what else you’d like me to cover in future tutorials…)

See more helpful PlanetJune crochet tips and technique tutorials

Comments (1)

  • Quick Links: Crochet

    navigation: arrow

    buy crochet patterns and accessories from my online store

    'Everyday Crochet' and 'The Essential Guide to Amigurumi' crochet books by June Gilbank

    Crochet video tutorials and step-by-step photo tutorials

    Free PlanetJune crochet patterns

    Frequently Asked Questions

    Quick Links: Crafts

    navigation: arrow

    Punchneedle Embroidery information, ebook & patterns

    Papercraft ebook & tutorials

    Free PlanetJune craft projects & tutorials

  • Blog Post Categories

  • Blog Archives

  • Welcome to PlanetJune!

    June Gilbank

    Hi, I'm June. Welcome to my world of nature-inspired crochet and crafting. I hope you enjoy your visit!

    If you'd like to get in touch, you can contact me here.
    crocheted Canadian flag by PlanetJune
  • A fanned-out pile of the books Everyday Crochet and The Essential Guide to Amigurumi, with text 'The answers to all your crochet questions at your fingertips - find out more'
  • Support PlanetJune!

    Want to say thanks? You can send me money in seconds at paypal.me/planetjune (over $20) or paypal.me/planetjune2 (under $20) or send me a donation through my shop.

    Or simply click through from my links before you shop at Amazon, Etsy, KnitPicks, LoveCrafts or Crochet.com, and I'll make a small commission on your purchase, at no cost to you! Start here:

    ♥ Support PlanetJune ♥

    Tip: This link is also in the footer of every page!

    Thank you so much for your support!