PlanetJune Craft Blog

Latest news and updates from June

Archive for November, 2012

Amigurumi Giant Panda crochet pattern

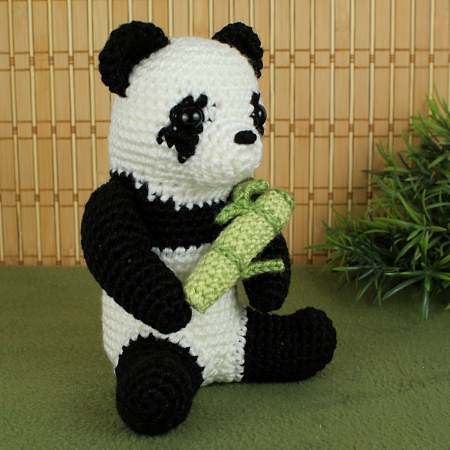
It’s time to present another commissioned design: Giant Panda!

giant panda amigurumi crochet pattern by planetjune

This pattern is a little later than scheduled, both because I’ve been sick and because I wanted to take some extra time to really perfect this design. Some designs come easily, and some take extra time and care to get just right. With an animal as iconic and well-known as the Giant Panda, there were a few criteria I knew I had to include in my design; every crocheted panda I’ve ever seen is just a basic toy bear shape with black circular patches added around the eyes, and that’s not the way I wanted to go.

My panda needed realistic shaping – the sloped back of head and neck, the iconic comfy seated pose – as well as some clever colourwork to give the shaped markings around the shoulders and realistic, symmetrical eye patches. I also had to strike the right balance between including all the features I wanted and making a pattern that isn’t ridiculously complicated to follow. With all those factors to juggle, I ended up making three complete pandas before everything came together perfectly!

giant panda amigurumi crochet pattern by planetjune

In the final design, there are only 8 rounds of follow-carefully colour changes, and the pattern includes lots of tips – specific to this pattern – to make the colour changing easier and ensure you’ll get a beautifully tidy result. I’ve introduced a few new simple but effective shaping techniques too that are built right into the crocheting – I think you’ll enjoy how easily they come together when you make your own panda…

crocheted lucky bamboo by planetjune

I should mention that the bamboo my panda is holding is not included in the Giant Panda pattern – it’s taken from my Lucky Bamboo pattern, which you can buy separately. However, the Giant Panda pattern does include the modifications for turning the standard Lucky Bamboo pattern into the freestanding panda-sized bamboo stalk you see pictured above with my panda. ๐Ÿ™‚

(Btw, my newsletter is going out later today with an exclusive discount coupon for the Lucky Bamboo pattern. I’ll be re-sending that update to new subscribers on Monday, so sign up this weekend and you won’t miss out!)

If you pledged towards the Giant Panda commission, you should have already received your copy of the pattern, and the panda’s bamboo as a special commissioning bonus. Otherwise, if youโ€™d like to make a panda of your own, you can now pick up the Giant Panda crochet pattern from the PlanetJune shop!

If youโ€™re not quite ready to buy though, how about queuing Giant Panda on ravelry so you donโ€™t forget about it?

Comments (15)

wet blocking for crochet (& knit)

Wet blocking is a process used to finish articles made from yarn. It basically involves soaking your finished piece of knitting or crochet to wet it thoroughly then shaping it to the final dimensions, pinning it into place, and leaving it to dry. When dry, the piece will hold its new dimensions (until you wash it, in which case it’ll need to be blocked again while it dries).

Why Wet Block?

Pretty much everything can benefit from blocking, to even up your stitches and square up the edges. But, for lacy projects, blocking is essential for opening up the stitches and showing off the stitch pattern.

wet blocking
My Rippled Lace Rectangular Shawl before and after blocking – there’s no comparison!

You’ll find wet blocking instructions in all my crocheted lace PlanetJune Accessories patterns, but I thought it might be helpful to go into a bit more detail here – I’ll explain how to wet block, the best tools for blocking, and some clever money-saving substitutions (also useful if you don’t have a local shop that sells the specialised blocking tools).

Basic Wet Blocking Instructions

  1. Soak your piece in lukewarm water until thoroughly saturated.
  2. Gently squeeze without wringing, to remove most of the water.
  3. Lay out on a clean towel and roll the towel up to remove excess moisture.
  4. Lay out onto your blocking surface (foam floor tiles, or a large dry towel on a flat surface).
  5. Gently ease into shape, using a tape measure to make sure the piece is shaped symmetrically or achieves the required dimensions.
  6. Use blocking wires and/or pins to keep in position while it dries.
  7. When completely dry (typically about 24 hours), remove the pins and/or wires.

Wet Blocking Tools

The minimum requirements for blocking are:

  • A towel to remove excess moisture
  • Towel(s) large enough to lay out your project onto
  • A surface you can pin into (a bed, carpet)
  • Rustproof pins

But, with a couple more purchases, your blocking will be much easier and more successful. The magic tools are:

  • Blocking wires
  • Foam floor tiles

Blocking wires are a revelation! Any time you need to wet block a crocheted (or knit) piece with straight edges, they save so much time and make a straight edge much easier to achieve. When you stretch a wet piece to block it and pin it into shape while it dries, the fabric between each pin tends to be stretched less, and you end up with a slightly scalloped edge, where each pinned point is stretched out more than the area between pins. You can minimise this by increasing the number of pins you use, but that takes a lot of pins, and a lot of time. If you weave a blocking wire along an entire straight edge of a piece, you need only a few pins to keep the wire in position, and the final edge will be perfectly straight. This is especially crucial for lace projects.

wet blocking
The blocking wire keeps the entire edge perfectly straight with very few pins

Foam floor tiles are waterproof and make a perfect surface for pinning into – especially if you don’t have a spare bed or carpeted floor to leave your work pinned to for 24-48 hours! The interlocking edges allow you to create a surface as large as you like, anywhere you have room for them.

wet blocking
Foam floor tiles are the perfect waterproof surface to pin into

Money-saving Tips

You can buy all these from yarn shops, for example KnitPicks sell reasonably-priced foam Blocking Mats ($25), Lace Blocking Wires ($20), and T Pins ($3). But you can save even more money by looking for the same products in everyday shops (this is also helpful if you don’t have access to a yarn store that sells dedicated blocking supplies). Here are my top tips:

wet blocking
Blocking wires (welding wires) and T pins

Stainless steel welding wires are identical to blocking wires, and you get over twice as many for about the same cost – so split a pack with a friend! Look in a hardware store for 4ft welding wires, and make sure they are marked as stainless steel so they won’t rust.

T pins. Okay, you can’t beat the KnitPicks price on these, but, for those outside their shipping range, you can also find T pins with dressmaking supplies in sewing shops. Just make sure you get rustproof pins – they’ll be touching your wet yarn and you don’t want to leave rust-coloured stains on your beautiful handiwork!

wet blocking
Foam floor mats (play mats)

Foam floor tiles or play mats for kids are identical to blocking mats. You can buy 2ft or 1ft square tiles in bright colours or serious grey, but I prefer the set of 12″ letter mats pictured above: with 26 interlocking mats I can arrange them into the shape of any crocheted piece I’m ever likely to make. Wait for a sale and you can pick up a set for under $10 – they may look a bit unprofessional, but you get far more blocking area than in an ‘official’ set of blocking mats, for far less money.
UPDATED 22 Mar 2013: Please read my warning about colour transfer if you use these mats!

Blocking is Key

Next time you’re crocheting lace, don’t worry if it looks less than encouraging while you’re crocheting – that is just part of the magic of lace! You can stretch it out between your hands to give you a temporary idea of how the finished stitch pattern will look after blocking. It’s always worth blocking your finished work to make it look its best, even if you use an acrylic yarn:

wet blocking
My Climbing Eyelets Triangular Shawl is 100% acrylic fingering weight, and, although the effect isn’t as dramatic as with the laceweight alpaca, blocking it still made a big difference. And, a year and a lot of use later, my shawl still looks just as good as the ‘after’ photo.

After all the effort you’ve put into crocheting a beautiful lacy piece, don’t skimp on that one last day waiting for your blocked piece to dry – it’s well worth it to turn your work from okay-looking to spectacular!

Ready to try making and blocking some crocheted lace? How about joining the PlanetJune Accessories Crochet-Along (on Ravelry)? The CAL runs until the end of the year, so you still have plenty of time ๐Ÿ™‚

Comments (20)

November update

Crochet Tutorials

In case you haven’t seen it yet, I’ve revamped my crochet tutorials pages and collected them all together into one convenient master list. Now you can easily find instructions for whatever you’re looking for! Just remember www.planetjune.com/help ๐Ÿ™‚

crochet tutorials master list by planetjune

Technical Difficulties

Heavy server loads caused some intermittent problems at PlanetJune last week. My site was migrated to a new server at the weekend, which improved matters somewhat, but I’ve just bitten the bullet and paid for a massive upgrade – business continues to grow and my server has to grow along with it! (You shouldn’t see any difference in speed at normal load, but hopefully in future there won’t be any slowdowns or error messages when things get too busy.)

18 dinosaur amigurumi crochet patterns by PlanetJune pine cone collection crochet pattern by planetjune

Bonus Discounts: In case the downtime stopped you from taking advantage of last week’s special offers, I’ve extended both the Dinosaur Expansion Pack Sets launch sale and the Pine Cone Collection discount code until this coming Sunday. The dinosaur sets are already discounted in the shop, and you’ll find the pine cones code in my last newsletter!

I’ve also just discontinued my Affiliate Program – the code developed a glitch a week or so ago, and, as the program isn’t aligned with my primary PlanetJune goals (to design amazing new crochet patterns, to make clear and helpful tutorials, and to provide stellar customer service) it didn’t seem worth the time to fix it. The idea of paying people to recommend me seems a bit icky, anyway, now I think about it – I want people to say nice things about me because they want to, not because they’re being paid, so maybe this is all for the best…

Review and Win contest

October’s ‘Review and Win’ winner is Jamie S, with her review of my Climbing Eyelets Triangular Shawl:

PlanetJune Accessories Climbing Eyelets Triangular Shawl crochet pattern

This is the loveliest item Iโ€™ve ever made! What makes this pattern wonderful is, first, it’s an incredibly fast stitch pattern, once you get the initial set-up rows stitched. A large shawl in less than 3 days! Second, after a few rows into the pattern, I no longer had to look at the instructions. In my opinion, it becomes so easy to remember as a result of its intuitive construction. Third, because itโ€™s very open, it mitigates the inherent characteristics of crochet (heavy, thick), producing a light fabric that I can easily see myself wearing on cooler evenings/mornings in the hot and humid climate zone where I live, and I say this whilst using worsted weight yarn! On a final note, when I had a question about the pattern, June answered it promptly and in a cordial manner ๐Ÿ™‚

Congrats Jamie – I’ll email you to find out which pattern you’d like as your prize ๐Ÿ™‚

It’s so rewarding for me to see people enjoying my Accessories designs. They’re a great introduction to new crochet techniques that you may think would be intimidating or too advanced, but they really aren’t! If you’d like to try crocheting one too, you’ll find extra support in the Accessories CAL thread on Ravelry.

Comments (1)

narrow pointed tubes for amigurumi [video]

Link easily to this tutorial in your patterns: www.planetjune.com/tube

how to make narrow pointed tubes for amigurumi, by planetjune

I know, you’re probably saying “Huh? What’s a narrow pointed tube?” Well, that’s the best generic term I could think of to describe thin pointy bits on amigurumi, such as spikes, legs, horns and tails.

thin-legged reptile and amphibian crochet patterns by planetjune

I know that the trickiest parts of my reptile and amphibian patterns (pictured above) are those really thin pieces that make the legs (and chameleon toes and tail). With many of my new dinosaur patterns (see a few examples below) featuring spikes and horns, I thought it was time to give you a demonstration of the way I crochet the tiniest thin tubes without difficulty. I hope you’ll find my tips useful!

Dinosaurs Set 1X Expansion Pack crochet patterns by PlanetJune: Amargasaurus, Kentrosaurus, Pentaceratops

Here’s the video tutorial (in right- and left-handed versions, of course):

Narrow Pointed Tubes for Amigurumi (right-handed)

Click to watch this video on YouTube.

Narrow Pointed Tubes for Amigurumi (left-handed)

Click to watch this video on YouTube.

Note: The videos may look a little small embedded in the blog: if so, you can fullscreen them or click through to YouTube to watch them full-sized ๐Ÿ™‚

Written Instructions

  1. At the end of Round 1, pull the magic ring gently closed (but not too tight, or it’ll be difficult to begin Round 2).
  2. At the end of Round 2, pull the magic ring tightly closed, then, before you begin Round 3, turn the piece right-side out. This is a little tricky, and it’s much easier to understand if you watch the video, but, in case you can’t do that, here’s my description from the video:

    To turn a narrow piece inside out, gently peel the stitches back, starting from the last stitch you made, and working backwards around the circle. It’s a slow process, so just keep pulling back around the edges gently, and the stitches will gradually reverse, until the magic ring pops through to the front, and you can see all the ‘V’ shapes around the edge of the piece. Once you’ve got it right-side out, roll the piece between your fingers to help set the stitches the right way out.

  3. Now you can begin Round 3, with the piece right-side out. Continue to crochet around the tube, and you’ll find it’s all relatively easy from here, even with a tiny 4-stitch tube. Just keep rotating the work, and single crocheting into the next stitch.

If you enjoy my crochet tutorial videos, please help to spread the word about them, and/or subscribe to the PlanetJune YouTube channel. And let me know if you have any requests for crochet techniques you’d like me to explain in a future video tutorial!


Do you find my tutorials helpful? If so, please consider making a contribution towards my time so I can continue to create clear and concise tutorials for you:

Thank you so much for your support! Now click below for loads more crochet video and photo tutorials (and do let me know what else you’d like me to cover in future tutorials…)

See more helpful PlanetJune crochet tips and technique tutorials

Comments (9)

  • Quick Links: Crochet

    navigation: arrow

    buy crochet patterns and accessories from my online store

    'Everyday Crochet' and 'The Essential Guide to Amigurumi' crochet books by June Gilbank

    Crochet video tutorials and step-by-step photo tutorials

    Free PlanetJune crochet patterns

    Frequently Asked Questions

    Quick Links: Crafts

    navigation: arrow

    Punchneedle Embroidery information, ebook & patterns

    Papercraft ebook & tutorials

    Free PlanetJune craft projects & tutorials

  • Blog Post Categories

  • Blog Archives

  • Welcome to PlanetJune!

    June Gilbank

    Hi, I'm June. Welcome to my world of nature-inspired crochet and crafting. I hope you enjoy your visit!

    If you'd like to get in touch, you can contact me here.
    crocheted Canadian flag by PlanetJune
  • A fanned-out pile of the books Everyday Crochet and The Essential Guide to Amigurumi, with text 'The answers to all your crochet questions at your fingertips - find out more'
  • Support PlanetJune!

    Want to say thanks? You can send me money in seconds at paypal.me/planetjune (over $20) or paypal.me/planetjune2 (under $20) or send me a donation through my shop.

    Or simply click through from my links before you shop at Amazon, Etsy, KnitPicks, LoveCrafts or Crochet.com, and I'll make a small commission on your purchase, at no cost to you! Start here:

    ♥ Support PlanetJune ♥

    Tip: This link is also in the footer of every page!

    Thank you so much for your support!