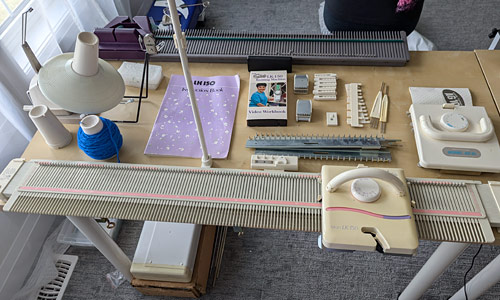
PlanetJune Craft Blog

Latest news and updates from June

Archive for Knitting

Relaxing Crafts: Finger Knitting with Loop Yarn

Have you seen this novelty loop yarn in stores? It’s designed to be finger-knit with no tools – you just pull one loop through the next.

finger knitting with loop yarn

Working straight gives you a standard knitted fabric, and crossing pairs of loops before you ‘knit’ them lets you make pretty stitch patterns.

finger knitting with loop yarn

I picked up a bargain bundle of this Bernat Blanket Alize Blanket EZ from the yarn factory outlet store as part of my quest to find relaxing crafts to try. (And yes, this is the wrong time of year to be making a cozy blanket, but I have air conditioning, so it’s not that bizarre…)

Choosing a Pattern

Once you know what you’re doing, you can probably adapt many knitting patterns for this type of yarn, but I’d recommend starting out by choosing a pattern that’s designed especially for loop yarn.

I chose my favourite pattern, Yarnspirations’ Diamond Lattice Blanket, and looked up other projects on Ravelry to see what other people thought of it. Based on the feedback of a few other ravelers, I started by forming a starting chain so the bottom of the blanket would match the cast-off edge, and pulled up a row of plain knit stitches in the back bumps of the chain before beginning the lattice pattern, to give a straighter bottom edge.

This pattern says it’s rated as ‘experienced’ skill level, and I agree with that assessment. I wouldn’t jump into this as your first loop knitting project like I did unless you really like a challenge. (Luckily, I do!)

finger knitting with loop yarn

As others had noted in their project notes, the pattern is extremely wordy and not clear to follow. I decided to just ignore the pattern directions after the first row, and figure it out myself based on watching where the slanted crossed stitches should go next. I got a bit confused at the edges at first, but apart from that it was fairly straightforward, thanks to my experience with crossed stitches in knitting. Again, I wouldn’t recommend this specific pattern unless you’re familiar with loop knitting and/or regular knitting with crossed stitches.

Loop Knitting: The Process

Loop knitting is actually a little more difficult than I’d imagined it would be:

  • As you never turn the work, you work left to right for one row and right to left for the next, so each hand has to do different things on odd and even rows.
  • It’s definitely a two-handed craft – crossing loops with one hand while finding the next loop of the working yarn with the other keeps you on your toes!

finger knitting with loop yarnCrossing a pair of stitches

Upsides

Although the in-progress project looks like a knitter’s nightmare – just like you’ve dropped all your stitches off the needles! – the textured yarn holds the loops in place well, so the stitches are fairly secure. It even takes a bit of effort to frog these stitches if you make a mistake, so stitches unravelling by mistake doesn’t seem to be a problem.

finger knitting with loop yarn

The yarn is very soft and feels nice to work with (if you’re familiar with plush chenille super bulky blanket yarns, it’s like a looped version of an extra thick one). As each stitch is large, it works up quickly and the resulting fabric is extremely thick and plush – I’d never use this yarn and technique to make anything other than a cozy blanket.

Downsides

I discovered a major problem with using this kind of yarn: as you never turn the work, you don’t see the back until you’ve finished (or stop and flip it over). That wouldn’t be a problem, except that it’s very easy to skip a loop in your working yarn without noticing, so you keep going blissfully along with no problem until the end of your session when you fold up your work and see this:

finger knitting with loop yarnNoooo!

A big loop on the back of the work! The only solutions at this point are:

  • Cut the loop off (which should be just as safe as starting a new ball of looped yarn – there’s just a tiny nub of plain yarn at the end of each ball – but that would leave two extra tiny nubs in your work).
  • Cut the loop in half and weave in each of the resulting ends (again, it’s safe to do this, but I’m not sure how well the ends would stay hidden over time).
  • Undo alllll the way back to the loop and redo it properly.

Can you guess which one I did?! That’s right, I frogged back to fix the mistake whenever I realised that I’d done it again, sometimes unravelling 5 or 6 entire rows, so I could fix the problem – ugh.

And here’s the other problem with this yarn: the fluffy chenille is very ‘grabby’ – when you’ve pulled a loop through another loop, they tend to hold in place. This is obviously a good thing when you have a whole row of loose loops to work with, but it does mean that unravelling takes almost as long as knitting the loops in the first place!

Adding a New Ball of Yarn

I couldn’t find any info on how to add the next ball of yarn, so my solution was to hold the last loop of the old ball and the first loop of the new ball together. Then, on the next row, all I had to do was to remember to pass the new loop through both the loops below.

Tip: As there are free loops all over the place, it’s easy to miss the doubled loop, so I clipped a locking stitch marker around both loops so I could easily spot them again as I worked the next row.

The Result

My finished blanket is 43×57″, which is a nice size for a sofa throw. (It did confuse me though, as the pattern claims the blanket is 56″ wide, not 43″ – I think that must be a mistake in the pattern instructions, as that’s a huge discrepancy.)

loop knitted lattice blanketIsn’t it pretty?

Although it’s far too hot to even contemplate needing a thick cozy blanket at the moment, I know I’ll enjoy using mine when the cooler weather arrives. It’s very soft, has a good weight to it, and I love that lattice stitch pattern.

loop knitted lattice blanket

A couple more angles…

loop knitted lattice blanketHere’s the texture of the back of the blanket.

loop knitted lattice blanketAnd here are the top and bottom edges – they did end up matching nicely.

And, most importantly: it’s passed the Maggie test! She curled straight up on it on my lap and went to sleep – that’s high praise from my discerning girl. 😉

loop knitted lattice blanket

Relaxing Verdict

Loop knitting is definitely a relaxing craft if you’re following a simple repetitive pattern. Once you’ve completed the first row, it’s very easy to form knit stitches by pulling the next loop from the working yarn through the next loop of the row below. I found it to be mostly relaxing once I got used to my more challenging stitch pattern, and if you chose a more straightforward stitch pattern, it would be very relaxing!

Finger knitting with pre-looped yarn means you don’t need to worry about tension – the size of each loop is fixed, so you know you’ll get a nice even result without any effort to control it. But it does give rise to the problem of accidentally leaving a loop on the back of your work – that’s one thing that would never happen with knitting or crochet, or even finger knitting, where you always control the flow of yarn.

Immersing your fingers directly in the soft cozy yarn to create a blanket makes a nice change from holding a hook or needles, but my overall verdict is that looped yarn is a bit of a novelty with limited applications. It’s fun to try, and the results can be lovely – I’m very happy with my chunky blanket! – but I don’t see loop knitting becoming the ‘next big thing’ in fibre arts. What do you think?

Comments (6)

more knitted dog sweaters

The first sweater I knitted for Maggie on my knitting machine has been a huge success – the only real problem is that, with 3 snowy walks each day, I need at least 3 sweaters in rotation so I always have one dry and ready for her next walk!

machine knitted dog sweater
I vaguely remember these days before snow season began!

Next, I’d planned to knit a striped sweater for her, but I decided to refine the basic pattern (and get some more machine knitting practice) before getting too fancy.

Dog Sweater #2 (Lavender)

Did you know that the tummy cut-out on dog sweaters is only necessary for male dogs?! I didn’t, and poor Maggie’s tummy was always getting covered in mud or snow in her first sweater, so no more tummy cut-outs in future.

I also decided to make the back slightly longer, to see if it would help keep the sweater from being pushed up by her tail.

machine knitted dog sweater
It’s so comfy she fell asleep during the test fit!

Other than that, I followed my original pattern exactly (apart from the yarn colour):

machine knitted dog sweater

The new sweater (right) is 3″ longer on the tummy and 1″ longer on the back than the original sweater (left).

machine knitted dog sweater

And now for the moment of truth:

machine knitted dog sweater

So cute! The back length is better, and the tummy coverage is just right.

You may notice that she looks a little stockier now – that’s because she wears a harness under her sweaters these days (ever since the scary moment that she slipped her collar and ran straight into the road…).

The leash attachment point on the harness is further down her back than with the collar. Between that and the extra bulk from the harness, the neck opening is now a little low-cut.

To combat that I decided I should add an extra 1.5″ at the neck (and one more inch at the tail end) for the next version…

Sweater #3 (Greys)

The yarn I’d used for the first two sweaters (Bernat Satin) is very soft and I thought a firmer acrylic might be a) more hard-wearing and b) less likely to ride up Maggie’s back when she’s walking. So I raided my stash and found a couple of skeins of Hobby Lobby ‘I Love this Yarn!’ acrylic.

I made the length modifications I’d decided on above, and, as Maggie is a stylish pup, I thought I’d try knitting all the ribbing in a lighter shade of the main mid-grey colour:

machine knitted dog sweater

I crocheted very carefully around the leash slit, to make sure it looked neat even in the contrast colour. I think the result is super stylish:

machine knitted dog sweater

Sorry the colour balance is so far off between the pics above and below – it is the same sweater, I promise!

machine knitted dog sweater

I think we have a winner with this design! The fit is great now, with more coverage at the front and full coverage at the back.

machine knitted dog sweater

The fabric feels resilient, and I’m sure it’s going to wear better than the Satin yarn sweaters (which are already a little fluffy around the cuffs).

machine knitted dog sweater

And look how smart that ribbing and leash slit are! I’m really happy with how this turned out.


Is this it for tweaking the design? Well, no, I think I might also try adding an extra inch to the legs next time to give her more protection in deep snow.

But that striped sweater is still on the cards too! It might just need to wait until the lockdown ends so I can go yarn shopping…

It’s so rewarding to knit functional clothes for Maggie that are much better fitting than anything I could buy from a pet store. And she gets so many compliments when we’re out walking these days 🙂

Comments (6)

machine knitted dog sweater

After the success of my first big machine knitting project, I wanted to try something smaller so it wouldn’t take as much energy to knit, and now I have Maggie I finally have a small recipient to knit for!

(You may think machine knitting sounds easy and automated, but there’s a lot to it: pushing the carriage back and forth across the needles; remembering to move the weights up every few rows; checking no stitches have jumped off the needles, and following the pattern by counting rows and manipulating stitches to make increases or decreases. Doing all that at the same time takes physical and mental energy – and the more tired you get, the more chance you forget to do something and risk dropping a stitch or skipping a section of the pattern. No prizes for guessing how I know all this!)

I decided to keep it simple for my first attempt at a dog sweater: I drafted a basic pattern by measuring the sweater I bought for Maggie last winter – it’s just formed from two knitted rectangles stitched together, so it should be simple to make. By using the leftover yarn from my last sweater, I didn’t even need to make a gauge swatch to calculate the number of stitches and rows I’d need, so I could get started right away.

My knitting machine is very basic and only forms knit stitches, so in my last project I hand-knitted all the ribbing after machine-knitting the bulk of the sweater. This time I was brave enough to knit extra rows for the ribbing, and then drop every other column down by the length of the ribbing while the piece was still on the machine and latch them back up in the other direction to form purl columns, so there was no hand-knitting at all involved. Once you get the hang of this, I think it’s much faster than hand knitting ribbing.

I knitted my two rectangles on the machine, remembering to leave a slit for the leash at the shoulder, and stitched the two rectangles together (without finishing anything in case it needed to be altered). Then it was time for the first test fitting!

machine knitted dog sweater

Maggie wasn’t so sure about this monstrosity with all the dangling yarn ends, but it fit nicely, so I could weave in all those ends and move onto phase 2 of the sweater…

You see, Maggie’s fur attracts snow, and the more she walks in the snow, the more tiny snowballs form on her legs, until she ends up with snow and ice ‘boots’ caking her entire legs!

machine knitted dog sweater

By that point, it’s difficult for her to walk – that’s no surprise, with blocks of ice in her armpits – so I decided to add some sleeves to this sweater, in the hope of preventing the snow from getting too high up her legs.

The armholes in the sweater are just slits, so I knitted some teeny-tiny little rectangular sleeves with ribbed cuffs:

machine knitted dog sweater

I seamed them up and stitched them into the armhole slits.

machine knitted dog sweater

I wasn’t at all sure how this would look, as it’s the equivalent of a drop-sleeved sweater for a human – a boxy shape without a close fit – but this is a dog sweater, so I wasn’t too worried: it’s going to get dirty and snagged on twigs and thrown in the wash dozens of times over its lifetime. All it needs to do is keep her warm and stay in place on our walks.

But, flattened to the side, it looks like it should work…

machine knitted dog sweater

And it needed one finishing touch before we could field-test the sweater: strengthening the leash slit with an edging. I decided to keep it simple and single crocheted around the slit with the same yarn. It turned out to be an easy way to make a very neat-looking buttonhole.

machine knitted dog sweater

And now for the moment of truth: will Maggie like her sweater?? Let’s try it out at the park and see what she thinks…

machine knitted dog sweater

I think that happy face says it all – it’s a big success!

(By the way, it looks from these pics like the sweater might be too short, but that’s just because Maggie’s sweet spiral tail pushes it up her back so it won’t stay in place – I don’t think there’s any way around that!)

As I made Maggie’s sweater from the leftover yarn from my own, we now have matching sweaters. And while we won’t be going out in public like this (any time Maggie’s wearing her sweater, it’ll be cold enough for me to need a coat), I couldn’t resist asking Dave to take a photo of us in our matching outfits…

machine knitted dog sweater

Hahaha – isn’t that hilarious?!

I’m really pleased with how this project worked out. And I’m especially happy because, by the time I got to the second sleeve, I finished the entire piece without making a single mistake – maybe I’m actually getting the hang of this machine knitting thing!

It’ll probably take 24 hours for a wet sweater to dry before Maggie can wear it again, so I think she’s going to need at least a few more sweaters, don’t you? 😉

That gives me an excuse to try some more knitting machine experiments without having to make a me-sized sweater. I think I’m going to try some stripes on her next one, so stay tuned to see how that turns out…


Comments (16)

first machine-knitted sweater!

This is my first FO of the year, and I’m completely thrilled by it!

machine/hand knitted periwinkle sweater by planetjune

It’s a combination of machine and hand knitting, and to explain how that came about, let’s start with some backstory…

Despite having filled my wardrobe with handknits, I haven’t finished knitting a sweater for over a year now. With hindsight, I think the reason is that knitting kept me going through the worst of my PTSD. When I couldn’t do anything else, I could still move my needles, loop my yarn, and make one neat stitch after another to pass the time in a constructive way. Knitting became my therapy, and it did that job so well that it ruined knitting for me as a fun hobby.

I’d started on a simple project that should have been easy and fun – remaking my simplest sweater design in a different colour (the lovely periwinkle you see above). I got most of the way through the sleeves, and then… I stalled.

I put the project away and hadn’t been tempted to knit another sweater for ages, until I bought my knitting machine. I used the rag hems I told you about in my previous post as guides to try to match my gauge to the sleeves I’d already knitted by hand, and then got started trying to machine knit the missing parts (the front and back) of the sweater.

The back went so well that I got a little too enthusiastic (or too confident!) when I knitted the front – I got over-tired and didn’t notice I’d skipped the whole section from waist to underarms!

It’s hard to see what’s going on while you’re knitting, as the work is weighted down and completely stretched out of shape, so I didn’t notice my mistake until I’d finished and laid the sweater front out flat…

machine/hand knitted periwinkle sweater by planetjune

Bet you’ve never seen a sweater with this shape before! (Ignore the green rows at the bottom – those are my rag hem and won’t be part of the final sweater.)

Haha! Disaster! I fed a lifeline (the yellow yarn across the photo above) through the row below the point where I went wrong – there should be an extra 32 rows of knitting at that point!

But I wasn’t too discouraged by my mistake – it was good practice for following my at-the-same-time armhole decreases and neck decreases, and I was encouraged by how neat the stitches looked.

I frogged all the way back to the lifeline, hooked it all back onto the machine, and tried again (without making any stupid mistakes this time).

Once I’d finished, it was just a matter of seaming the front, back and sleeves together, then picking up stitches to knit the bottom band and neckband by hand. And it seems I’ve got my knitting mojo back! I really enjoyed hand-knitting the ribbing so I could see how the sweater would turn out.

machine/hand knitted periwinkle sweater by planetjune

There are some minor flaws in my knitting, where the yarn must have caught on something and so the tension of the whole row is too tight, but I’m delighted with this as my first attempt. The gauge is exactly what I was aiming for, and it’s a perfectly cosy sweater for this time of year!

I’m so impressed with how well the stitches match between my hand knit sleeves and the machine knit body – if you didn’t know, would you be even able to tell there was a difference?!

machine/hand knitted periwinkle sweater by planetjune

Concept proven, and now I’m back in the knitting game with lots of ideas for what to knit next with my combination of machine- and hand-knitting – I think it’s the best of both worlds. So exciting!

Comments (15)

Adventures in Machine Knitting

Well yes, I seem to have picked up another new fibre-crafting hobby!

A few weeks ago, I somehow ended up on Facebook Marketplace, and noticed someone in my neighbourhood was selling something called the Ultimate Sweater Machine

knitting machine
It’s the ultimate!

I mean, how could I pass that up?! It even has the prestigious “As Seen on TV” award 😉

I knew nothing about machine knitting, but I love crafting tools and learning new skills, so I couldn’t resist.

The machine was complete but for the instruction manual and – oh! the tragedy! – the patterns for the ’90s-chic designs pictured on the box. It did come with some instructions, but I have no way to view them…

knitting machine
Yep, this is old!

I began to question the sanity of my purchase, but thank goodness for YouTube – there were plenty of tutorials there to get me started. I clamped the machine to the front of a desk and I was ready to go:

knitting machine
I got lucky – the machine matches the length of my desk perfectly

My machine is about as simple as it gets. It only knits stockinette, and there’s no motor or electronics or automation – you operate it by pushing the carriage back and forth across the row of latch hooks. One pass equals one row of stockinette.

knitting machine
Pretty latch hooks, all in a row

In case you’re like me and wondering how on earth this works, here’s a 10-second explanation: inside the purple carriage, the angled bars on the green plate direct the raised peg near the back of each hook, which pushes each hook in and out as you move the carriage along. The hook is moved forwards to grab the yarn in the open latch, and then moved backwards, which closes the latch, draws the new yarn through the existing stitch, and drops the old stitch off the hook.

knitting machine
It’s a simple but clever mechanism

It’s possible to make increases, decreases, lace and cables with the machine, but you have to move each stitch in turn into its new position (which takes ages) before you knit each row – it’s a completely manual process.

(If you wanted to do ribbing, or any other stitch pattern consisting of both knits and purls, there’s no way to do that except to drop every stitch that should be a purl, and hook it back up in the other direction with a crochet hook or latch hook – I’m not sure if you’d save much time at all after all that faffing around!)

After a few stitch-dropping fiascos, I got the hang of the machine and knitted a rag hem (a reusable provisional weighted hem). The machine is incredibly fast when you’re just knitting back and forth – it just takes a couple of seconds to knit a full row!

knitting machine
Woohoo! I knitted something on the machine!

I made two more rag hems, both for practice using the machine and as gauge swatches for my first ‘proper’ project (blog post coming soon…)

And here’s the rag hem in action as I start swatching for another project:

  • The weighted rod slides inside the bottom edge of the hem to weigh down the project
  • The pink thread temporarily attaches the project to the hem
  • The yellowish-green yarn is the first row of my project

knitting machine
Rag hem in action

Here’s the finished swatch before I bound it off. It looks pretty strange, because the stitches are hugely stretched out across the machine, and the front of the fabric faces away from you as you knit:

knitting machine
Knitting in progress (with the rag hem at the bottom)

After removing the project from the machine, the stretched stitches retract back into regular knitted fabric. Flip it over, and you have rows and rows of stockinette:

knitting machine
Looks like knitting!

I have big plans for this machine – in theory, I should be able to design a handknit sweater and knit my design much more quickly than on manual needles. You may consider it cheating, but I’ll still have to form every increase and decrease myself at the right places, and do all the assembly and knit the ribbing by hand. It’s just a different way to knit, and I think I’m going to enjoy it!


Have you ever tried machine knitting? Or do you think it’s cheating to use a machine?!

I’d love to hear about your experiences, or if you have any resources or tips to share. Let me know in the comments below!

Comments (10)

Professional Design vs Hobby Design

If you’ve ever considered upgrading your craft/design hobby into a business, this post may offer an interesting insight, as I’m now both a professional designer in one field (crochet) and a hobby designer in another (knitwear), so I can speak to both sides of this.

12 knit sweaters project

My Hobby/Pro Designer Experiences

I’m really enjoying my journey as a knitwear designer – I get to design, make and wear my own clothes, and that feels like a pretty amazing process. Every now and then, I feel a little wistful that I’m not parlaying my designs into a new income stream by selling patterns for my sweaters. It may seem like an obvious next step, but there are many reasons why I don’t want to do this.

Knitting is my hobby. I enjoy doing it for relaxation in between my crochet designs. I like making clothes for myself, that fit me and in colours I’ll wear. I can take months or years to finish a design and it doesn’t matter. If something isn’t perfect I can fudge it to make it good enough to wear.

Crochet is my business. It’s how I earn my living. I enjoy the challenge of developing new designs – and I love the things I design! – but there’s always a voice at the back of my head thinking ‘How well will this translate into a pattern? How can I explain this technique? Can I simplify anything to make it more enjoyable to crochet?’ Every new design has to be as good as I can possibly make it, and, while I never hurry an individual design, there’s always pressure to have regular new pattern releases, to keep PlanetJune in people’s minds and keep my business going.

PlanetJune Accessories 2018 Shawl crochet pattern collection

Support. I’ve built an extensive website full of tutorials to help crocheters successfully follow my patterns. I don’t have the time or inclination to do that for knitting techniques. At best, I could provide links to other sites that offer tutorials, and that’s not the level of service people expect from me.

PlanetJune Crochet Video Tutorials on YouTube

Fitted garments. I intentionally don’t design fitted garments in crochet. When I design and knit clothes for myself, I make them to fit me (short and pear-shaped). There are so many different body types and shapes, and it’s important that your clothes fit your shape as well as your size, or they won’t look or feel good on you. And I love making knitwear for myself that makes me feel good when I wear it!

silver thermal pullover by June Gilbank

If I designed a (knit or crochet) garment in the style I like as a pattern for sale, I’d have to:

  1. design it for ‘standard’ body measurements
  2. make a standard-sized sample (that wouldn’t fit me well!)
  3. find a ‘standard’ shaped lady to model it for the pattern photos
  4. either accept that ‘non-standard’ bodies (i.e. most people!) won’t be 100% happy with the result of my pattern, or offer extensive customization advice for how to modify the sizes to fit your own shape

The other option would be to change my design style to create very simple, non-fitted, rectangle-based garments that will work for most people as-is, but that’s not a style I’d enjoy either making or wearing. (There are also plenty of designs like that already, so I probably wouldn’t even make any money from trying to sell something I didn’t want to make in the first place!)

My Decision

I’m sure there are many more potential difficulties I haven’t even thought of, but just these few are more than enough to keep me from starting down the path of publishing my knitwear designs.

I know I don’t have time to start a parallel second career, and certainly not to run a knitwear pattern business with the level of quality and support that (I hope) people have come to expect from PlanetJune.

So, at least for the foreseeable future, I’m keeping my knitting (and garment design) on a purely hobby level. But I do love sharing what I’ve made, and I hope my projects will inspire others to try knitting (or crocheting, or sewing) a garment. It’s a very empowering feeling to be able to make your own clothes, and so satisfying when you get it right and it actually fits!

12 knit sweaters project

Hobby or Business?

Finding a way to make a profitable business from your hobby may sound like a dream come true, but it has the potential to suck all the joy out of your hobby, and, at best, it permanently changes your relationship with your craft.

I’m endlessly grateful that I’ve been able to build a successful business from my crochet designs. I try to keep innovating and developing new techniques to keep my designs fresh and exciting – both for my customers, and for my own enjoyment and improvement in my craft!

PlanetJune pattern selection

But, even so, I do sometimes miss the freedom of being able to create more complex crocheted art pieces that wouldn’t make a good pattern. Keeping my knitting as a purely creative outlet, with no motive other than making things I want to make, has given me that freedom back. It’s a way to balance the pressure of creating for my business with the joy and relaxation that only comes with making for fun.

WIP cardigans - knit and crocheted - by planetjune

So, the moral of the story is: there’s no right answer as to whether you should try to turn your hobby into a money-making venture:

  • A hobby gives you complete artistic freedom, relaxation, enjoyment, and personal satisfaction.
  • A business reduces all those things in exchange for the possibility of success: happy customers, recognition, more financial freedom, etc.

Having a hobby can give you a release from the stresses of everyday life. Turning it into a business adds to those stresses, but if you’re willing to put in time, hard work, and the determination to keep going even when you don’t feel like it, turning your hobby into a business can be very rewarding.

Or you could keep it more casual – instead of aiming to start a serious business enterprise, you could have a ‘hobby business’, where you sell a few things you’ve made to pay for your craft supplies etc, but don’t try to scale it up into a full-time business.

On the other hand, there’s a lot to be said for the pure joy of making just for fun! Maybe you should keep your craft as a hobby, like my knitting- it’s important to protect the things that make you happy. 🙂


So, what’s your experience? Have you ever considered turning your hobby into a business? Have my words made you think about doing (or not doing!) it? Or have you already tried, and how did that change your relationship with your hobby?

I’d love to know! Please leave your thoughts in the comments below…

Comments (6)

silver thermal pullover

After ‘graduating’ from my long term project to teach myself to knit through designing and making 12 sweaters, I wasn’t at all bored with sweater knitting, so my next project was bound to be… yep, another sweater to add to the pile!

As soon as I arrived back in Canada I loaded up on Michael’s Loops & Threads brand Woolike yarn – it’s a super-soft super-fine non-wool yarn with amazing yardage for the price, and I wondered what it’d be like to make a whole sweater from such fine yarn.

The answer? An incredible amount of work, but the result is my favourite sweater to date!

silver thermal pullover by June Gilbank

I wasn’t sure what I wanted to do for this sweater, so I started by knitting plain stockinette sleeves while I pondered. It was slow going with such fine yarn and small needles, but I was encouraged to continue because the knitted fabric felt so soft, and looked so smooth and fine when I draped it over my arm.

I was worried that the fine knit wouldn’t keep my torso warm enough, so I decided on a thermal stitch pattern for the body. This was the slowest thing ever to knit, but the pattern is neat and stretchy and snuggly, so it was a pleasure to watch it grow, however slowly.

silver thermal pullover by June Gilbank

The fine yarn and stretchy stitch pattern gives it a wonderful flattering drape, even with no shaping built in. Doesn’t it look good?

silver thermal pullover by June Gilbank

It was very fiddly to stitch the sleeves to the body neatly – with hindsight, I should have worked the last 2 stitches at the armhole edges in stockinette so I’d have a plain unpatterned edge for joining. My first seaming attempt ruined the whole look of the sweater, so I unpicked the join and tried again very slowly and carefully. I think it took the best part of an hour to seam each sleeve, but it was worth it.

After seaming, I finished my sweater with simple 1×1 rib cuffs and bands, which, again, took forever – switching between knit and purl for every single tiny stitch slows things down considerably – but now I could see that it was going to be a gorgeous sweater, I didn’t mind at all.

silver thermal pullover by June Gilbank

I love this sweater! The patterned body and smooth arms; the v-neck that isn’t too deep (for warmth); the fit that I intentionally made loose enough to wear with a long-sleeved t-shirt underneath to keep me warm, but still nicely fitted… I’d have cried at spending so much time on it if it hadn’t turned out well, but it’s exactly what I hoped it would be.

I’d have liked to switch to smaller needles for the ribbing for the cuffs and bands, but I was already using my smallest (3mm) needles, so the ribbing isn’t quite as neat as I’d like, although I don’t think you’d notice if I hadn’t pointed it out, right?

If I were making this sweater again I’d buy smaller needles for the ribbing, and maybe add a tiny bit of extra height to the shoulders, but overall I’m very pleased with how this one turned out, and it’s now my favourite sweater in my wardrobe!

What’s next in my knitting adventure? I’m trying something other than a sweater for once – I’m in need of a really warm hat…

Comments (8)

12 Knit Sweaters Project wrap-up

When I decided to learn to knit by making a dozen self-designed sweaters, I didn’t really think I’d ever reach this point – surely I’d lose interest in knitting such time-consuming pieces before I’d completed 12 sweaters?

12 knit sweaters project

Apparently not! Shall we take a look at them all properly?

12 knit sweaters project: sweaters 1-3

12 knit sweaters project: sweaters 4-6

12 knit sweaters project: sweaters 7-9

12 knit sweaters project: sweaters 10-12

(Find details of each sweater project in its own post, here.)

Project Stats

I started my first sweater in June 2012, and knitted the final stitch on my 12th sweater in June 2017. So that’s 12 sweaters in 60 months, or an average completion time of 5 months per sweater.

I was very surprised to discover I’ve been working on this project for 5 whole years, but then, I’m busy with work a lot of the time, and summers in Africa aren’t very conducive to knitting sweaters, so maybe it’s not so surprising!

Techniques I’ve Learnt

This project has helped me learn a huge number of knitting techniques. And, while there’s still much, much more I can learn, I’m almost comfortable calling myself a knitter now without feeling like a fraud.

  • I’ve made sweaters from the top down and bottom up, seamed and seamless, flat and in the round, with raglan and set-in sleeves, and sleeveless.
  • I’ve made cardigans and pullovers and a vest.
  • I’ve tried lace and cabling, ribbing and all-over texture.
  • I’ve used provisional and cable cast-ons, directional increases and decreases, mattress stitch, kitchener stitch and 3-needle bind-offs.
  • I’ve used short rows and turned hems, attached i-cord and picked-up stitches.
  • I’ve made buttonholes and inserted a zip.
  • I’ve learnt how to reliably make a sweater that will fit me, in a range of yarn weights and fibres.

Final Thoughts

12 knit sweaters project

I feel quite proud, seeing the whole dozen together like this. Although they almost all have features I’d change, with hindsight, were I to knit them again, I enjoy wearing all of them. (And I have my notes, so I can always reknit them with a few tweaks once the originals wear out!)

All in all, I’d say I’ve met my original goal:

I’m teaching myself to knit by making myself a dozen self-designed sweaters, and learning new techniques with each one I make. I’m hoping that, by the end of this journey, I’ll be a real knitter and not have to survive on guesswork!

It’s time to own it: I am a real knitter.

What’s Next?

Now I’ve completed my mission, I don’t have any plans to stop knitting sweaters for myself – it’s become a long-term hobby, and I can’t imagine buying a sweater at this point! I’ve already bought the yarn to make another half dozen – I think we can safely say I’m addicted… 😉

(You might also be wondering if I’m considering selling patterns for my knitwear designs… and I’ll save that topic for another post!)

Comments (5)

« Previous entries
  • Quick Links: Crochet

    navigation: arrow

    buy crochet patterns and accessories from my online store

    'Everyday Crochet' and 'The Essential Guide to Amigurumi' crochet books by June Gilbank

    Crochet video tutorials and step-by-step photo tutorials

    Free PlanetJune crochet patterns

    Frequently Asked Questions

    Quick Links: Crafts

    navigation: arrow

    Punchneedle Embroidery information, ebook & patterns

    Papercraft ebook & tutorials

    Free PlanetJune craft projects & tutorials

  • Blog Post Categories

  • Blog Archives

  • Welcome to PlanetJune!

    June Gilbank

    Hi, I'm June. Welcome to my world of nature-inspired crochet and crafting. I hope you enjoy your visit!

    If you'd like to get in touch, you can contact me here.
    crocheted Canadian flag by PlanetJune
  • A fanned-out pile of the books Everyday Crochet and The Essential Guide to Amigurumi, with text 'The answers to all your crochet questions at your fingertips - find out more'
  • Support PlanetJune!

    Want to say thanks? You can send me money in seconds at paypal.me/planetjune (over $20) or paypal.me/planetjune2 (under $20) or send me a donation through my shop.

    Or simply click through from my links before you shop at Amazon, Etsy, KnitPicks, LoveCrafts or Crochet.com, and I'll make a small commission on your purchase, at no cost to you! Start here:

    ♥ Support PlanetJune ♥

    Tip: This link is also in the footer of every page!

    Thank you so much for your support!