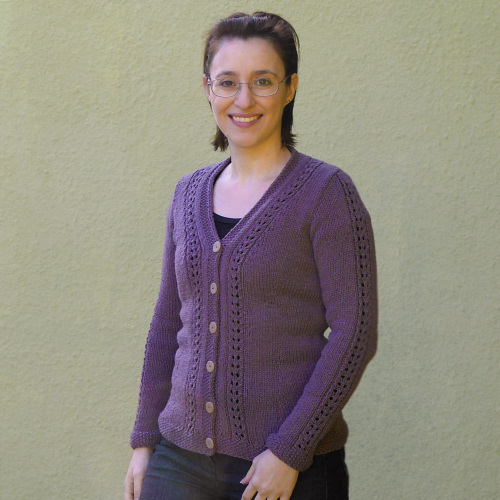
PlanetJune Craft Blog

Latest news and updates from June

Archive for Knitting

zipped cardigan

Have I told you about my knitting goal? I’m teaching myself to knit by making myself a dozen self-designed sweaters, and learning new techniques with each one I make. I’m hoping that, by the end of this journey, I’ll be a real knitter and not have to survive on guesswork! (Here are links to #1, #2 and #3, if you’d like to see my progress.)

This is sweater #4 and, as with all the others so far, it’s not perfect – there are things I’d change if I were designing it again – but it is perfectly wearable. I actually finished knitting it a few months ago, but didn’t have a chance to block it until Christmas.

I’m not really sure if I should call this a cardigan or a jacket, but I’m wearing it as a cardigan. I wanted to try knitting a zip-up top, and I was inspired by the smooth sporty lines of a fleece top – I thought a knitted version would give a slightly less casual feel.

sage zipped cardigan
(My new camera can be remote-controlled by my phone – I took this photo by mistake while setting up the app, but it shows the fit of the cardigan nicely!)

I worked turned hems to give a smooth look, and a big turned collar. The back and front have waist shaping so, even though I couldn’t find a 2-way separating zip, it can fit over my hips at the bottom edge without stretching, but still has a fairly smooth fitted look at the waist. I knitted all the pieces bottom-up, with the body as a single piece to the underarms, and set-in sleeves.

sage zipped cardigan

The turned collar has two purposes: it matches the hems visually, and the built-in facing covers the zipper tape along both collar edges, so it looks tidy whether you have the collar open or zipped right up. I knitted the collar after completing the rest of the cardigan, so I could make it exactly the right length to fold around the top of the zip, and it turned out pretty well, I think.

sage cardigan - zip detail

Zipped right up, the cardigan works like a cosy built-in scarf, with 2 layers of knitted fabric around my neck. I wouldn’t usually wear it zipped up like this, but I’m looking forward to taking advantage of the warmth on unexpectedly windy days!

sage zipped cardigan

The yarn colour is a bit unusual – which made buying a co-ordinating zip next-to impossible, although I like the muted purple I chose in the end – but the best part about this yarn was the price: I bought it from a yarn factory outlet sale, and the entire sweater cost me the grand total of $5. It’s Bernat Satin yarn, so it’s very soft and snuggly, despite being acrylic.

sage zipped cardigan

I’m calling this one a success! Lessons learnt:

  • Knitwear and zips aren’t the best of friends, particularly with the stretchy drapey knitted fabric I prefer. Sewing it in was tricky, and, when I sit down, the zip bulges out over my tummy in a less-than-flattering way. (This could have been minimised if I’d been able to find a 2-way zip, or made a shorter length sweater, but I think I prefer buttons anyway.)
  • I misunderstood how to do a sloped bind-off, and the combination of that together with set-in sleeves and thick knitted fabric meant my shoulder seams are a little bulkier than I’d like, although I don’t think it’s too obvious until I point it out, right? (I’ve since realised my mistake, and I know how to do it properly now!)

My biggest victory with this sweater was getting my measurements spot on – it fits me perfectly all over. These measurements will be my go-to template for future sweaters, and should make designing the next ones much simpler. I love this process; I’m learning so much with each new garment I make. And, with this cardigan, I’ll be well prepared once summer ends and my house gets chilly again.

Comments (16)

knitted poinsettia

Before we go any further: don’t panic! This is not the start of a shift away from crochet and into knitting patterns – it’s just that my Poinsettia ornament happens to be knitted this year. As with my other Poinsettia designs, I’m making it available as a donationware pattern. Although I’m not ruling out the possibility of publishing other knitting patterns in future, it’s not part of my current plan 🙂

As you may remember, I have a little Christmas tradition of crafting a new Poinsettia ornament every year, and, although I’ve been madly busy this year, I’ve managed to squeeze in another poinsettia design so I can keep up the tradition. Now I’ve been doing this for 8 years, I have enough poinsettias to decorate a small tree! And that’s exactly what I’ve done for my Christmas decorating this year:

poinsettia christmas tree by planetjune
My poinsettia tabletop tree! Can you spot the new addition?

Here’s a closer look at the PlanetJune Poinsettia Collection to date:

tsumami kanzashi poinsettia by planetjunecrocheted poinsettia by planetjune
polymer clay poinsettia by planetjunepunchneedle poinsettia by planetjune
felt poinsettia by planetjunebeaded poinsettia by planetjune
thread crochet poinsettia by planetjunepunchneedle poinsettia by planetjune

Top (L-R): 2006 kanzashi poinsettia; 2007 crocheted poinsettia 
2nd Row (L-R): 2008 polymer clay poinsettia; 2009 punchneedle poinsettia
3rd Row (L-R): 2010 felt poinsettia; 2011 beaded poinsettia
Bottom Row: 2012 thread crochet poinsettia; 2013 …?

(You can find all my Poinsettia designs as PDFs in my shop, or use the links above for the free online versions.)

And now for the 2013 PlanetJune Poinsettia: the knitted poinsettia!

knitted poinsettia by planetjune

As I’ve been teaching myself to knit over the past couple of years, a knitted poinsettia seemed appropriate for 2013. This is a very simple pattern, provided you know how to cast on, make knit and purl stitches, and increase and decrease. If you don’t already know how, this is a nice small project for learning those skills! (And, although teaching you to knit is not something I can take on, there are many good books and tutorials, and I’ve linked to my favourite online tutorials in the pattern.)

I know we’re only a week away from Christmas, but this really is a speedy pattern, so I hope you’d like to try knitting one of your own – the link to the free pattern is below, and, as always, if you choose to thank me with a donation, you’ll get the handy printable PDF version 🙂

Go to the Knitted Poinsettia pattern >>

* * *
PS – I’ve just finished my book – yay! – and I’m going to take a much-needed break for the next few weeks. I’ll just be popping in for minimal maintenance on PlanetJune stuff, so please be patient if I don’t respond promptly to your emails etc. I’ll be back with exciting new things once I’m completely rested. In the meantime, I hope you have a wonderful festive season!

Comments (2)

I Love Yarn!

Today is I Love Yarn day, and, although every day is I Love Yarn day as far as I’m concerned, I thought I’d take a quick break from book-writing to share a little of my yarny love, as evidenced by a few of my old blog photos…

As a crocheter, I love yarn. I love being able to turn this:

my Bernat Satin stash
some of my amigurumi yarn stash

via this:

amigurumi in progress
toymaking!

into this:

PlanetJune amigurumi designs
some of my amigurumi designs

and this:

baby alpaca laceweight yarn
mmm, laceweight baby alpaca

into this:

PlanetJune Accessories designs
some of my accessories designs

But possibly the best thing about working with yarn is that you can fudge things and fix mistakes – it doesn’t always have to be perfect.

I’m a novice when it comes to knitting, and I must confess that I wasn’t quite delighted with my grey cardigan (the first garment I knitted) – stockinette tends to curl, and my i-cord edging wasn’t enough to combat that curl at the bottom. I found myself doing the Picard tug to the bottom of the cardigan every time I stood up…

I’d heard you can stitch a tape facing to the inside to keep it straight, but who has time to shop for tape? Then I realised I could make an afterthought knitted facing by picking up stitches all around the bottom, knitting a few rows, then stitching it a few rows up on the cardigan. I used some stash fingering weight yarn (left over from my Climbing Eyelets Shawl) and just did it without over-thinking the plan…

grey cardigan - afterthought facing to stop curling

It worked perfectly! My cardigan now has a straight non-curling edge around the bottom. You can just see a dented line on the outside from where I grafted the live stitches from the top of the facing to the cardigan with duplicate stitches, but the pale green colour is totally invisible from the outside and looks pretty from the inside when I wear the cardigan unbuttoned.

3 knit sweaters by planetjune

With this fix, I now have 3 self-designed and wearable handknit sweaters, and they’ve seen me through the (southern hemisphere) winter nicely. None of them is 100% perfect, but that may just make them even more special because it reminds me that I made them and it inspires me to do better next time. Although I won’t have time to knit anything else until I finish my book, I’m very excited at the idea of having a whole wardrobe of handmade sweaters – and in another year or two of knitting that could well be possible! I already have yarn bought and earmarked for the next 3…

So, both as a yarny professional (crochet designer) and an enthusiastic amateur (knitting adventurer), I really do love yarn! It’s amazing that you can start out with a ball of yarn and a hook or a couple of pointy sticks, and make pretty much anything 🙂

Comments (6)

snuggly alpaca sweater

The weather never gets truly cold in Cape Town, but with poor insulation and no central heating in the houses, winter in South Africa can be very cold when you’re inside. It’s often warmer outside (in the sunshine) than in my house, which never really gets warm in winter, no matter how many portable heaters I turn on.

If you peeked through my window right now, you’d see me sitting at my desk, bundled up in multiple sweaters, two pairs of socks, a shawl, a blanket, a scarf and wristwarmers. I’m glad that I get to use all the accessories I’ve crocheted, but it does get a bit frustrating when my layers make me as bulky as the Michelin Man…

What I really needed was a warm sweater without bulk, so I ordered some beautiful fluffy dark teal alpaca yarn (KnitPicks Reverie) for my next knitting project – the shawl-collar pullover I made looks warm, but it’s not enough for the cold days here. I used the basic size template I designed for that sweater, and made a few refinements, to produce this:

alpaca knit sweater by planetjune

Changes from my last sweater:

  • I made a more subtle rib at the collar and cuffs, and made the collar into a simple v-neck with a neat overlap at the point of the V.
  • I added interior waist shaping (instead of the side shaping I used before) that I learnt from Amy Herzog (Knitscene magazine, Fall 2011).
  • And I bought two Craftsy online classes (which I’ll review properly at a later date once I’ve had a chance to finish them) which taught me how to design and knit fitted set-in sleeves – a revelation!

alpaca knit sweater by planetjune

I intentionally made the neckline very wide and open, as I wasn’t sure how the alpaca would feel next to my newly-sensitive eczema-prone skin, and I wanted to be able to avoid direct skin contact if necessary. I also added extra ease to this sweater from my last one, so I could wear a long-sleeved t-shirt underneath if my wrists were irritated without making the sweater look too tight.

What I didn’t take into account – I am still a novice knitter! – was that the finer yarn, knit more loosely, would already add ease, even if the finished measurements are the same. Thanks to this, the finished sweater fits more loosely than I’d imagined it would, and the neck opening is even wider than I’d planned. But, although the waist shaping I added isn’t at all obvious, imagine if the waist had an extra 3″ of fabric: waist shaping does make a difference, even in a garment that isn’t closely fitted. Note: the bunching in the photo above is just drape due to how I was standing (oops!), not voluminous folds of extra fabric.

alpaca knit sweater by planetjune

The verdict: I really love this sweater – it’s probably the warmest garment I own, even though it’s very thin and not at all bulky. The yarn is ultra soft and luxurious, and it doesn’t irritate my skin at all, and the colour is truly gorgeous. I do wish I’d made it slightly narrower, and less open at the neck, but those are things I can change next time – I’ve already ordered more Reverie yarn so I can make another one to keep me warm next winter 🙂

I can’t even begin to estimate how long it took me to knit this sweater, but it was worth every moment – it helped me get through some very stressful times, and I have a snuggly warm sweater to show for it! Unfortunately, I have no time to design my next knit piece at the moment, but I’ll definitely be adding to my handknit wardrobe once I’ve finished writing my book. Making garments and accessories that fit well enough to actually wear without being embarrassed is so rewarding – don’t you think?

Comments (4)

knitted shawl collar pullover

Now I understand how knit and purl stitches look and work, I’ve started examining all the knitted items in my wardrobe to see how the various elements fit together. I decided it’d be interesting to see if I could re-make a store-bought sweater by using it as my ‘pattern’ for my next piece of knitwear (although not for the collar – the original was a zip-up cardigan). I won’t keep you in suspense – here’s the result:

shawl collared knit sweater by planetjune

I used the store-bought sweater to get the basic measurements, but I did make a few modifications so it would fit me better. I decided to create a pattern as I went – well, more of a recipe than a pattern – so I’ll be able to create knitwear for myself more easily in future.

(For example: Make paired decreases at each side, every other row for 24 rows would be a specific pattern instruction, but Decrease by 6″ width over 3″ height means I just need to plug in my gauge and I’ll be able to make the same shape and size of sweater next time, even if I’m using different needles, yarn, stitch pattern, etc – it just takes a quick calculation to work out how many decrease rows I’ll need over how many total rows.)

I know I’m making this sound like it was all easy for me, but it wasn’t! I don’t want to give the impression that I have an amazing natural talent for knitting or knitwear design; as I’m still an (adventurous) beginner, I had to reknit almost every stage of this sweater due to stupid errors on my part. But I actually don’t mind that – I’ve learnt a lot from those mistakes, and really, the knitting is about keeping my hands busy so I can relax in front of the TV instead of being tempted to work on a new crochet design. The finished sweater is just an added bonus.

shawl collared knit sweater by planetjune

Techniques I learnt for this sweater:

  • Cable cast-on
  • 2×2 rib for the collar and cuffs
  • Transitioning from rib to stockinette
  • Basic shaping (paired increases/decreases) at either side of the body
  • 3-needle bind-off for the underarms and at the back of the neck
  • A more subtle raglan decrease for creating the yoke and shoulders
  • Shadow-wrapped short rows to create the shawl collar
  • Stretchy bind-off for the sides of the collar
  • Horizontal-to-vertical grafting to attach the sides of the collar

Confession time: the end result isn’t quite how I envisioned this sweater; I made a slight blip in my yoke calculations, and ended up losing a bit of length in my planned armhole depth and neckline depth as a result. It still fits pretty well though, so I decided it wasn’t worth reknitting everything from the armpits up. But I’ve learnt that lesson now, so I won’t make the same mistake next time.

shawl collared knit sweater by planetjune

I’m pretty pleased with myself for working all this out though; this sweater doesn’t look like I made it up as I went along, and I feel like it actually has some design to it! I love how the collar turned out – I wanted it to be narrow at the front so it wouldn’t overpower my frame, but wide at the back to make a snuggly warm collar. I’d hoped my first attempt at short rows might work to create the shape I needed, and the collar actually ended up working perfectly on my first try. This sweater is definitely going to get a lot of wear (I’m actually wearing it right now!)

I also intentionally made the sleeves extra long, for cosiness. I can wear them uncuffed and keep my hands warm – built in wristwarmers! – or turn the ribbing back to normal sleeve length for a slightly smarter look.

shawl collared knit sweater by planetjune

(Oh, and I didn’t bother to block it, so it may look even better after I wash and block it!)

What’s Next?

Now I have a basic template for a sweater that fits me, I’m definitely going to knit more of them, and learn some new techniques with each, so I don’t make the same design over and over again and I can keep advancing my knowledge bit by bit. I’m already working on my next design, with interior shaping and a subtler, less bulky ribbing.

After making it all up as I go along for my first two knitted garments, I’ve decided it’s time to find out how you’re really meant to go about designing garments that fit. I’ve bought a couple of Craftsy online classes (Custom Cabled Pullovers with Carla Scott, and Handknit Garment Design with Shirley Paden) that should help me understand some of the slightly more advanced elements of knitwear design, e.g. set-in sleeves, and I’m trying to figure out how I can get my hands on a copy of Amy Herzog’s new book, Fit to Flatter. (I’ll keep you posted with reviews once I’ve finished taking the classes, and if I can get the book!)

I love, love, love being able to make clothes I can actually wear and that fit me, and not having to worry about making patterns for them. Having a relaxing and useful hobby that’s completely unrelated to my work is so refreshing!

Comments (6)

knitted lace hat

I actually wrote this post long before Christmas, but it’s been too hot to even consider modelling a warm hat until now, so let’s pretend I just finished it – I want to tell you the lemons-into-lemonade story of how I ended up with this lacy knitted hat instead of the cardigan or sweater I’d intended to make…

knitted lace hat

After the success of my first knitted cardigan, I needed to get another project started asap so I didn’t revert back to my exhausting pattern of working (crochet designing) while watching TV in the evenings.

I looked through my stash and found this interesting yarn – it looks like mohair but it’s actually an acrylic/nylon blend… No, it’s not the loveliest yarn ever, but my Mum found it in a charity shop for next to nothing, and I thought I could use it up on some knitting practice before committing to the expense of buying yarn for a sweater. (As there are no big box craft stores here, no weekly sales, no 40% off coupons, I can’t get any bargain yarn any more, so working through my stash is suddenly more appealing to me!)

knitted lace hat

I wanted to try a built-in edge to prevent the stockinette curling this time, so I learnt how to start with a built-in facing and cast-on for the back of my unplanned sweater/cardigan:

knitted lace hat
Built-in facing (look how neat it makes the bottom edge look)

Feeling ambitious, I thought I’d find out how to make knitted lace (i.e. strategically placed holes), and invented a basic pattern to work with:

knitted lace hat
My very basic lace pattern

Disaster 1: After working through my 12-row lace pattern repeat three times (while watching TV and paying very little attention to what I was doing) I held my knitting up and noticed a couple of big mistakes in the position of my lace holes – one in the wrong place and one extra hole that shouldn’t have been there.

Solution 1: Here’s a big advantage of knitting over crochet: if you made a mistake, even many rows back, you can unravel that column of stitches down to the mistake like a ladder in a stocking, fix the mistake, and then zip all the stitches back up again with a crochet hook by hooking each through the last. Mine was a little trickier than fixing a mistake in stockinette, as I had to unravel some lace pattern stitches – decreases and yarn overs – but it worked! Which means that now I can confidently knit without paying much attention to it, knowing that I can fix a mistake later.

Disaster 2: I realised that a) I really don’t love this yarn enough to wear a sweater made from it, and b) knitting lace without making mistakes would take more concentration than I can afford to spend – the whole joy of my knitting is that I can do it mindlessly to stop myself from working on crochet designs out-of-hours, and that doesn’t really apply when getting into more complex stitches and patterns. What’s the point in completing an un-relaxing project to make an un-wearable sweater?

Solution 2: By luck, the bottom hem of my ‘sweater back’ was just the right length to be a hat band. (That’s only because my gauge was a bit off to begin with, and my planned 18″ back was actually 20″ wide – another reason not to continue with this project as a sweater.) So I stopped working my lace pattern and figured out a decrease pattern to make the top of a hat shape instead. I found out that I can extrapolate my crochet shaping knowledge to make knitted shaping pretty easily.

knitted lace hat
Decreases create the top of the hat

I seamed the two side edges together, and, voilà, a hat is born:

knitted lace hat
I knitted a hat – by accident!

And the bonus surprise from all this: I actually like the hat! I think I could get away with a small accessory in this yarn and colourway, whereas I know for a fact I would never have worn it as a sweater. I’ve never designed a hat before as I’m not really a hat person, but this has actually made me consider designing a crochet hat pattern at some point…

knitted lace hat

I’m avoiding getting fancy with my next knitting project (a sweater). I really like the look of stockinette, and the miles of pulling one loop through another to form a neat even fabric is very soothing to me. Yes, this fabric could be made in minutes on a knitting machine, but there’s still an advantage in making over buying: I can tailor my garments to fit me instead of having to settle for leaving the bottom of every cardigan unbuttoned to accommodate my hips.

Plus, it’s just relaxing to design things without writing anything down or worrying about how it’ll translate into a pattern. Yay for non-work crafting!

Comments (5)

basic knit raglan cardigan

Look what I made!

grey knitted cardigan

This was my second ever knitting project, after the wristwarmers I made last year. I lost my knitting momentum as I waited 3 months for the needles I’d ordered to arrive in South Africa, and found it very difficult to pick it back up again, especially as my plan was pretty daunting: to make a cardigan from scratch with no pattern.

Actually, the plan was for 2 cardigans, one knit and one crochet, as relaxation projects to keep me occupied outside working hours so I don’t end up working all the time. Although the crocheted cardigan was much faster to create (I finished it in July), I haven’t quite finished weaving in the ends on that one, so the knitted one gets to make its debut first 🙂

WIP cardigans - knit and crocheted - by planetjune
Self-designed knitted and crocheted cardigans in progress

When I finally decided to make a start on the cardigan project in June, I measured some of my existing clothes to give me an idea of size and then just started with the back of each, with no real idea of what to do after that. My plan with this knitted cardigan was to make it a learn-as-I-go piece: picking up new knitting skills along the way as I needed them, and hopefully ending up with something wearable too; or at the very least a good idea for how to make the next one good enough to wear without embarrassment. And, somewhat to my surprise, this strategy worked!

Project Details

Yarn: Bernat Satin in Forest Mist Heather

I bought 6 skeins of this yarn at a yarn factory outlet sale in 2010. One became my Diamond Lattice Neckwarmer, so I had 5 left, and I hoped that would be enough. (If not, my plan was to add some stripes of a different colour near the edges.) As it turned out, I only needed 3.7 skeins – less than 700m of yarn – so that’ll be handy to keep in mind for my next sweater.

Needles: KnitPicks interchangeables, 5mm, with 2×24″ and 2×32″ cables

I’m really enjoying these KnitPicks needles. I have the nickel-plated tips and they’re lovely and smooth and very easy to knit with (not that I have anything to compare them with). I made full use of the interchangeable needle tips and cables with this cardigan:

  • I held each piece on one of the spare cables until it was time to join them together. To start the next piece, I switched the needle tips to a different cable and screwed the stoppers on each end of the old cable.
  • I used cable connectors to make extra-long cables and to join the cables temporarily so I could slide my live stitches from one cable to another.

At some points I had all 4 of my cables in use; I think I’ll need to invest in some more, and longer, cables before my next project.

Pattern: None! I made it up as I went along.

grey knitted cardigan drying flat with feline assistance
Maui volunteered to keep the finished cardigan held flat while it dried…

Techniques

Here’s my journey of new knitting skills:

Provisional cast-on: I decided to use a provisional cast-on (a crocheted chain made in a different yarn) to give me some flexibility with the length and put off the decision of how to edge the piece until I got further into the project (and hence a little more knitting practice).

Purl: As a cardigan is worked in rows, this was my first attempt at purling (my wristwarmers were worked in the round, so they only used the knit stitch). I made the body in one seamless piece, bottom up, up to the armholes, then set it aside to start the sleeves.

Increases: I knitted my first increases for the sleeves, using Knitting Help’s incredibly useful increase reference to pick the increases I liked best (M1L and M1R, in case you were wondering).

Mattress stitch: I had planned to knit the sleeves in the round as I did for my wristwarmers, but, after working flat, I couldn’t remember how I managed to knit in the round (with Magic Loop) without getting any ladders at either side – it had seemed so easy before! I decided to worry about that later and keep my momentum going by working the seams flat and learning how to stitch side seams invisibly with mattress stitch instead.

A little detour… After making most of the first sleeve, I basted it closed to make sure it was wide enough at the bicep. It turns out that, although my gauge calculations were spot on, the size of my arms is apparently a little wider than I’d thought, as the sleeve was going to fit very closely – not a very flattering look. I ripped it all out, added 20% to all my width calculations and started again…

grey knitted cardigan

Decreases: I joined the body and sleeves to make a raglan yoke. It was time to learn how to make left-leaning and right-leaning decreases, so I referred back to Knitting Help to choose my favourites (k2tog and SKP).

Kitchener stitch: After finishing the yoke, I had to stitch the sleeves to the body at the underarms, so it was time to learn how to stitch invisible horizontal seams with Kitchener stitch. I wish crocheted seams were this simple and invisible!

Ribbing: I decided a 1×1 rib might look nice for the edging (with the advantage that I’d then be able to try TECHknitting’s tubular cast-off that I had my eye on). (In the end, I decided against using it in the finished sweater – I just didn’t like the finished look of it, so I ripped the cuffs out and redid them later.)

Magic Loop (again): By the time I got to edging the cuffs, I’d already seamed the sleeves together, so working flat was no longer an option. I relearnt Magic Loop so I could complete the cuff edging in the round.

Tubular Cast-off: I really liked the idea of this cast-off because it has no edge to look messy (and as an added bonus, I got to learn double knitting as part of the technique). The instructions I used didn’t explain one crucial step (bring the yarn to the front before slipping the purl stitches; bring the yarn to the back before slipping the knit stitches) so it took me a while to figure out what I was doing wrong. In the end, although I did master the technique, I didn’t love the look, so I decided to lose the ribbing and tubular cast-off and try something with a cleaner look instead…

I-cord Cast-off: Did you know there are apparently infinite variants of how to do this? Knitting some, or all, of the stitches through the back loop, decrease with k2tog, ssk, or skp… Every tutorial and video I looked at had a slightly different method. I decided to try the KnitPicks tutorial (except with a provisional cast-on) and it looked fine, so I went with that method.

Picking up stitches: Edging the cuffs and bottom was easy – I just ripped out my provisional crocheted cast-on and continued knitting downwards from there. But, to make the collar edging and button band, I needed to pick up stitches along the side edge, so I could add an applied i-cord. My gauge was a perfect 18 sts and 24 rows in 4″ (exactly as the ball band of my yarn claimed!) so I picked up stitches on 3 of every 4 rows so my vertical edging wouldn’t pucker.

Buttonholes: I sort of cheated in my buttonholes: all I did was to not pick up the stitches at the points where I wanted the buttonholes to be, and worked the i-cord without attaching it for 3 rows to leave a vertical gap. I’ll have to learn a proper method in my next project!

Weaving in ends: Thanks to adding edgings, changing my mind, starting new balls of yarn, etc, I had a whopping 26 ends to weave in. Luckily, I already had an excellent tutorial bookmarked from The Purl Bee that clearly shows several different techniques. My favourite was duplicate stitch on the wrong side.

Finishing touches: I was hoping to find some decorative shank buttons to liven up the cardigan slightly, but when I went shopping I found a clear sign that wasn’t the way to go. These buttons cost 5c each (that’s less than 1 US cent apiece!) and amazingly were a perfect match for the greenish grey shade of my yarn. I used sewing thread to attach them, with a crochet hook as a spacer to make a thread shank, and small anchor buttons on the back so my thread wouldn’t cut through the yarn with wear. To finish it off, I knotted yarn all the way up each thread shank both to stop it from being floppy and to disguise the thread.

grey knitted cardigan
Perfect match! (This photo is untouched – the subtle heathered greenish grey of the yarn shows clearly here.)

Result

13 new knitting techniques learnt, and what do I have to show at the end of it all? A totally wearable cardigan!

grey knitted cardigan
Happy June says “I made this!”

It’s not perfect in terms of design: I forgot to start neck shaping while I was wrestling with the first few rows of the joined sleeves and body, so the V is a little shallower than I’d have preferred. Also, the i-cord isn’t quite enough to stop the stockinette from curling at the bottom, although it does stay fairly flat while I’m wearing it so I don’t think I’ll bother adding a facing to stabilise it.

But it fits very nicely, it doesn’t look embarrassingly ‘homemade’, and it’s been doing a great job of keeping me warm all week. And, in the end, isn’t that exactly what a cardigan should do?

Verdict

As a self-teaching tool, this project worked exactly as I’d hoped – I gradually, over the course of making the cardigan, taught myself a huge number of knitting techniques. If I’d tried to learn them all before tackling the project I’d probably have been too daunted to ever make a start on it. I had the advantage that I’ve read lots of knitting tutorials over the past few years, so, even though I didn’t know how to knit ahead of time, I did know the theory (e.g. you need to pair a left-leaning and right-leaning decrease; you use mattress stitch for a vertical seam and Kitchener stitch for a horizontal seam, etc) – so it was just a matter of googling each new technique as I needed it.

I had no doubt that I’d be able to do something like this in crochet, but designing a knitted cardigan when I didn’t even know how to purl before I started did seem like a bit of a crazy challenge… Knowing that I had a goal (a piece of wearable clothing) in mind kept me moving forward and trying new techniques in a far shorter amount of time than I would have managed to learn them otherwise.

I guess I can say I’ve graduated from the ‘beginner’ knitter category now? Plus, I have the added bonus of a nice warm cardigan that fits! And I suppose I could even call myself a knitwear designer now too, although strictly for fun, not profit 🙂

Comments (9)

knitted wristwarmers

Yes, you read it right, this is a post about knitting – who’d have guessed!

I’ve tried, and failed, to enjoy knitting before. I bought straight needles and hated them. I bought dpns and hated them. It always seemed like such a struggle to wrangle the yarn without a handy hook with which to grab it. But, thanks to my practice with knooking, I now understand the shape of knitted (and purled) stitches, and how they fit together. I’ve done a lot of theoretical learning – reading books, watching videos – and I finally hit on a way to make it all work for me! Here’s the June magic formula:

Circular needles: so much easier to keep hold of than those long pointy sticks. I took a chance and ordered some from KnitPicks before I moved out of shipping range, but didn’t have a chance to play with them for many months after that.

circular knitting needle

Knitting right-handed: I’m left-handed, and I crochet left-handed. But you knit with both your hands, so why shouldn’t I learn the ‘standard’ right-handed way and save having to reverse instructions later so they work for a leftie?

English (throwing) style: this is the magic part for me, as a crocheter. Because I’m left-handed, I hold my crochet hook in my left hand, and tension my yarn with my right hand. By knitting right-handed, English style, I can still tension my yarn with my right hand – something I have years of experience with!

Magic loop: This technique makes so much sense to me. Working on one circular needle with a flexible cable instead of constantly switching between DPNs: yes. This is good.

So, with my strategy in place, I tried putting the theory into practice. I don’t like making test pieces, so I decided to make my knitting practice piece into something useful: wristwarmers. Even if they looked awful, they’d come in handy in my unheated house once summer ends.

I made up my own pattern, because that’s just how I like to work. Long tail CO 34, knit in the round with magic loop until the thumb, bind off 6 for the thumbhole, next round backwards loop CO 6 to go over the top of the thumb, continue working until long enough, stretchy bind-off. Easy.

(Don’t I sound like I’ve been doing this for years?! Never underestimate the power of research.)

knitted wristwarmers by planetjune

I love how they turned out! My tension is pretty even for a first attempt, and that’s thanks to using the same hand I always use for tensioning. There are slight ladders at the bottom of the first wristwarmer, before I figured out how to keep the tension even when switching the needles for the magic loop, but I love that too – every time I wear these wristwarmers it’ll show me ‘this is when I learnt to knit’.

knitted wristwarmers by planetjune

I used 4.5mm KnitPicks nickel needle tips with a 32″ cable. The yarn is Bernat Satin in the gorgeous Plum Mist Heather colourway – a very dark purple tinged with red, and pretty much impossible to photograph – if my skin tone looks off here, that’s why! (Indoors, they photographed as almost black.)

I can already tell I’m going to get a lot of use out of these. There’s no central heating in our house and my hands get very cold when I’m working. These will be perfect to wear while I work – I’m wearing them as I type this and they aren’t impeding me at all: success!

knitted wristwarmers by planetjune

I was all fired up after finishing these, and decided to order some larger needle tips so I could try something a little more ambitious. My LYS actually carries the same brand of needles (although outside N America they are known as KnitPro, not KnitPicks – isn’t that strange?!), and told me he could probably get them within 1-3 weeks. That was in November, and they just came in last week; I can confirm that the concept of ‘Africa time’ is no myth – it’s taken 3.5 months for my needle tips to arrive!

I haven’t picked up the needles in the meantime, so I expect I’ve now forgotten everything I briefly knew about knitting and will have to re-learn it all again before I attempt progressing to anything more complicated. It may be a while before you see another knitted project from me…

Comments (16)

Next entries »
  • Quick Links: Crochet

    navigation: arrow

    buy crochet patterns and accessories from my online store

    'Everyday Crochet' and 'The Essential Guide to Amigurumi' crochet books by June Gilbank

    Crochet video tutorials and step-by-step photo tutorials

    Free PlanetJune crochet patterns

    Frequently Asked Questions

    Quick Links: Crafts

    navigation: arrow

    Punchneedle Embroidery information, ebook & patterns

    Papercraft ebook & tutorials

    Free PlanetJune craft projects & tutorials

  • Blog Post Categories

  • Blog Archives

  • Welcome to PlanetJune!

    June Gilbank

    Hi, I'm June. Welcome to my world of nature-inspired crochet and crafting. I hope you enjoy your visit!

    If you'd like to get in touch, you can contact me here.
    crocheted Canadian flag by PlanetJune
  • A fanned-out pile of the books Everyday Crochet and The Essential Guide to Amigurumi, with text 'The answers to all your crochet questions at your fingertips - find out more'
  • Support PlanetJune!

    Want to say thanks? You can send me money in seconds at paypal.me/planetjune (over $20) or paypal.me/planetjune2 (under $20) or send me a donation through my shop.

    Or simply click through from my links before you shop at Amazon, Etsy, KnitPicks, LoveCrafts or Crochet.com, and I'll make a small commission on your purchase, at no cost to you! Start here:

    ♥ Support PlanetJune ♥

    Tip: This link is also in the footer of every page!

    Thank you so much for your support!