PlanetJune Craft Blog

Latest news and updates from June

Archive for June, 2022

free pattern: Amigurumi Beach Ball

Amigurumi Beach Ball is a fun no-sew pattern for summer – or for any time of year!

  • Make a play ball for the kids, a set of juggling balls, or a stress ball to play with at your desk.
  • Make it interactive by adding a squeaker, rattle or bell when you stuff it.
  • Stuff it with plastic pellets to make your ball into a bean bag or hacky sack.

Amigurumi Beach Ball crochet pattern by PlanetJune

For this pattern, crisp colour changes are essential, and I’ve come up with a special new technique (a variant of my invisible increase) that makes the colour changes look extra neat at the increase points, plus I’ve included lots of tips for dealing with the yarn as you go – there’s no cutting or knot-tying required!

Amigurumi Beach Ball crochet pattern by PlanetJune

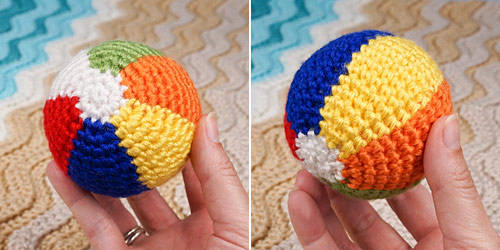
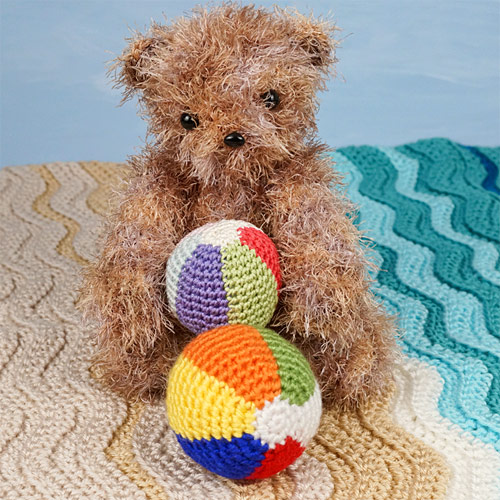
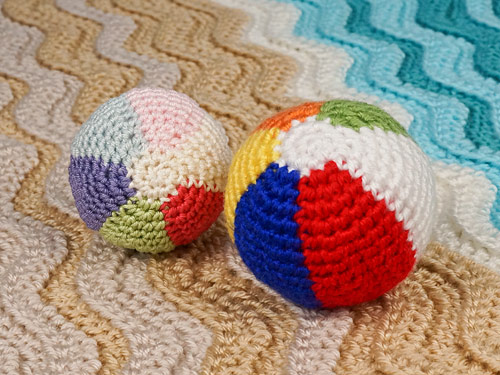
This pattern is great for using up scraps of brightly-coloured yarn! You can choose any 6 colours of yarn for this pattern, and the main colour you choose will also be the colour of the top and bottom circles on the beach ball. I made my main beach ball (above) in light worsted weight yarns (Bernat Satin and Red Heart Soft) with an E US/3.5mm hook, using ‘classic beach ball’ saturated colours.

I also made a second beach ball (below, left) from Patons Grace, a sport weight mercerized cotton, with a C US/2.75mm hook and whatever colours I happened to have in my stash. This gave me a slightly smaller ball (2.5″ vs 2.75″), and I love how it looks in the cotton too!

Both balls are a great size for playing with, juggling, etc.

Amigurumi Beach Ball crochet pattern by PlanetJune

And can I just mention that I designed this pattern very carefully, so the bottom of the ball looks just as good as the top! Look:

Amigurumi Beach Ball crochet pattern by PlanetJune
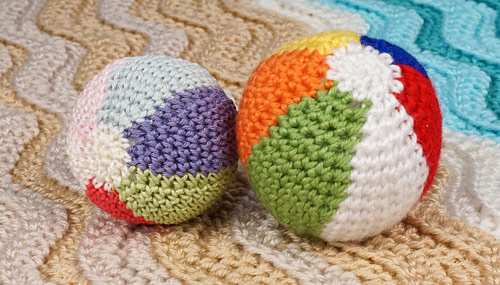
Yep, these are the bottoms of the balls! They look good from all sides 🙂

As I like to reward people who choose to donate for my donationware patterns, the PDF version of the Amigurumi Beach Ball pattern also includes additional tips and photos that you’ll only find in the PDF version (including instructions for how to fix any too-tight stitches on your finished ball), and the crochet instructions are all included on one printer-friendly page, so you can save paper and ink by printing only that page.

As always, the pattern is free for you to use online, and you need only donate if you’d like to thank me for my time in creating it, or if you’d like the easy-to-print PDF version with the bonuses.

Go to the free Amigurumi Beach Ball pattern >>

Or jump straight to donate:

Order the Amigurumi Beach Ball pattern >>

Not ready to make one yet? Add this pattern to your Ravelry queue:


Summer Fun CAL

If you’re about to make a beach ball, why not join a relaxed PlanetJune crochetalong (CAL) while you make it? The rules of the Summer Fun CAL are simple: make any PlanetJune pattern in July or August 2022, and share photos of what you’re making!

Summer Fun 2022 CAL - all crochet patterns by PlanetJune
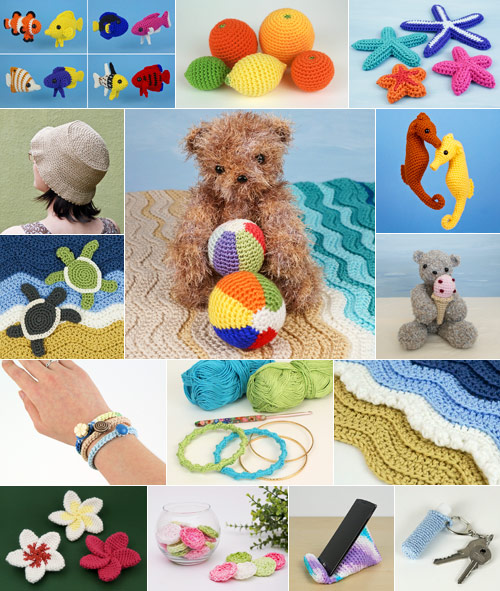
Here’s a selection of quick and/or summery PlanetJune patterns to give you some ideas…

If you want to join in with the community and see what everyone else is making, come and hang out in the Summer Fun CAL thread in the PlanetJune group on Ravelry or the #crochetalongs channel on the PlanetJune Discord server.

You can also join in by posting your pics on your social media, and remember to tag me (@planetjune) so I can see what you’ve been making!


I hope to see lots of Beach Balls in different colourways and yarns this summer – this is going to be fun 🙂

Comments (1)

PlanetJune Stories: Belinda’s Toasty Turtle

Today’s PlanetJune Story comes from Belinda from Australia. Belinda first contacted me when she’d made her turtle beach blanket and wanted some advice on the turtles, then she stayed in touch with her progress on the baby turtles, and her clever idea for a matching turtle heat pack. I knew you’d love to see this project too, and to hear about how she came up with this idea and made it happen!

Over to Belinda:


Between gifts for my children and other family members, I rarely make things for myself, but when I saw a friend’s Turtle Beach blanket, I loved it so much that I made one for myself.

PlanetJune Stories: Belinda's Toasty Turtle and Blanket

I crocheted the blanket and turtles with 8-ply cotton from Bendigo Woollen Mills. While mostly made while waiting at school pick up and in doctors’ surgeries, I also crocheted the blanket at every beach I went to, including Peterborough in Victoria, Penguin in Tasmania, and Geographe Bay in Western Australia. I used June’s technique of attaching the baby turtles with buttons so they can, and do, move around.

PlanetJune Stories: Belinda's Toasty Turtle and Blanket

Once the blanket and baby turtles were complete, I realised they needed a companion. I hoped to make a cushion, so I bought the AquaAmi and Simple-Shell Sea Turtle patterns.

PlanetJune Stories: Belinda's Toasty Turtle and Blanket

The turtle pattern didn’t prove big enough for a cushion, so I made a heat pack! The shell, head, legs and tail are crocheted with 10-ply cotton held double, and a 5.5 mm hook. To make sure the heat would be close to the surface, I crocheted the tummy with one strand of yarn and a 7 mm hook. Other than that, I did not make any changes to the pattern.

PlanetJune Stories: Belinda's Toasty Turtle and Blanket

I sewed a little canvas shape and filled it with wheat, then put it against the tummy side, packed polyester stuffing between it and the upper shell, then attached the head. I used plastic backed eyes. It’s been in the microwave quite a few times and seems no worse for wear.

PlanetJune Stories: Belinda's Toasty Turtle and Blanket

I usually use a heat pack when I have a sore tummy and am feeling a bit sorry for myself. Having a warm, friendly turtle looking after me is lovely at a moment when I need that extra bit of care.

PlanetJune Stories: Belinda's Toasty Turtle and Blanket

I love June’s patterns, and I love my toasty turtle!


(Back to me, June, again!)

I love your idea, Belinda! It’s such a good idea to make the turtle into a heat pack – I’d never have thought of that, but I think I might need to make one for myself now – a warm cuddly turtle to soothe a sore tummy sounds very appealing 🙂

(And isn’t that long narrow blanket the perfect shape for lying on the sofa? This entire project is very cozy and snuggly!)

Thank you so much, Belinda, for sharing your story with us today 🙂
Please leave Belinda a comment if you’ve enjoyed this post!

PS – If you’d like to make your own turtle beach blanket and/or toasty turtle, here are the links to all the PlanetJune crochet patterns Belinda used:


Do you have a PlanetJune Story you’d like to share? I’d love to hear it! Please email your story to june@planetjune.com, together with one or more high quality photos showing what you’ve made from PlanetJune patterns. If I choose your story to feature here on the blog, I’ll send you your choice of pattern from my shop to say thank you!

Comments (7)

Crochet Tools – last chance!

This is your last call to order from my Crochet Tools shop before it closes tomorrow (Wednesday) night.

If you’re reading this after June 15th, click here to sign up to be notified next time the shop opens!

Below, I’ll give you a quick rundown of what I have on offer this time – the classic PlanetJune tools plus exclusive new products! I only open the tool shop once or twice a year*, so if anything catches your eye, please don’t wait – get your order in now before the shop closes…

(And if you’ve already placed an order but want to grab something else while you have the chance, I’d be happy to combine your orders and refund you for the second shipping charge – just let me know!)


Detail Stuffing Tools

The ever-popular PlanetJune-exclusive stuffing tools are back, in all 5 cheerful colours:

Detail Stuffing Tools for Amigurumi and Plush by PlanetJune

The Detail Stuffing Tool lets you get a grip on your stuffing, stuff the tiniest pieces and stuff right into the corners with ease. Don’t miss out on your chance to grab my bestselling tool that’s already an essential for thousands of amigurumi makers!

Detail Stuffing Tool Handles

If you’ve ever wished your stuffing tool was just that little bit longer or stronger, the Detail Stuffing Tool Handle is just what you need! Made from high quality aluminium, the handle is strong, lightweight, rustproof, and will last a lifetime. Note: At their low introductory price, these have been selling like hotcakes!

Crochet Tools by PlanetJune: an aluminium Handle for the Detail Stuffing Tool

The Detail Stuffing Tool Handle is available as a Standard 4″/10cm length (pictured above), an Extra-Long 6″/15cm version, or a value pack of both lengths. They give your tool added strength and longevity, plus over an inch (Standard) or three inches (Extra-Long) of extra length, so you can place your stuffing further into your amigurumi with ease.

PlanetJune Enamel Pins

I’m thrilled to be able to bring my first pin designs to you! PlanetJune Enamel Pins are high quality, wearable and collectable. Pin them to your jacket, your backpack or your project bag, decorate your cork board, or add them to your pin collection.

enamel pins: PlanetJune Logo and Turtle Beach designs

Choose between the stylish PlanetJune Logo pin, a precious baby sea turtle on the Turtle Beach pin, or a value pack including one of each pin!

Vinyl Stickers & FREE Signed Bookmarks

Show your PlanetJune love with a premium vinyl sticker that will stick on any flat surface! Stick it on your notebook, your laptop, your coffee mug, even your car’s bumper…

Crochet Tools by PlanetJune: vinyl stickers and free signed bookmarks

And, by request, here’s another chance to pick up a free signed Collector’s Edition bookmark to go with your collectible copy of my out-of-print first book, The Complete Idiot’s Guide to Amigurumi. (And if you don’t own the book but still want a signed bookmark, that’s fine too – I have plenty left, and I’d be happy to sign one for you!) This bookmark is totally free with the purchase of anything else from my Crochet Tools shop, or, if you don’t need anything else, you’ll just pay the cost of a stamped envelope.

More Crochet Tools

Crochet Tools by PlanetJune: extra-strong stitch markers, yarn needles, embroidery and handsewing needles

PlanetJune Stitch Markers are back in extra-strong black plastic with a wider opening, but still with the same rounded tip that won’t snag your yarn, a secure clasp that won’t pop open accidentally, a large enough size (3cm/1.2″) to be able to open and close easily, and a super-cute safety pin shape. Sold in a set of 5.

Needles in Flip-Top Pebble Cases – finally, the perfect way to store your needles so you won’t lose them! The stylish flip-top Pebble container is smooth and flat and easy to slip into your project bag, but large enough not to be mislaid. Each high quality needle slides into its own space in the Pebble, so it’s easy to see if you’ve forgotten to replace it after use. Available in three varieties:

  • The Knitters Pebble (jade) includes 3 large assorted yarn needles for weaving in the yarn ends on your crochet or knitting projects.
  • The Tapestry Pebble (lavender) includes 6 assorted tapestry needles for embroidery (including embroidering faces on your amigurumi!)
  • The Household Pebble (pink) includes 12 assorted general hand sewing needles for emergency repairs or any other sewing projects.

That’s everything! You can find them all on one convenient page in the Crochet Tools shop, so do head over and have a browse – but please be quick, the shop closes tomorrow night. ⏰

* In case you’re wondering why I don’t keep the shop open all the time, this isn’t a marketing ploy – it’s just not logistically possible for me. Canada Post’s only international shipping option is slow, expensive and untracked, so I use a cross-border shipping service instead. It’s faster, cheaper, and includes tracking as standard, but to use that I have to ship all my orders at once, in a single batch. So now you know: there is a good reason!

Comments (2)

16 years, 1000 blog posts

16 years ago today, I hit ‘publish’ on my first post to this blog. Short and sweet, I said:

I hope I’ll be inspired to be more creative by keeping track of my crafts here.

I think I succeeded in that hope! Here are just a few of my favourite projects from the past 16 years:

a variety of craft projects by June Gilbank: crochet, punchneedle, papercraft, polymer clay, knitting
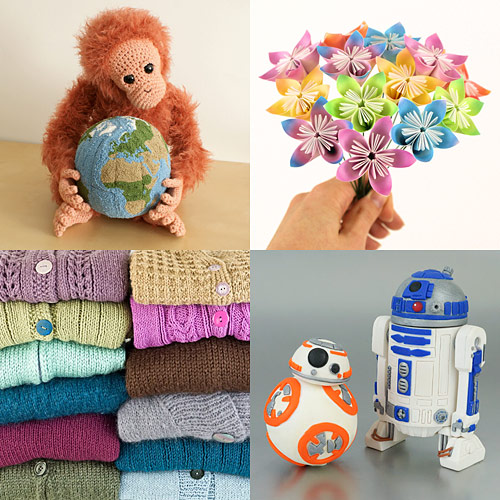
Clockwise from top left: crocheted orangutan and punchneedle embroidery globe, papercraft flowers, polymer clay R2-D2 and BB-8, knitted sweaters

And, 6 years ago, on my 10th blogiversary, I said:

Little did I know that this blog would change my life and my career path, allow me to build a successful business, and help me to meet some of my best friends and inspiring crafters all over the world. PlanetJune (the business, and my career) has all come about as a direct result of starting a little blog as a way to document the things I make, way back in 2006.

That is so true! Thanks in large part to this blog, I stumbled into becoming first a crochet designer, then a full-time self-employed business owner, then a published author, and paid teacher, speaker, YouTuber… Would PlanetJune even exist today if I hadn’t started this blog?! Probably not.

A Thousand Posts in 16 Years

This, today, is my 1000th post. That seems like an impossibly large number, but it’s only an average of 5.2 posts per month (for 192 months)! Right from the start, I vowed to only ever post when I have something to say, so I never followed the typical advice to post on a regular schedule. In my early fast-paced youthful days I’d sometimes post 2 or 3 times a week; these days, it’s more like 2 or 3 times a month, but I’m still here, and still going.

I’ve just looked back to some of those early posts, and my writing style has definitely evolved over the past 600,000 words. (That’s enough words to fill eight 300-page novels – it’s no wonder I’ve developed as a writer…)

My blog has been there through everything with me, slow and steady, chronicling my progress and sharing my creative ideas with you. I’ve made friends from all over the world and bonded over our shared love of crochet, crafting, animals and nature.

wildlife photos by June Gilbank: lion, peacock butterfly

Life can be hard, but when you can make lovely things and appreciate the wonders of nature, it always makes life feel that little bit better, don’t you think?

In today’s fast-paced world of stress and social media, I hope I can provide a little oasis of calm from the overwhelm every now and then, and I’m honoured that you choose to spend a little time with me here.

The Rise and Fall of Craft Blogging

Blogging has changed a lot since I first started in 2006. There was no social media at all back then, and the craft blogosphere and forums were the main ways that crafty types met online, made friends, and shared ideas and projects. People would flock to new blog posts, nobody expected your photos to be professional quality, and you’d get lots of affirming comments whenever you posted. It was, simply, fun!

In 2013, Google Reader (the main way people kept track of blogs they followed) closed down, and blogs were ‘replaced’ by social media. Was this the end for blogs? Who would bother to visit my blog when they could see so much more stuff in one place on Facebook, or Instagram, or Pinterest..?

Never one to follow the trends, I stuck with blogging anyway, and I’m so glad I did. I have all the usual social accounts (I’m @planetjune everywhere if you want to follow me) but I really like writing: crafting a post slowly, and editing it multiple times before I hit ‘publish’.

Blogging just fits me. It’s slower, more thoughtful, and longer-lasting. Social media is fleeting – if you miss something when I first post it on a social account, it’s unlikely you’ll ever see it – but you can browse through my 16 years of blog posts (or choose a category to browse through, or search for something specific) at any time. Or when you google for something, a post I wrote over a decade ago may still be relevant and pop up for you:

Shrinkydinks Rings by PlanetJunee.g. google “shrinkydinks rings” and my tutorial from 2008 is still the first result!

An Oasis of Calm

These days, most of the remaining crochet and craft blogs are jam-packed full of ads. Those ad boxes are the primary source of income for many designers, but isn’t it frustrating when a pattern, tutorial or recipe is constantly interrupted by ads?

I find it so jarring, so I’ve stubbornly stood my ground about keeping PlanetJune ad-free, even though I’m leaving hundreds – maybe thousands – of dollars per month on the table. My goal in life (and business) isn’t to make the most money by any means possible, and it just seems wrong for me to make money at the expense of your comfort… so, I don’t!

I hope you appreciate the refreshing ad-free experience here. 🙂

Thank You!

Although very few people leave comments on blogs any more, that just makes it more of a delight every time someone does leave me a comment. And every now and then I get an email from a reader who’s still out there, reading and appreciating, and sending me their own news in return – that always makes my day.

So, friend, whether you’ve been with me since the early blogosphere days or you just found PlanetJune this year, I’m so happy you’re here, and I hope you’ll stick around to see what comes next!

Cheers! ?

Comments (17)

Custom Enamel Pins

I’m so excited to have developed a new product line that I’ll be launching soon: PlanetJune Enamel Pins! They’ll be perfect to add to your jacket, your project bag, or to add to your pin collection. Looook what I made!

enamel pin: PlanetJune logo

I love how stylish the PlanetJune logo looks in pin form with the shiny silver.

And I designed another pin based on my Turtle Beach pattern collection (awww, who can resist a precious baby sea turtle?)

enamel pin: PlanetJune Turtle Beach

PlanetJune Pins – Coming Soon!

Would you like a PlanetJune pin or two? I’ll be offering these special PJ pins as part of my upcoming Crochet Tools flash sale, so you can save on shipping by placing a single order for everything you need – including the classic tools, the new pins and more brand new products.

The Crochet Tools shop will only be open for a few days, and supplies are limited, so click here if you’d like me to send you an email as soon as the shop opens!

How to Make Custom Enamel Pins

In case you’ve been wondering how to create your own custom pin designs, I’ll walk you through the process and my experience.

I ordered my pins from WizardPins, who made the whole process very straightforward. Although I had no idea what was involved in pin design before I started, the team were very responsive with answering my questions and helping me figure out what I needed.

Designing Your Pin

Enamel pins need a specific type of design – every area of colour needs to be separated by a thick line so the coloured enamel paints can be applied into the separate sections of the pin. The lines appear as metal outlines in the finished pin. A simple design is better, as fine details may be too small to be reproduced in the pin.

If you can draw your design as a vector (as I did) you can customize your design to look exactly the way you want it:

  • The strokes (outlines) – of any width you want – will all become your choice of silver, gold, copper or black-plated metal
  • The fills (areas) – in the colours you want – will become coloured enamel

But if all that sounds like gibberish to you, it’s no problem – the WizardPins artists can take any artwork you provide – a drawing, a photo, or even a written description – and create a pin design from it at no extra charge. The turnaround time is fast, and they’ll send you a digital mockup by email to approve. You can request changes as many times as you need until you’re completely happy.

Although I didn’t end up using their artists, I did try out the service – I sent over a photo to be converted to line art:

photo converted to line art

The artist was faithful to the photo I provided, but interpreted the crochet stitches with lots of wiggly lines (not at all what I had in mind!) and the turtle was far too wonky for my taste. I had originally asked for the turtle to be dark grey and for each colour to be a solid block, and I could have asked them to make those changes to the initial mockup – that’s part of the full service they offer – but you can probably guess that I’m too much of a control freak to let anyone else draw my design for me… ?

Tip: Based on this experience, I’d suggest that if you’re submitting artwork for a pin, try sending a sketch instead of a photo, so the artist will have a better idea of what you’re looking for. They can easily turn a simple sketch into a colourful design for you.

I redrew my turtle beach design in Illustrator in my clean PlanetJune style, then submitted it and my logo to be converted to pins. Almost immediately, they sent me back PDF proofs to approve before we finalized the order.

mockup proofs for enamel pins from WizardPins

This time, the proofs looked perfect, so it was time to submit my order and wait for my pins to arrive!

Pin Manufacture and Delivery

Although WizardPins is a US-based company, the pins are printed in their factory in China, like almost all enamel pins. Their turnaround time is usually much faster than you’d imagine: only 2-3 weeks between placing an order and receiving your pins – that’s pretty amazing!

I had a different experience, but it was just due to bad luck: I unfortunately chose to order at the worst possible time: just as my pins were due to be printed, the factory was forced to close due to the recent COVID shutdown in China…

As a result, I had to wait for 2 months for my pins to arrive, but that was nobody’s fault, and WizardPins were great about it – they kept me informed whenever I asked about my order status, and sent me pics of my finished pins from the factory to tide me over while I waited for FedEx to resume international shipping from Shanghai.

And it was worth the wait! My designs have been brought to life in shiny metal and colourful enamel, and they look amazing!

enamel pins: PlanetJune Logo and Turtle Beach designs

Aren’t they wonderful? The quality is absolutely perfect – they are exactly what I’d hoped for.

enamel pins: PlanetJune Logo and Turtle Beach designs

Thank you to WizardPins for this collaboration – I love these pins so much, and after seeing how well these turned out, I already have ideas for more PlanetJune pin designs!

PS – Don’t forget to sign up to be first in line when the PlanetJune pins are available to purchase! ?

Comments (1)

  • Quick Links: Crochet

    navigation: arrow

    buy crochet patterns and accessories from my online store

    'Everyday Crochet' and 'The Essential Guide to Amigurumi' crochet books by June Gilbank

    Crochet video tutorials and step-by-step photo tutorials

    Free PlanetJune crochet patterns

    Frequently Asked Questions

    Quick Links: Crafts

    navigation: arrow

    Punchneedle Embroidery information, ebook & patterns

    Papercraft ebook & tutorials

    Free PlanetJune craft projects & tutorials

  • Blog Post Categories

  • Blog Archives

  • Welcome to PlanetJune!

    June Gilbank

    Hi, I'm June. Welcome to my world of nature-inspired crochet and crafting. I hope you enjoy your visit!

    If you'd like to get in touch, you can contact me here.
    crocheted Canadian flag by PlanetJune
  • A fanned-out pile of the books Everyday Crochet and The Essential Guide to Amigurumi, with text 'The answers to all your crochet questions at your fingertips - find out more'
  • Support PlanetJune!

    Want to say thanks? You can send me money in seconds at paypal.me/planetjune (over $20) or paypal.me/planetjune2 (under $20) or send me a donation through my shop.

    Or simply click through from my links before you shop at Amazon, Etsy, KnitPicks, LoveCrafts or Crochet.com, and I'll make a small commission on your purchase, at no cost to you! Start here:

    ♥ Support PlanetJune ♥

    Tip: This link is also in the footer of every page!

    Thank you so much for your support!