PlanetJune Craft Blog

Latest news and updates from June

Archive for July, 2012

vacation crochet

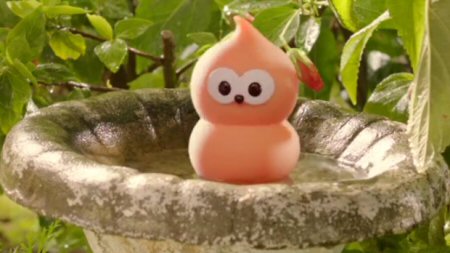
In the UK, there’s a TV ad campaign for an energy company featuring a character called Zingy. It’s a hugely popular series of commercials, but there’s no official Zingy merchandise available (yet).

Zingy from EDF Energy commercial
Zingy character and photo copyright Beatbots LLC, for EDF Energy commercials.

My sister is a big fan so I told her I’d make her a Zingy. Of course, I had no craft supplies with me, so I had to buy everything I needed locally – quite a challenge on the tiny island of Jersey! The best I could manage was DK weight yarn, a 3mm tapered hook (as far as I could tell, there are no in-line hooks available in the UK…), fibrefill, and some black and white felt. Here’s what I came up with:

zingy fan art by planetjune
My crocheted Zingy fan art. I’m not licensed to produce a pattern for the Zingy character, so please don’t ask me for one!

Considering the constraints, I think he turned out well, and the recipient is happy, so that’s the main thing πŸ™‚

I also had a chance to solve a problem using crochet: my sister had a dress with plastic rings connecting the bodice to the straps, but one of the rings had broken. The only way to replace the ring would be to unpick the stiching on the bodice loop and the strap, and re-stitch them around a new ring. And then I had the idea to crochet a ring directly, with no need to unpick any stitching. I bought some embroidery floss in a complementary colour, made a magic ring that passed through both strap loops, and crocheted over it, rotating it as I crocheted so the straps didn’t get in the way.

Of course, I had to replace both rings so both sides of the dress would match, but it only took a few minutes to crochet each replacement ring, and it ended up looking prettier than with the original plastic rings:

crocheted dress strap rings by planetjune
Close-up of new rings attaching the adjustable straps to the dress bodice, crocheted from embroidery thread.

I had packed yarn and hook to create my next crochet lace shawl design while I was away, but I didn’t even get halfway through it as I only worked on it during my flights and on one evening. But that’s okay – I can still look forward to finishing the shawl (I’m planning to do a beaded edging), and I’m glad I could do a little helpful crochet while I was visiting my family!

Comments (1)

Ravellenic Games training

I’m back from visiting my family! It was lovely to see them, but, wanting to make the most of my rare time with my parents, sister, and brother-in-law, I didn’t slow down when I got first a sore throat and then a cold, and as a result I’ve ended up with full-blown bronchitis (not much fun). Now I have to try to recover while trying to catch up on everything from the last week, but it was worth it to have some special family time πŸ™‚

Ravellenic Games 2012: Team PlanetJune

I haven’t had a chance yet to remind you about the Ravellenic Games, which start tomorrow! If you’d like to challenge yourself to crochet anything from any of my patterns, there’s still time to join Team PlanetJune and compete along with us to complete crochet projects and earn medals during the timeframe of the Olympic Games.

Prizes!

If you complete one or more events for Team PlanetJune, you’ll be entered into the draw to win special prizes from PlanetJune and Suncatcher Eyes.

There are a total of six prizes on offer:

  • $10 gift certificate for the PlanetJune shop (1 winner)
  • A free pattern of your choice from PlanetJune (2 winners)
  • 10 pairs of eyes (your choice of colours and sizes) from Suncatcher Eyes (1 winner)
  • 5 pairs of eyes (your choice of colours and sizes) from Suncatcher Eyes (2 winners)

And all other medalling (not meddling!) Team PJ members will receive the runner-up prize of a PlanetJune discount coupon – there are no losers here πŸ˜€

Events

There are lots of Events you can participate in (and we have a handy events’ list for the ones that are applicable for Team PlanetJune), but I thought I’d give you a couple of examples with the projects I’m hoping to medal in:

WIPs Wrestling
RULE: not touched since May 15 2012; projects can’t cross compete in other events

As my original amigurumi kingfisher unfortunately went MIA after being photographed for a certain magazine, I’ve been wanting to crochet a replacement. I started last year, but I’ve been so busy since then that I haven’t had a chance to work on it for months, so the Ravellenic Games will be the perfect opportunity (and incentive) to get him finished.

wip: amigurumi kingfisher by planetjune, in progress
I don’t think I’ve touched this kingfisher project bag since 2011!

Toy Toss
I won’t be crocheting any other existing PlanetJune patterns for the games, but this is the event category you can use for all my amigurumi! There is no design event, so I’ll be entering my next commissioned design, the Sea Otter, in the Toy Toss event too. To medal in this event, my challenge to myself will be to complete the actual design and sample otter, and not necessarily to publish the pattern by the end of the games (there’s no point in including the pattern writing in the challenge, as I need the instructions to be clear and perfect, and I can’t rush that).

Synchronized Stash Busting
RULE: use only stash yarn that is over a year old

You can qualify for the stashbusting event with a project that’s already entered in another event, so my Sea Otter design will also qualify here, as I originally bought yarn with a sea otter design in mind in 2008 (as part of an AquaAmi Set 2 that I never finished). I just never got around to actually designing it until it was commissioned – one of the reasons I love my new commissions process! But the yarn is still sitting in my stash, ready to go.

wip: amigurumi sea otter by planetjune, in progress
Some, but not all, of these yarn colours will be turned into a cute sea otter…

Training
We’re not allowed to start our projects until the Olympic opening ceremony (9pm tomorrow, UK time, i.e. 3PM Eastern, noon Pacific), but training (i.e. research, swatching, choosing yarns, etc) is allowed! So I’ll be relaxing on the sofa with my laptop and trying to get this bronchitis under control while training for the Toy Toss by doing lots of sea otter research. It’ll be fun – sea otters are totally adorable and I’m looking forward to learning more about them, to make sure my design will be perfect.

I’ll also be hunting through my big yarn stash bags to see if I can locate the cream colour I had bought for my otter’s face. Otherwise I’ll just give him a light taupe face instead, which is fine – sea otters’ faces lighten with age, so mine can just be a younger one πŸ˜‰

Join us?

Team PlanetJune - Ravellenic Games 2012

We’ll all be cheering each other on with our projects, so if you’d like some added motivation to help you crochet something special over the next couple of weeks, please join Team PlanetJune – we’d love to have you, and you may win a prize too! You can join at any time during the games, which end on August 12th, so don’t worry if you miss the opening ceremonies tomorrow.

It’ll be fun to see how many medals we can amass between us by the end of the games. Go Team PlanetJune!

Comments (1)

crochet seat cover

This post comes to you from beautiful Jersey, where I’m visiting my parents at the moment. My chair and I are actually on different continents right now, but I finished making this cover and took the photos before I left on my travels…

You may remember that the only way I was able to fix my badly-ripped office chair seat was with ugly frankenstitches:

mending my chair
I fixed the rip, but it’s certainly not pretty…

I decided to crochet a quick seat cover to hide the unsightliness. I picked a stitch pattern from a Japanese stitch pattern book and looked through my stash for some suitable yarn. I decided on Loops & Threads Impeccable – it feels hard and tough compared with the soft acrylics I usually use, so I’m hoping that means it’ll be hard-wearing too. I picked black to match the chair, with a dark red accent to match my fireplace, and started crocheting…

crocheted seat cover by planetjune
This stitch pattern was really fun to crochet!

(These really aren’t my colours, but working from stash means making compromises, and at least it matches the chair. Anyway, I won’t really see the finished cover much as I’ll be sitting on it almost all the time, so it doesn’t matter too much what it looks like – I just don’t want to see the ugly ‘scar’ from the giant rip any more!)

My one skein of black Impeccable just covered the seat top, with no yardage left over to crochet the side edges to keep it in place. I thought I’d use up some dark grey Impeccable for those, but at the first fitting I realised that wasn’t going to work:

crocheted seat cover by planetjune
Yuck!

So I sacrificed some of my precious Vanna’s Choice so I could redo the sides in black, and I ended up with this:

crocheted seat cover by planetjune
Much better!

A few details:

crocheted seat cover by planetjune
A custom-curved side at the front helps the top piece fit over the curved front of the cushion and stay in place.

crocheted seat cover by planetjune
I crocheted extra tabs at the back to tuck into the very tight space between the back and seat cushions (left: untucked tab; right: wedged into place). The tabs hold it all very firmly in place without visible ties.

And the end result is a nicely fitted cover:

crocheted seat cover by planetjune
It fits like a glove!

This was a satisfyingly fast project to complete, and it’s really nice to be able to use my crochet powers for good (I mean, to solve a problem by making something I actually need). The finished seat cover is a big improvement over the frankenstitches, and now I’m saved from buying an expensive new chair – mission accomplished! πŸ™‚

Comments (24)

Free-For-All CAL roundup

This extended 6-week CAL was a Free-For-All, so participants had free choice to make any PlanetJune patterns they wanted (amigurumi, accessories, free patterns, patterns from my book). It’s interesting that with 120 patterns to choose from, you can see some definite trends in what people chose to crochet, but also loads of variety.

Team PlanetJune - Ravellenic Games 2012

Now it’s time for me to take a short break while I visit my parents.

The next CAL will be the Ravellenic Games, from July 27th to August 12th. I’d like to invite you to join Team PlanetJune! (See the end of this post for more details.)

Okay, now back to the CAL roundup! I think you’ll be amazed by the number of submissions this month – I certainly was! Now let’s dive into this epic roundup…

__(‘Read the rest of this entry »’)

Comments (2)

review: Mend It Better

I won this book through its blog tour, so I decided to review it for you. The following, as always, is based on my honest opinions!

Overview

Mend It Better: Creative Patching, Darning, and Stitching by Kristin M Roach, who you may know from her blog Craft Leftovers, is a combination book consisting of basic mending advice and project tutorials for creative mending.

'mend it better' review

The tutorials, mostly contributed by other crafters, show a variety of mending options to cover tears, holes and stains by crafting embellishments or making a feature of the damaged area, and upcycling projects to improve badly-fitting clothing or thrift store finds. Kristen also provides a tutorial for making a cute zippered mending kit.

'mend it better' review
Colourful creative mending projects (e.g. this page is from the Mola Applique Patch tutorial by Carina Envoldsen-Harris)

The bulk of the book is reference material: it includes a lot of excellent mending information: repairing various fabrics; fixing damaged seams and buttonholes; repairing or replacing damaged zips and pockets, and much more. But calling it just a ‘mending book’ doesn’t really do it justice (and I haven’t seen this mentioned in any other reviews) – it also includes instructions for alterations you can make to your clothing: taking in a seam, adding hidden pockets, taking up a hem, adding bead or stitched embellishments, etc.

'mend it better' review
Detailed information, e.g. how to mend pile (left) and stretch (right) fabrics

The information starts from absolute basics – no prior knowledge of sewing equipment or techniques is assumed. The written instructions and accompanying photos are clear and comprehensive. Although I’m not in love with the narrow 3-column page layout, it’s efficient – there’s lots of information on each page but it doesn’t feel cramped. All project steps are clearly numbered, so it’s easy to follow the instructions.

'mend it better' review
Mending information starting from the basics

My Experience

I skimmed through the whole book to give me a basic idea of techniques I could use at the moment and then decided to fix a backpack where the fabric had frayed along the seam allowance and left a big hole along the seam. I used my sewing machine and sewed a patch onto the back of the frayed fabric, then unpicked the original seam and re-sewed it to include the patch. I didn’t think to take a ‘before’ picture, but, as you can see, the result is pretty much invisible:

mended backpack
The fabric had frayed along the seam, leaving a big hole between the arrows.

Next I consulted the section on fixing leather. I had assumed my office chair was real leather until it started to wear through and rip, and I could see the sad pleathery truth. Months ago, I tried to mend it with Speed Sew fabric repair glue, but it didn’t hold, and the rip worsened every time I sat down until it reached this sorry situation:

mending my chair

The rest of the chair is fine, though, so I really needed to fix it somehow before the exposed foam started to disintegrate and made the chair unusable.

As my ‘fabric’ is cheap faux leather, I wasn’t sure if the leather-mending instructions would work, so I started with this tiny hole on the other side of the chair front, to test the method. I tried the ‘mending a tear in leather’ instructions but, although the instructions were fine, it quickly became apparent that it wouldn’t work in my case – the pleather tore with any stress on it, so I ended up having to make large whipstitches over the top of the hole to keep it together. Result: a mended hole, but not a pretty one.

mending my chair
Tiny hole, before and after stitching

By this point, I could tell that fixing the giant rip neatly was not an option, so I decided to go for a functionally creative mend, using patching and gluing techniques from the book in addition to trying to sew the hole so it would stay closed.

mending my chair

I cut some black webbing to fit inside the gaps, and then slowly glued a section of the seat cover to the webbing, and stitched the hole closed. The rip was so large that pulling the sides together was extremely difficult, especially as the seat fabric ripped if the stitches were too close to the ripped edge. I found that making large stitches through the fabric and into the webbing was the best bet – the stitches kept the fabric in place against the webbing while the glue dried, and added support for the glue.

mending my chair

It was a long, hard job – stitching through thick webbing with a thin curved upholstery needle is hard work, but a thicker needle would have damaged the pleather even more, so I persevered. And here’s the result:

mending my chair

No, it’s certainly not pretty, but it all holds together: my frankenstitches feel very stable with the glued webbing to back them up, and I think I’ve succeeded in saving the chair – the foam shouldn’t degrade any more now it’s safely hidden away. Now I just need to crochet a seat cover to hide the frankenstitches, and my chair will be as good as new πŸ™‚

I’d ignored these problem for months, but having a book of mending techniques at my disposal makes me feel like I can tackle these things. Next I’m going to try fixing a too-loose zip that keeps falling down!

Peeves

  • There’s a lot of information contained in the 200+ pages of this book, and some of the chapter headings are a bit broad and unclear (e.g. the Surface Fixes chapter includes fixes for snags and pulls, how to fix a patch pocket, 2 different project examples of adding new patch pockets, and instructions for re-pleating a skirt, while the Getting Fancy chapter includes lace, leather and stretch fabric repair). A one-sentence summary of each chapter on the Contents page would have been very helpful – I’d never have thought to look in ‘Getting Fancy’ to find the leather repair instructions! – so I definitely recommend consulting the index if you’re looking for something in particular.
  • I have a very understated taste in clothing and I can’t imagine using any of the project ideas on my own clothes. They’d definitely be a fun way to extend the life of children’s clothing – which are much more likely to need mending anyway – or if you have a less conservative dress sense than me. Having said that, if I look at the projects as embellishment tutorials instead of mending tutorials, I could adapt them for decorating cushions, bags, etc, so they still have some value to me.

Final Thoughts

Mend It Better: Creative Patching, Darning, and Stitching has plenty of eye candy and project ideas for creative mending, upcycling and embellishing. For me, though, the real value of this book is in the well-explained techniques that will let you fix and mend common problems and make alterations to get more mileage out of your clothing (and also luggage and even upholstered furniture: although the book focuses on clothing, the techniques can obviously apply to any repairs of fabric, zips, buttons etc).

The techniques explained here are absolutely worth the purchase price, even if none of the projects appeal to you, so I recommend Mend It Better as a solid reference for a variety of sewing and mending techniques. I’ll be keeping my copy in my reference library, so I’ll have more confidence in attempting fixes and alterations for my clothes, and I’ll be well prepared next time I have a mending emergency!

Comments (8)

July update

Over the past couple of weeks, I’ve started some purely recreational craft projects to keep my hands busy in the evenings and weekends so I don’t accidentally start doing work again all the time. I’ve decided to try designing a couple of cardigans for myself. As I have no interest in becoming a professional knit/crochet-wear designer (I can’t do everything!), I don’t have to worry about taking notes or keeping my designs easy to follow, and I can hopefully tailor them to fit me, not the mythical average-sized woman.

To keep things interesting, I’m designing one in crochet (using some lovely Lion Brand Cotton Bamboo yarn that I’ve been hoarding for well over a year) and designing a knitted one too (and yes, this really will be my second knitting project ever, and my first attempt at purling!) – I’ll teach myself the other knitting techniques I’ll need as I go!

WIP cardigans - knit and crocheted - by planetjune
My WIPs: knitted and crocheted cardigans. I think I can do this!

Making any kind of fitted clothing is all very new to me, but I thrive on challenge and don’t like following other people’s patterns, so these are actually perfect relaxation projects for me. I can try them on as I go and adjust things if I need to. I really hope that my years of designing 3D shaping and beautiful stitch patterns will let me create clothing that doesn’t look embarrassingly home-made or ill-fitting, but that remains to be seen…

I’ll post photos and more details of each when I’ve finished them! I attached the first arm to the crocheted one last night, so that should be finished soon, but the knit cardigan is obviously going to be a very long-term project, assuming I can ever finish it. And that’s just fine – no rush, no stress, no deadlines; I’m just enjoying the process.

And now for some other news:

Vacation Shipping

As I’ll be visiting my parents later this month, I won’t be able to ship any orders while I’m away. So, please, if you need any crochet tools (Amigurumi Essentials Kits, Detail Stuffing Tools, Stitch Markers), order them by July 12th so I can mail them to you before I leave! Any orders received after this date will be shipped on my return, on July 30th.

Note: only the Crochet Tools category of my shop will be affected by my vacation – all patterns are instantly downloadable, as always πŸ™‚

Review and Win contest

June’s ‘Review and Win’ winner is Haley B, with her Chunky Elegance Rug Trio review:

PlanetJune Accessories Chunky Elegance Rug Trio crochet pattern

This is a wonderful pattern and easily customizable! I made mine with only one strand of bulky weight yarn and it is still very large – I also used two colors and it looks beautiful like that as well. With only one strand, I used about three and a half balls of yarn. I highly recomend this pattern; don’t be intimidated by how intricate it looks because the instructions are very clear!

Congrats Haley – I’ll email you to find out which pattern you’d like as your prize πŸ™‚

To be entered into this month’s draw for a free pattern of your choice, just write a review of any product in my shop – thank you!

Comments (4)

the cleanest stripes in amigurumi: a comparison

Spoiler alert: in doing this amigurumi stripe technique experiment, I invented 2 new techniques that make much neater stripes than I’ve ever seen before! If you’re not interested in my experiments, jump straight to the Perfect Stripes for Amigurumi video tutorial πŸ™‚

perfect stripes for amigurumi by planetjune


It’s usually best to work amigurumi in a continuous spiral, to avoid any visible seams. The most useful reason to use joined rounds instead is if you’re forming stripes: you end up with a very obvious ‘jog’ between the start and end of each stripe with spiralled rounds, as the ends don’t meet.

striped amigurumi by planetjune
Some examples of stripes in amigurumi

I’ve had requests for a video showing how to crochet neatly in joined rounds, and, while making my sample for the video, I didn’t like the results I was getting, so I thought I’d try a little experimentation to make sure I’d demonstrate the best way to make joined rounds for stripes, with the joins as seamless and jogless as possible…

Joining: the basics

To form joined rounds in single crochet, when you reach the end of a round, you sl st into the first stitch of that round. Then, to raise your hook to the height of the next round, you ch 1. But there are several ways to accomplish this, so I tried every option I could think of, to see what gave the best result and whether it’s worth joining your rounds or not…

Spiral (no join)

The standard amigurumi continuous spiral.

#1: Change to new colour in the last loop of the stitch before the colour change, sc in each st around.

amigurumi stripe investigation by planetjune
It’s the bane of amigurumists: perfect stripes from the front (left), but a ‘jog’ at the back (right, marked by arrows).

The stitches are all even – there’s no seam at all – but the ends of the stripe don’t meet up at all.

Travelling Join

#2 and #3 are the same except for the point where you change colour (before or after the sl st).

Ch 1, sc in next st and in each st around, sc in sl st, skip ch 1. With [#2: same; #3: new] colour, join with sl st to first st.

amigurumi stripe investigation by planetjune

The seam is almost invisible but the colour jog is still fairly prominent with both options. #2 has too much yellow, and #3 has distracting bars of brown showing at the join of the yellow.

amigurumi stripe investigation by planetjune

And here’s the main problem with using either of these Travelling Join methods: the end of the round travels forward by one stitch with each round (marked by dotted lines in the pic to the right). This means it’s impossible to hide your seam at the back of the piece, because the seam moves with every stripe.

So far, #2 is the winner.
I should just add here that NeedleNoodles also has a jogless stripes tutorial. Her method is far better than both my #2 and #3, but it still uses a travelling join, so you can’t use it for any patterns with shaping (e.g. most of mine, which have shaping that defines the front or top) or anywhere you want to hide all the joins in one line at the back.

Stacked Join

#4 and #5 are the same except for the point where you change colour (before or after the sl st).

Ch 1, sc in first st (the same stitch you sl st’d into), sc in next st and in each st around. Skip sl st, skip ch 1. With [#4: same; #5: new] colour, join with sl st to first st.

amigurumi stripe investigation by planetjune

The stripe ends match up more closely, and the start of the round doesn’t travel. #4 is the method I’ve recommended in the past, and it’s reasonable, although you can see that the yellow has a little jump in the last stitch. #5 has very obvious brown bars at the join of the yellow.

amigurumi stripe investigation by planetjune

The downside with these Stacked Join methods is the series of visible horizontal bars along the seam (marked by arrows here). They’re caused by the sl sts that you don’t work back into, but the end result is that it looks like you’ve stitched along this seam with a series of too-loose whipstitches – and it’s even more obvious in reality than in my photo.

So far, #4 is the winner.

Experimentation

With my research done, it was time to invent my own join. The requirements were:

  • The seam must line up at the back to minimise visibility – it can’t travel around the piece.
  • The horizontal bar from my other stacked joins must be reduced as much as possible.

amigurumi stripe investigation by planetjune

To save you from boredom, I’ll skip a full summary of the couple of dozen variants I tried (you can see some of the rejects in my samples above!) and just present the winners…

Perfect Stripes

I’ve created 2 methods to create the best stripes in amigurumi: the Invisible Join and the No-Cut Join.

amigurumi stripe investigation by planetjune
#6: Invisible Join; #7: No-Cut Join

Can you see how much better they are than any of the standard joins?! The Invisible Join (as the name suggests) gives a slightly better finish, but the No-Cut Join is faster and less fiddly, so I recommend using a combination of the two for any pattern where you need to single crochet in joined rounds and/or make stripes. (More about that on the tutorial page.)

Now I have these new techniques at my disposal, you may well see more PlanetJune patterns involving stripes in the future! Curious how they are done? Allow me to demonstrate…

Continue to the Perfect Stripes for Amigurumi video tutorial >>

Comments (9)

  • Quick Links: Crochet

    navigation: arrow

    buy crochet patterns and accessories from my online store

    'Everyday Crochet' and 'The Essential Guide to Amigurumi' crochet books by June Gilbank

    Crochet video tutorials and step-by-step photo tutorials

    Free PlanetJune crochet patterns

    Frequently Asked Questions

    Quick Links: Crafts

    navigation: arrow

    Punchneedle Embroidery information, ebook & patterns

    Papercraft ebook & tutorials

    Free PlanetJune craft projects & tutorials

  • Blog Post Categories

  • Blog Archives

  • Welcome to PlanetJune!

    June Gilbank

    Hi, I'm June. Welcome to my world of nature-inspired crochet and crafting. I hope you enjoy your visit!

    If you'd like to get in touch, you can contact me here.
    crocheted Canadian flag by PlanetJune
  • A fanned-out pile of the books Everyday Crochet and The Essential Guide to Amigurumi, with text 'The answers to all your crochet questions at your fingertips - find out more'
  • Support PlanetJune!

    Want to say thanks? You can send me money in seconds at paypal.me/planetjune (over $20) or paypal.me/planetjune2 (under $20) or send me a donation through my shop.

    Or simply click through from my links before you shop at Amazon, Etsy, KnitPicks, LoveCrafts or Crochet.com, and I'll make a small commission on your purchase, at no cost to you! Start here:

    ♥ Support PlanetJune ♥

    Tip: This link is also in the footer of every page!

    Thank you so much for your support!