Amigurumi Beach Ball crochet pattern
© June Gilbank 2022
Amigurumi Beach Ball is a fun no-sew pattern for summer – or for any time of year! Make a play ball for the kids, a set of juggling balls, or a stress ball to play with at your desk.
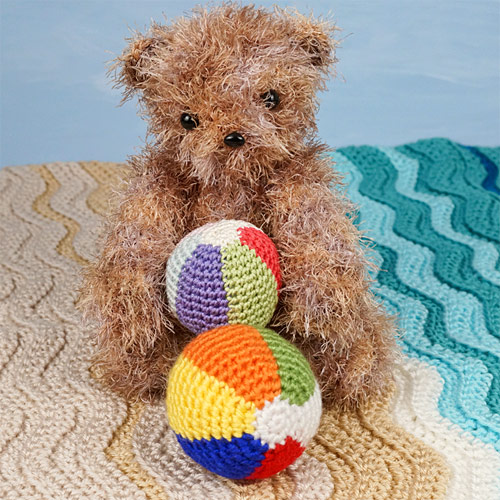
Make it interactive by adding a squeaker, rattle or bell when you stuff it, or stuff it with plastic pellets to make your ball into a bean bag or hacky sack.
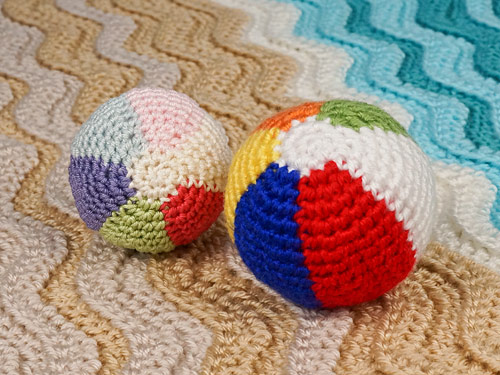
This Amigurumi Beach Ball pattern is Donationware – the pattern is available for free, but if you like it please consider sending me a donation to show your appreciation:
Send me a donation and receive the easy-to-print PDF version of the pattern as a thank you! It includes additional tips and photos that you’ll only find in the PDF version (including instructions for how to fix any too-tight stitches on your finished ball), and the crochet instructions are all included on one printer-friendly page, so you can save paper and ink by printing only that page.
Donations of any size are much appreciated. Just add the amount you wish to donate, and, once you have checked out and paid, your pattern will instantly be available to download from your PlanetJune account.
The complete pattern and instructions are available below, regardless of whether or not you choose to pay for them 🙂
This is a PlanetJune original crochet pattern. Feel free to use items made from this pattern however you wish, but I’d appreciate credit as the pattern designer. Please do not reproduce the pattern anywhere else; instead post a link to www.planetjune.com/beachball/
Not ready to make it yet? Add it to your Ravelry queue: 
Terminology
| ch | chain |
| invdec | invisible decrease Note: If you prefer, you may use a standard sc2tog decrease in place of each invdec. |
| sc | single crochet (double crochet for UK/Aus) |
| scBL | single crochet in back loop only (double crochet in back loop only for UK/Aus) |
| st | stitch |
You will need…
- E US/3.5mm crochet hook
- Small quantity of worsted weight yarn in six different colours (e.g. white, red, blue, yellow, orange, green, or any 6 other colours!)
- Polyester fibrefill stuffing
- Yarn needle to weave in ends
Size
Approx 2.75″ (7cm) diameter. (Your gauge and yarn choice will affect the finished size slightly.)
Scaling the Pattern
As always, you can scale the size up or down by using a heavier or lighter yarn together with a correspondingly larger or smaller hook (see my article on Scaling Amigurumi for further details).
The slightly smaller ball in my cover photos used a sport weight mercerized cotton with a US C/2.75mm hook, and measures 2.5″ (6.5cm) diameter.
Colour Selection
You can choose any 6 colours of yarn for this pattern. Before you begin, decide which of your 6 colours will be the main colour (MC) – this will also be the colour of the top and bottom circles on the beach ball.
Note: This pattern only works as a continuous spiral without an obvious colour jog because the colour of the top and bottom circles is also the first of the six stripe colours!
For my beach ball, I chose classic beach ball colours: white for the main colour, and then red, blue, yellow, orange, green for the 5 other colours.
Tip: Use my Worsted Weight Yarn Comparison chart to see which of your yarns might be a good match to use together in this pattern.
Lay your yarns out in a circle before you start, to make sure you like the colour order for your segments. For example, I found I didn’t like it when orange touched red or blue touched green, so it’s worth doing a little planning before you start!

How the Pattern Works
For every round, you’ll work the first repeat in MC, and then each of the 5 remaining repeats in one of your other colours, always following the colour order you’ve chosen.
It’s easy to remember your colour order: after the colour setup round (Rnd 3), each stitch will be worked into the same colour stitches from the round below.
And, although you’ll change colour 6 times in every round, it’s very easy to manage the yarn ends in this pattern – you can just drop each colour to the back and then pick it up again when you next need it, leaving a long strand of yarn (called a ‘float’) on the inside of the ball.

Tips for This Pattern
Introducing the Colours: In Rnd 3, work the stitches of each colour over the starting tail of the same colour to lock it in place. At the end of Rnd 3, trim off the remaining tails so they won’t show through between the white stitches when you stuff the ball.
Managing The Yarns: I recommend you drop each yarn to the back as you finish with it, and pick it up again when you’ve worked back around to the same colour segment. Give the yarn a gentle tug so the final stitch of the previous round in that colour isn’t too loose, then lay the yarn behind your work and pick it up again so it leaves a loose strand behind the stitches of the same colour.
Tip: Before you continue crocheting, check to make sure your float (the loose length of yarn) isn’t too tight or too loose. You want it to lie smoothly against the inner surface of the piece when it’s been stuffed. If it’s too tight (below, left), the float will be taut and will pull the edges of the coloured segment together. If it’s just right (below, right), the float will lie loosely along the inside of the fabric.
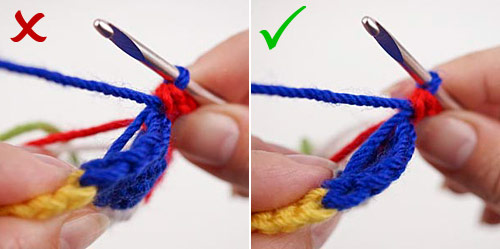
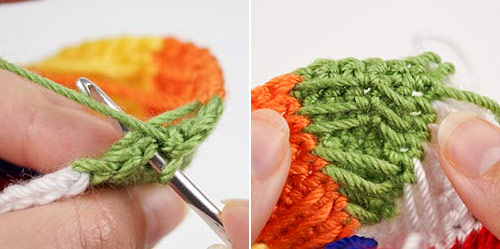
Trapping the Floats: As the ball increases in size, the float (the loose length of yarn) inside the ball gets longer, so there’s more chance that the last stitch of the previous round in that colour will become loosened by taking up some of the slack from the strand. Here’s an optional technique you can use as you crochet, to help reduce this effect. For Rnds 8-14, when you reach the 4th stitch of each colour, insert your hook into the stitch and also under the long float on the back of the piece before you yarn over (below, left), so you’ll crochet over the float as you make the stitch. This will trap the yarn strand so there isn’t such a long free length on the inside of the ball (below, right), reducing the chance that the last stitch will loosen.
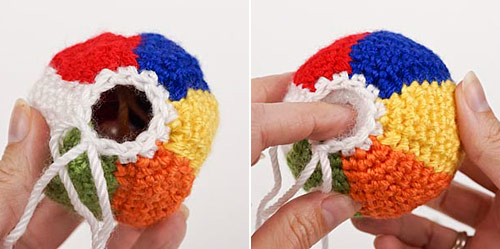
Stuffing: Don’t worry if your ball looks very uneven before you stuff it (below, left) – the magic will happen when you add the stuffing (below, right), turning your lumpy work into a smooth and even ball!
Crochet Instructions
Notes
- Do not join at the end of each round; rounds are worked in continuous spirals.
- Always change colour in the last loop of the stitch before the colour change: www.planetjune.com/colour
Beach Ball
Note: Before you start to crochet, please read through all the instructions above for additional instructions and tips.
With MC, make a magic ring, ch 1.
Rnd 1: 6 sc in magic ring. (6 st)
Rnd 2: 2 sc in each st around. (12 st)
Rnd 3: (sc in next st, [sc, scBL] in next st) six times, starting with MC for the first repeat and changing to each of the contrast colours in turn for the remaining five repeats (here, and throughout the rest of the pattern). (18 st)
Rnd 4: (sc in next st, 2 sc in next st, sc in next st) six times, changing colour for each repeat. (24 st)
Rnd 5: (sc in next 3 st, [sc, scBL] in next st) six times, changing colour for each repeat. (30 st)
Rnd 6: (sc in next 5 st) six times, changing colour for each repeat. (30 st)
Rnd 7: (sc in next 2 st, 2 sc in next st, sc in next 2 st) six times, changing colour for each repeat. (36 st)
Rnds 8-9: (sc in next 6 st) six times, changing colour for each repeat. (36 st)
Rnd 10: (sc in next 5 st, [sc, scBL] in next st) six times, changing colour for each repeat. (42 st)
Rnds 11-12: (sc in next 7 st) six times, changing colour for each repeat. (42 st)
Rnd 13: (invdec, sc in next 5 st) six times, changing colour for each repeat. (36 st)
Rnd 14: (sc in next 6 st) six times, changing colour for each repeat. (36 st)
Rnd 15: (sc in next 2 st, invdec, sc in next 2 st) six times, changing colour for each repeat. (30 st)
Rnd 16: (sc in next 5 st) six times, changing colour for each repeat. (30 st)
Rnd 17: (invdec, sc in next 3 st) six times, changing colour for each repeat. (24 st)
Rnd 18: (sc in next st, invdec, sc in next st) six times, changing colour for each repeat. (18 st)
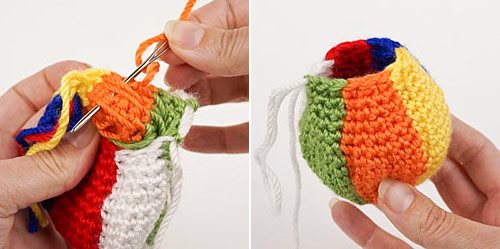
After changing colour back to MC, draw your working loop of MC long so you can drop your hook. Fasten off all the yarns except MC. Tie off or weave in each of the remaining contrast-coloured yarn ends on the inside so the final stitch of each colour won’t work loose (below, left), then trim off any remaining long ends (below, right).
Replace the working loop of MC on your hook and draw it back down to the normal size.
With MC:
Rnd 19: (invdec, sc in next st) six times. (12 st). Stuff the ball firmly through the remaining hole.
Rnd 20: invdec six times. (6 st)
Fasten off, stitch the remaining hole closed and weave in the end. (For the neatest result, use my Ultimate Finish technique.)
Roll the ball around to shape it evenly into a perfect ball shape.
The finished beach ball looks as good from the bottom as it does from the top!

I hope you enjoy this pattern. Please leave me a comment below if you do, and consider leaving me a donation. Thanks!

PS: If you’re looking for the other crochet patterns featured in this photo, here are all the links:
- Fuzzy Bear
- Turtle Beach Blanket (Teal Ombre Version)
- and, of course, Amigurumi Beach Ball 🙂


Donna said
Thank you sooo much for your inspiration, your kindness, your patience, and all you do!!! I am so grateful to be a follower, and what ever I make I promise to send you my results!!!! I have never crocheted an animal or any kind of stuffing, but I want to learn everything I can about crocheting and knitting! I use to knit at 8 years old but make just scarves or a block Looking sweater for my daughter when she was born that was 1983! But I am a beginner really just started to get the directions that’s the hardest for me, thanks again, and I will be checking out your site! Blessed Be!!!
Jan Daniels said
Hi June
I am in awe of your handiwork. It is absolutely amazing, and beautifully done. Yesterday I spent the entire day trying to create a water pattern for my great grandson’s school project. I got fairly close to your pattern, but I couldn’t get my head past the two blues and one white. Anyhow, he was thrilled (it is for a class project at school) and I am thrilled also (a) that it got done, and (b) I have found your amazing website.
I am crocheting items with Aboriginal themes at the moment, and I wondered if you had anything I could purchase. My daughter (with whom I live) works as a Day Care person for kiddies under 5 years of age, and it has now become mandatory for all Family Care establishments to display Indigenous themes. So far I have crocheted two rugs (which came out very nicely) red, black and yellow beanies for the Indigenous dolls, and today I am working on an assortment of red/black/yellow balls of all sizes.
I will bookmark your website and go back and have a good look around. I just wanted to say how amazing you are, totally creative, and talented. As another hooker, I can see all that in the work you have displayed. Well done!
Jan Daniels