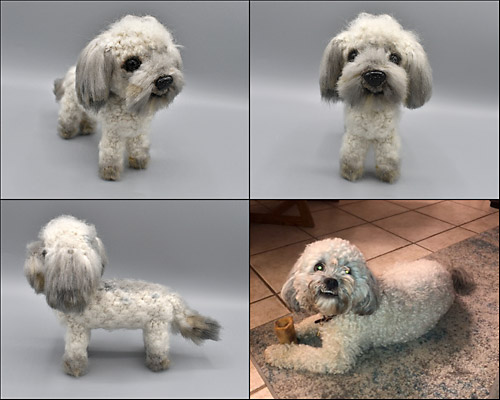
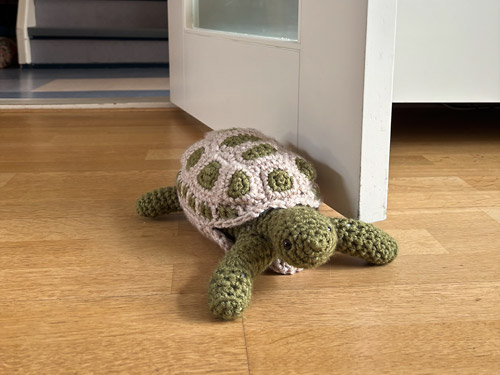
PlanetJune Craft Blog

Latest news and updates from June

Archive for PlanetJune Stories

PlanetJune Stories: Ann’s Giant Orca

Today’s PlanetJune Story comes from Ann Rowley in the UK. Ann first contacted me to ask for some advice on upsizing my Orca (Killer Whale) pattern to Giant scale.

I cautioned that, in Giant scale, the Orca would take a lot of yarn and likely be over 3 feet long! Even so, Ann thought that it would make a perfect gift to give to her 12 year old great niece who loves sea animals, saying “I’ve ordered the yarn as she is very worth it. I must admit I’m now a bit worried that I won’t manage it but I’ll give it a go”.

Armed with my Orca pattern and Complete Guide to Giant Amigurumi ebook, Ann got to work, and, just a few days later, she emailed me again with photos of the result! I was so impressed, I knew you’d love to see her amazing Giant Orca too.

Over to Ann:


PlanetJune Stories: Ann's Giant Orca

The Orca is 38” long nose to tail.

PlanetJune Stories: Ann's Giant Orca

I used 596 grams of Bernat Blanket in black (phew just made it from 2 balls) and 94 grams in white, plus a bit of scrap aran/worsted in black and white for the eyes.

PlanetJune Stories: Ann's Giant Orca

I did try to follow the pattern exactly apart from not cutting yarn on every colour change.

PlanetJune Stories: Ann's Giant Orca

The Orca was gifted to my 12 year old great niece who loved it. She is now named Orla the Orca. Several names starting with O were tried, some male as well, but apparently she’s an Orla. I am very happy as this might possibly be the last year she wants a giant crocheted animal, next year as a teenager they just might not be cool.

PlanetJune Stories: Ann's Giant Orca

My nephew commented how he liked the eyes! A relief as I didn’t think they showed much.

PlanetJune Stories: Ann's Giant Orca

Thank you so much for such a fantastic pattern. Easy to follow and a great result. I can imagine some baby orcas coming along…


(Back to me, June, again!)

Doesn’t it look fantastic? I’m thrilled with how well it turned out – you did a great job, Ann! At 38″ (97cm) long, this truly is a GIANT Orca, and I bet your great-niece will treasure her one-of-a-kind gift forever.

Thank you so much, Ann, for sharing your story with us today 🙂

Please leave Ann a comment if you’ve enjoyed this post!

PS – If you’d like to make your own giant orca – or any other giant amigurumi! – here are the links to the PlanetJune pattern and ebook that Ann used:


Do you have a PlanetJune Story you’d like to share? I’d love to hear it! Please email your story to june@planetjune.com, together with one or more high quality photos showing what you’ve made from PlanetJune patterns. If I choose your story to feature here on the blog, I’ll send you your choice of pattern from my shop to say thank you!

Comments (10)

PlanetJune Stories: Going Postal!

Today’s PlanetJune Story comes from Hils Parker from Ickenham (in the London Borough of Hillingdon, UK), who made this amazing super-sized Discworld to top a post box earlier this year. Just look at this beauty!

PlanetJune Stories: Going Postal: Hils' amigurumi Discworld postbox topper

I really enjoyed seeing Hils making this amazing project (which she shared in the PlanetJune Discord group), and asked her to share the whole story here with you.

Keep reading to the end to see the topper in place on the post box!

And now, over to Hils, to explain how this all came to be:


In recent years in the UK many groups have sprung up with a habit of yarnbombing their local postboxes. The British postbox is something of a unique design in the world of mailboxes, a very distinctive column shape typically painted red, with a rounded mushroom-like top that just lends itself to decoration! Officially the boxes belong to Royal Mail, but they don’t mind the public adorning them as long as access to the mail slot and door is kept clear of obstruction.

My own postbox topper group started in March 2021, in the midst of Lockdown 3. A desire to do something to bring a smile to the community led to the idea of decorating the 18 postboxes in our area. Fast forward two years, and our group has expanded and gained a multitude of crochet and knitting skills (as well as a little infamy!). We now have a planned timetable for when we’ll make toppers during the year and the themes we’ll follow. For spring 2023 our theme was World Book Day.

For me there could only be one choice – I had to pick Terry Pratchett’s Discworld. I’ve been a fan since being introduced to his books as a teenager, and for years the latest novel was an easy birthday or Christmas gift to give me. I’ve had encounters with Sir Terry on several occasions but sadly never had a chance to properly say hello in person.

I had come across June’s crocheted Discworld some time before, so I knew it would be the perfect place to start looking for inspiration and tips. After reading through her incredibly helpful notes, I unhesitatingly purchased her sea turtle and elephant patterns. But there was one big issue I needed to tackle – the scale. A British postbox is 22″ (56cm) across with a domed top. I needed to make my Discworld much bigger than the original patterns gave hook and yarn measurements for!

I decided to start with the four elephants, and then work out the relative scale of the turtle and disc from those. My first attempt with a 3.5mm hook and DK yarn proved too small. Doubling my yarn to using 2 strands of DK and switching up to a 5mm hook seemed more promising. But what of sizing up Great A’Tuin?

PlanetJune Stories: Going Postal: Hils' amigurumi Discworld postbox topper

After joining the PlanetJune Discord server, I asked for help in my endeavour. Everyone is lovely and so forthcoming with tips and advice! It’s a fabulous little crochet community there, so I do recommend checking it out.

I can’t say my first shell attempt with an 8mm hook and chunky yarn [pictured above] was especially successful! But using two strands of chunky yarn, and adding an extra fourth round to the hexagons of the shell made it big enough to look substantial on the postbox and fit on the four elephants.

PlanetJune Stories: Going Postal: Hils' amigurumi Discworld postbox topper

I found working with the chunky yarn and large hook quite tough; I was grateful to be able to give my fingers a rest after completing A’Tuin.

PlanetJune Stories: Going Postal: Hils' amigurumi Discworld postbox topper

The Disc was a very different challenge to that of scaling up patterns. I decided I wanted to add the various Discworld continents as applique pieces on top of a plain blue crocheted circle ocean. As postboxes are quite tall, adding this relief would hopefully help to make them more visible. I measured how big I needed the disc to be (25cm) and made a brown and blue flat circle which would have plasticard sandwiched between them to provide some structure to the disc and help it survive the outdoor elements.

PlanetJune Stories: Going Postal: Hils' amigurumi Discworld postbox topper

I scaled up an illustration of the Discworld map to match the size of the disc, printed off a copy and started creating the lands. As these involved quite a lot of small detailing, I switched to using a 3mm hook and a single strand of DK.

PlanetJune Stories: Going Postal: Hils' amigurumi Discworld postbox topper

Making the continents was an exercise in freehand crochet and very much a case of making it up as I went along! l began at the centre with the hub of the Discworld, Cori Celesti, and radiated out the main landmass from there. I tried to follow the contours of the continent by eye and placed my crochet pieces frequently against the map to check how well they matched. The Unnamed Continent and Klatch were made as one single piece, then the Counterweight Continent and Fourecks as separate pieces, then more individual islands. The underside of the applique pieces became a mass of loose ends to tuck away and use as extra relief as I sewed them on top of the disc!

PlanetJune Stories: Going Postal: Hils' amigurumi Discworld postbox topper
Postbox toppers require liberal amounts of wire, cocktail sticks and kebab skewers to help support the pieces and fix them to each other, and this one was no different. The final touch after sewing all the pieces together was to brush out an extra round of white yarn I’d crocheted around the edge of the disc to emulate the waterfalls tipping over the edge. I’d say I was perhaps only semi-successful at doing that, I managed to draw blood at one stage! An extra addition of light blue yarn sewn around the edge to secure places where I’d destroyed the stitches from the brushing added some subtle colour changes.

PlanetJune Stories: Going Postal: Hils' amigurumi Discworld postbox topper

June: I love this brushed Rimfall effect! And here’s the finished project:

PlanetJune Stories: Going Postal: Hils' amigurumi Discworld postbox topper

The World Book Day toppers were in position for 2-3 weeks around the village in early March, surviving wind, rain and even a sprinkle of snow!

PlanetJune Stories: Going Postal: Hils' amigurumi Discworld postbox topperPlanetJune Stories: Going Postal: Hils' amigurumi Discworld postbox topper


(Back to me, June, again!)

Isn’t that fantastic? I love the special touches Hils added to her Discworld – the 3D effect on the landmasses and that Rimfall are wonderful! And did you notice the ‘starry sky’ background with that sparkly black yarn? Hils had some inspired ideas here – including the title for this story (I’m sure all fellow Pratchett fans will get it, right?)

Thank you so much, Hils, for sharing your story and your impressive project with us today – and well done 🙂
Please leave Hils a comment if you’ve enjoyed this post!

PS – Inspired to make a Discworld of your own? Read all about my original project – approved by Sir Terry Pratchett himself! – and get the sea turtle and elephant patterns on my amigurumi Discworld info page.


Do you have a PlanetJune Story you’d like to share? I’d love to hear it! Please email your story to june@planetjune.com, together with one or more high quality photos showing what you’ve made from PlanetJune patterns. If I choose your story to feature here on the blog, I’ll send you your choice of pattern from my shop to say thank you!

Comments (4)

PlanetJune Stories: Diane’s Succulent Arrangements

Today’s PlanetJune Story comes from Diane Theriault from Boston, MA. Diane had the innovative idea to make needlepointed plastic canvas bases for my Succulent Collection crochet patterns, to make them into modular desk displays that can be arranged in multiple configurations, and combined into a giant window display.

This is such a clever concept, and I knew you’d love to see it too. Maybe you’ll be inspired to try it for yourself!

Over to Diane:


I first made an instance of the original succulent pattern (the 4 plants in the pot) for my advisor in 2013 and then I made a set of singles in little pots for my labmates in 2015. My main innovation is mounting the succulents on top of little rectangles of needlepointed plastic canvas, which has been working well for me for making modular rearrangeable desk displays.

PlanetJune Stories: Diane's Modular Crocheted Succulent Arrangements

PlanetJune Stories: Diane's Modular Crocheted Succulent Arrangements

I had an overuse injury in 2017 so I couldn’t crochet for a few years, and I started nine months of hand OT in mid-2021 because I wanted to be able to do it again! After a lot of physical therapy, the succulent pieces were a good reentry project because they had lots of natural stopping places, while something larger would be tempting to keep going even when I should stop.

PlanetJune Stories: Diane's Modular Crocheted Succulent Arrangements

I looked at a lot of pictures from companies selling succulents to decide what colors to use. I mostly used a variety of colors from the Vanna’s Choice line of Lion Brand yarn, with a couple of Red Heart colors. Sticking with mostly colors from the same line of yarn was useful because all the colors went together nicely.

PlanetJune Stories: Diane's Modular Crocheted Succulent Arrangements

Since the display I imagined was a lot larger than the little pots, I wanted some of the plants to be a little bigger. I improvised a couple of larger leaf sizes for some of the plants, and lots of strands – and longer strands – for the trailing plants.

PlanetJune Stories: Diane's Modular Crocheted Succulent Arrangements

I had done the plants in the crocheted pots before and it was more crochet than I thought my wrist would tolerate, so I decided to try plastic canvas. I was concerned about the plastic tearing, so I needlepointed it for structural support (and to make it a nicer color).

PlanetJune Stories: Diane's Modular Crocheted Succulent Arrangements

I chose the sizes for the bases by tacking the plants down and seeing if they fell over or not. They are in a variety of sizes between 2×2″ and 3×3″.

PlanetJune Stories: Diane's Modular Crocheted Succulent Arrangements

The trailing plants are mostly on 2″x3″ bases. If the stems are hanging down without support, the bases need to be oriented long-ways towards the edge of the surface, because otherwise, the weight of the stems will pull them over, even if they are sitting flat.

PlanetJune Stories: Diane's Modular Crocheted Succulent Arrangements

Each little base takes 30 – 60 minutes to needlepoint, depending on size.

PlanetJune Stories: Diane's Modular Crocheted Succulent Arrangements

I started this project in Feb 2022 and finished most of the plants and bases by May. When I tried to arrange the plants in the window, I found that the taller plants fell over because the ledge was too steep, so I decided that I needed to make a planter to get them up higher and reduce the angle.

PlanetJune Stories: Diane's Modular Crocheted Succulent Arrangements

Meanwhile, I started taking little selections of plants to work for displays on my desk.

PlanetJune Stories: Diane's Modular Crocheted Succulent Arrangements

Needlepointing the big pieces for the planter took quite a while, and was less fun than making the plants so it didn’t go as fast, but I think the final effect is pretty good. I used a piece of oak deck trim to provide structural stability – cheaper than a dowel and more sturdy. I declared victory on the planter in October.

PlanetJune Stories: Diane's Modular Crocheted Succulent Arrangements

It took a lot of volume to fill the planter so the plants would sit on top and be visible. I basically made a lot of pom poms from yarns I had laying around that I didn’t like, with a top layer of pom poms in the matching brown color.

PlanetJune Stories: Diane's Modular Crocheted Succulent Arrangements

Thank you June for all your beautiful patterns and meticulously executed instructions!

PlanetJune Stories: Diane's Modular Crocheted Succulent Arrangements


(Back to me, June, again!)

Aren’t these projects wonderful? The needlepointed bases are a clever and unique touch, the modular desk display looks like it’d be fun to play with and rearrange, and I’m sure you’ll agree that the finished succulent window planter is spectacular!

Thank you so much, Diane, for sharing your story and inspirational photos with us today 🙂
Please leave Diane a comment if you’ve enjoyed this post!

PS – As you can see, my crocheted succulent patterns are very versatile! You can use them individually or in a potted succulent garden as I show in the patterns, or you can keep making more and more of your favourites, to fill any space. You can find all the mix-and-match PlanetJune Cactus and Succulent Collection crochet patterns in my shop 🙂


Do you have a PlanetJune Story you’d like to share? I’d love to hear it! Please email your story to june@planetjune.com, together with one or more high quality photos showing what you’ve made from PlanetJune patterns. If I choose your story to feature here on the blog, I’ll send you your choice of pattern from my shop to say thank you!

Comments (6)

PlanetJune Stories: Belinda’s Toasty Turtle

Today’s PlanetJune Story comes from Belinda from Australia. Belinda first contacted me when she’d made her turtle beach blanket and wanted some advice on the turtles, then she stayed in touch with her progress on the baby turtles, and her clever idea for a matching turtle heat pack. I knew you’d love to see this project too, and to hear about how she came up with this idea and made it happen!

Over to Belinda:


Between gifts for my children and other family members, I rarely make things for myself, but when I saw a friend’s Turtle Beach blanket, I loved it so much that I made one for myself.

PlanetJune Stories: Belinda's Toasty Turtle and Blanket

I crocheted the blanket and turtles with 8-ply cotton from Bendigo Woollen Mills. While mostly made while waiting at school pick up and in doctors’ surgeries, I also crocheted the blanket at every beach I went to, including Peterborough in Victoria, Penguin in Tasmania, and Geographe Bay in Western Australia. I used June’s technique of attaching the baby turtles with buttons so they can, and do, move around.

PlanetJune Stories: Belinda's Toasty Turtle and Blanket

Once the blanket and baby turtles were complete, I realised they needed a companion. I hoped to make a cushion, so I bought the AquaAmi and Simple-Shell Sea Turtle patterns.

PlanetJune Stories: Belinda's Toasty Turtle and Blanket

The turtle pattern didn’t prove big enough for a cushion, so I made a heat pack! The shell, head, legs and tail are crocheted with 10-ply cotton held double, and a 5.5 mm hook. To make sure the heat would be close to the surface, I crocheted the tummy with one strand of yarn and a 7 mm hook. Other than that, I did not make any changes to the pattern.

PlanetJune Stories: Belinda's Toasty Turtle and Blanket

I sewed a little canvas shape and filled it with wheat, then put it against the tummy side, packed polyester stuffing between it and the upper shell, then attached the head. I used plastic backed eyes. It’s been in the microwave quite a few times and seems no worse for wear.

PlanetJune Stories: Belinda's Toasty Turtle and Blanket

I usually use a heat pack when I have a sore tummy and am feeling a bit sorry for myself. Having a warm, friendly turtle looking after me is lovely at a moment when I need that extra bit of care.

PlanetJune Stories: Belinda's Toasty Turtle and Blanket

I love June’s patterns, and I love my toasty turtle!


(Back to me, June, again!)

I love your idea, Belinda! It’s such a good idea to make the turtle into a heat pack – I’d never have thought of that, but I think I might need to make one for myself now – a warm cuddly turtle to soothe a sore tummy sounds very appealing 🙂

(And isn’t that long narrow blanket the perfect shape for lying on the sofa? This entire project is very cozy and snuggly!)

Thank you so much, Belinda, for sharing your story with us today 🙂
Please leave Belinda a comment if you’ve enjoyed this post!

PS – If you’d like to make your own turtle beach blanket and/or toasty turtle, here are the links to all the PlanetJune crochet patterns Belinda used:


Do you have a PlanetJune Story you’d like to share? I’d love to hear it! Please email your story to june@planetjune.com, together with one or more high quality photos showing what you’ve made from PlanetJune patterns. If I choose your story to feature here on the blog, I’ll send you your choice of pattern from my shop to say thank you!

Comments (7)

PlanetJune Stories: Maureen’s Armadillo

Today’s PlanetJune Story comes from Maureen Carter, a crochet enthusiast from Grosse Pointe Woods, MI. Last year, Maureen tagged me on Facebook with this picture of an incredibly colourful armadillo she had crocheted using my pattern and based on a child’s drawing:

Maureen's crocheted armadillo with Isabella's armadillo drawing

…and I just had to reach out to her to find out more about the story behind this incredible project!

Over to Maureen:


I learned how to crochet when I was 12 years old but have only been doing amigurumi in the last 4 years. I used to make mostly slippers, hats, mittens, blankets, scarves, sweaters, ponchos. Now I do a lot of amigurumi as well. It is a lot of fun seeing all the little parts come to life as a stuffed animal. My crochet teacher always said, “Make joy with your crochet.” Amigurumi always brings joy to those that receive the finished projects.

I have relatives in California who were involved with helping support and promote an online fundraiser by the Dominican Sisters Vision of Hope, a non-profit organization that raises funds to support several Catholic schools in the Los Angeles area and the San Francisco-Oakland California area. One of my sisters invited me to participate in the online auction.

One of the features of the auction was artwork made and donated by students in the schools supported by the auction. I was very taken with a colorful drawing called “Oaxacan Armadillo” by a first grade student, Isabella. I placed a bid for her drawing in the auction and was so happy to be the successful bidder.

“Oaxacan Armadillo” by Isabella

When the framed artwork arrived at my home I came up with the idea that this artwork could be transformed into an amigurumi replica that I could send as a surprise to Isabella. I looked for armadillo crochet patterns and decided that I could work with June’s pattern as the base, but incorporate the colors and designs from Isabella’s drawing.

I have followed June’s work and often watched her tutorials and lessons on how to do certain stitches and techniques. I was happy to find her pattern which was a great help to bring this drawing to life. June’s armadillo design was the perfect one to use as my base, especially since the armor shell is made as a separate piece that attaches after it’s all done.

Armadillo crochet pattern by PlanetJune The PlanetJune Armadillo crochet pattern

I made each leg a different color with 3 toes, and made the ears and eyes and facial expression to match Isabella’s drawing as closely as possible. The color I added to the armor was achieved partly by crocheting in stripes, then I made small appliques and sewed them on and did some surface crochet to get the shapes and colors that were used in the drawing.

Maureen's crocheted armadillo

It took me 2-3 weeks working intermittently to recreate the armadillo. I also had a color copy of the drawing made up to send with the crocheted armadillo. I mailed it to Isabella in the care of her school principal. It was presented to her at school.

Isabella with her armadillo drawing and Maureen's crocheted armadillo

I sent a note thanking her for making the beautiful colorful drawing and sharing it with the fundraiser for her school. I encouraged her to continue to have fun making beautiful things using her imagination and talent. I told her that when I see it on my fireplace mantle every day, it brings me joy.

I recently received a note back from Isabella and her mother. Isabella’s handwritten note says:

Dear Ms. Maureen,
Thank you for my armadillo. I really like it. I like how it looks exactly like my drawing and it turned out very colorful. It is very special to me.
Love, Isabella

Isabella's note

Her mom also sent a beautiful note thanking me for making the armadillo for Isabella, which she named “Alice.”

Isabella's mom's note

I loved Isabella’s artwork right away the first moment I saw it. I felt compelled to do something to express how much I admired her work and that I hope she continues to enjoy drawing and making things. I thought I could do it justice as a crocheted stuffed animal that she might like, so I gave it a try. It was a happy and moving experience for both of us.


(Back to me, June, again!)

I love everything about this story – it’s such a fun project, and isn’t the story behind it fantastic?! Both Maureen and Isabella are wonderfully creative, and I’m so happy my armadillo pattern contributed to their collaboration.

Part of the joy I find in having a clean and simple design style is seeing how people choose to adapt, embellish and modify my PlanetJune patterns – and I’m sure you’ll agree that Maureen’s armadillo is a prime example of that creativity.

Thank you so much, Maureen, for sharing your story with us today 🙂
Please leave Maureen a comment if you’ve enjoyed this post!


Do you have a PlanetJune Story you’d like to share? I’d love to hear it! Please email your story to june@planetjune.com, together with one or more high quality photos showing what you’ve made from PlanetJune patterns. If I choose your story to feature here on the blog, I’ll send you your choice of pattern from my shop to say thank you!

Comments (8)

PlanetJune Stories: CGOA Chapter Challenge

Today’s PlanetJune Story shows how easily you can brighten someone’s day with crochet. When Nancy Smith, the chairman for the Crochet Guild of America’s Chapter Challenge, contacted me in February to ask for permission for the CGOA to use my Love Hearts pattern as a way for their members to give back to their communities, I never dreamt it would lead to such an amazing result!

Let’s hear from Nancy:


The Crochet Guild of America (CGOA) is a national organization of local crochet guilds located in almost all 50 states of USA. CGOA also hosts a national conference called Chain Link held in different locations each summer that includes classes of various skills, stitches, and techniques, a Design Contest, a fashion show and banquet, and a ‘Meet and Greet’ to possibly sell your designs to publishers, yarn companies and/or magazines. There is also a Masters Program which tests your skills in all aspects of crochet from stitches to gauge to finishing techniques. Be brave! Check it out!

Each year, CGOA challenges the chapters to give back to their local communities by participating in the CGOA Chapter Challenge which selects a project for all interested chapters to make.

Each project is selected with a particular need in mind. Past years have included chemo hats, preemie blankets, squares for afghans, and scarves. This year was a bit different since a lot of places were not accepting physical items due to COVID-19 protocols. But June Gilbank of Planet June came to our rescue by allowing us to use her Love Hearts pattern for the Challenge.

PlanetJune Stories: CGOA Chapter Challenge - Love Hearts

The hearts could be distributed as a group project if there were places near each chapter that were accepting items, along with individual members passing them out to total strangers, family, friends, neighbors, hospitals workers, doctor offices, fire houses, etc.

PlanetJune Stories: CGOA Chapter Challenge - Love Hearts

At first, members were kind of skeptical about the project, but some that handed the hearts out individually reported the results/reactions back to their chapters, and the interest really took off. The smiles and reactions from the recipients were well worth the work!

PlanetJune Stories: CGOA Chapter Challenge - Love Hearts

There were 12,798 hearts made for this Challenge! Besides being individually handed out, hearts were disbursed to an entire elementary school, to Meals on Wheels, to assisted living centers, nursing homes, animal shelters, special education centers, teachers for Teacher Appreciation Day, church meetings, and being attached to future donation projects each chapter makes.

PlanetJune Stories: CGOA Chapter Challenge - Love Hearts

June’s pattern was fast and easy to make, and the chapters were told to use whatever yarns and hook sizes they wanted, which created a variety of sizes and colors besides the three sizes June has in the pattern.

CGOA and its’ chapters send a big THANK YOU to June for so generously allowing us to use her pattern!

For more information about CGOA, and possibly starting your own local chapter, here are the links:

Nancy Smith
CGOA Chapter Challenge Chairman


A few more photos, shared with permission from the participating chapters:

PlanetJune Stories: CGOA Chapter Challenge - Love HeartsNew York City Crochet Guild, Manhattan NY

PlanetJune Stories: CGOA Chapter Challenge - Love HeartsNorthern Illinois Crochet Guild, Rolling Meadows (a suburb of Chicago) IL

PlanetJune Stories: CGOA Chapter Challenge - Love HeartsHappily Hooked on Crochet Guild, Danbury CT

PlanetJune Stories: CGOA Chapter Challenge - Love HeartsThe Happy Hookers, Atlanta GA

PlanetJune Stories: CGOA Chapter Challenge - Love HeartsNorthern Kentucky Crochet Guild, Burlington KY

PlanetJune Stories: CGOA Chapter Challenge - Love HeartsEbenezer Angelic Crocheters, Washington DC

PlanetJune Stories: CGOA Chapter Challenge - Love HeartsCrocheters of the Lakes, Lake County IL

PlanetJune Stories: CGOA Chapter Challenge - Love HeartsNew Mexico Crochet Guild, Albuquerque NM

PlanetJune Stories: CGOA Chapter Challenge - Love HeartsCrochet Twin Cities, Minneapolis/St Paul MN

And here’s the video of the Challenge results:


(Back to me, June, again!)

Well over twelve thousand crocheted hearts – isn’t that incredible! Congratulations to all the participating CGOA chapters – your generosity and kindness has touched so many deserving people. I’m honoured that my Love Hearts pattern continues to be used in such meaningful ways.

Thank you so much, Nancy, for sharing your report – and for choosing to use my pattern for such a successful Chapter Challenge 🙂
Please leave Nancy and the CGOA members a comment if you’ve enjoyed this post!

Do you have a PlanetJune Story you’d like to share? I’d love to hear it! Please email your story to june@planetjune.com, together with one or more high quality photos showing what you’ve made from PlanetJune patterns. If I choose your story to feature here on the blog, I’ll send you your choice of pattern from my shop to say thank you!


PS – If you’re feeling inspired to bring some smiles to your community with crocheted hearts, you can find my Love Hearts crochet pattern here. 🙂

Comments (10)

PlanetJune Stories: Dorte’s Fishbowl

Today’s PlanetJune Story comes from Dorte Jensen in Denmark, who used a selection of my crochet patterns to create this gorgeous realistic fishbowl!

Dorte's crocheted fishbowl made from PlanetJune patterns

I’ll let Dorte explain how this project came to be:


My husband saw your tropical fish patterns and said that they were so cute and that he wanted these fish made for his birthday. I don’t remember when the idea came for me to use a real fishbowl for them.

Dorte's crocheted fishbowl made from PlanetJune patterns

My plan required some plants for the bottom of the bowl. I had seen your succulent collection 1 and 2 and I really wanted to crochet them but had never found the time for them. I realized that I could use those plants for the fishbowl. I also came up with my own idea for a plant that the red fish could hide in.

Dorte's improvised crocheted aquatic plant

I didn’t have “earth” to sew the plants onto so they would stand up straight. I made a white circle to sew them onto that I could hide beneath the stones in the bottom of the bowl.

Dorte's crocheted fishbowl made from PlanetJune patterns

I suspended the fish using fishing line – I thought that would be most invisible. Then some dots of glue on the edge of the fishbowl to keep the line and the fish in place. I used a line across the fishbowl so the clownfish could hang in the middle of the bowl.

Dorte's crocheted fishbowl made from PlanetJune patterns

Finally I just want to say that both the fish and the plants were so much fun to crochet, and your crochet tutorials have taught me a lot. It is always a great pleasure to follow your great, well-explained and well constructed patterns.


(Back to me, June, again!)

Thank you so much, Dorte! Isn’t this a fabulous project? Beautifully crocheted, and using the large glass fishbowl with real stones in the bottom was an effective way to add to the realism of this display.

I think the succulents and her clever plant design look perfect in there too. I was surprised to see how well my succulent patterns stand in for corals and aquatic plants (and yes, in case you’re wondering, I do have some real coral patterns planned for some point in the future too…)

I hope these beautiful colourful fish have brightened your day (and maybe even inspired you to make a crocheted aquarium of your own?) Please leave Dorte a comment if you’ve enjoyed this post!

Do you have a PlanetJune Story you’d like to share? I’d love to hear it! Please email your story to june@planetjune.com, together with one or more high quality photos showing what you’ve made from PlanetJune patterns. If I choose your story to feature here on the blog, I’ll send you your choice of pattern from my shop to say thank you!


PS – If you’re looking for the PlanetJune patterns featured above, you can find all my Tropical Fish and Succulent crochet patterns in my shop 🙂

Tropical Fish crochet patterns by PlanetJune

Cactus and Succulent crochet patterns by PlanetJune

Comments (10)

PlanetJune Stories: crochet with kids

Today’s PlanetJune Story is a follow-up from last month’s story of 10-year old Seth and his crocheted dinosaurs. Seth’s mom Amy and brother Benjamin have contributed this month, to tell us about their family’s crochet time, and Amy shares her tips for teaching kids to crochet.

I think she knows what she’s talking about – the crochet force is strong in this family 😉

PlanetJune Stories: crochet with kids
Benjamin, Seth and Amy crocheting together!

And now over to Amy and Benjamin:


Amy’s Story

I learned to crochet twenty years ago, but after making one baby blanket, I quit. I didn’t like the tedium of doing the same stitch endlessly back and forth.

When we gave my son Seth a crochet kit for Christmas last year, I knew I would have to learn in order to help him. We spent two days straight of crocheting, unpicking, recrocheting, counting, and celebrating anytime we miraculously had the correct number of stitches at the end of a round. We laugh at Seth’s lion now, crocheted wrong-side out with messy seams, but we love him for the victory he represents.

Before too long, I was in love with crocheting as much as Seth was. I started making critters in random colors to use up whatever yarn I had. Making amigurumi was much more enjoyable than the boring baby blanket of my youth.

PlanetJune Stories: crochet with kids
Amy’s horses

By April, my oldest son wanted to learn to crochet as well, and my youngest two sons wanted me to teach them how to chain.

Now, a neighbor comes over weekly for a crochet party, and several neighborhood kids have asked us to teach them. For me, crocheting began as an attempt to help my son and use up a few random balls of yarn. Crochet has become a full-blown hobby, not just for myself, but for my children and our friends too.

Benjamin’s Story

Hi, I’m Benjamin, age twelve, and I love to crochet!

When my brother started crocheting, I saw the cute little animals he made and wanted to make some too! He and my mom taught me how. Then one day, my mom bought the horse pattern from PlanetJune, and made two cute little horses for my grandma. When I saw the finished result, I wanted to make my own horse, modeled after Black Beauty from the book.

PlanetJune Stories: crochet with kids
Benjamin with his Black Beauty – good work, Benjamin!

Recently, I showed some of my critters to a neighbor and she wanted to buy one from me. She said she wanted a sloth, but it was tricky to find a good pattern until I looked at PlanetJune’s sloth. I loved the cute face markings, and the ability to hang! It was so cute I almost didn’t want to part with it!

I think my favorite part of PlanetJune is the tutorials. The tutorial about sewing pieces of animals together really helped my critters go from good to excellent! I have also helped some people learn how to crochet, and the magic ring tutorial helps them remember how to do it when they get home!

PlanetJune Stories: crochet with kids
Benjamin with his Black Beauty and Sloth, and Seth with some of his AmiCats

Amy’s tips for teaching kids how to crochet

  1. Watch the tutorials on PlanetJune. There are tons of tutorials out there, but you may as well start with the best.
  2. Choose a pattern your child really wants to make… the motivation is crucial. My boys especially like PlanetJune patterns because they are realistic, and I like them because they have pictures and very clear instructions so that the kids can easily follow them. If you are going to spend the time making a critter, you want to be very sure that the pattern is a good one. June has also been super helpful and responded quickly whenever we have had a question. [June: I’m so happy to hear that, Amy!]
  3. Don’t be afraid to do the hard parts for your children when they are starting out. You won’t cripple them. When Seth started, I usually did the magic ring and the first few rounds for him. When he would get too overwhelmed or if we had to undo stitches, I would fix what was broken. This kept his enthusiasm high, and before I knew it, he surprised me by making his first magic ring. I don’t think I have crocheted anything for him since, even bobble stitches, picots and back post single crochet.

PlanetJune Stories: crochet with kids
Even Amy’s youngest sons are learning how to chain

Amy and sons’ life lessons learned from crochet

  1. Everyone has a different way of doing things. It’s okay to do what you like, and let others do what they like.
  2. Mixing our own creativity with what we learn from others is fun!
  3. Patience and work are necessary to create something you like. Innovation and flexibility are too, because mom won’t buy a whole skein of yarn for just a few stitches. Sometimes you just have to work with what you have.
  4. Self-compassion is important, especially when your item doesn’t look like the picture in the pattern.
  5. Most things don’t look exactly like the picture, but they can still look fantastic in their own way.
  6. Taking the time to fix a mistake, even very painful ones, is worth the effort.
  7. Mom can help fix a lot of mistakes, and it is okay to ask for help.
  8. Step away and take a deep breath (or many) before trying to fix any mistakes. A calm brain is much more effective at problem solving.
  9. Everyone makes mistakes and has to try again sometimes… even mom.
  10. Everyone has something to offer the world… even kids.

PlanetJune Stories: crochet with kids
It’s a happy family that crochets together…


(Back to me, June, again!)

Amy has shared such good advice here – and those life lessons also apply to much more than just crocheting with kids! I hope this may motivate some of you to see if your kids (or other children you know) might like to have a go at our favourite hobby..? Even crocheting a simple chain from a colourful yarn can provide hours of fun, plus it builds hand-eye coordination and dexterity, and encourages creativity.

Thank you so much, Amy, Benjamin (and Seth), for sharing your story with us today. Aren’t they an inspiring and talented family?
Please leave them a comment if you’ve enjoyed this post!

Do you have a PlanetJune Story you’d like to share? I’d love to hear it! Please email your story to june@planetjune.com, together with one or more high quality photos showing what you’ve made from PlanetJune patterns. If I choose your story to feature here on the blog, I’ll send you your choice of pattern from my shop to say thank you!


PS – If you’re looking for the PlanetJune patterns featured above, here are the links to the patterns in my shop: Horse, Sloth, AmiCats 🙂

Comments (9)

« Previous entries
  • Quick Links: Crochet

    navigation: arrow

    buy crochet patterns and accessories from my online store

    'Everyday Crochet' and 'The Essential Guide to Amigurumi' crochet books by June Gilbank

    Crochet video tutorials and step-by-step photo tutorials

    Free PlanetJune crochet patterns

    Frequently Asked Questions

    Quick Links: Crafts

    navigation: arrow

    Punchneedle Embroidery information, ebook & patterns

    Papercraft ebook & tutorials

    Free PlanetJune craft projects & tutorials

  • Blog Post Categories

  • Blog Archives

  • Welcome to PlanetJune!

    June Gilbank

    Hi, I'm June. Welcome to my world of nature-inspired crochet and crafting. I hope you enjoy your visit!

    If you'd like to get in touch, you can contact me here.
    crocheted Canadian flag by PlanetJune
  • A fanned-out pile of the books Everyday Crochet and The Essential Guide to Amigurumi, with text 'The answers to all your crochet questions at your fingertips - find out more'
  • Support PlanetJune!

    Want to say thanks? You can send me money in seconds at paypal.me/planetjune (over $20) or paypal.me/planetjune2 (under $20) or send me a donation through my shop.

    Or simply click through from my links before you shop at Amazon, Etsy, KnitPicks, LoveCrafts or Crochet.com, and I'll make a small commission on your purchase, at no cost to you! Start here:

    ♥ Support PlanetJune ♥

    Tip: This link is also in the footer of every page!

    Thank you so much for your support!