PlanetJune Craft Blog

Latest news and updates from June

Archive for January, 2013

Pet-Along CAL roundup

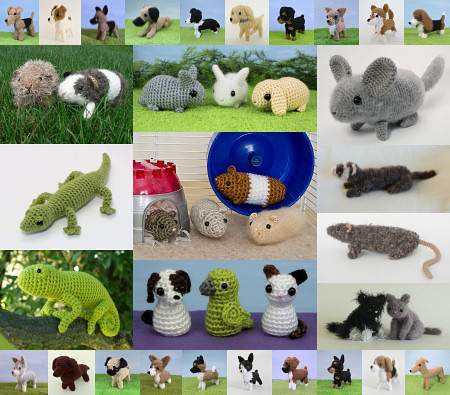
It’s been a fun month of making and sharing crocheted pet animals in the Ravelry group, using all my pet patterns:

PlanetJune Pet-Along crochet-along patterns

And now it’s roundup time! (Don’t forget to keep reading to the end to see what CAL themes we have in store for February.)

__(‘Read the rest of this entry »’)

Comments

Perfect your invisible decreases

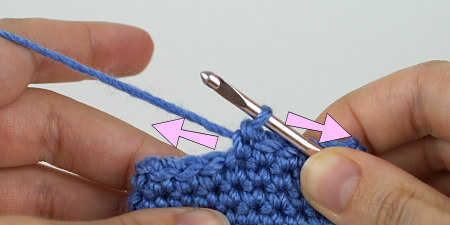
Link easily to this tutorial in your patterns: www.planetjune.com/invdectips

The invisible decrease (invdec) is one of the two absolutely essential techniques for making beautifully neat amigurumi (the other being, of course, the magic ring). But invdec is a little tricky to get the hang of, and there are 2 points during the decrease where you can accidentally lengthen your stitch so it isn’t neat and tight, and the resulting decrease will be far more obvious.

Today I’d like to demonstrate these invdec problem points, so you know where the pitfalls are, and how to avoid them. You’ll find this tutorial useful if:

  • You’re new to the invisible decrease technique (watch my video tutorial before you continue reading this!)
  • You’ve tried invdec but been disappointed by your results
  • Your invdecs look inconsistent, gappy, or too prominent
  • You want your amigurumi to look as good as possible!

A Note about Tension

Although maintaining consistent tension on your yarn is a skill you need to master in order to crochet anything beautifully, it’s vitally important for amigurumi, as you need your stitches to be tight and even to produce the regular, firm amigurumi fabric that allows us to create complex ami shaping, and hides your stuffing. I’ve seen some people recommend that you tug on your yarn after every stitch to tighten it up, but that isn’t necessary if you maintain consistent tension.

crochet tension
Tensioning your yarn is a balance between the hook pulling forward and your other hand pulling backward.

How do you do that? Well, while your hook is pulling the yarn forward, your non-hook hand is simultaneously pulling back on the yarn, so you use a controlled amount of yarn to form each stitch. (You probably do this without even realising you’re doing it; if the yarn could just slide freely through your fingers with no tension, your hook would pull up large, inconsistent loops, and your crochet would look sloppy.)

When I talk below about pulling back on the yarn so the working loop is tight around your hook, the goal is to bring the tension back to your standard level, so the working loop should be the same size and tightness as it is for all your other stitches. If you go too far and pull it extra-tight, you’ll just make it more difficult to work back into that stitch in the following round.

Perfecting the invdec

If you look at the top of an invdec stitch, you’ll see there’s a ‘V’ at either side of the decrease. (As invisible decreases are practically indistinguishable from the surrounding stitches, I’ve crocheted my samples with the invdecs and the surrounding top loops in a different colour, so you can see what I’m talking about!)

perfect your crochet invisible decreases
Left: The source of the problems is these extra-long Vs at the top of the stitches surrounding the invdec.
Right: Invdec done right, with the Vs the same length as in the surrounding stitches.

These two Vs (A and B) are the culprits – if either or both of these is lengthened, there’ll be extra space around the invdec and it can look gappy or sloppy.

perfect your crochet invisible decreases
Left: The lengthened Vs have left a larger gap at either side of the invdec.
Right: Invdec is indistinguishable from the surrounding stitches (except for my helpful colour change!)

Loop A

Checkpoint: When you begin an invdec stitch, as you’re swinging the hook around to get the tip through both front loops, the working loop (the one that was already on your hook before you started the stitch) tends to loosen up.

Fix this: Once you’ve inserted your hook under the 2 front loops, and before you yarn over, tug the yarn to make sure the working loop is still tight on your hook and hasn’t lengthened.

perfect your crochet invisible decreases
Left: Lengthened working loop on hook will cause a loose stitch.
Right: Tightened loop – perfect!

Loop B

Checkpoint: After you complete the invdec, you’ve just turned 2 stitches into 1 stitch, and your hook is now further back than it usually would be for starting a new stitch. So this is another point where your yarn can make an extra-long loop, as you bring your hook forward over that extra distance to begin the next stitch.

perfect your crochet invisible decreases
Left: The position of the hook after a sc stitch.
Right: After an invdec, the hook is further back (dotted line marks the usual position), so there’s a greater distance to reach the next stitch.

Fix this: Make sure you keep tension on your yarn, so the loop on your hook doesn’t stretch out as you insert your hook into the stitch after the invdec. (If, after inserting your hook to begin the next stitch, you see the working loop has lengthened, just pull the yarn so the working loop is tight around your hook again, before you yarn over and continue with the stitch.)

perfect your crochet invisible decreases
Left: Lengthened working loop after inserting hook into next stitch.
Right: Tightened loop – perfect!

Multiple Decreases

The potential problem is doubled when you’re working 2 invdecs in a row, as you have the ‘too far back’ effect (Checkpoint B) and the ‘swinging the hook’ effect (Checkpoint A) both acting on the same loop, so you should make a little extra effort to be conscious of the size of the loop on your hook, and make sure it stays tight and doesn’t lengthen.

* * *

With a little extra effort to make sure you’re maintaining consistent tension, even while you decrease, your stitches will all stay the same size, and your invdecs will be as invisible as advertised!


Do you find my tutorials helpful? If so, please consider making a contribution towards my time so I can continue to create clear and concise tutorials for you:

Thank you so much for your support! Now click below for loads more crochet video and photo tutorials (and do let me know what else you’d like me to cover in future tutorials…)

See more helpful PlanetJune crochet tips and technique tutorials

Comments (13)

Baby Cephalopods crochet patterns

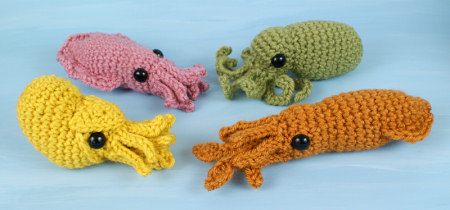
Make your own aquatic nursery with my new Baby Cephalopod collections: Octopus & Squid, and Cuttlefish & Nautilus. A perfect use for yarn scraps, these mini amigurumi take only 25-30m of yarn apiece, and work perfectly in any colour.

baby cephalopods crochet patterns by planetjune: octopus, squid, cuttlefish, nautilus

Cephalopod Fun Facts:

  • Cephalopods are a type of mollusc, which means they have no skeleton and are related to snails.
  • Cephalopod means ‘head-foot’, referring to the fact that their arms and tentacles are attached to their heads, not their bodies.
  • There are only 4 types of cephalopod, so you can crochet a complete collection if you buy my patterns!
  • Only the nautilus has a visible shell; squids and cuttlefish have an internal shell, and octopuses have no shell at all.
  • In real life, each cephalopod has a different pupil shape: Nautilus (tiny pinhole), Squid (large and round), Cuttlefish (‘W’ shape), Octopus (horizontal slit). In amigurumi world, big black eyes are just fine though 😉

Meet the Cephalopods:

Baby Octopus has long curling arms and a realistic body shape:
baby octopus amigurumi crochet pattern by planetjune
Fun Fact: Octopuses are completely soft, with no bones or shell, so they can squeeze themselves through tiny gaps barely larger than their eye!

Baby Squid has two long tentacles and swimming fins at the back:
baby squid amigurumi crochet pattern by planetjune
Fun Fact: There are about 300 species of squid, ranging in size from a only few centimetres to over 10m long!

Baby Cuttlefish has an undulating fin all the way around its body.
baby cuttlefish amigurumi crochet pattern by planetjune
Fun Fact: Cuttlefish squirt a brown ink called sepia – this is the source of the name of the colour sepia!

Baby Nautilus has a mass of tentacles and a shell with a hood.
baby nautilus amigurumi crochet pattern by planetjune
Fun Fact: Nautiluses are ancient cephalopods known as ‘living fossils’ because they’ve remained virtually unchanged for 500 million years!

About the Patterns:

Baby Cephalopods are between 5 and 6.5″ long, including tentacles. Each design is crocheted in only 2 or 3 pieces, so there’s minimal finishing to do when you’ve finished crocheting. And, although each has different arms/tentacles, they all use the same basic method, so, once you’ve made your first cephalopod, you’ll be able to fly through crocheting the tentacles for the others.

I think the few pieces and fast assembly would make these designs perfect candidates for those of you who enjoy selling your crocheted items

All the designs are very simple to crochet, except the Nautilus, which is slightly more advanced as the body and shell look like two separate pieces, but they are actually one piece – the hood is the only separate part. (I think you’ll enjoy my special technique though – it’s very clever! I’ve included lots of extra photos with it to make sure everyone will able to create the clever two-piece shell/body effect.)

As well as my usual step-by-step photos, any pieces that are crocheted in non-amigurumi style include crochet stitch diagrams in addition to full written instructions, so you can follow whichever method you prefer. (I’m hoping you’ll find the stitch diagrams to be a useful addition to my patterns; one diagram is clearer than a whole series of round-by-round photos.)

These designs are available as two sets of 2 patterns:
baby cephalopods crochet patterns by planetjune: octopus, squid, cuttlefish, nautilus
Left: Baby Cephalopods 1: Octopus & Squid
Right: Baby Cephalopods 2: Cuttlefish & Nautilus

But, because these baby best friends can’t bear to be apart, I’ve put together a multipack deal for you when you buy both sets: Baby Cephalopods 1 & 2 includes all four patterns for a bargain price.

Not ready to buy yet? Queue/heart them on Ravelry!
Set 1: Set 2:

I first sketched out these designs and picked out the yarn colours two years ago, before I left Canada. It’s taken all this time to simplify and perfect them. I think I’ll make a second set in more realistic colours, because, now I’ve finally finished the patterns, they’re irresistibly quick and fun to crochet! I hope you’ll enjoy making them as much as I do…

Comments (7)

deals and offers

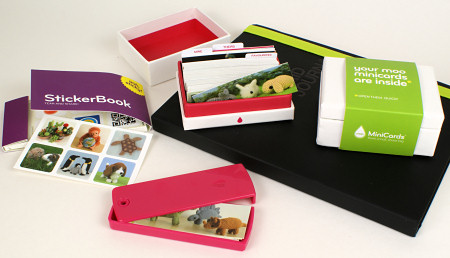
This post isn’t PlanetJune-related but I do love a bargain and I’ve found some crafty deals you might like too, so I wanted to share them! If you’re waiting for a crochet post, I’ll have a brand new pattern collection to reveal, next week…

MOO card winners and discount codes

Thanks to everyone who entered my MOO giveaway! I wish you could all win – it was great to hear about your small businesses, crafty ventures and good ideas that could benefit from some MOO cards.

PlanetJune MOO order

But there can only be 3 winners, and random.org tells me they are Kati, Diana Mullins-Atkinson, and Katie. Congratulations to you all!

I’ll email you to notify you of this too, but I’ll be passing your names and email addresses along to Dan at MOO and he’ll contact you to arrange your prize – your choice of 50 Classic Business Cards or 100 MiniCards 🙂

PlanetJune MOO order

Now, if you didn’t win, but thinking about what you’d do with your MOO cards has got you all excited, I have another offer for you! With my order, I received 5 discount codes each worth 15% off your first order at MOO, and I’d like to share them with people who can make use of them. Here’s what I have:

  • 3x 15% off your entire order
  • 1x 15% off any 1 product (the cheapest, if you order more than one item)
  • 1x 15% off 1 pack of MiniCards

As I don’t know how many people may want them, and people read my blog at different times of day, I think the fairest thing would be to give you a 24-hour window to let me know if you want a code.

  • If you haven’t ordered from MOO before and would like to now, please leave a comment below to let me know. (If you could also say if you’d be happy with any of the codes or you need one in particular, I’ll try to match the winners with their requests so the codes will do the most good!)
  • If there are more than 5 requests, 24 hours from now, I’ll randomly draw 5 to get the codes.
  • If there are less than 5 requests in 24 hours, I’ll keep this offer going until I’ve received 5 requests and given out all the codes!

UPDATE 27 Jan: All the codes have now been claimed! I’m glad they’ve found good homes. Chrisie, Aimee, Amanda W, milla1222, Karina – I’ll email your codes to you tomorrow. Hope you enjoy your discounted MOO orders 🙂

Try Zinio for free


Zinio - Be Well Read
I must confess I’m quite addicted to Zinio now – it’s made buying magazines so easy that I’ve bought digital subscriptions to crochet magazines, and also to some knitting titles (for clothing inspiration and techniques), and Ideas magazine (for some local South African crafty flavour). It also makes it really easy to pick up a one-off back issue of a magazine that has a pattern or article you want, which is very handy!

Anyway, I found an amazing offer to try $50 of Zinio managzines for free – you have to activate it by January 31st, so hurry and get on it if you’d like to take advantage of this deal too! There’s a wide selection of magazines to choose from and, although there aren’t any crochet mags included, there are two knitting titles and a nice selection of other crafty magazines, as well as food, home, lifestyle, computers, photography, music, sports, etc etc.

zinio e-magazines, nexus 7, crochet

Here’s what you need to do:

  1. Click here and then click ‘Claim Coupon’ to get started.
  2. Once you get your code, copy and paste it somewhere safe (so you can log back in again later and choose more magazines).
  3. Login here to redeem your voucher.
  4. Don’t worry if nothing happens when you’ve selected your magazines – you’ll be emailed the links in a couple of days. I’ve tried it and it does work; it just takes a while!

Now, here’s how I made the deal even better for myself. You don’t have to order all 18 magazines at once, and you have 90 days to redeem them. So:

  1. Keep a note of your voucher code – you’ll need it to log back in later.
  2. Select single issues, not subscription, to get the latest issue and be able to choose 18 different magazines.
  3. Some magazines only have a 1-issue subscription available, but if you log back into the redemption page in a month (or whenever the next issue comes out), you’ll be able to get the next issue of the same magazine free too! A handy tip: you’ll receive whichever issue has its cover pictured on the page at the time you redeem your voucher.

I hope you enjoy these deals. Don’t forget to leave a comment requesting a MOO code, if you’d like one!

Comments (15)

crochet bamboo cardigan

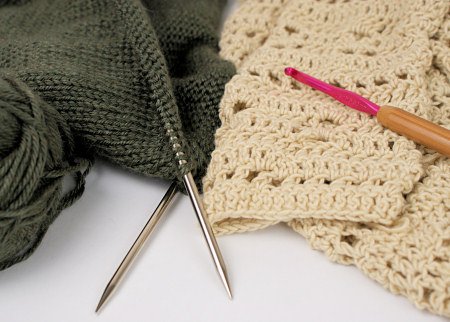
Last July, I posted about my plan to design one knitted and one crocheted cardigan for myself, just for fun:

WIP cardigans - knit and crocheted - by planetjune

Although the crocheted cardigan took a fraction of the time of the knitted one to make, I actually completed the knitted one first – probably because it was Southern hemisphere winter, so knitting a warm cardigan was more appealing than weaving in lots of fiddly ends on a lacey crocheted cardigan! But now, finally, here’s my finished crocheted cardigan:

crocheted bamboo cardigan by planetjune

You may be thinking that the stitch pattern looks familiar, and you’d be right: I knew I wouldn’t be publishing a pattern for this cardigan, but I liked this stitch pattern so much after I came up with it that I used the same stitch pattern in my Frosty Windows Scarf too – no point in keeping a good stitch pattern to myself when you can enjoy it too, in another format!

The story of this cardigan…

I had 3 skeins of deliciously smooth and soft LB Collection Cotton Bamboo yarn in my yarn stash since I chose it as my prize for winning the Instructables/Lion Brand Critter Contest in 2010. I intended to make a PlanetJune Accessories pattern of some sort from it and came up with a stitch pattern, but I hadn’t come up with the perfect project idea.

I picked it up again a few months ago and decided to do something with it. I still liked the stitch pattern I’d designed and thought I’d try turning it into a light summery cardigan. I used a slightly larger hook than recommended so I’d have a nice drapey fabric. I didn’t work out a formal pattern – I just measured some of my existing cardigans and crocheted pieces (two fronts and a back) in my stitch pattern that approximated those sizes. Knowing I didn’t have to keep notes for a pattern to publish made it easy to fly through the crocheting!

crocheted bamboo cardigan by planetjune

My first problem came when I realised I wouldn’t have enough yarn to complete both sleeves and finish the garment – and obviously no way to get more from the US without great expense – so I had to rethink the design for 3/4 length sleeves. I’d worked the sleeves from the cuff up, and I was working both at once (crocheting one round of one sleeve, and repeating the same round on the other sleeve with a separate ball of yarn) so I’d make sure I’d end up with two sleeves that matched. Changing my design to 3/4 length sleeves meant frogging both sleeves entirely and starting again, as they were too fitted at the wrist to wear the original cuff higher up my arm.

And then my second problem: as I’d made the sleeves fairly close-fitting, the armholes I’d left in the body were far too large. That was easily fixed; I just crocheted an edging around both the sleeve tops and the armholes, decreasing as I went around the armholes until I had the same number of stitches in each piece. (An added bonus of this was that the seaming was ridiculously easy and tidy, as I had the same number of stitches on each side to begin with.)

crocheted bamboo cardigan by planetjune
Shoulder seam

To tie it together, I used the same stitch for the body/sleeve linking stitches that I planned to use for the cardigan’s edging. And then it was just a matter of edging the entire garment, adding space for buttons on one side and buttonholes on the other. I edged the cardigan using linked stitches (which I love – I’ll make a video tutorial for them at some time!) to add some structure without stiffness, and I used foundation stitches to leave vertical buttonholes – easy and neat.

All that remained was to weave the ends in securely, block the cardigan, and sew on the buttons. I found the perfect buttons in a craft shop in Jersey while visiting my parents last July, but then I lost my momentum as it was winter here and not the right weather for this type of light cover-up. But now it’s summer and this cardigan is just what I need! So weave, wash, block, sew, photograph, and here we are 🙂

crocheted bamboo cardigan by planetjune
I flipped the corner up to show you one of the wooden button (left) and one of the hidden anchor buttons on the inside (right)

I used my favourite technique of stitching each button with an unobtrusive anchor button on the inside, to avoid putting strain on the yarn. The finished cardigan is light, comfortable, and silky-soft – I’m already enjoying wearing it:

crocheted bamboo cardigan by planetjune

What’s Next?

This project has convinced me that I really can make non-embarrassing wearable clothes for myself, so I really want to make more, but, with my hand problems, I need to save most of my crochet time for designs I can publish. For that reason, I’ll probably be knitting more clothes than I crochet in future: knitting uses different motions, so I can knit and crochet for far longer than I could just crochet.

I’m really glad to have made a crocheted garment that isn’t stiff, boxy or unflattering – I love crochet and I want to make it clear that, although you’ll be seeing me make more knitted sweaters in future, I’ll never abandon crochet in favour of knitting. If any knitting snobs think I’m knitting clothes because knitting is superior to crochet, I’ll be able to point to this cardigan as evidence to the contrary!

Comments (16)

MOO cards: review and giveaway

MOO logoNote: Don’t miss the giveaway at the end of this post!

You’ve probably heard of MOO before – the company that turns your Flickr images into mini business cards – but they now offer a lot more: full size business cards, greeting cards and postcards, stickers and labels, and more. And you don’t need a Flickr account to use them – you can upload your photos directly to MOO.

MOO asked me if I’d like to test out their service, and I was happy to oblige – I’d wanted to order some minicards anyway, but had no idea that they’d be able to ship to me in South Africa! It turns out that MOO have two websites (US and UK) but they ship worldwide from both those locations (if you’re international, compare shipping prices to your country from each site before you order, to get the best deal).

My Experience

I decided the most useful products for me would be lots of PlanetJune MiniCards and StickerBooks. (I also ordered a high quality dot grid notebook, because I love large notebooks when I’m designing, and the grid of dots makes it easy for me to draw crochet stitch patterns, write without sloping down the page, and sketch without lines getting in the way.)

The process for creating any size of cards or stickers is really simple – just browse your computer for some suitable photos, and upload them. The unique thing about MOO’s service is that you don’t need to have the same image on each of your cards: for no extra cost, you can upload as many images as you want, to the point where every card in your pack can have a different photo, if you want! (You can also use MOO’s design templates if you don’t want to start from scratch with your card design.)

creating MOO minicards

Once you’ve uploaded your images, you can resize and crop each one to fill the frame nicely before approving the project. You can also delete any images that don’t look good, add extra pics, or save your project to edit later. A little tip: If you have several designs uploaded to one pack of cards/stickers, you’ll receive an equal number of each design. As my Baby Bunnies photo is so perfect for the MiniCard size and shape, I added that same photo several times, so I’d end up with lots of bunny cards and a few of each of my other choices.

Here’s what arrived:

PlanetJune MOO order

Lots of pretties! Let’s look at the MiniCards first:

PlanetJune MOO order

They look great: bright and colourful, and the photos are crisp and high-res. MiniCards are the same width as a standard business card, but half the height. Each card is printed in full colour on both sides of the high quality cardstock, so, for the first time ever, I have my logo and colour printing on the back of my business cards:

PlanetJune MOO order

I want to address price before I move on. Although MOO’s prices may not look competitive compared with cheaper services like Vistaprint which I’ve used in the past, there are no hidden extras with MOO. When I used Vistaprint, by the time I’d added the glossy upgrade fee, the image upload fee, and the print on reverse side fee, the cards ended up being many times more expensive than they initially appeared to be, and only worked out to be cost-effective if I bulk-ordered 500 or 1000 cards at a time. And looking at both cards together, the print quality is much better on the MOO cards:

PlanetJune MOO order
MOO (left) vs Vistaprint (right). Any fuzziness is from the extreme close-up, but you can see the clear grain pattern visible on the VP cards only.

Okay, now back to my order! I put together the most adorable StickerBooks:

PlanetJune MOO order

Each sticker is just under an inch (22mm) in size. The stickers have rounded edges and look completely professional. My only problem with them is that they look so cute as a sticker collection, I’m going to have a hard time using any of the stickers!

As you can see from my earlier photo, MiniCards come packaged in a very nice classy white cardboard box, but as they are an unusual shape, I also bought a MiniCard holder to keep my cards looking pristine when I’m out and about:

PlanetJune MOO order

I chose this hot pink shade so I’ll quickly be able to find it in my bag when needed, but you can also get sensible black and white versions. And this is, for me, the genius part of MOO cards. Now when I meet someone and they ask what I do, I can whip out my pink card holder and say “I design the patterns for these”:

PlanetJune MOO order
Pick a card; any card…

I’ve already tried it and it’s a great icebreaker – nobody can resist taking the cards and looking through them all. Then I can casually say “keep your favourite, if you like” and they look thrilled as they try to choose the one they like best. The result is that I’ve handed out my business card (and my details are on the back, so I may get a new customer as a result), but my new friend feels like they’ve been given a gift instead of having contact details forced on them. Win-win 🙂

Giveaway Time!

MOO have very generously offered to give three PlanetJune readers their choice of either 50 Classic Business Cards or 100 MiniCards. (Classic Business Cards are exactly the same as MiniCards in terms of quality etc; the only difference is that they’re standard business card size).

The prizes includes standard worldwide shipping, so this contest is open to everyone – yay!

To enter:

  • Just leave a comment on this post saying what you’d use your MOO cards for if you win!
  • One entry per person, please.
  • Make sure the email address you leave with your comment is valid, so I can contact you if you win (don’t worry, that field is private, so only I will see it).
  • You may enter until 6pm (EST) 11.59pm (PST) on Tuesday January 22nd 2013. I’ll draw the 3 random winners from all the entries after that time.

Good luck!

UPDATE 24 Jan: Thanks to everyone who entered! Just to keep you in the loop, I’ll be drawing the winners in the next few days (when I have time to set up the random drawing) and I’ll update this post with the winners’ names once I’ve done that 🙂

Comments (101)

hand-shaped fingerless gloves

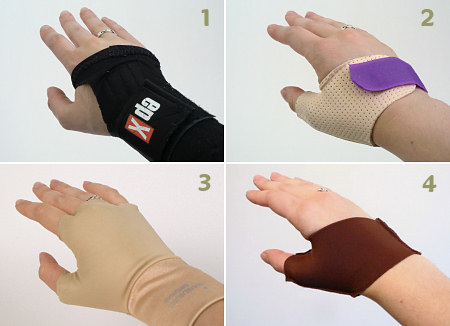
I suffer from hand pains similar to arthritis, especially when I overuse my hands with too much crochet, typing, driving, etc. A few years ago, I saw some hand specialists and was given various support devices to help minimise the pain and help my recovery. The biggest problem is at the base of my thumbs (the ‘basal joint’, according to the hand specialist I saw), and, over the years, I’ve discovered that what helps most is the warmth and compression provided by a stretchy fitted glove that supports my thumb.

various support gloves for hand pain

  1. Wrist support prescribed by specialist (good for wrist pains, but it does nothing for my thumb).
  2. Custom-made rigid thumb support to immobilise my thumb joint (I only wear it at night now, as I can’t do anything with my hand while wearing it).
  3. Handeze therapeutic support gloves are quite helpful, but the side seams dig into my hands, so I have to wear them inside out. I also find the fabric between my fingers slightly annoying.
  4. My first prototype sewn thumb-support glove.

thumb-support glove for basal joint pain
My well-worn thumb-support glove.

After trying all sorts of options, I developed the fingerless support gloves pictured above, sewn from stretch fabric (with the seams on the outside so they don’t dig into my hands). I’ve worn them for years whenever I feel the need, and, as you can see, they now look a little worse for wear!

I need to make some more, but, in the meantime, I found some stretchy sock-type yarn (Elle Stretch) and wondered if I could use that to crochet some gloves that may look a little more respectable to wear in public, help support my hands with warmth and compression, and still be flexible and unobtrusive enough to let me crochet, type, etc without hindrance. I decided to make these gloves a little longer than the fabric gloves, to keep my knuckles and wrists warm and supported too. And here’s the result:

fitted crocheted fingerless gloves by planetjune

I approached this project just like I would the shaping for an amigurumi: single crochet in a spiral, with (invisible) increases and decreases for shaping, to match the shape of my hand exactly. To save breaking the yarn, I surface crocheted down the finished thumb to get back to the hand and continue the main part of the glove. To keep it stretchy, I used foundation single crochet in place of chains for the foundation and the thumb gusset.

fitted crocheted fingerless gloves by planetjune

You can see that the shape conforms to my hand so well that the gloves are still hand-shaped even when I’m not wearing them! Although, from the above photo, they may look rigid and uncomfortable, the stretch in the yarn means they have plenty of give and I can easily move my hands into any position (see the photo below), so they’re fine to wear while typing and crafting. I’m actually wearing them now, as I type this post 🙂

fitted crocheted fingerless gloves by planetjune

Please don’t ask for a pattern – as this is a very fitted glove, I shaped it to fit my hands perfectly. There are so many factors to consider: gauge, the stretchiness of the yarn, and the size/shape of your hand; creating a pattern that would work for all hand sizes would be more work than I could justify.

fitted crocheted fingerless gloves by planetjune

Isn’t it interesting to see how my amigurumi-shaping skills can be translated into making functional items, as well as decorative ones? I wonder what other useful objects I could crochet…

Comments (11)

AmiDogs Scottish Terrier crochet pattern

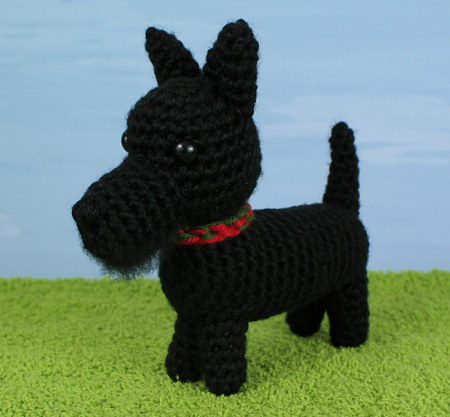
Thanks to my Commissions system, it’s time to launch my 21st dog crochet pattern, AmiDogs Scottish Terrier:

AmiDogs Scottish Terrier crochet pattern by PlanetJune

Queue or favourite Scottie on Ravelry:

My Scottie Dog completes Set 7 of the AmiDogs, for what it’s worth – I mostly just make the sets now for my Etsy shop, as almost everyone takes advantage of the mix-and-match Custom Set for the same price in my shop. But, if you’ve been waiting for AmiDogs Set 7, here’s the group shot of #19 Basset Hound, #20 Rottweiler, and #21 Scottish Terrier:

AmiDogs Set 7 crochet patterns by PlanetJune

I made my Scottie’s collar in red and green to hint at a Scottish tartan, but I don’t know if that comes through on such a small scale! Either way, it adds a nice splash of colour to an all-black dog with black eyes and a black nose…

AmiDogs Scottish Terrier crochet pattern by PlanetJune

Here are the other 20 AmiDogs breeds:


Don’t forget to download the re-released patterns of any of these you’ve already purchased! The new layout saves 1-2 pages on average, and the updated patterns include details like finished size info and US/UK conversions; they print equally well on letter- or A4-sized paper, and they’ve been updated with extra information and tips. Just log back into your PlanetJune account to re-download the new versions of your patterns. (If you originally ordered through Etsy or similar, see yesterday’s re-release announcement for how to get the new versions.)

After the epic task of re-editing and re-formatting all my prior dog designs, plus creating the new Scottie, I feel a bit dogged-out now – I definitely need a break before I design any more AmiDogs! You can still commission new designs though, if your favourite dogs are missing from my collection – I have 4 fully pledged commissions in the queue, so, even if another new design was commissioned today, it’d be months before I get to it.

If you know someone who loves Scotties or has a Scottish connection, you can pick up the AmiDogs Scottish Terrier pattern in the shop right now. Or, if you’d like to add several dogs to your pattern collection, I recommend my AmiDogs Custom Set – you can choose any 3 dog breeds for a bargain price. And you’ll get the AmiDogs Collar pattern as a free bonus with any AmiDogs purchase 🙂

Thanks to everyone who commissioned me to make this design – if you haven’t already, you can log into your PlanetJune account to download your pattern! Next up on the commissions list: the Killer Whale (Orca) – I’ll be collecting pledge monies on Monday for that one, and then I can start figuring out those lovely black and white markings…

Comments (3)

« Previous entries
  • Quick Links: Crochet

    navigation: arrow

    buy crochet patterns and accessories from my online store

    'Everyday Crochet' and 'The Essential Guide to Amigurumi' crochet books by June Gilbank

    Crochet video tutorials and step-by-step photo tutorials

    Free PlanetJune crochet patterns

    Frequently Asked Questions

    Quick Links: Crafts

    navigation: arrow

    Punchneedle Embroidery information, ebook & patterns

    Papercraft ebook & tutorials

    Free PlanetJune craft projects & tutorials

  • Blog Post Categories

  • Blog Archives

  • Welcome to PlanetJune!

    June Gilbank

    Hi, I'm June. Welcome to my world of nature-inspired crochet and crafting. I hope you enjoy your visit!

    If you'd like to get in touch, you can contact me here.
    crocheted Canadian flag by PlanetJune
  • A fanned-out pile of the books Everyday Crochet and The Essential Guide to Amigurumi, with text 'The answers to all your crochet questions at your fingertips - find out more'
  • Support PlanetJune!

    Want to say thanks? You can send me money in seconds at paypal.me/planetjune (over $20) or paypal.me/planetjune2 (under $20) or send me a donation through my shop.

    Or simply click through from my links before you shop at Amazon, Etsy, KnitPicks, LoveCrafts or Crochet.com, and I'll make a small commission on your purchase, at no cost to you! Start here:

    ♥ Support PlanetJune ♥

    Tip: This link is also in the footer of every page!

    Thank you so much for your support!