PlanetJune Craft Blog

Latest news and updates from June

Archive for January, 2007

fuzzy bear pattern available

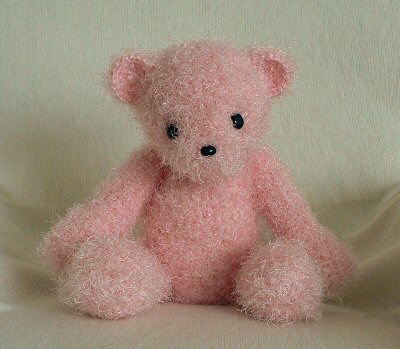
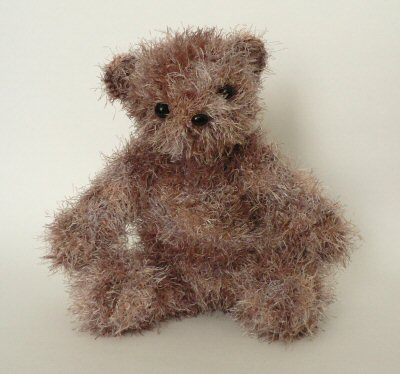
I’ve finished the pattern for the Fuzzy Bears! You can order it here on PlanetJune.com and the pdf will be e-mailed to you.


Fuzzy Bear crochet pattern by June Gilbank 


Hope you enjoy it, and I would love to link to posts or photos of finished Fuzzy Bears when you’ve made them! Happy crocheting 🙂 

Comments (2)

pink fuzzy bear

This pink fuzzy bear is a commission from my sister. I made him using my Fuzzy Bear pattern. Hope you like him, Dawn:

pink fuzzy bear

He’s quite a bit bigger than the original bear, because I used a different yarn, but the pattern worked perfectly. Now I’ve tested the pattern I am confident about making it available for sale (look out – it will be available from PlanetJune.com soon!).

Here he is with the original fuzzy:

fuzzy crocheted bears!

Now he has a big journey ahead, to cross the Atlantic to England. Bon voyage, pink bear!

UPDATE: Looking for the pattern? You can find the Fuzzy Bear crochet pattern in my shop.

Comments (2)

patchwork embellished tote

patchwork embellished tote bag 

I made this bag for the January One Hour Craft Challenge. It’s a smallish tote because I made it to be a lunchbag-in-disguise so I can bring food into work without being too obvious 🙂

I made up the pattern using the size of my lunchbox as the base of the bag. I used a thick black fabric for the outside, so it won’t look grubby once I’ve used it for a while. I think it’s supposed to be suit fabric, but it works for me as bag fabric! I made the lining out of thin black vinyl, so the interior of the bag can be wiped clean – always useful when it’s going to carry food.


I made the handles from the same fabric as the outer bag, and the bag fastens with one snap in the middle of the top edges. I also added a pair of magnets on each side at the top (inside the lining) to stop the sides from sagging outwards when the bag is half empty.

The crowning glory is my machine-appliqued patchwork design on the front, inspired by Wee Wonderfuls’ Hillary’s zig-zag’d patchwork bag, which in turn came from the Japanese craft book Machine Made Patchworks. I changed the method a bit – I used HeatnBond to iron the patchwork squares into place on my fabric, and then used one careful line of zigzag stitching to anchor all the edges. I completed this step first, before even cutting the fabric for the bag. I’ve wanted to try this for months, and I am unfeasibly pleased with how it turned out. I’ve never even used anything other than straight stitch on my sewing machine before!

machine applique patchwork

Love love love this patchwork! I have some fabric left over, so I’ll definitely have to make something else to match my tote…

Comments (9)

fuzzy crocheted bear

fuzzy crochet bear

Heehee, I’ve designed a new crocheted teddy bear! Isn’t he cute? He’s loosely based on my 2005 blue fuzzy bear (I made up the design as I crocheted), but with a little more structure and better proportions. I love his almost antique look.

Here goes nothing… I’ve written up the pattern for this guy and will be submitting it to the 2008 Crochet Pattern-a-Day Calendar. I don’t know how much chance I have of getting in to the calendar, but please keep your metaphorical fingers crossed for me.

UPDATE: Looking for the pattern? You can find the Fuzzy Bear crochet pattern in my shop.

Comments (10)

japanese craft book

I have been coveting Japanese craft books for months, and trying to decide which of the books at Crafting Japanese. I like best. There’s something about the Japanese designs that really appeals to me. I finally saw the one craft book that I couldn’t resist – those ducks on the front cover are so cute! I bought it from a Japanese seller on eBay but found out later when I had the book and the ISBN that it’s also available (more cheaply) from amazon.co.jp.

The book seems to be called “chirimen shugei” which I believe means “chirimen handicrafts”. Chirimen is the type of textured fabric that the patterns use – anyone know where I can find some? In Canada especially?

The patterns are a mix of lovely bags, Japanese dolls, and cute animals and fruit with little pouches inside. The book comes with a pullout of full-size paper patterns.

ISBN 4140311002


Front cover


Back cover


Sample page

It all looks so lovely! I can’t wait to get started making something from the book. I just need to find some suitable fabric.

Comments (1)

wip: fimo sculpture

polymer clay stulpture... in progress!
Can you tell what it is yet? 😉

It’s work-in-progress Friday, so here’s a sneak peek at my latest FIMO sculpture. I should have included something for scale in the photo but, just so you know, it’s just over 3cm in diameter.

I’ve only finished the top part but I’m really pleased with it so far. As a lifetime fan of this movie I’ve always wanted one of these, and hey, why buy when you can make?!

I’m going to set this one aside for a while as I have some January-specific projects to work on (crochet calendar submission and my OneHourCraft bag). Any idea where I can find an extra couple of hours each day so I can actually make all the things I want to?

Oh, and don’t worry – I’ve baked what I’ve done already, so I don’t need to worry about all my hard work getting dusty or squashed (I learned this lesson the hard way). 

Comments (3)

bargain crochet patterns

I do love a bargain – I just picked up the 2007 Crochet Pattern-a-Day calendar at 50% off! I only just resisted buying Origami-a-day and Sudoku-a-day as well…


Lots of inspiration in here, and it’s kind of making me want to submit a pattern for next year’s calendar, although that may be a bit ambitious with only 3 weeks until the submission deadline… I’ll think about it, and if I don’t make the deadline, I’ll have plenty of time to design something for the 2009 calendar!

Comments (5)

there’s nothing more english…

…than a good cup of tea. We even import our tea from England because it’s just not the *same* in Canada. Our teapot is round and comforting, but our precious tea gets cold before hubby can have his third mug.

As a (slightly belated) Christmas gift, I’ve made him a quilted tea cosy. I’ve seen knitted tea cosies that have holes at the front and back for the spout and handle, but the only quilted tea cosies I’ve seen are like giant hats, and you have to remove them to pour the tea. Maybe it’s just easier that way, because the knitted fabric will stretch to fit over the teapot appendages, but quilted cotton obviously can’t do that. But why should that stop me – there has to be a way to make a quilted tea cosy that you don’t have to remove to pour the tea…

I played around with folding a piece of paper until I found something that looked about right:


Starting with a rectangle for each side (dimensions depend on the size of your teapot), sew line A to line B and line C to line D. Then sew the two sides together along lines E and F. These lines are dotted because the easiest way to get the angles right is to NOT measure these lines initially, but draw them in after sewing A-B and C-D so E and F form one straight line along the top of the cosy.

I started by quilting this cat and mouse fabric together with extra thick batting and some scrap cotton on the back (using curved lines to avoid cutting any cats in half with the quilting!) and then cutting it in half to make my two rectangles:


Left: front after quilting; right: back after quilting

I sewed my A-B, C-D, E-E and F-F lines. The double layer of extra thick batting proved too much for my sewing machine, so I had to finish them by hand. I then trimmed the resulting triangles of batting that I had created inside the cosy. I repeated the process using black cotton (unquilted) to form the lining, and tacked it wrong sides together with the cosy.

I handmade bias tape from the same fabric using the Dread Pirate Rodgers’ Continuous Bias Tape instructions. I have never made bias tape before, and this method worked really well for me – the best part was cutting the tube I had created into a long spiral and it magically turned into a perfect bias tape strip.

I applied one long strip of bias tape around all the edges using Heather Bailey’s wonderful Continuous Quilt-Binding instructions. I sewed the two sides together under the spout and then sewed a black hook and eye under the handle at the back, so the cosy can be removed.


Ooh, a nicely mitred corner (thanks Heather!)

Finally, I finished the top of the cosy with a fabric covered button with a mouse nicely centred on it!

Et voila!


Hubby is pleased – in our preliminary testing, it kept the tea nice and warm for 2 hours! I am entering this in the GIFT category in this month’s Whiplash contest.

Comments (17)

« Previous entries
  • Quick Links: Crochet

    navigation: arrow

    buy crochet patterns and accessories from my online store

    'Everyday Crochet' and 'The Essential Guide to Amigurumi' crochet books by June Gilbank

    Crochet video tutorials and step-by-step photo tutorials

    Free PlanetJune crochet patterns

    Frequently Asked Questions

    Quick Links: Crafts

    navigation: arrow

    Punchneedle Embroidery information, ebook & patterns

    Papercraft ebook & tutorials

    Free PlanetJune craft projects & tutorials

  • Blog Post Categories

  • Blog Archives

  • Welcome to PlanetJune!

    June Gilbank

    Hi, I'm June. Welcome to my world of nature-inspired crochet and crafting. I hope you enjoy your visit!

    If you'd like to get in touch, you can contact me here.
    crocheted Canadian flag by PlanetJune
  • A fanned-out pile of the books Everyday Crochet and The Essential Guide to Amigurumi, with text 'The answers to all your crochet questions at your fingertips - find out more'
  • Support PlanetJune!

    Want to say thanks? You can send me money in seconds at paypal.me/planetjune (over $20) or paypal.me/planetjune2 (under $20) or send me a donation through my shop.

    Or simply click through from my links before you shop at Amazon, Etsy, KnitPicks, LoveCrafts or Crochet.com, and I'll make a small commission on your purchase, at no cost to you! Start here:

    ♥ Support PlanetJune ♥

    Tip: This link is also in the footer of every page!

    Thank you so much for your support!