PlanetJune Craft Blog

Latest news and updates from June

Archive for August, 2014

pattern re-releases: Fuzzy Friends

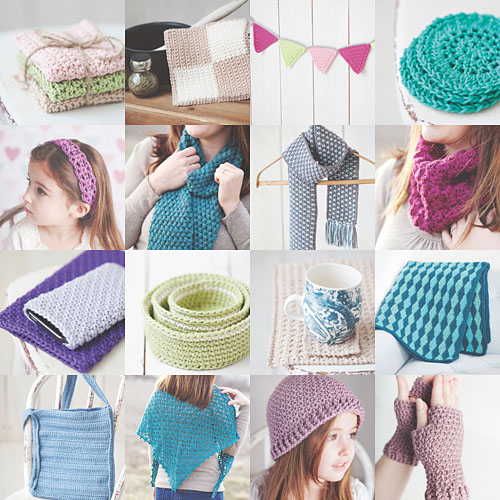
I’ve been updating my entire back catalogue of patterns with extra information and tips and a new space-saving layout, and re-releasing them in batches as they are ready. Please see the Pattern Re-Release FAQ for more information.

I’ve finally done it! With this last batch of 12 patterns, all my crochet patterns, punchneedle patterns and ebook, and craft tutorials have been updated and re-released. That’s 125 re-released patterns over the course of almost 2 years (I re-released the first batch in October 2012) and it’s a huge weight off my mind that you can now be assured that any PlanetJune pattern you purchase meets my high standards for clarity, quality, detail, and ease of understanding.

This final batch of re-releases includes all 11 patterns from the Fuzzy Friends collection, the About Fuzzy Patterns reference guide you receive with each of these patterns, and Ice Cream Bear.

All these crochet patterns are now updated and re-released:

Fuzzy Friends crochet patterns (and Ice Cream Bear) by planetjune
Fuzzy Bear, Fuzzy Bunny & Chick, Fuzzy Lamb, Fuzzy Penguin, Mini Fuzzies: Woodland Creatures, Fuzzy Seal, Fuzzy Ferret, Fuzzy Monkeys, Fuzzy Kitten, Fuzzy Guinea Pig, Fuzzy Rat, Ice Cream Bear.

If you’ve previously purchased any of these patterns, the update(s) are now ready for you to download in the new format!

Log back into your PlanetJune account at any time in the next 2 weeks and you’ll see the download buttons for these purchases have been re-enabled, so you can click and download the new versions.

If you have lots of past orders in your PlanetJune account, you don’t have to hunt for the right ones; just follow these simple steps:

  1. In your PlanetJune account, click Show All Orders.
  2. At the top of that page, click to the list of all your past purchases.
  3. Find the pattern name in the alphabetical list.
  4. Click the order number to go directly to that order.
  5. Re-save your pattern 🙂

The Pattern Re-Release Project has been a much larger job than I originally anticipated, especially with these final Fuzzy Friends patterns. I left them until last for a few reasons:

  • They were my first ever patterns, so needed the most work to get them up to standard, especially the usual PlanetJune level of detail when it comes to assembly and finishing.
  • They used a technique I developed especially for working with novelty/eyelash/fuzzy yarns. I’ve updated any parts worked in standard yarns to use more conventional techniques (magic ring, invisible decrease, worked right side out) and to offer optional instructions for changing direction for any pieces that change from fuzzy to non-fuzzy yarn or vice versa.
  • They (mostly) didn’t use safety eyes, so I had to add extra instructions as to where and when to attach safety eyes, if you want to use them instead, before the head is stuffed! In several cases, this involved re-crocheting at least part of the original design so I could add this information correctly.
'About Fuzzy Patterns' reference guide, by June Gilbank

I’ve also completely revised the About Fuzzy Patterns document that you get with any Fuzzy Friends pattern purchase. The new 4-page reference guide is crammed full of information, tips, and examples for choosing and using both eyelash and fluffy/fuzzy yarns, how to substitute any regular yarn of your choice, and how to brush smooth pieces with a wire brush to give a fluffy result.

To save you from downloading it multiple times, I’ve made it a separate download in every order that includes a fuzzy pattern – so just download that ‘About Fuzzy Patterns.pdf’ file once! And yes, it’s a straight PDF file, not a ZIP file (woohoo!), so if you have any problems in downloading it, please let me know what went wrong, in as much detail as possible, so I can investigate before I transition my shop away from ZIP files to straight PDFs…

Note: I should just add at this point that Ice Cream Bear is not a Fuzzy Friends design – he’s worked normally and doesn’t need the About Fuzzy Patterns file – but his pattern suffered from a few of the above problems (minimal assembly instructions, no instructions for safety eyes) so I saved him for this group so I could find a solution for them all at once.


If you’re tempted by these new and improved Fuzzy Friends patterns, I have a new deal available for you! Starting from today, you can now buy a Custom Set of any 3 Fuzzy Friends patterns of your choice, for a special bargain price.

Fuzzy Friends custom set of any 3 crochet patterns by PlanetJune

As with my other Custom Sets (AmiDogs and PJ Accessories), if you want more than 3 patterns, just add the Custom Set to your cart as many times as you need, selecting 3 different patterns each time.


Now the pattern reformat project is complete, I’ll be giving you another chance to download any and all of the updated patterns you purchased but may have missed the window for re-downloading. That won’t be for a while though – it’ll probably be some time in October.

In the meantime, if you need access to any of your expired patterns, the process is the same as always: just shoot me an email including your 5-digit order number (you’ll find the number in your order confirmation email, and in your list of orders in My Account), and I’ll be happy to unlock that order for you 🙂


If you have any questions about the pattern reformat project, or you received the patterns through a different mechanism (and so don’t have an order for them in the PlanetJune shop) but you’d still like the new versions, check the Pattern Re-Release FAQ for more information.

I can’t believe this project is finally finished! Now I think I’m definitely overdue for a rest; it’s going to be a while before I can even look at another crochet pattern, let alone have the brain power to design one… Thanks so much for your patience during this long pattern overhaul period. I feel that the new versions are vastly improved and worthy of the PlanetJune stamp of quality – I hope you agree 🙂

Comments (3)

Ring Box

Today I have yet another project I’ve made from modifying a pattern from my Idiot’s Guides: Crochet! This project is a miniature version of my Handy Baskets pattern:

Handy Baskets crochet pattern by June Gilbank

Handy Baskets on Ravelry:

This concept was born of necessity: my skin condition means I can’t always wear my wedding rings any more, so I often leave them lying around the house. After I was burgled, I thought for one horrible minute that my rings had been taken..! They were lying on the coffee table, and would have been grabbed up if I hadn’t accidentally dropped my gloves right on top of them earlier that day, so they were hidden from the burglars. I needed a special place for my rings that’s both safe and unassuming-looking, so I can hide my rings in plain sight when I can’t wear them.

To make my ring box, I held 2 strands of Knit Picks Curio (size 10 crochet thread) together with a B (2.25mm) hook, which made a nice sturdy fabric for the box. I made an extra-small version of the Handy Baskets pattern by only making 4 rounds for the base, and I continued with the sides until the box was tall enough to fit all my usual rings inside.

ring box based on Handy Baskets by June Gilbank

Then I made a lid by making a slightly larger version of the same pattern – I made 5 rounds for the base, but fudged the increases in the last 2 rounds (by skipping 1 or 2 in each round) so I ended up with a base with a total of 27 stitches around the edge – just right to snugly fit over my box base. (If you’re going to try a project like this, it’s really a matter of trial and error to see how much larger the lid should be than the box, as it’s very dependent on your yarn/hook/gauge combination, and how tightly you want the lid to fit!)

ring box based on Handy Baskets by June Gilbank

To make my box look less obviously like a container, I gave the lid long sides, so it completely covers the base of the box. If anyone sees it, they’d probably think it’s a solid stuffed shape – a mini pincushion, maybe? – and hopefully won’t give it a second glance.

ring box based on Handy Baskets by June Gilbank

Only I – and now you! – know the truth… 😉

ring box based on Handy Baskets by June Gilbank

It’s a really tiny box, at only about 3cm (just over an inch) across and 1.5cm (5/8″) tall, but still large enough that I never misplace my rings any more. Now, when I can’t wear them, my rings are safe and cosy in their miniature home!


Are my posts giving the idea for how easy it is to modify my book patterns to meet your own needs? I do hope so! It’s one of the themes I tried to convey throughout the book.

If you’re making projects from IG: Crochet, please join the Book-Along CAL in the PlanetJune Ravelry group and share your photos (see the PlanetJune CAL FAQ for details if you’re new to the crochet-along concept).

We already have coasters, headbands, baskets, phone covers, and even a shawl posted in the CAL thread – it’s lovely to see the book projects mounting up!

Comments (4)

Shoulder Strap Purse

The patterns I designed (together with the modification tips) in my new book Idiot’s Guides: Crochet are just so handy, I’ve been making new projects for myself using them as starting points – something I hope my adventurous readers will also attempt! This is one of my favourites: I made a mini version of the Solid Stripes Bag to use when I’m out for a walk in the summer, have no pockets for my phone, keys and lip balm, and don’t want to carry a handbag.

shoulder strap purse based on Solid Stripes Bag by June Gilbank

It’s so cute and tiny! Here it is with the original Solid Stripes Bag, for comparison:

shoulder strap purse based on Solid Stripes Bag by June Gilbank

Solid Stripes Bag on Ravelry:

I made the strap extra long so I can wear it across my body (for extra safety) or over one shoulder (for convenience). The mods I made to resize the bag like this are detailed below (or you could resize it to any size you like, using the instructions given in the pattern – this is a good example of how you can get a completely different result using those resizing instructions!)

I only had a single skein of this variegated green linen blend so I crossed my fingers and hoped it would be enough. In the end, I ran out of yarn with only a few stitches of joining to go, so I frogged the joining stitches and crocheted the seams in a different yarn in a lighter shade of green, leaving the remaining original yarn for the strap edging. It looked fine, except a bit strange with the top edge being the only one without the lighter green edging, so I slip stitched across the top front edge of the bag, and then decided to add a button on the front and a crocheted button loop as part of the top edging on the back:

shoulder strap purse based on Solid Stripes Bag by June Gilbank

I thought this was a very clever (but pretty simple) method for making a nice button loop, so I’ll share it here (see below), together with my mods from the original pattern.


How to Make the Shoulder Strap Purse

To make this purse, you’ll need the original Solid Stripes Bag pattern, available exclusively in my book, Idiot’s Guides: Crochet. You can buy the book from amazon (here are the direct links – click your country: US, Canada, UK, Germany) or ask your local library if they have a copy you can borrow 🙂

To make my tiny version of the bag, follow the Solid Stripes Bag pattern exactly as written, with the exception of the following modifications:

Bag front and back:

  • ch 19
  • 9 rows

Strip

  • ch 200
  • ldc instead of ltr
  • omitted 2nd row of strip

You can also add the (optional) button loop (for any size of bag you wish):

FSC Button Loop

Firstly, decide whether you want one or more buttons – for a larger bag, you may prefer two buttons or toggles spaced at thirds across the bag instead of one at the midpoint. I’ll describe the technique for a single button/toggle:

  1. with the right side of the back of the bag facing you, sl st across the top of the bag to the stitch before the midpoint
  2. fsc in the next stitch (see p152 of IG: Crochet for the tutorial!)
  3. fsc as many additional stitches as you need to make the loop (hold your button in place on the front of the bag to judge the length, but remember the loop will stretch, so you can make it a little shorter than you think it should be)
  4. sc into the ‘chain’ at the bottom of the first fsc you made
  5. continue to sl st across to the other edge of the bag

Attach the button loosely, so there’s enough space behind it for the fsc loop to sit comfortably. For best results, add the button or toggle after you complete the loop, so you can reposition it if the loop is a little longer or shorter than you anticipated. Oh, and if you’re making 2 closures, count how many fsc stitches you make for the first loop as you crochet them, so you make both loops the same length. 😉

It should make sense when you try it (provided you’re already familiar with foundation single crochet), but, if you need more help understanding this technique, let me know and I can make a step-by-step photo tutorial (although it won’t be for a while)!


I think of this little purse as a ‘pocket’ – it’s just so useful in summer when you have no actual pockets in your clothing for those essentials you can never leave the house without. I’m so pleased with how it turned out! (And I can confirm that my non-stretchy strap technique works like a charm: I used my ‘pocket’ all last summer and the strap hasn’t stretched at all.)

shoulder strap purse based on Solid Stripes Bag by June Gilbank


Some amazing projects have already been shared in the Book-Along CAL – it’s so much fun to see my designs brought to life in different colours and yarns! If you’re making projects from IG: Crochet, please join the crochet-along in the PlanetJune Ravelry group, and share what you’re making – we’d love to see them!

If you’re new to my crochet-alongs, I’ve written a PlanetJune CAL FAQ for you – a page of instructions to get you started with joining Ravelry, joining the PJ group, and adding your first project to a CAL. Please do check it out if you have any questions or worries about how to join in…

Comments (4)

South Africa wildlife IV

This post is part of my occasional series of photoblog posts about the wildlife and nature I see while living in South Africa.

For various reasons, it’s been far too long since I’ve been able to get outside and enjoy nature, but this weekend changed all that – we had beautiful summer-in-winter weekend weather and it was too nice to be inside. I took my camera with me to see what I could see, and ease me back into my wildlife photoblogging. So, there’s no real theme to this post, it’s just ‘what I saw this weekend’ 🙂

In my garden:

…a white butterfly finally stopped moving for long enough for me to photograph it:

white butterfly

…a giant grasshopper found the perfect lighting to pose for me:

locust

…and I spotted a new (to me) sight with my favourite Garden Acraeas: egg-laying!

garden acraea butterflies laying eggs
The female hangs from the edge of a leaf and raises her abdomen to lay her eggs against the underside of the leaf (see the butterfly on the right). I have no idea why a male (top left) kept flying over the other female’s leaf (bottom left) and interrupting her while she tried to do the same.

At a local nature reserve:

…flower season is most definitely beginning:

flowers

…the waterbirds were enjoying the sunshine:

flowers
Back: white-breasted cormorants; front: red-knobbed coots.

…some kind of shield bug (I’m no bug expert!) sunned itself on a succulent:

flowers

…and the red bishops looked spectacular as always:

flowers

And, by the river:

…these tiny flowers look like normal lawn daisies, except the petals are extra-short:

daisies

…we spotted a Cape weaver starting to weave a new nest between two tree branches:

cape weaver nest

…carefully weaving each blade of grass into the ring he’d already constructed:

cape weaver nest

…3 hours later, the ring of grass had become a ball and a female came to check it out:

cape weaver nest
If she liked his work, she’d line the nest and they’d lay their eggs inside.

…she inspected his handiwork thoroughly, but wasn’t impressed:

cape weaver nest

…maybe he needs to do a little more weaving and he’ll have more luck tomorrow! I’ll have to check back – if a female moves in, we should be able to see her flying into the nest with soft lining materials. If not, he’ll abandon the nest in a couple of days and try his luck with a new one…


A bit of a random return for my wildlife posts, but these little signs of spring make me very happy! I hope you’ve enjoyed seeing them too. Please leave me a comment if so – I do love to hear from you…

Comments (17)

Bamboo Cozy Cowls

To commemorate the release date of my new Idiot’s Guides: Crochet, I decided to crochet a project from the book just for myself – a rare treat for someone who crochets for a living… I made a less bulky version of the Cozy Cowl to wear indoors (it’s still winter here and cold inside!) by resizing the pattern to be much less wide and longer so I can wrap it around my neck twice:

Cozy Cowl by June Gilbank in bamboo yarn from Vinni's Colours

Cozy Cowl on Ravelry:

I treated myself to a skein of Vinni’s Colours Serina in Plum – a locally-produced 100% bamboo yarn. It’s much finer than the yarn in the book, so I had to swatch to find an appropriate hook size (I/5.5mm), and gamble that the single skein I bought would be enough for my project…

bamboo yarn from Vinni's Colours

I’d been looking for an excuse to buy some of this yarn for ages, not only because it’s beautiful and amazingly soft, but (from the yarn’s ball band):

This yarn is hand dyed and balled by women from an economically depressed rural area of South Africa. The sale of this product has empowered them and brought economic benefits to their community.

Getting to support the local economy is an added bonus!

Cozy Cowl by June Gilbank in bamboo yarn from Vinni's Colours

I used the modification instructions (that I’ve provided with all the patterns so you can resize them to be any height and width you want) to make my cowl thin and long, instead of short and wide as shown in the book. As my cowl is so narrow (ch 15 for the starting chain) there was actually more than enough yarn in the skein to make the 36″ loop I wanted. And the result is just what I hoped for:

  • It keeps the gap at the top of my sweaters covered so I don’t freeze
  • It’s extremely soft and non-irritating on my neck
  • It’s not bulky so I can wear it inside the house when it’s cold without looking stupid
  • And the yarn (and colour) are gorgeous!

And now, for contrast, here’s a second bamboo cowl I made, using the same Cozy Cowl pattern and the same concept (a thinner cowl to wrap twice). This time I used Bernat Bamboo, a bulky yarn, with a very large L/8mm hook, and what a difference that made!

Cozy Cowl by June Gilbank in Bernat Bamboo yarn

It’s very bulky, and so soft that the texture of the stitch pattern is almost lost, but it’s comfy and snuggly, so it feels lovely to wear. Between these two new cowls, I should stay nice and warm for the rest of the southern hemisphere winter!


If you’ve also started making a project from IG: Crochet, please join the crochet-along in the PlanetJune Ravelry group, and share what you’re making. It’s so exciting for me to see these patterns – some of which I designed a year ago – finally starting to be used to make beautiful things, and I’d love to see your versions of them too…

Comments (3)

August update

I skipped July’s monthly update, as I didn’t have anything to report except more burglary aftermath, but now I’m being treated for the PTSD, and today I had new extra-strong security gates installed at every entryway into my house, so things are getting better and I should feel much more secure from now on. And that’s enough about that – let’s move swiftly onto the good stuff!

Book-Along CAL

I’m most excited this month to start a new crochet-along for the new book (and the previous book, to be inclusive) in the PlanetJune Ravelry group. Throughout August and September, you can join in by making anything using the patterns, concepts and techniques from either of my two crochet books: Idiot’s Guides: Crochet and The Complete Idiot’s Guide to Amigurumi:

Idiot's Guides: Crochet by June Gilbank - patterns
IG Crochet: Easy Stitch Gallery patterns
IG Crochet: Intermediate Stitch Gallery patterns
IG Crochet: Motif patterns
The Complete Idiot's Guide to Amigurumi by June Gilbank - patterns

So yes, you have a lot of choices! I think you’ll find something you’ll like in this Crochet-Along and I hope you’ll join us by making one (or many) projects over the next 2 months and sharing them in the Book-Along CAL thread – you’ll find full details of the CAL there.

If you’re new to PlanetJune CALs, please see the CAL FAQ page for information and instructions for how to get started!

Subscribing to Blog Comments

It’s come to my attention that a recent WordPress update broke the ‘Notify me of follow-up comments by email’ function on my blog. I’m not sure how long it’s been broken for, so if you asked me a question and were waiting for notification of my reply, please return to the post you commented on to see my reply! The feature is now fixed and runs through Jetpack, so, in future, you can subscribe to comments on any post and you will receive notification by email when I respond to your query.

I do apologise to anyone who’s been negatively affected by this – I got to work fixing it as soon as someone mentioned it wasn’t working, but, as far as I know, it could have been broken for months. 🙁 If you notice any other problems with my website, please let me know – I want everything to run smoothly, and if anything looks or acts strangely, I’d really appreciate it if you’d mention it to me, so I can try to improve it. Thanks!

Fiction and Fantasy CAL Report

The June/July CAL has now ended. Even though it’s been summer (for most) we had a lovely variety of entries – including lots of the new Aliens – and some very creative participants! Here’s a sampling of the entries (click the pic to see them all on Ravelry):

PlanetJune Fiction and Fantasy CAL 2014 - sample of entries

Review and Win contest

The monthly Review and Win contest has not been abandoned; I’m just postponing the draws for the winners of June and July’s contests. I’ll announce the 3 winners for all 3 summer months in September’s monthly update – so keep your fingers crossed, one of your June or July reviews may already be a winner and you don’t even know it yet!

You’re automatically entered in the next monthly draw every time you write a review for a PlanetJune pattern you’ve enjoyed – and you’ll also be helping future customers make an informed decision about patterns they are considering buying.

It’s Book Launch Time!

Idiot's Guides: Crochet by June Gilbank

Tomorrow, August 5th, is the official launch date for my new book, Idiot’s Guides: Crochet. So, if you haven’t pre-ordered it online, you may be able to pick it up from your local bookstore!

If you do see a copy on the shelf in a real-life shop, please snap me a pic and tweet, facebook or email it to me – I’d love to see my book ‘in the wild’!

Comments (3)

IG Crochet 5: Patterns Part 2

Idiot's Guides: Crochet by June Gilbank

This is the last day of my week of posts telling you all about my new book, Idiot’s Guides: Crochet, which will be released in 4 days, on 5th August.

For my main intro to the book, how to order your copy, and the other posts in this series, please see my main IG: Crochet info page.

Following on from yesterday’s post, here are my insights into the designs that make up the the second half of the pattern gallery at the end of my book…

Rolling Waves Blanket

Idiot's Guides: Crochet by June Gilbank - Rolling Waves Blanket pattern
I really enjoyed crocheting this blanket – the hardest part was knowing how long I’d have to wait to keep it looking nice and neat before Maui and I could snuggle up in it! This design has a beautiful stitch pattern but it’s easy to memorise. You only need to change colour once every 2 rows, so you won’t have hundreds of ends to weave in.

It’s easy to customize this design to make any size of blanket – from a baby blanket to an afghan for a king-sized bed – or even to crochet just the first 8 rows and you have a lovely wave pattern scarf.

I named this blanket Rolling Waves for the stitch pattern, and the colour choices for my sample support the name, but the wave pattern would look equally lovely in a non-aquatic colour scheme – just choose any main colour (the dark teal in my sample) and add one, two or more contrast colours. Pastels would make a sweet baby blanket, or how about a bold rainbow of different coloured wavy stripes against a black background? I can’t wait to see the different colour combos when people start working on this blanket. 🙂

Solid Stripes Bag

Idiot's Guides: Crochet by June Gilbank - Solid Stripes Bag pattern
This design was a challenge for me – I’m really not keen on most crocheted bags, as they almost always need to be lined to be useful, and the straps stretch out as soon as you put anything in them (unless you add a fabric backing to the straps too). Another challenge I set out to solve with my design!

Would you believe the lovely textured stripes of this bag are created with only one stitch? The linked stitch pattern has no holes, so you don’t need to line it with fabric, and small items such as pens (and crochet hooks!) won’t fall out. The tall stitches work up quickly, and the finished bag is large enough to be useful without taking forever to make. I was thinking of a bag for carrying library books when I made my sample, although of course you can use my modification notes to make a bag of any size.

My clever strap design creates an inelastic strap that won’t stretch out, and, possibly the best part of all: this design is almost no-sew – you just need a few stitches to join the ends of the strap together, and all the rest of the assembly is crocheted. I’ve included assembly diagrams to make that process even simpler.

Double Diagonals Shawl

Idiot's Guides: Crochet by June Gilbank - Double Diagonals Shawl pattern
This may be my favourite pattern in the book. I thought I’d nailed the design several times, but then came up with a tweak to make it even better and had to redo the whole thing with the improved stitch pattern, over and over again. But it was worth every frogging and redoing – the final stitch pattern is infinitely prettier than my original concept! It looks to me a little like flowers and a little like snowflakes, but, either way, the parallel diagonal stitches throughout (that give this design its name) are uniquely beautiful.

The shawl is a shallow triangular shape, which means it’ll work up more quickly than a standard right-angled triangular shawl. As it’s worked from the bottom up, you can just keep crocheting until you like the size – or until you run out of yarn! A subtle picot edging makes the perfect finishing touch for this stunning shawl.

Front-and-Back Hat

Idiot's Guides: Crochet by June Gilbank - Front-and-Back Hat pattern
My editors were pretty insistent that I should design a hat for this book, but after browsing pages and pages of hat designs on Ravelry, I realised that I just don’t like crocheted hats… I don’t like the bulls-eye shape the rows make on the top of the head; I don’t like the helmet-like structure of a single crochet hat, or the gappiness of a hat made with taller stitches; I really don’t like hats with a plain top and a fancy stitch pattern that only starts on the sides.

So I set out to design a hat that avoided everything I don’t like about crocheted hats – quite a challenge as I’m so picky! Finally, I came up with a seamless stitch pattern that gives a subtle all-over texture, with no obvious rows, and no transition between the increase part at the top of the hat and the straight sides. Even the increases are pretty much invisible!

I love the texture of this hat – it gives the hat a beautiful appearance and a nice stretch but without leaving any gaps for the wind to sneak through. The ‘Front-and-Back’ name refers to the trick that makes this hat unique – a combination of front and back loop only stitches (which are mirrored in the front and back post stitches in the ribbing).

I designed this hat in 3 sizes (child, adult small and adult large), but I’ve also included a recipe that works by size, so you can make this hat with any yarn and any gauge, and end up with a hat that fits anyone beautifully. Note: the beautiful girl in this photo is wearing the adult small size hat, which is why it’s a little large on her.

Front-and-Back Fingerless Mitts

Idiot's Guides: Crochet by June Gilbank - Front-and-Back Fingerless Mitts pattern
And now to the final pattern. If your book has one hat and one set of fingerless mitts, it just makes sense to design the patterns so you can crochet a matching set!

I was originally going to just make basic wristwarmers with a slit for the thumb, but I decided it’s important for your thumb joint to be warm too, so I set out to design a shaped, fitted, no-sew fingerless mitt where the thumb shaping doesn’t disrupt the stitch pattern. I designed these mitts to be long enough to cover your knuckles and keep you cosy, or of course you could add extra rows above or below the thumb gusset to make your mitts longer still.

If you’ve already made the hat, the mitts are a natural progression – slightly more complex due to the thumb gusset shaping, but you’ll still find it easy, as it uses the same front-and-back stitch patterns you used for the hat.

I’ve supplied the mitts pattern in 2 sizes that should cover pretty much all women’s hand sizes, and – as I mention in the pattern – you can modify it further by intentionally not meeting gauge, to make your mitts a little smaller or bigger, as necessary.

Note: all images reprinted with permission, Alpha Books, a member of DK.


Intrigued Yet?

So that’s it – the end of the week of posts that tell you all about my new book, Idiot’s Guides: Crochet. I hope you’ve found these posts interesting and that they’ve tempted you to take a look at the book once it’s released on August 5th (assuming you’re not one of the lucky few who amazon shipped to early!)

I put my heart and soul into making this book the best it could be, and I really hope you’ll enjoy it and find it useful, and different from every other crochet book out there.

  • Buy it! If you haven’t bought IG: Crochet yet, and would like to, please use my amazon links to buy either the paperback or Kindle version – you’ll save some money vs buying it in a bookstore, and I’ll make a few extra pennies too.
  • Review it! If you’ve already bought it and love it, please consider writing a review on amazon and telling the world why you think it’s a special book. Thank you 🙂

Crochet-Along With Us!

And to celebrate the launch of IG: Crochet, today we’re starting a 2-month Book-Along crochet-along (CAL) in the PlanetJune Ravelry group. That gives you plenty of time to try out a project – or several – from IG: Crochet, discuss yarns and colour choices, ask for advice, share your photos of your projects, and enjoy seeing what everyone else is making and how the different patterns look in different yarns and colours.

I’ll be there too, of course, if you have questions or want my opinion on anything. It’s going to be great, and I really hope you’ll join us for it! If you’re new to Ravelry, you’ll have to sign up for a free membership, but I promise you’ll love being a part of our friendly, helpful PlanetJune community. I hope to see you there!

Comments (3)

  • Quick Links: Crochet

    navigation: arrow

    buy crochet patterns and accessories from my online store

    'Everyday Crochet' and 'The Essential Guide to Amigurumi' crochet books by June Gilbank

    Crochet video tutorials and step-by-step photo tutorials

    Free PlanetJune crochet patterns

    Frequently Asked Questions

    Quick Links: Crafts

    navigation: arrow

    Punchneedle Embroidery information, ebook & patterns

    Papercraft ebook & tutorials

    Free PlanetJune craft projects & tutorials

  • Blog Post Categories

  • Blog Archives

  • Welcome to PlanetJune!

    June Gilbank

    Hi, I'm June. Welcome to my world of nature-inspired crochet and crafting. I hope you enjoy your visit!

    If you'd like to get in touch, you can contact me here.
    crocheted Canadian flag by PlanetJune
  • A fanned-out pile of the books Everyday Crochet and The Essential Guide to Amigurumi, with text 'The answers to all your crochet questions at your fingertips - find out more'
  • Support PlanetJune!

    Want to say thanks? You can send me money in seconds at paypal.me/planetjune (over $20) or paypal.me/planetjune2 (under $20) or send me a donation through my shop.

    Or simply click through from my links before you shop at Amazon, Etsy, KnitPicks, LoveCrafts or Crochet.com, and I'll make a small commission on your purchase, at no cost to you! Start here:

    ♥ Support PlanetJune ♥

    Tip: This link is also in the footer of every page!

    Thank you so much for your support!