PlanetJune Craft Blog

Latest news and updates from June

Archive for May, 2020

PlanetJune Stories: Dorte’s Fishbowl

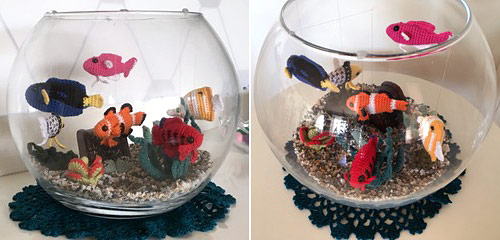
Today’s PlanetJune Story comes from Dorte Jensen in Denmark, who used a selection of my crochet patterns to create this gorgeous realistic fishbowl!

Dorte's crocheted fishbowl made from PlanetJune patterns

I’ll let Dorte explain how this project came to be:


My husband saw your tropical fish patterns and said that they were so cute and that he wanted these fish made for his birthday. I don’t remember when the idea came for me to use a real fishbowl for them.

Dorte's crocheted fishbowl made from PlanetJune patterns

My plan required some plants for the bottom of the bowl. I had seen your succulent collection 1 and 2 and I really wanted to crochet them but had never found the time for them. I realized that I could use those plants for the fishbowl. I also came up with my own idea for a plant that the red fish could hide in.

Dorte's improvised crocheted aquatic plant

I didn’t have “earth” to sew the plants onto so they would stand up straight. I made a white circle to sew them onto that I could hide beneath the stones in the bottom of the bowl.

Dorte's crocheted fishbowl made from PlanetJune patterns

I suspended the fish using fishing line – I thought that would be most invisible. Then some dots of glue on the edge of the fishbowl to keep the line and the fish in place. I used a line across the fishbowl so the clownfish could hang in the middle of the bowl.

Dorte's crocheted fishbowl made from PlanetJune patterns

Finally I just want to say that both the fish and the plants were so much fun to crochet, and your crochet tutorials have taught me a lot. It is always a great pleasure to follow your great, well-explained and well constructed patterns.


(Back to me, June, again!)

Thank you so much, Dorte! Isn’t this a fabulous project? Beautifully crocheted, and using the large glass fishbowl with real stones in the bottom was an effective way to add to the realism of this display.

I think the succulents and her clever plant design look perfect in there too. I was surprised to see how well my succulent patterns stand in for corals and aquatic plants (and yes, in case you’re wondering, I do have some real coral patterns planned for some point in the future too…)

I hope these beautiful colourful fish have brightened your day (and maybe even inspired you to make a crocheted aquarium of your own?) Please leave Dorte a comment if you’ve enjoyed this post!

Do you have a PlanetJune Story you’d like to share? I’d love to hear it! Please email your story to june@planetjune.com, together with one or more high quality photos showing what you’ve made from PlanetJune patterns. If I choose your story to feature here on the blog, I’ll send you your choice of pattern from my shop to say thank you!


PS – If you’re looking for the PlanetJune patterns featured above, you can find all my Tropical Fish and Succulent crochet patterns in my shop 🙂

Tropical Fish crochet patterns by PlanetJune

Cactus and Succulent crochet patterns by PlanetJune

Comments (10)

Sprouting seeds – easy, fun and tasty!

I’ve been growing my own sprouts for about a year now, and I thought now would be the perfect time to share the process with you. Even if it’s not practical to get out to buy fresh fruit and vegetables, you can still have nutrient-packed fresh and crunchy sprouts every day.

(And it’d be a great project for kids – it’s so fun to watch the sprouts grow over a few days and then be ready to eat!)

This is my almost-daily lunch:

a sandwich made with home-grown clover sprouts

Mmm, yummy! The act of germinating the seed unlocks all the nutrients contained within it, and the resulting sprout gives you a boost of fresh plant goodness.

And look how much fun it is to watch the seeds sprout – from seed to food in just 5 days!

growing clover sprouts - from seeds to sprouts

My Favourite Sprouts

There are lots of seeds you can sprout, depending on what you enjoy. I started out with broccoli sprouts, because they have loads of health benefits, but I found their flavour overpowering unless I paired it with a spicy condiment in my sandwich (mustard or horseradish are perfect choices).

After some experimentation, I decided on my favourite sprouts – these would both be a great starting point if you’d like to make your own, as they are easy to grow and have a mild flavour that you can easily add to your food without overwhelming it.

Clover
clover seeds and sprouts

Clover sprouts have a mild, fresh flavour. They are perfect in a sandwich or wrap, added to salads, or anywhere else you might use lettuce. I also like to pile them on top of burgers.

(If you can’t find clover sprouting seeds, I hear that alfalfa is similar.)

Mung Beans (Bean Sprouts)
mung bean seeds and bean sprouts

I’m sure you’re familiar with bean sprouts, most commonly used in Chinese cooking. Growing them at home in a jar means you don’t end up with the long straight sprouts you find in the supermarket, but they taste just as good and it’s incredibly easy to toss a handful into your stir fries and sauces when you’re about to serve them, and add a tasty crunch to your dish.

Supplies

To get started, you’ll need some seeds, a wide-mouthed jar and some sort of screen to cover the top of the jar with.

I started my sprouting adventures with the no-cost method: a well-cleaned pasta sauce jar with a doubled layer of cheesecloth across the top, held in place with a rubber band.

Once I knew I’d be keeping this hobby going, I invested in a set of wide-mouthed mason jars and screw-on sprouting lids (there are lots of options – if you buy some, just make sure the width of the top is the same as the mouth of your jars.)

And then, you’ll need some seeds! You can buy these from health food stores or online. Just make sure you search for sprouting seeds that are intended for consumption – regular seeds that are intended to be planted in the ground to grow into plants are usually treated with a fungicide, so the seeds are not edible.

Get Sprouting!

Here are my notes for sprouting clover. The process is the same for other sprouts; the only differences would be a) how much seed to use, b) how long to soak the seed for, and c) how many days until the sprouts are ready.

But these instructions will give you an idea of how easy it is to grow your own sprouts…

  1. Measure 2 tbsp of seed into the jar, then screw on the lid.
  2. Fill with water and soak for 8-12 hours.
  3. Tip out the soaking water.
  4. Without removing the lid, add water, swirl the seeds around and tip out the water.starting clover sprouts
  5. Repeat step 4, making sure to shake out all the water so the seeds won’t be sitting in water.
  6. Shake the seeds down away from the jar lid so air can circulate.
    starting clover sprouts
  7. Lay the jar on its side, out of direct sunlight.
  8. Every morning and evening, repeat steps 4-7.
  9. When the jar is fairly full (3-5 days) and the sprouts have leaves, leave the jar on a sunny windowsill for a day for the leaves to green up.
  10. Tip the sprouts into a large bowl and fill it with water.preparing clover sprouts
  11. Swish the sprouts around so the hulls float to the top.
    preparing clover sprouts
  12. Skim off the hulls or push them to the sides of the bowl, then grab a handful of sprouts and pull them out of the bowl.preparing clover sprouts
  13. Place into a salad spinner or onto a kitchen towel-covered plate.
  14. Repeat to get all the rest of the sprouts out (leaving a few hulls with them is fine).preparing clover sprouts
  15. Spin the sprouts to dry them, or leave them on the counter for a couple of hours to dry out.
  16. Put the sprouts in a plastic container and refrigerate for up to a week.
  17. Enjoy!

a sandwich made with home-grown clover sprouts

I hope this has inspired you to think about growing your own fresh sprouts!

And, if you’ve tried growing sprouting seeds before, which varieties are your favourites? I’d love to try some different seeds – do let me know your recommendations in the comments below…

Comments (12)

  • Quick Links: Crochet

    navigation: arrow

    buy crochet patterns and accessories from my online store

    'Everyday Crochet' and 'The Essential Guide to Amigurumi' crochet books by June Gilbank

    Crochet video tutorials and step-by-step photo tutorials

    Free PlanetJune crochet patterns

    Frequently Asked Questions

    Quick Links: Crafts

    navigation: arrow

    Punchneedle Embroidery information, ebook & patterns

    Papercraft ebook & tutorials

    Free PlanetJune craft projects & tutorials

  • Blog Post Categories

  • Blog Archives

  • Welcome to PlanetJune!

    June Gilbank

    Hi, I'm June. Welcome to my world of nature-inspired crochet and crafting. I hope you enjoy your visit!

    If you'd like to get in touch, you can contact me here.
    crocheted Canadian flag by PlanetJune
  • A fanned-out pile of the books Everyday Crochet and The Essential Guide to Amigurumi, with text 'The answers to all your crochet questions at your fingertips - find out more'
  • Support PlanetJune!

    Want to say thanks? You can send me money in seconds at paypal.me/planetjune (over $20) or paypal.me/planetjune2 (under $20) or send me a donation through my shop.

    Or simply click through from my links before you shop at Amazon, Etsy, KnitPicks, LoveCrafts or Crochet.com, and I'll make a small commission on your purchase, at no cost to you! Start here:

    ♥ Support PlanetJune ♥

    Tip: This link is also in the footer of every page!

    Thank you so much for your support!