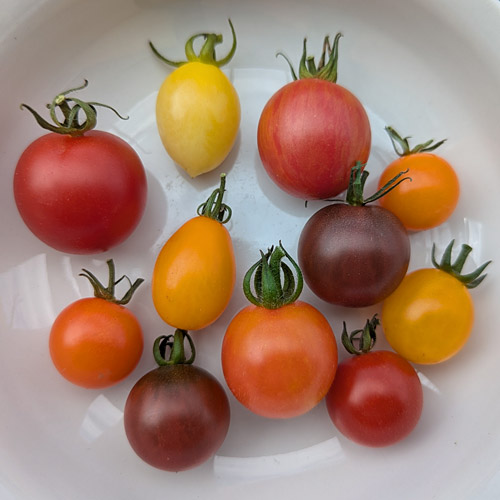
PlanetJune Craft Blog

Latest news and updates from June

Archive for Food

Peanut Butter Dog Cookies

Last week was a double celebration: my beautiful pup Maggie’s 8th birthday, and 8 months since we adopted her! She’s completely changed my life for the better this year – she’s a perfect emotional support dog and companion, I get daily fresh air and exercise on our walks, and together we’ve made lots of friends in our neighbourhood.

peanut butter dog cookies

Our first fall colours with our pup – and my first success at getting her to pose for me!

We recently discovered that Maggie loves peanut butter, so, to celebrate those 8s, I decided to try making some peanut butter cookies for her. I compared several recipes and then came up with my own, and it was a huge success!

With only 3 healthy ingredients and no additives or preservatives, I think I may have stumbled on the perfect recipe, so I’ll share it with you below so you can make some for your own canine companions.

peanut butter dog cookies

Is it cookie time?

Peanut Butter Dog Cookies

Makes about 50 tiny cookies or 25 small cookies (or you can halve the recipe for a smaller batch).

Ingredients

  • 1/2 cup (55g) whole wheat flour
  • 1/4 cup (75g) natural peanut butter
  • 2 tbsp unsweetened apple sauce*
  • 2 tbsp water

*Tip: If you can’t find a jar of apple sauce, 100% apple baby food is exactly the same

Method

  1. Preheat oven to 350°F (180°C).
  2. Mix all ingredients in a bowl to form a thick dough.
  3. Pull off small pieces, roll each into a ball and flatten to 1/4″ inch (6mm) thick.
  4. Place on ungreased baking sheet and bake for 18 minutes or until golden brown. Allow to cool completely before serving/storing.

peanut butter dog cookies

These are the 2 sizes I made – I got bored making the tiny bite-sized ones and made half my batch double-sized. They were both equally enjoyed.

These cookies don’t spread at all in the oven, so, if you wanted to be fancy and make beautiful giftworthy cookies, you could roll out the dough and use a mini bone-shaped cookie cutter, but Maggie and her neighbourhood friends confirm that my rustic round cookies are just as tasty!

peanut butter dog cookies

They are easy to break apart, but not crumbly.

My batch lasted for about a week and the last few were noticeable drier to me but still equally enjoyed by Maggie, so I think they should keep for at least a week in an airtight container.

peanut butter dog cookies

My name is Maggie, and I approved these cookies

Maggie’s main present – a sweater I’m knitting for her on my knitting machine – isn’t quite finished yet, but it’s not quite dog sweater weather yet, so that’s okay! I’ll share pics once it’s finished. 🙂

Comments (13)

Sprouting seeds – easy, fun and tasty!

I’ve been growing my own sprouts for about a year now, and I thought now would be the perfect time to share the process with you. Even if it’s not practical to get out to buy fresh fruit and vegetables, you can still have nutrient-packed fresh and crunchy sprouts every day.

(And it’d be a great project for kids – it’s so fun to watch the sprouts grow over a few days and then be ready to eat!)

This is my almost-daily lunch:

a sandwich made with home-grown clover sprouts

Mmm, yummy! The act of germinating the seed unlocks all the nutrients contained within it, and the resulting sprout gives you a boost of fresh plant goodness.

And look how much fun it is to watch the seeds sprout – from seed to food in just 5 days!

growing clover sprouts - from seeds to sprouts

My Favourite Sprouts

There are lots of seeds you can sprout, depending on what you enjoy. I started out with broccoli sprouts, because they have loads of health benefits, but I found their flavour overpowering unless I paired it with a spicy condiment in my sandwich (mustard or horseradish are perfect choices).

After some experimentation, I decided on my favourite sprouts – these would both be a great starting point if you’d like to make your own, as they are easy to grow and have a mild flavour that you can easily add to your food without overwhelming it.

Clover
clover seeds and sprouts

Clover sprouts have a mild, fresh flavour. They are perfect in a sandwich or wrap, added to salads, or anywhere else you might use lettuce. I also like to pile them on top of burgers.

(If you can’t find clover sprouting seeds, I hear that alfalfa is similar.)

Mung Beans (Bean Sprouts)
mung bean seeds and bean sprouts

I’m sure you’re familiar with bean sprouts, most commonly used in Chinese cooking. Growing them at home in a jar means you don’t end up with the long straight sprouts you find in the supermarket, but they taste just as good and it’s incredibly easy to toss a handful into your stir fries and sauces when you’re about to serve them, and add a tasty crunch to your dish.

Supplies

To get started, you’ll need some seeds, a wide-mouthed jar and some sort of screen to cover the top of the jar with.

I started my sprouting adventures with the no-cost method: a well-cleaned pasta sauce jar with a doubled layer of cheesecloth across the top, held in place with a rubber band.

Once I knew I’d be keeping this hobby going, I invested in a set of wide-mouthed mason jars and screw-on sprouting lids (there are lots of options – if you buy some, just make sure the width of the top is the same as the mouth of your jars.)

And then, you’ll need some seeds! You can buy these from health food stores or online. Just make sure you search for sprouting seeds that are intended for consumption – regular seeds that are intended to be planted in the ground to grow into plants are usually treated with a fungicide, so the seeds are not edible.

Get Sprouting!

Here are my notes for sprouting clover. The process is the same for other sprouts; the only differences would be a) how much seed to use, b) how long to soak the seed for, and c) how many days until the sprouts are ready.

But these instructions will give you an idea of how easy it is to grow your own sprouts…

  1. Measure 2 tbsp of seed into the jar, then screw on the lid.
  2. Fill with water and soak for 8-12 hours.
  3. Tip out the soaking water.
  4. Without removing the lid, add water, swirl the seeds around and tip out the water.starting clover sprouts
  5. Repeat step 4, making sure to shake out all the water so the seeds won’t be sitting in water.
  6. Shake the seeds down away from the jar lid so air can circulate.
    starting clover sprouts
  7. Lay the jar on its side, out of direct sunlight.
  8. Every morning and evening, repeat steps 4-7.
  9. When the jar is fairly full (3-5 days) and the sprouts have leaves, leave the jar on a sunny windowsill for a day for the leaves to green up.
  10. Tip the sprouts into a large bowl and fill it with water.preparing clover sprouts
  11. Swish the sprouts around so the hulls float to the top.
    preparing clover sprouts
  12. Skim off the hulls or push them to the sides of the bowl, then grab a handful of sprouts and pull them out of the bowl.preparing clover sprouts
  13. Place into a salad spinner or onto a kitchen towel-covered plate.
  14. Repeat to get all the rest of the sprouts out (leaving a few hulls with them is fine).preparing clover sprouts
  15. Spin the sprouts to dry them, or leave them on the counter for a couple of hours to dry out.
  16. Put the sprouts in a plastic container and refrigerate for up to a week.
  17. Enjoy!

a sandwich made with home-grown clover sprouts

I hope this has inspired you to think about growing your own fresh sprouts!

And, if you’ve tried growing sprouting seeds before, which varieties are your favourites? I’d love to try some different seeds – do let me know your recommendations in the comments below…

Comments (12)

chocolate truffles recipe

Ahh, it’s Christmas! I made a batch of chocolate truffles yesterday, and mmmmm, they are so good! I wish I could give one to each of you, but as that’s a little unfeasible, my gift to you is the recipe so you can make your own. They only take a few minutes to make (plus time to set) and make lovely gifts, if you can bear to part with any! I think they are out-of-this-world delicious with Tia Maria, but you can use your favourite spirit instead – rum, Kahlua, etc – or even omit the alcohol and substitute with the same volume of milk for a teetotal version.

Happy Christmas!

chocolate truffles by planetjune

Chocolate Truffles (makes approx 30)

Ingredients

  • 4 oz / 120 g chocolate (semi-sweet or unsweetened)
  • 10 oz / 300 g / 2 ¼ cups icing sugar (aka powdered/confectioners’ sugar), sifted
  • 2 oz / 60 g / ¼ cup unsalted butter
  • 1 tbsp Tia Maria (or alcohol of choice)
  • Optional: chocolate sprinkles, cocoa powder or icing sugar for decoration

Method

  1. Melt chocolate and butter in a heatproof bowl over a saucepan of simmering water.
  2. Add alcohol and stir to blend.
  3. Gradually add the sifted sugar and stir until all the sugar has been incorporated.
  4. Divide the mixture into approx 30 pieces and roll each piece into a ball in your hands.
  5. Roll each ball in chocolate sprinkles, cocoa powder or more icing sugar (or leave plain if preferred).
  6. Place each truffle into a paper case and leave to set for 4-5 hours.

Store any leftovers in an airtight container – they will keep for weeks, but I doubt they’ll last that long!

chocolate truffles by planetjune

Bon appetit, and happy holidays!

Comments (7)

blueberry syrup

I got 4lbs of blueberries free as a special offer with my groceries – yum! I’ve munched my way through over 2lbs of them so far(!), but thought it might be good to try some blueberry recipes.

Blueberry syrup

blueberry syrup and pancakes

Ingredients
1 cup fresh blueberries
1/4 cup sugar
1/4 cup water

Directions

  1. Bring ingredients to a boil in a saucepan.
  2. Simmer for a few minutes until the berries are soft.
  3. Squash the berries with a potato masher or the back of a spoon.
  4. Either serve as is, or push the syrup through a sieve with the back of a spoon to filter out the skins.

After straining, I was left with just under 2/3 cup of fresh blueberry syrup. Simple, and delicious served over pancakes!

Comments (6)

hummingbird nectar recipe

I’m still deeply ensconced in my secret project, so I haven’t had anything crafty to post about recently – hopefully that will all change soon! In the meantime, I thought I’d share a quick nectar recipe for those of you who are lucky enough to live in an area visited by hummingbirds.

ruby throated hummingbird

Hummingbirds are fascinating little miracles – so tiny and so fast, it’s hard to believe they can exist! They are only 3-4 inches long from beak to tail and they beat their wings around 60 times per second, which produces the humming sound for which they were named. Coming from the UK, I had never even seen a hummingbird until a couple of years ago, and now I can see Ruby-throated Hummingbirds daily (in summer) in my own garden, just by putting up a little nectar feeder for them 🙂

ruby throated hummingbird

You can buy powdered hummingbird nectar, but it’s a bit messy to prepare, and expensive. It’s actually super-simple to make your own nectar for feeding hummingbirds: all you need is sugar and water! Hummingbird feeders are red, so the colour of the feeder will attract the birds and there is no need to add red colour to the nectar.

  • Ingredients: 1 part granulated white sugar and 4 parts tap water. (I use 1/2 cup sugar and 2 cups water, which makes a 2-week supply for my hummers.)
  • Place the sugar and water in a saucepan and bring to the boil, stirring occasionally.
  • Cover the suacepan and boil the nectar for a couple of minutes (this retards mould growth).
  • Allow to cool to room temperature, then pour into a clean hummingbird feeder.
  • Store leftover nectar in the fridge for up to 2 weeks.
  • Replace the nectar and clean your feeder twice a week to prevent mould.
  • Enjoy the beauty of the visiting hummingbirds!

ruby throated hummingbird

Comments (5)

low fat banana muffins

Sweet, moist, fruity and delicious – it’s hard to believe that (apart from 1 egg yolk) there is no fat in these muffins. It’s a good job they’re low fat though – it’s almost impossible to eat just one!

low fat banana muffins

I had some browning bananas lying around the kitchen this week. I didn’t want to waste them, and didn’t want the temptation of fat-filled banana bread in the house, so I invented this recipe by modifying a banana bread recipe. It’s too good not to share with the world, so here’s how I did it.

Note: This recipe makes 18 muffins. You can easily halve the recipe to make 9 muffins by beating the egg and then using half of the beaten egg with half of all the other ingredients. Or make the full batch and freeze some for later (see end of post for defrosting instructions).

Ingredients
4 ripe bananas
1 1/2 cups all-purpose flour
1 cup sugar (reduce to 3/4 cup if you don’t have a sweet tooth)
1 teaspoon vanilla extract
1 teaspoon baking soda
1/2 teaspoon baking powder
1 egg
6 tablespoons unsweetened apple sauce

Note: you could switch it up by adding 1/2 cup chocolate chips or your favourite dried fruit, but they don’t need the extra flavour

Directions

  1. Preheat oven to 350F.
  2. Mash the bananas in a large bowl.
  3. Add the remaining other ingredients and mix well.
  4. Pour mixture into greased muffin pans, filling each pan to 2/3 full.
  5. Bake for approx 22 mins (check for doneness with a toothpick)

Notes:

  • Best eaten slightly warm. 10 seconds in the microwave will bring out the banana flavour!
  • You can also freeze them (if there are any left!). Defrost in the microwave for about 30 seconds on full. Yum – instant breakfast.

I hope you’ll be tempted to try my new favourite muffin recipe…

Comments (5)

banana brownie challenge

Whilst browsing the Food Network Canada website, I stumbled upon the Foodtv.ca Cooking Club Challenge: a monthly online challenge to make a specific recipe from one of their shows, with some cookbook prizes for the winners. The challenge for May is Michael Smith’s Banana Brownies, and I just happened to have all the ingredients in my kitchen already, so I thought I’d join in.

The original recipe is somewhat very high in calories and fat, so I made a few modifications:

  • Halved the recipe to make a smaller batch.
  • Substituted semi-sweet chocolate for dark chocolate (from necessity – it was all I had in stock)
  • Reduced the fat by substituting half the butter with the same weight in unsweetened applesauce.
  • Made individual brownies by pouring the batter into a muffin pan – my half-sized batch filled 12 muffin cups (3/4 full) perfectly.
  • Reduced the baking time to 1hr 10 mins to compensate for the smaller cake size.

They turned out very well – not overly sweet or rich, nicely dense, and very tasty. The banana flavour is quite noticeable, although I think that may have been due to my bananas being very ripe! With a bit of whipped cream on the top (which is entirely justified with the lower fat mods and smaller portion size) they make a very nice dessert. Have a virtual taste:

banana chocolate brownies

To enter the Cooking Club Challenge, you just submit a photo and a description of your creation. I submitted mine and now I just have to wait and see…

I really don’t expect to win, but the club is a nice motivator to try out a new recipe every month!

Comments (4)

christmas cookies

I’ve been busy today, baking tray after tray of sugar and spice cookies:

cookies

They were intended as gifts, but bad weather changed our plans, and now we’ll be eating dozens of delicious cookies ourselves! What a hardship 😉

Cookie, anyone? Help yourself…

cookies

Happy Christmas to all my readers! I hope your holidays are happy and restful.

Comments

« Previous entries
  • Quick Links: Crochet

    navigation: arrow

    buy crochet patterns and accessories from my online store

    'Everyday Crochet' and 'The Essential Guide to Amigurumi' crochet books by June Gilbank

    Crochet video tutorials and step-by-step photo tutorials

    Free PlanetJune crochet patterns

    Frequently Asked Questions

    Quick Links: Crafts

    navigation: arrow

    Punchneedle Embroidery information, ebook & patterns

    Papercraft ebook & tutorials

    Free PlanetJune craft projects & tutorials

  • Blog Post Categories

  • Blog Archives

  • Welcome to PlanetJune!

    June Gilbank

    Hi, I'm June. Welcome to my world of nature-inspired crochet and crafting. I hope you enjoy your visit!

    If you'd like to get in touch, you can contact me here.
    crocheted Canadian flag by PlanetJune
  • A fanned-out pile of the books Everyday Crochet and The Essential Guide to Amigurumi, with text 'The answers to all your crochet questions at your fingertips - find out more'
  • Support PlanetJune!

    Want to say thanks? You can send me money in seconds at paypal.me/planetjune (over $20) or paypal.me/planetjune2 (under $20) or send me a donation through my shop.

    Or simply click through from my links before you shop at Amazon, Etsy, KnitPicks, LoveCrafts or Crochet.com, and I'll make a small commission on your purchase, at no cost to you! Start here:

    ♥ Support PlanetJune ♥

    Tip: This link is also in the footer of every page!

    Thank you so much for your support!