PlanetJune Craft Blog

Latest news and updates from June

Archive for March, 2010

technical details

Some of you may have experienced problems when trying to access PlanetJune lately. I’ve been complaining to my webhost for months about intermittent errors that happen sometimes, for some people, and they haven’t been able to help at all – all they said was that there were no server problems. It’s been highly frustrating!

They finally admitted on Thursday (coincidentally, just after I renewed with them for another year – I hope they will give me a refund!) that my website is just too popular for them to handle:

You are receiving a very large amount of daily traffic to your sites and this is the cause of the long loading times and 503 errors. This kind of traffic is much too large for a shared hosting environment. I would recommend moving your sites to a VPS or dedicated hosting provider.

So, I’ve just signed up for a new and expensive VPS (virtual private server). This means that I won’t be sharing system resources with any other people any more, and I should have more than enough resources for PlanetJune.com pages (and FoldingTrees.com pages, incidentally) to always load quickly and without errors 🙂

I have another announcement and a new amigurumi tutorial for you, but I’ll save them until you can see them on the new server – there’s a waiting period until “planetjune.com” points to the new server (it takes a couple of days). If you’ve been having problems loading my shop or any other pages, these should all be resolved shortly – thank you so much for your patience!

Comments (4)

Detail Stuffing Tool reviews

A little ‘newsy’ post today. The Detail Stuffing Tools are back in stock, and I aim to keep them in stock permanently from now on. Thanks to everyone who ordered one already; I mailed out all the backorders yesterday (unless you also ordered out of stock eyes in which case they’ll be on their way tomorrow; I just didn’t anticipate getting so many orders over the past couple of weeks!) This is what my poor Post Office lady had to deal with yesterday:


Eek! If only I could print postage online, I’d save hours waiting at the Post Office and writing out customs labels, but Canada Post in their infinite wisdom have decided that the ‘Light Packet’ rate can only be obtained in person at the Post Office…

Detail Stuffing Tool by planetjune

And the reviews of the stuffing tool have started to come in! I know my tool is now indispensible to me – I keep one with every in-progress crochet project – but it’s great to hear that other people like it too. Firstly, a review by Jessica (aka Plushroom Soup), a plush artist and one of the first people to snap up my new tool on launch day. She says:

This little number may not look like much, but boy is it handy! I’ve used everything in the book trying to more efficiently stuff tiny plush parts (tiny fingers and toes are the worst!)—chopsticks, knitting needles, wooden dowels, doll stuffing forks, the Stuff It tool, etc. But nothing had good enough grip for the stuffing; the tools would just slide right through. Wooden dowels were the closest to providing what I needed, but I still struggled. Especially because tiny dowels have a tendency to snap in half while I’m stuffing.

Enter the Detail Stuffing Tool! This neat tool makes quick work of stuffing tiny parts. It’s extremely easy to use and has excellent grip for the stuffing. No more slipping, and stuffing right where I need it.

You can read the rest of her Detail Stuffing Tool review at Plushroom Soup!

And secondly, did you know that March is National Crochet Month? It’s nice to see crochet getting more recognition, although I’d like to see an International Crochet Month next time… Silverlotus, a cross-stitcher and knitter, and novice crocheter (although you wouldn’t guess that from her work!) has written a lovely post about a certain crochet designer for National Crochet Month, including this little snippet about my Stuffing Tool:

Just this month June introduced her new detail stuffing tool, which helps make stuffing little amigurumi creations so much easier. And, my dear cross stitching readers, I know it would make stuffing biscornus and ornaments much, much easier too. I recommend it highly.

See her full review of me (*blush*) on her blog, Reflections in the Pond.

Yay, thanks so much, ladies! If you’ve bought my Detail Stuffing Tool, I’d love to know what you think of it too!

And if you’re still saying “huh? stuffing tool?” here’s my demo video so you can see what all the fuss is about:

Comments (5)

AmiDogs Boxer pattern

Allow me to introduce the latest member of my AmiDogs family: the Boxer!

AmiDogs Boxer crochet pattern by planetjune

He’s about 6″ long and worked in brown, white and black worsted weight yarn. I decided to go with natural, floppy ears, instead of the cropped pointy ones, but if you’re desperate for a Boxer with sticking-up ears, I’ve also included modifications for that in the pattern 🙂


It’s hard to believe that the Boxer is my 15th AmiDogs design! My first three AmiDogs were published in July 2007 – that’s almost 3 years ago. Hmm, I suppose that 15 breeds in 3 years doesn’t sound quite so impressive! But I have to go slowly with designing them or I get really bored (it’s having to make and attach all those endless legs!). And a bored June is not a creative and happy June, so it may be another few months before I start on the next batch of AmiDogs.

AmiDogs set 5 by planetjune (great dane, airedale, boxer)
Bit of a size difference going on here!

Now I’ve finished another three designs, AmiDogs Set 5 (Great Dane, Airedale Terrier and Boxer) is also ready to go. But if you’d like to mix and match your own three favourite breeds, you can use the Custom Set feature in my shop to choose any 3 dog breeds for the same special price.

I hope you like my boxer. It took a while to get the patterning on the face and muzzle the way I wanted it, but I think I’ve captured that special boxer quality!

Comments (9)

‘grass’ sticky page markers

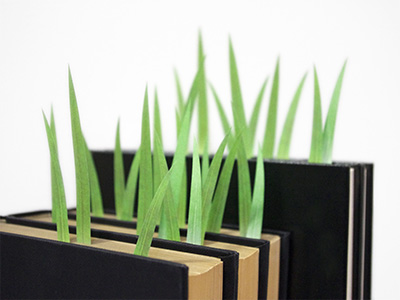
I’ve been avoiding paper crafts since I stopped writing for Folding Trees. Trying to scan the web every day for paper craft resources to highlight was exhausting and ultimately put me off papercrafting. But I’ve started to miss coming up with my own crafty paper tutorials – I think I’m out of my paper funk!

Here’s a really simple paper project. The idea came from these GreenMarkers that Kari found in a Japanese online shop:

GreenMarkers from Yuruliku

When you need to mark up a lot of pages of a book, you end up with a swarm of sticky arrows sticking out of the edge of the book. I love the idea of forming a little clump of grass ‘growing’ out of the book instead, so here’s my simple 5-minute DIY version:

‘Grass’ Sticky Page Markers

grass sticky page markers by planetjune
They look especially cute in my papercraft book, Paper Chains and Garlands, don’t you think? 😀

You will need:

  • Green sticky notes (if you can’t find green ones, you could colour normal coloured notes with a green pencil or paint before you begin)
  • Pair of sharp scissors
  • Bone folder (optional)

I found these recycled paper Post-It notes that include a lovely spring green colour:

grass sticky page markers by planetjune

Take a sticky note and make sure the sticky edge is at the bottom:

grass sticky page markers by planetjune

Cut out blades of grass from the note. You need to make a long thin triangular shape with a slight curve, starting from the bottom (sticky) edge and tapering to a point. Cut the shapes freehand – if they aren’t exactly the same size and shape they will have a more organic, natural feel.

grass sticky page markers by planetjune

Note: Make all the blades curve in the same direction – it saves paper, and when you stick some on left-hand pages and some on right-hand pages of your book, you’ll end up with some blades curving in each direction anyway!

Stick the blades down on a piece of paper.

grass sticky page markers by planetjune

Turn the paper around so that the sticky edge of the blades is at the top. Use a bone folder or the wrong side of the edge of your scissors to score a line down the middle of each blade, drawing the folder towards you from the base to the tip of each blade.

grass sticky page markers by planetjune

You don’t have to be too exact! If you look carefully you can see my scored lines on the 4 rightmost blades:

grass sticky page markers by planetjune

With your fingers, pinch the sides of each blade slightly so that it folds up around the scored line. This adds a little dimension and realism to the grass!

grass sticky page markers by planetjune

Use your blades of grass to mark up your reference books without damaging them!

grass sticky page markers by planetjune

A touch of spring, whatever the weather! I hope you like my grass markers 🙂

Comments (13)

Easter Eggs pattern

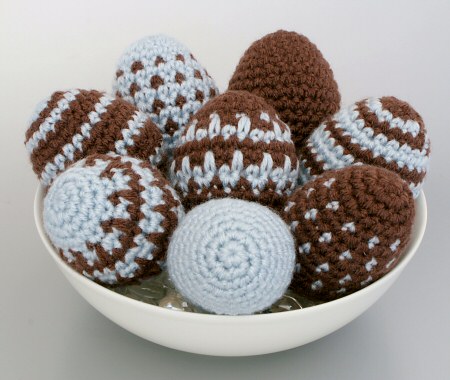
Did you know it’s less than a month until Easter? I’m a little bored with pastel coloured eggs and I thought I’d try to come up with an Easter decoration that’s a little more contemporary and sophisticated. Using a limited colour pattern of chocolate brown (yum!) and ice blue, I’ve designed 8 different eggs (4 designs in each of 2 colourways) that coordinate beautifully together for Easter-themed decorating. You could arrange them in a bowl or basket as a centrepiece, hang them from an Easter tree, or string them into an Easter garland.

When I was coming up with my basic egg shape, I looked around at other crocheted egg patterns, and I couldn’t find a single one that was the shape of a real egg: some were too pointy, some were too long, some weren’t round enough. I’ve tried to make my design closer to a real egg shape, but a little larger so there’s more room to add the pattern! My eggs are just under 3″ long made with Vanna’s Choice yarn, so they would probably be about 2.5″ long if you used a different worsted weight yarn (Vanna’s is, confusingly, much thicker than most other worsteds!)

I found it really addictive to make my eggs – they are so quick and satisfying, with no sewing required. I loved my colour scheme too – it reminds me of really fancy chocolate eggs, but without the calories! Of course, if you’d like to use more traditional pastel colours, or make a multi-coloured set, that would look lovely too 🙂

If you’d like to make some crocheted Easter Eggs too, my pattern includes 4 egg designs, so that, using only 2 colours of yarn, you can make 8 different eggs. This pattern is a great way to practice crochet colourwork and maybe learn a new stitch. The four egg designs are arranged in order of difficulty, so that novice crocheters can start with the basic plain egg, and move up through the designs, learning something new about colourwork with each one.

If you’re put off by the thought of colourwork and all those ends to weave in, please don’t be: I’ve designed the patterns so that the colours are swapped either every stitch or every row, so that you can just drop the unused yarn to the inside of the egg, and pick it back up again when you work back around to it! Maximum effect for minimum effort – just the way I like it!

You can pick up the Easter Eggs pattern from the PlanetJune store. I’d love to see your finished eggs (and anything else you’ve made from any of my patterns!) so please keep posting your photos to the PlanetJune Crochet Flickr pool!

PS: If you’d like to do some more Easter-themed crocheting, here are my other Easter-y patterns:

__(‘Read the rest of this entry »’)

Comments (2)

Detail Stuffing Tool

I’m so excited to launch my new product today! The Detail Stuffing Tool came about because it’s really difficult to stuff tiny things, or to get that last bit of stuffing in before you close up a hole. After making a million AmiDogs legs (that’s what it feels like, anyway!) and other tiny pieces that have to be stuffed firmly, I realised I needed a better way of doing it…

Dollmakers have a special forked metal stuffing tool, and that’s where I got the inspiration for my tool. The dollmaker’s tool costs around $15, and I wanted to produce something more affordable – if you’re anything like me, you lose tools far more often than you break them, so an inexpensive plastic tool is much more appealing!

Detail Stuffing Tool for amigurumi and plush by planetjune

Whether you crochet, knit, or sew stuffed toys or amigurumi, you need a Detail Stuffing Tool! Not convinced? I’ve made a short video to demonstrate the benefits of the tool, and techniques for using it:

More Details:

Get a grip on your stuffing: Fiberfill (especially the better quality ones) can be quite slippery, and if you try to use the end of your crochet hook or a chopstick to stuff, you’ll find that the fibres just slide around the edge of the stick, and you end up poking a hole in the stuffing instead of pushing the stuffing into the hole! The Detail Stuffing Tool has two prongs that catch the fibres of the stuffing so it can’t slip away as easily, and twisting the tool as you insert it spins the stuffing fibres into the piece with ease.

Stuff the tiniest pieces: The head of the Detail Stuffing Tool is small enough to fit inside the tiniest amigurumi part. The added bonus is that you can use it to add an extra bit of stuffing to a closed shape after you’ve finished crocheting (when you only have a 6 sc hole remaining to stitch closed) so you can stuff as firmly as you want without having to struggle to avoid catching the stuffing fibres while you crochet that last round.

Stuff right into the corners: The Detail Stuffing Tool also works really well to stuff tiny pieces for sewn plush toys. It can be really difficult to position the stuffing exactly where you want it to fill a tiny finger or arm or nose. By twirling the stuffing around the tool to make a firm blob of stuffing at the head of the tool, you can place the tool inside the tip of the piece, and then grip the stuffing from the outside as you withdraw the tool, so that the stuffing stays in place.

I’ve been using my prototype tool for a couple of months, and I couldn’t be without it now! It makes the pesky task of stuffing small pieces so much less frustrating, and I love that I can easily stuff all my pieces more firmly by adding additional stuffing into the tiny hole that remains after finishing the crocheting.

Detail Stuffing Tool for amigurumi and plush by planetjune

I hope you like my Detail Stuffing Tool – now available to purchase from the PlanetJune shop! I really think it’s a tool that’s been missing from the world of stuffed toymaking until now 🙂

Comments (13)

climbing the walls

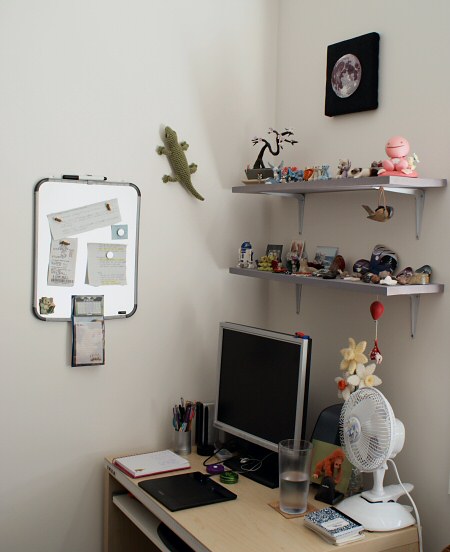
Finding space for all my creations is a bit of a challenge! I’ve come up with a novel solution for my amigurumi gecko, so I thought I’d share…

When we were in Hawaii, the geckos we saw could climb straight up vertical walls, thanks to their special toe pads. We always saw them climbing around window frames, or running around the walls inside the front porch, right up by the roof. That image was always in my mind when I made my gecko, so I thought it would be cool to let my gecko do a little wall-climbing too.

amigurumi gecko on the wall of my craft room

Also in this photo: my computer desk, the purple trinket shelves I made last year and my new magnetic white board (it’s actually silver-coloured, which is why it looks glaringly white here – reflected light from the window!)

How does he do it? It’s actually very simple – I knocked a couple of tiny nails into the wall and his stitches just hook onto them! The effect is very good – you only see the nails if you put your head right against the wall:

amigurumi gecko climbing the wall

And here’s my Hawaiian inspiration (awww!):

gecko

A pretty close match, I think 🙂

Comments (9)

  • Quick Links: Crochet

    navigation: arrow

    buy crochet patterns and accessories from my online store

    'Everyday Crochet' and 'The Essential Guide to Amigurumi' crochet books by June Gilbank

    Crochet video tutorials and step-by-step photo tutorials

    Free PlanetJune crochet patterns

    Frequently Asked Questions

    Quick Links: Crafts

    navigation: arrow

    Punchneedle Embroidery information, ebook & patterns

    Papercraft ebook & tutorials

    Free PlanetJune craft projects & tutorials

  • Blog Post Categories

  • Blog Archives

  • Welcome to PlanetJune!

    June Gilbank

    Hi, I'm June. Welcome to my world of nature-inspired crochet and crafting. I hope you enjoy your visit!

    If you'd like to get in touch, you can contact me here.
    crocheted Canadian flag by PlanetJune
  • A fanned-out pile of the books Everyday Crochet and The Essential Guide to Amigurumi, with text 'The answers to all your crochet questions at your fingertips - find out more'
  • Support PlanetJune!

    Want to say thanks? You can send me money in seconds at paypal.me/planetjune (over $20) or paypal.me/planetjune2 (under $20) or send me a donation through my shop.

    Or simply click through from my links before you shop at Amazon, Etsy, KnitPicks, LoveCrafts or Crochet.com, and I'll make a small commission on your purchase, at no cost to you! Start here:

    ♥ Support PlanetJune ♥

    Tip: This link is also in the footer of every page!

    Thank you so much for your support!