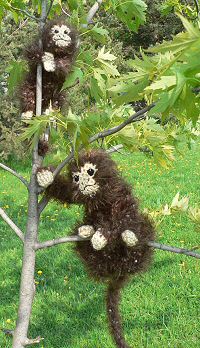
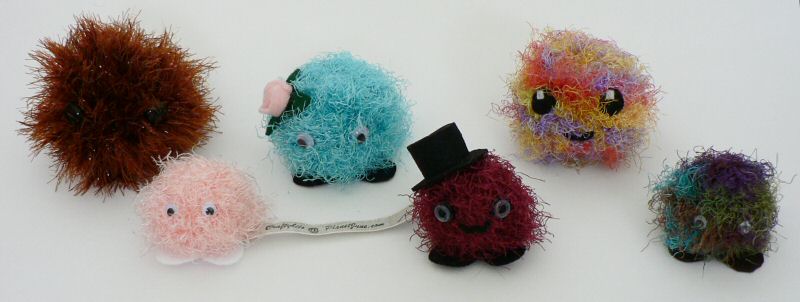
Fuzzballs are the ultimate in easy and cute crochet, and a perfect way to use up any scraps of fun fur, eyelash or any other fuzzy yarn you may have on hand. These tiny amigurumi are crocheted in fuzzy yarn and come in two sizes: Fuzzball and Fuzzball Mini. Let your imagination run wild as you embellish these little cuties!
This is just a quick prototype I made last night. It’s a bit uneven and a little smaller than I’d like (the finished holder only just holds 4 business cards). But I am pleased with the basic concept – I’ll add “make a proper business card holder” to my endless list of craft ideas!
A note before I begin: British trousers = American pants. I may use the terms interchangably in this tutorial after living in Canada for the past 4 years 🙂
As I am all of 5′ 2″ tall, it’s very rare that I find trousers that aren’t too long, and yet the petite ranges are typically just slightly too short for me. So, as I have to shorten my pants every time I buy a pair, I thought you might like to see how I do it.
The ‘regular’ way of taking up trousers involves ‘invisible’ stitching (i.e. only catching a couple of threads of the outside fabric). This is tricky, time-consuming, and if you’re not very careful, you can still see the stitches on the outside.
My method leaves a visible hem on the outside, but I don’t see anything wrong with one neat line of stitching, and for everyday or casual trousers, it can even leave a nicer finish than the hidden method. Maybe you won’t want to use this method for your best interview suit, but I use it for everything else!
You will need:
sewing machine
thread that matches the colour of your trousers
seam gauge (if you don’t have one, a measuring tape or ruler will do)
scissors
straight pins
sewing needle
marking pen/pencil
iron
Method:
Try on your trousers so you can see how long they need to be. Note: remember to wear shoes while you do this, or your trousers will look too short when you wear them with shoes!
Fold up the trousers to the length you want them to be (it helps if you have a mirror so you can see where they will fall when you are standing up straight). Adjust until you’re happy that they don’t scrape the floor but aren’t going to be too short either. Remember different heel heights will affect the apparent length, so keep that in mind.
Pin the turn-up to the back of each trouser leg (just one pin) to stop the turn-up from falling down when you take off the trousers. This is just to give you the required length, so don’t worry about being neat. Have a final length check after pinning. Looks good? Okay, now you can get changed into something more comfortable (and don’t prick yourself on those pins!).
Pinned to length at the back
Measure the length of the turn-up on each leg. They should be the same, but if they aren’t, pick a measurement midway between the two.
Comparing the turn-up lengths
If they are very different, you should probably try the pants on again and check which one is right! Make a note of your measurement (for these trousers, mine is 9cm).
Remove the pins and turn the trousers inside out.
Fold up the bottom of each leg, to the length you measured above, and pin in place.
Pinned 9cm turn-up
Iron the fold so it is pressed into a crease.
Mark 1 inch above the fold, all the way around both legs, then remove the pins.
1 inch marked in white pencil
Be brave – this is the scary part! Cut the turn-up around the lines you have just drawn, but be careful not to cut through both layers of fabric – just the turned up part – otherwise you’ll end up with capris!
Starting to cut
Partially cut
After cutting
Handy hint: you can even use the cut-offs to make hairbands.
With your remaining 1-inch turn-up, begin to fold the raw edge inside, so you end up with a 1/2 inch turn-up with no raw edges visible. Pin in place as you go.
Starting to fold in the raw edge and pin
Continue folding and pinning all around the bottoms of both legs. You can iron this fold in place before sewing (I like to; it makes the sewing part easier) or just sew it at this point.
Set up your sewing machine with a thread colour that matches the main colour in your fabric, for both the top and bobbin threads. Set it to a medium length straight stitch.
Winding a matching bobbin
Using the 1cm guide on your sewing machine (or whichever guide is just less than 1/2 an inch) sew around the bottom of each leg.
Ready to start sewing
When you get back to the start, sew over your first couple of stitches and then finish off.
Pull the loose threads to the wrong side of the fabric. You can knot them together for added security, if desired, then thread them through a sewing needle. Push the needle into the turned up fabric, and out a couple of inches further along.
Hiding the thread ends
Pull the thread ends to make fabric scrunch up slightly, then snip off the threads flush with the fabric, so they disappear inside the fabric when you pull it flat.
Snipping the ends
Turn the trousers right side out and admire your handiwork!
The finished seam as it appears on the outside of the trouser legs – crisp and neat.
After a strange hiccup this morning where my blog reverted to one month ago, everything now seems to be okay. Please let me know if you find any problems!
Also, if you signed up for the New Patterns mailing list last night or today, you might want to sign up again just to make sure your e-mail address didn’t get lost in the hiccup.
Thanks for your patience! Hopefully everything will run more smoothly on this new server 🙂
UPDATE: I spoke too soon… There are currently 2 versions of my website (old server and new server) and some people are seeing the old one (all posts present) while others were seeing the new one (lots of content missing). I believe I have got all the content into both versions now, and within 24 hours everyone should be seeing the shiny new version!
I’m putting together a reward as a thank you for putting up with all this disruption… Check back here tomorrow afternoon and find out what it is 🙂
The server that hosts PlanetJune.com is having some “issues”, so my webhost is moving my website to a shiny new server which will hopefully be more stable. As a result, PlanetJune.com may disappear for 24 hours or so. Do not despair! I will return and everything will be right in the world again 🙂
The monkeys went out to play today. It was a beautiful day and they were enjoying the sunshine.
Suddenly, they saw a stranger in their tree!
The monkeys moved in to investigate.
“Be careful – keep your distance,” warned Daddy Monkey.
But Baby Monkey wasn’t listening and leapt down to meet the newcomer…
It turns out the newcomer had been too shy to intrude on the family playtime, but once the ice was broken, she was happy to join in the games. The gibbon and the tamarins are now best of friends!
The Fuzzy Ferret pattern is now available! You can order it directly from PlanetJune.com and the pdf will be e-mailed to you.
Now you can make your own amigurumi ferrets! The pattern includes full instructions to make a single-colour ferret and a dual-colour ferret.
*SPECIAL OFFER* For this week only, all other Fuzzy Friends patterns will still be available for the old price of $3.50 USD. From May 14, 2007, all patterns will cost $4 USD each. Complete your collection before the prices go up!
Or simply click through from my links before you shop at Amazon, Etsy, KnitPicks, LoveCrafts or Crochet.com, and I'll make a small commission on your purchase, at no cost to you! Start here: