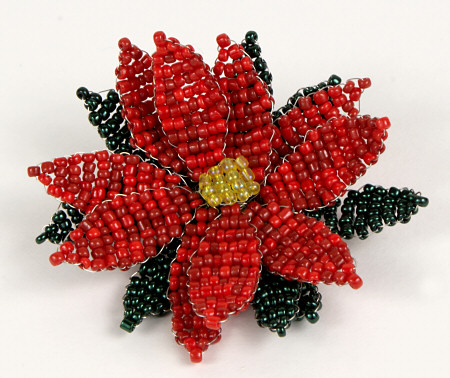
Beaded Poinsettia Tutorial
This decorative poinsettia is created using the Victorian beading technique. The poinsettia is just under 3″ (7cm) in diameter, and would make a lovely pin or fridge magnet, or a pretty table decoration, gift topper, or tree ornament.
This tutorial is Donationware – the instructions are available for free, but if you like it please consider sending me a donation to show your appreciation:

Send me a donation and receive the easy-to-print PDF version of the tutorial as a thank you!
Donations of any size are much appreciated. Just add the amount you wish to donate, and, once you have checked out and paid, your PDF will instantly be available to download from your PlanetJune account.
The complete instructions are available below, regardless of whether or not you choose to pay for them 🙂
This is a PlanetJune original tutorial. Please do not share or reproduce this tutorial; instead post a link to www.planetjune.com/beadpoinsettia
You will need:
- Seed beads in red, green and yellow. You’ll need less than one packet of each colour. I mixed various types of size 10 seed beads (I used whatever I could find in the right colours!):
- 560 red beads (I used 2 matte red shades, mixed randomly together, for a variegated look)
- 448 green beads (I used a metallic dark green)
- 14 yellow beads (I used a translucent yellow)
- Fine beading/craft wire – I used 0.2mm thick wire (32 gauge)
- Wire cutters
- Floral tape (optional)
Notes:
- You can use any type and size of seed beads – just make sure they are all similar sizes. Smaller beads will make a more delicate, smaller poinsettia. Inexpensive craft seed beads are fine to use – they have slightly varying widths, as you can see from my photos, but this just makes your leaves look imperfect and more realistic!
- Use a very fine beading wire that can comfortably pass twice through the centre of your beads
- Don’t be tempted to use beading thread instead of wire; you’d need to use a beading needle on each end of the thread, and the resulting leaves will be floppy and won’t hold their shape.
- Feel free to increase the number of rows and/or the number of beads on each row to create larger leaves – you can use this beading technique to create any size and shape of petal or leaf!
Leaves
Note: The same method applies for both the red and green leaves.
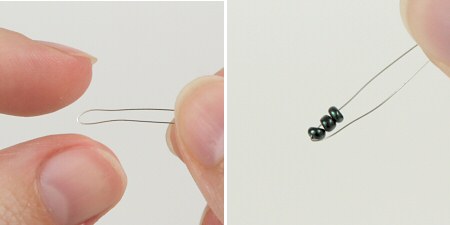
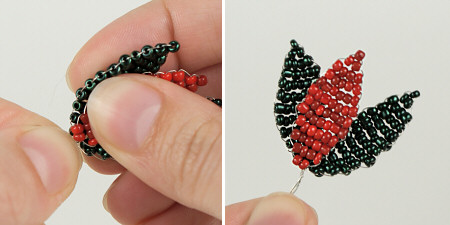
1. Cut a 40cm (16″) length of wire and fold it in half to make a bend at the midpoint (below, left). Thread 3 beads onto the wire and slide them down to the midpoint (below, right).
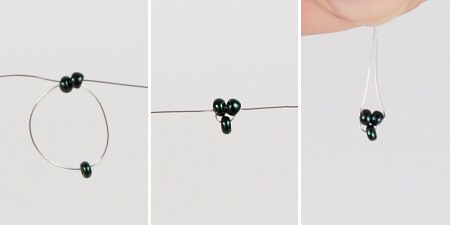
2. Pass one end of the wire back through 2 of the beads from the opposite direction so a wire end emerges from either side of the 2 bead row (below, left). Pull on both ends to tighten the wire loop at the midpoint of the wire (below, middle). Pull each end of the wire up to kink the wire where it emerges from the beads (below, right) – this will prevent the wire loop from loosening when you let go. You’ve just made the first two rows!
3. String 4 beads onto one wire (below, left). Pass the second wire through all 4 beads in the other direction (below, middle). Pull both wires tight so the row of beads is snugged up against the previous row. Kink the wires to keep the beads in position (below, right). Row 3 completed.
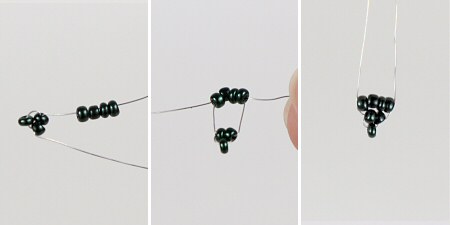
4. Repeat step 3 to complete the leaf shape, using the number of beads given below for each row (note that if you’ve followed the steps above you’ve already made rows 1-3, so start with row 4 (5 beads):
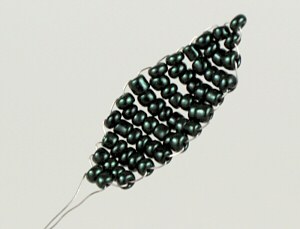 Leaf (make 18):
Row 1: 1 bead
Row 2: 2 beads
Row 3: 4 beads
Row 4: 5 beads
Row 5: 6 beads
Row 6: 7 beads
Row 7: 7 beads
Row 8: 7 beads
Row 9: 6 beads
Row 10: 5 beads
Row 11: 4 beads
Row 12: 2 beads
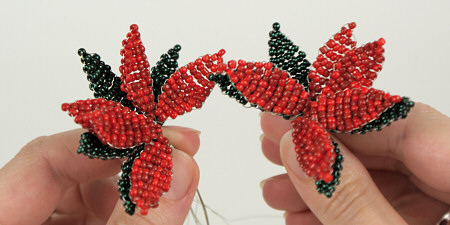
5. Set the finished leaf aside and repeat for all the other leaves. You’ll need about 18 in all: I made 10 red and 8 green, but you can change the proportions as desired.
Assembly
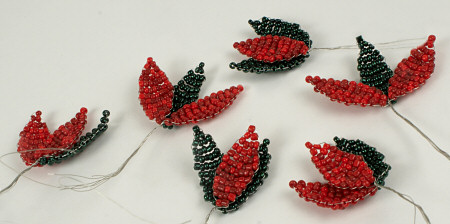
6. Divide the leaves into mixed groups of 3 (2 red and 1 green, or 2 green and 1 red). Arrange each group of 3 so they overlap (2 in front and 1 behind, or 2 behind and 1 in front) – the order doesn’t matter, but make sure that all the front leaves are red (some back leaves can also be red).
7. Grip a group of 3 together at the base of the leaves and the top of the wire ends and twist the leaves around so the wires are twisted together and the group of leaves will stay together (below).
8. Repeat step 7 for each of the other 5 groups of 3 leaves (below).
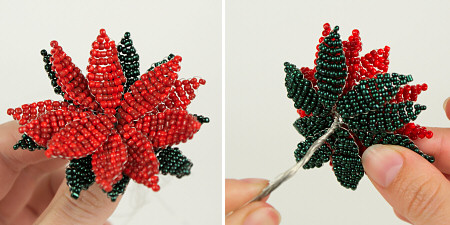
9. Now to form the groups into the flower shape. The groups can overlap each other so there are 3 layers of leaves at some places, but make sure that no red leaves end up behind a green leaf. Twist the wires together as close to the base of the leaves as possible, to keep the flower compact.
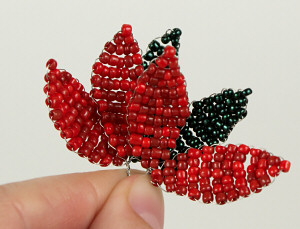 Twist two groups together at their base (right), then add a third group and twist the wires together to join it to the others.
Repeat the process for the other 3 groups, so you have two half flowers (below).
Finally, twist the wires of the two halves together to complete the flower shape (below).
Centre
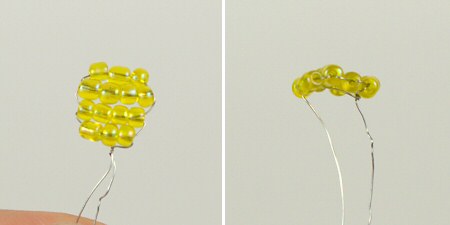
10. Cut a 20cm (8″) length of wire and use the yellow beads to make a centre using the same Victorian beading method and this pattern:
Centre (make 1):
Row 1: 3 beads
Row 2: 4 beads
Row 3: 4 beads
Row 4: 3 beads
(You’ll start this pattern by threading 7 beads onto the wire for Rows 1 and 2, then thread one wire back through 4 beads from the opposite direction and pull tight.)
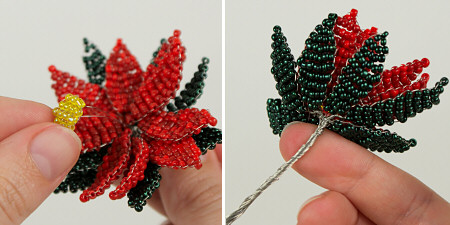
11. Twist the wire ends together (below, left), then hook one wire between two beads of Row 1 so the centre can be attached by top and bottom (below, right).
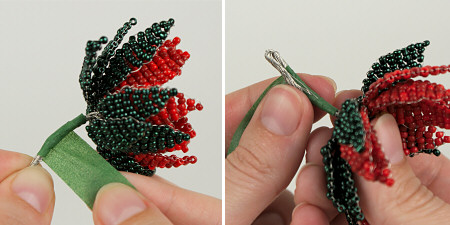
12. Thread both wire ends through the centre of the poinsettia, from front to back, between the leaves (below, left), then twist the ends around the existing wires (below, right).
Finishing
If you’re going to attach the poinsettia to something else, you can twist the wire ends firmly together and then trim them down to about an inch long, curling them around so they’ll be hidden underneath the leaves.
For a stand-alone poinsettia, stretch and wrap floral tape around the top of the bundle of wires (below, left), snip off the wires to the desired length and fold the ends up so you won’t have any sharp edges (below, right), then continue to wrap the wires with floral tape to make a short stem. You can curl the stem around to hide it beneath the poinsettia, or leave it straight, as a stalk.
I hope you enjoyed this tutorial! Please leave me a comment if you did, and consider leaving me a donation. Thanks!
And I’d love to see a photo of your poinsettia in the PlanetJune Tutorials flickr group 🙂
Happy Christmas!


Veronica K Albin said
These will be donated to fund raiser to help our food pantry
janet said
I bought .3mm bead stringing wire but doing the leaf, it just curls. what brand of wire do you use?
June said
It doesn’t have a brand, just a gauge (thickness). With any wire beadwork, you need to hold the beads flat as you pull the wires, so the beads end up in neat straight rows. You may be pulling your wires too tightly and causing the beads to pull too closely together; you need to kink them at just the right point to keep the beaded rows straight. It may take a little practice, so I’d suggest you keep going, concentrating on making sure each row is straight before you kink the wires to ‘set’ the row, and see if your leaf begins to straighten out. Once you can make flat straight rows, start again, and just treat that first leaf as a practice piece!
Cynthia said
Absolutely beautiful work and great tutorial! Thank you so much for sharing!
Merry Christmas and Happy New Year!
judy carlson said
I just finished the beaded poinsettia and attached a pin back. I love it! I’ll get a picture up soon!
Judy Carlson said
I bought supplies today and just started on it. I have three leaves done! I’ve never done any beading before. Thank you so much for the tutorial!
Carrie said
I have done this with pony beads. Now I will attempt it with seed beads. I love the look of this. Thanks for the project!
Carrie 🙂
Jana said
FUN! I am definitely going to try making this, IF I can find time! How long did the actual poinsettia take you?
June said
Hmm, I don’t actually know – I made the leaves over a few weeks whenever I had a couple of spare minutes between other projects… I’d guess no more than a few hours to make the whole thing. It’s certainly far faster than a crocheted poinsettia!
emily said
I am so making that!!!! I love beaded artwork!!!!
Stacey Trock said
Beautiful!