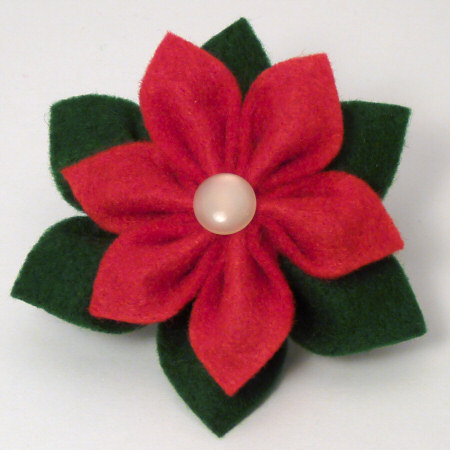
Felt Poinsettia Tutorial
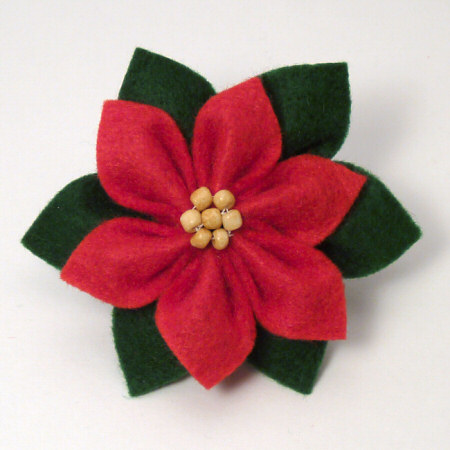
This poinsettia is about 3″ (8cm) in diameter, and would make a lovely pin or fridge magnet, or a pretty table decoration, gift topper, or tree ornament.
This tutorial is Donationware – the instructions are available for free, but if you like it please consider sending me a donation to show your appreciation:
Send me a donation and receive the easy-to-print PDF version of the tutorial as a thank you!
Donations of any size are much appreciated. Just add the amount you wish to donate, and, once you have checked out and paid, your PDF will instantly be available to download from your PlanetJune account.
The complete instructions are available below, regardless of whether or not you choose to pay for them 🙂
This is a PlanetJune original tutorial. Please do not share or reproduce this tutorial; instead post a link to www.planetjune.com/feltpoinsettia
You will need:
- Red and green felt (or colours of your choice)
- Scissors
- Needle and thread or glue – see Notes below
- Beads or a shank-backed button for the flower centre
Notes:
- I had no luck at all getting my craft glue to stick the felt together. I hear that Fabri-Tac or other fabric glues work better at sticking felt. If you can find a glue that holds the petals in shape, go for it! If not, stitch everything in the way I describe.
- You can easily resize this design – just start with larger squares. Just keep the green squares slightly larger than the red ones, and you can make these poinsettias as large as you’d like.
Method:
1. Cut the following from felt:
- 4cm x 4cm (1.5″ x 1.5″) red squares – cut three
- 5cm x 5cm (2″ x 2″) green squares – cut three
- 2cm (1″) diameter green circle – cut one
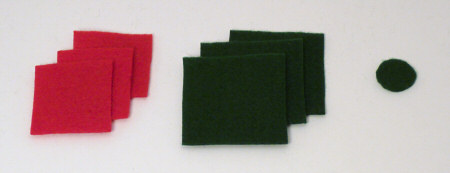
As you can see from my photo, you don’t need to be too exact – I just eyeballed everything.
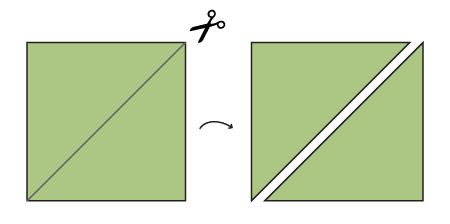
2. Cut each square in half along the diagonal. You’ll end up with 6 triangles of each colour.
Green Layer
3. Prepare a sewing needle with a length of thread. Tie a large knot near one end of the thread, leaving a couple of inches of thread beyond the knot. Put the needle and thread to one side for now.
4. Hold one green felt triangle with the long edge facing down. Fold the triangle in half from side to side.

5. Imagine a straight line from the bottom of the folded edge to about 1cm (3/8″ up from the 2 original bottom corners. This just removes some of the bulk from the petals and you can eyeball it so it looks like my diagrams below; if the leaves don’t end up exactly the same size it’ll just look more realistic! Cut along this line to give you the shape A-B-C (where A-B is the folded edge).
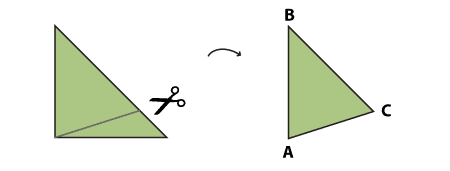
6. Fold the front corner C forward to meet A (below, left). Fold the back corner C back to meet A (below, right) – this view shows the back of the leaf.
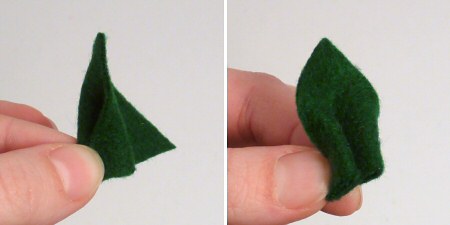
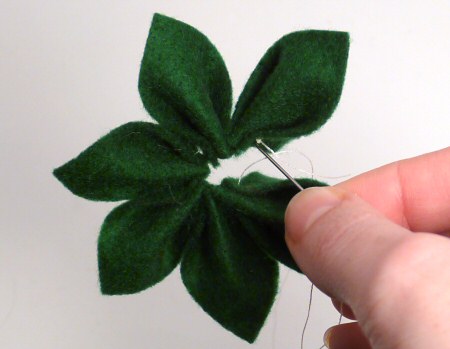
7. Keeping all the folds together with your fingers, flip the leaf over so you can see the front (below, left). Stitch through all the layers of the felt, slightly in from the very tips of the corners so the stitch will be secure (below, right). Pull the thread right through until the knot catches on the right (left if you’re left-handed) side of the leaf.
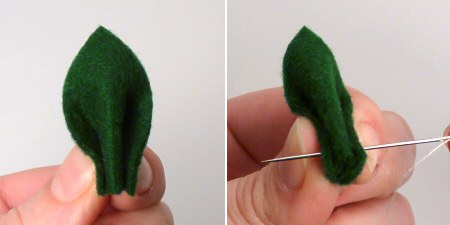
8. Make a second stitch back through all the layers, a couple of mm below the first, and then make a third stitch in the same position as the first. This will keep all the layers together so the leaf won’t reopen. Lay down the leaf and needle, but don’t fasten off.
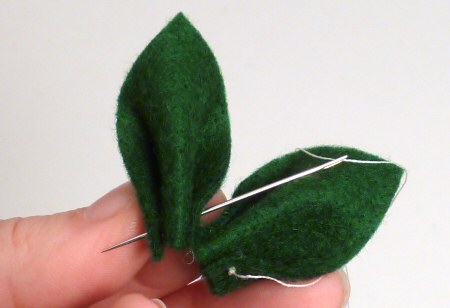
9. Fold a second leaf. Using the same needle and thread, make the first and second stitches through the leaf as in steps 7 and 8 above, but snug the 2nd leaf up to the 1st (see picture, below) before making the third stitch that locks everything into place.
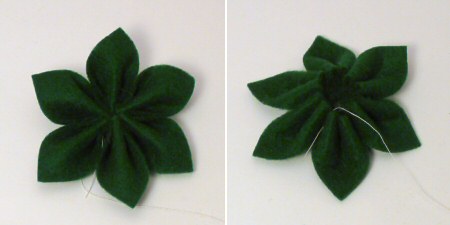
10. Repeat for the other 4 green leaves. When all 6 are attached together, pull them around to complete the circle, and stitch through the first leaf and back again to lock everything together.
11. First layer finished (below, left)! Flip the layer over, pull both thread ends to the back, tie them together (below, right) and trim the excess thread (don’t worry about hiding the ends though).
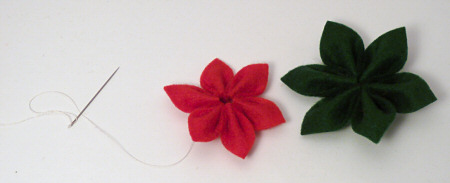
Red Layer
12. Repeat steps 3-10 with the 6 red triangles to complete the second, red, layer.
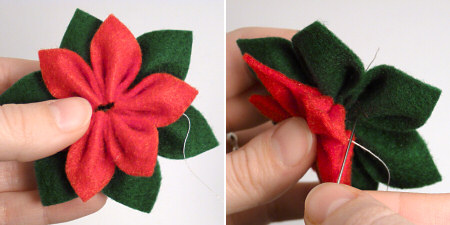
Assembly
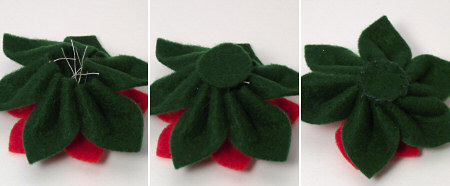
13. Centre the red layer on top of the green, with the leaves offset (below, left). Use the remaining thread, or cut a new length, to stitch the two layers together, making stitches in a small circle around the central holes (below, right). Make sure your stitches can’t be seen from the top of the poinsettia! (Again, you may glue the layers together instead, if you’d prefer.)
Centre
You can use whatever you want for the centre of the poinsettia; here are a couple of ideas.
Simple centre
Use a button with a shank (i.e. no visible buttonholes on the surface of the button). Just stitch it on – easy!
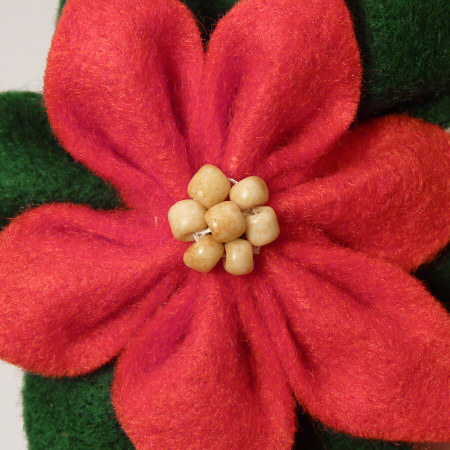
Decorative centre
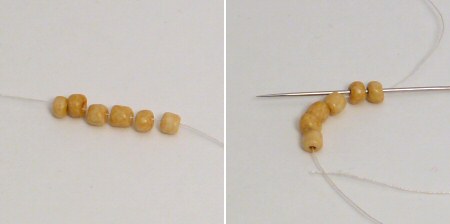
My preferred method! You’ll need 7 small beads and a needle and thread.
1. Thread 6 beads onto the thread (below, left), leaving a long tail so they don’t fall off. Pass the needle through the first 2 beads again (below, right).
2. Draw tight to pull the 6 beads into a ring (below, left). Thread the 7th bead onto the needle and pass the thread through the bead on the opposite side of the circle to keep the 7th bead in the middle of the ring (below, right).
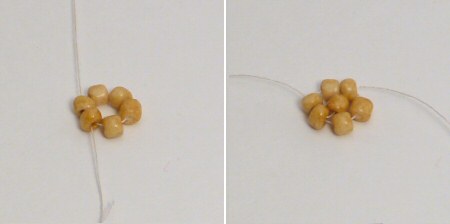
Pass the needle through all the beads around the circle until it meets the starting end. Tie the two ends together to secure the bead flower. Use the ends to stitch the flower into the centre of the poinsettia.
Finishing
Cover all the thread ends and the hole in the bottom of the green layer with the circle of green felt you cut earlier. Glue in place, or, for a more decorative finish, whipstitch or blanket stitch around the edge of the circle, catching the bottom of the green leaves with each stitch.
For display, you can add a pin back, glue on a magnet, or add a loop of ribbon so you can hang your poinsettia.
I hope you enjoyed this tutorial! Please leave me a comment if you did, and consider leaving me a donation. Thanks!
And I’d love to see a photo of your poinsettia in the PlanetJune Tutorials flickr group 🙂
Happy Christmas!


Hannah said
Absolutely lovely result and easy-to-follow instructions. Thank you for sharing!
Alison said
i love this, it’s so easy and yet so effective. im naking seversl white and red versions to ho in a Cristmas wreath. Thank you for the instructions.
Craft: 11+ DIYs to Make Cute Christmas Hair Bows – CrochetingHearts.org said
[…] 7. Felt Poinsettia Homemade Christmas Hair Bow Idea […]
Hande said
Thank you for your sharing. 🙂
Shari King said
Thank you for the great idea! I made mine from some fleece I had left over from a previous project–waste not, want not. It wasn’t quite as stiff, but worked well. I did the top layer in white and the bottom layer in red and added a green leaf to the back so it pokes out around the edges. I had leftover black beads and added some glitter paint as an accent around the beads.
MarKay Appel said
I don’t have a glue that works to adhere the pieces of felt together, but I do use glue for another felt sewing shortcut: I use Stiffy or watered down school glue to make slight creases. I use a toothpick or tiny brush to apply a thin line of glue where the leaf or petal would naturally bend, then I pinch them closed (right over the fold for a crisp look) with tiny plastic clothespins until dry. It will feel stiff and is difficult to sew through after that, but it is invisible. I love this poinsettia tutorial and can’t wait to get started!
0lga said
om Lisbon.Portugal, I thank you for the pretty poinsettia. Instead of felt i’ve made it with cloth. I’ve took a litle bit of time but, take my word: it worth all ime time and effort.
georgia stewart said
love it tfs !!!
Chrei said
I am looking for an easy felt hat pattern. As I would like to make a hat for each month. I feel the flower would add so much to the simple hat.
Do you have any more ideas? Can you help me?
The felt hat size would be for an adult. Something from the 40’s or 50’s.
June said
Chrei, I’m sorry, I have no idea where to find a felt hat pattern – I suggest you try Google 🙂
judy carlson said
I just finished making the felt poinsettia and put a pin back on it. Now I have two poinsettia pins: beaded and felt!
Henrietta M. Rice said
This pattern is wonderfully simple. I belong to a Craft Club. I plan on making 60 of them for the members for this Christmas (2011) I have started with leftover felt I had here that had sparkles on the red. They will be adorable. I am going to put a loop, and magnet and pin backing on each so the women can use them as they wish. Thanks I am always looking for simple, elegant, free patterns to do for the club. Thank you for sharing your God given talent with the rest of us.
Kimberely said
Thank you for sharing the pretty poinsettia made from felt. It is so easily made that a lot of people would not think of it. It can be used as a pin or for other decoration. It is also easy enough to be made & sold at a church fund raiser without a lot of cost & time.
Thank you for sharing it with us!!
Kimberely
melissa said
Thanks for sharing! Love this idea and was glad to find your post on it.Merry Christmas and Happy Happy New Year!
Donna said
I love it!
I have so much felt leftover from another project, I think I will make a few of these to give out to family members on Christmas day!
Thanks fro sharing!!
Kelley said
These felt flowers look so pretty. Thanks for sharing how to make them.