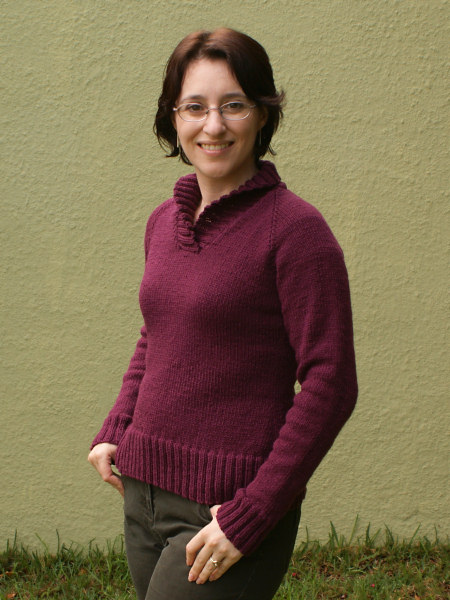
Now I understand how knit and purl stitches look and work, I’ve started examining all the knitted items in my wardrobe to see how the various elements fit together. I decided it’d be interesting to see if I could re-make a store-bought sweater by using it as my ‘pattern’ for my next piece of knitwear (although not for the collar – the original was a zip-up cardigan). I won’t keep you in suspense – here’s the result:
I used the store-bought sweater to get the basic measurements, but I did make a few modifications so it would fit me better. I decided to create a pattern as I went – well, more of a recipe than a pattern – so I’ll be able to create knitwear for myself more easily in future.
(For example: Make paired decreases at each side, every other row for 24 rows would be a specific pattern instruction, but Decrease by 6″ width over 3″ height means I just need to plug in my gauge and I’ll be able to make the same shape and size of sweater next time, even if I’m using different needles, yarn, stitch pattern, etc – it just takes a quick calculation to work out how many decrease rows I’ll need over how many total rows.)
I know I’m making this sound like it was all easy for me, but it wasn’t! I don’t want to give the impression that I have an amazing natural talent for knitting or knitwear design; as I’m still an (adventurous) beginner, I had to reknit almost every stage of this sweater due to stupid errors on my part. But I actually don’t mind that – I’ve learnt a lot from those mistakes, and really, the knitting is about keeping my hands busy so I can relax in front of the TV instead of being tempted to work on a new crochet design. The finished sweater is just an added bonus.
Techniques I learnt for this sweater:
- Cable cast-on
- 2×2 rib for the collar and cuffs
- Transitioning from rib to stockinette
- Basic shaping (paired increases/decreases) at either side of the body
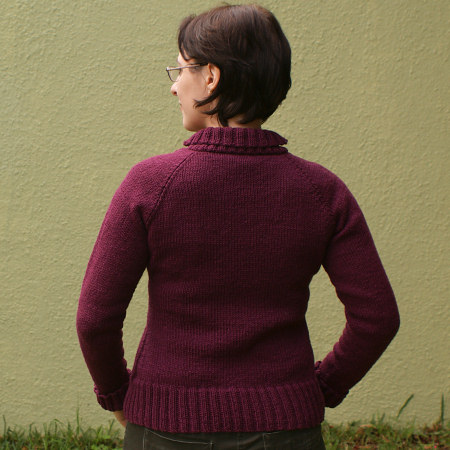
- 3-needle bind-off for the underarms and at the back of the neck
- A more subtle raglan decrease for creating the yoke and shoulders
- Shadow-wrapped short rows to create the shawl collar
- Stretchy bind-off for the sides of the collar
- Horizontal-to-vertical grafting to attach the sides of the collar
Confession time: the end result isn’t quite how I envisioned this sweater; I made a slight blip in my yoke calculations, and ended up losing a bit of length in my planned armhole depth and neckline depth as a result. It still fits pretty well though, so I decided it wasn’t worth reknitting everything from the armpits up. But I’ve learnt that lesson now, so I won’t make the same mistake next time.
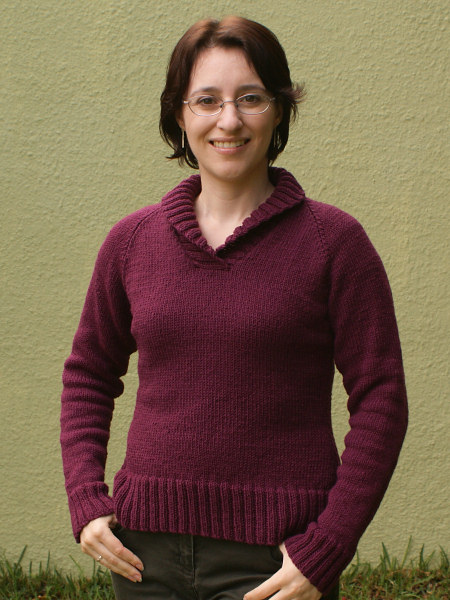
I’m pretty pleased with myself for working all this out though; this sweater doesn’t look like I made it up as I went along, and I feel like it actually has some design to it! I love how the collar turned out – I wanted it to be narrow at the front so it wouldn’t overpower my frame, but wide at the back to make a snuggly warm collar. I’d hoped my first attempt at short rows might work to create the shape I needed, and the collar actually ended up working perfectly on my first try. This sweater is definitely going to get a lot of wear (I’m actually wearing it right now!)
I also intentionally made the sleeves extra long, for cosiness. I can wear them uncuffed and keep my hands warm – built in wristwarmers! – or turn the ribbing back to normal sleeve length for a slightly smarter look.

(Oh, and I didn’t bother to block it, so it may look even better after I wash and block it!)
What’s Next?
Now I have a basic template for a sweater that fits me, I’m definitely going to knit more of them, and learn some new techniques with each, so I don’t make the same design over and over again and I can keep advancing my knowledge bit by bit. I’m already working on my next design, with interior shaping and a subtler, less bulky ribbing.
After making it all up as I go along for my first two knitted garments, I’ve decided it’s time to find out how you’re really meant to go about designing garments that fit. I’ve bought a couple of Craftsy online classes (Custom Cabled Pullovers with Carla Scott, and Handknit Garment Design with Shirley Paden) that should help me understand some of the slightly more advanced elements of knitwear design, e.g. set-in sleeves, and I’m trying to figure out how I can get my hands on a copy of Amy Herzog’s new book, Fit to Flatter. (I’ll keep you posted with reviews once I’ve finished taking the classes, and if I can get the book!)
I love, love, love being able to make clothes I can actually wear and that fit me, and not having to worry about making patterns for them. Having a relaxing and useful hobby that’s completely unrelated to my work is so refreshing!


dana Jensen said
Did you write out the pattern? I would love to make that sweater, but can’t just free-hand it . . .I need a pattern.
Thanks!
Dana
June said
Thanks for asking, but I’m fully booked with my crochet design work – I don’t have time to diversify into knitwear design for the forseeable future 😀
Theresa said
The sweater is amazing and I love the colour.
The Cogaroo said
You are absolutely amazing! I still can’t believe the second thing you ever knitted was a sweater. Usually people are either good at crochet or knitting, but you are good at both! Your blog is very inspiring and this sweater is beautiful, the color looks nice on you. Great job! 😉
Elise said
Wow, that sweater is amazing! It looks just like a store-bought sweater. I wouldn’t be able to tell the difference. And its a lot prettier than store bought sweaters I love the design I especially like the edgings! Great job June!!! 🙂
Lindy said
I love it! Love, Lindy xx