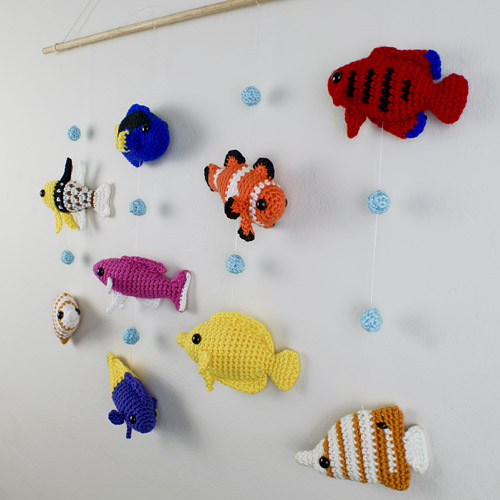
PlanetJune Craft Blog

Latest news and updates from June

Archive for Tutorials

Glinting Eyes for Amigurumi

Link easily to this tutorial in your patterns: www.planetjune.com/glint

Today I’d like to show you a technique that’ll bring your amigurumi to life when you don’t use shiny plastic eyes. This is particularly useful when you’re making baby-safe or pet toys, where plastic eyes may be a choking hazard.

example of embroidered catchlight on crocheted amigurumi eyes

The Power of the Catchlight

A catchlight is the highlight or glint of a light source reflected in an eye. Compare these kestrel photos I took a few months ago, and you’ll see how appealing a glint in the eye can be:

kestrel with glinting eye (by June Gilbank)
Where the eye has the magic glint, it brings a spark of life to the photo that makes it irresistible.

kestrel without glinting eye (by June Gilbank)
The same bird, only a couple of seconds later, but the angle is slightly different, and I didn’t catch a glint in the eye. Although the kestrel is still lovely, do you see how this photo looks dull and lifeless compared with the first?

Now, this principle doesn’t just apply to wildlife photography – the same concept applies in amigurumi! Two-part plastic animal (‘safety’) eyes are the ideal eyes for most amigurumi, because the shiny plastic replicates the shine of real animals’ eyes, giving a glint in the eye which helps to bring your amigurumi to life.

But plastic eyes aren’t always the best solution, especially if you’re making toys for very young children or pets, where plastic eyes may be a choking hazard and should be avoided. Non-plastic eyes can look dull and make your amigurumi feel lifeless, but there’s a simple way to add that spark of life back again.

Adding a Catchlight

If you crochet eyes for your amigurumi or make them from felt or embroidery, I highly recommend that you add a small white dot with white embroidery floss in the upper right quadrant of each eye, to simulate the glint. It makes the eye look more realistic and gives your toy that spark of life. All you need is a tapestry needle and a short length of white embroidery floss per eye.

Compare these two gingerbread men. Even before they have any features added beyond the eyes, there’s a huge difference in appeal:

Gingerbread Man (crochet pattern by PlanetJune) with and without a glint in the eye

Without a glint, the eyes have a dull vacant stare. With the glint, they have a sparkle of personality!

How to Add the Glint:

  • If you’re embroidering the eye directly onto your piece, you can stitch the catchlight on top of your other stitches.
  • If you’re attaching a felt or crocheted circle for the eye, you may find it easier to embroider the catchlight before attaching the eye, as you can then hide the thread ends beneath the eye. (If you plan to glue the eye in place, it’s essential to embroider the catchlight before you apply the glue, as it’s very difficult to embroider onto fabric that’s been hardened with glue!)
  • You can also add a catchlight with a dot of white fabric paint, but please do practice on a spare crocheted eye before adding paint directly to your amigurumi, to make sure you’re happy with the result.

illustration of good and bad glint positions for amigurumi eyes

Glint Size and Shape
The size and shape of the catchlights aren’t critical. A single stitch can be enough, or, if you prefer a more rounded/square shape, you can make a larger catchlight by making two or three stitches right next to each other. Whatever you decide, try to keep the glint the same size and shape on each eye.

Glint Position
You don’t have to use the upper right corner of the eye, but it’s very important that you add the glint in the same position on each eye – this is one situation where symmetry is definitely wrong! The idea of the catchlight is to suggest that the amigurumi is being lit from one side, and the side with the lamp/sun is the side that reflects that light as a glint. Light typically comes from above, so add the glint above the middle of the eye, but you can choose between the upper right or upper left side for both eyes.

Get Glinting!

This simple technique makes such a difference to any eyes made from fabric, yarn or embroidery floss. I hope you’ll use it every time you make crocheted, felt or embroidered eyes in future, to add an extra spark of life to your amigurumi!

Gingerbread Man crochet pattern by PlanetJune

Note: The samples used for this demo are made from my Gingerbread Family crochet patterns.


Do you find my tutorials helpful? If so, please consider making a contribution towards my time so I can continue to create clear and concise tutorials for you:

Thank you so much for your support! Now click below for loads more crochet video and photo tutorials (and do let me know what else you’d like me to cover in future tutorials…)

See more helpful PlanetJune crochet tips and technique tutorials

Comments (8)

A Colour Changing Crochet Investigation

managing yarns when changing colours tutorial

Spoiler alert: in doing this colour changing investigation, I’ve come up with recommendations for how best to manage your yarns when you make multiple-colour amigurumi.

If you’re not interested in my experiments and how I reached my conclusions, you can skip the rest of this post, and jump straight to the Changing Colour: Managing the Yarns tutorial 🙂


I’m often asked how to deal with the other yarn when changing colour in my amigurumi patterns. If there’s a specific technique I recommend for a specific pattern – one that makes the colour changes much neater or faster than any alternative – I give you that information in the pattern itself.

But, in general, I don’t give specific details within a pattern for every colour change, because a) there’s no one ‘right’ way to deal with yarn ends and carrying colours, and b) it’s up to you which method(s) you find to be the best combination of fast, easy, and with a good end result.

In fact, I tend to intuitively use a combination of several options, but how do you know what to use when? Time for another crochet experiment, so we can see the the advantages and disadvantages of each technique, and I can give you a better recommendation…

Note: Not interested in the investigation and just want my recommendations for how to deal with the other yarn when you’re changing colours? Go straight to my page Changing Colour: Managing the Yarns!

Method

I crocheted the same amigurumi-style sample piece 4 times, using the same pattern each time but changing the method for dealing with the other yarn in each sample, as a basis for comparison.

colour_changing_investigation

The pattern was a two-colour cylinder worked in a continuous spiral in the round, changing colour every five stitches on one side and every two stitches on the other side, so we can see any differences between short and long blocks of stitches between colour changes.

The techniques I used were:

  • 1. Cut-and-tie: Cut the yarn at every colour change and tie each resulting pair of ends together.
  • 2. Stranding: Carry a float of yarn behind the work, and pick it back up when you resume crocheting with that colour.
  • 3. Tapestry crochet (yarn on top): Lay the unused yarn across the top of the stitches, and crochet around it with every stitch.
  • 4. Tapestry crochet (yarn behind): I don’t think there’s a real name for this technique: crocheting around the other yarn with each stitch, but holding it behind the back loop, instead of across the top, of the stitch below. (But does that really make a difference? Let’s find out…)

Results

The overview picture below shows the results of the four different methods.
L-R for each method:

  • Wide blocks of colour, right side
  • Wide blocks of colour, wrong side
  • Narrow blocks of colour, right side
  • Narrow blocks of colour, wrong side

colour changing experiment by PlanetJune - 4 methods to deal with yarn ends when changing colour in amigurumi

(You may be wondering why I’m looking at the wrong sides too, when the inside will never be seen in an amigurumi piece. It’s important for the experiment to see what’s going on behind the scenes as well as comparing the look of the finished outside.)

By comparing each of these samples, I could see the advantages and disadvantages of each method, which will let me figure out which is best to use when, and why…

Cut-and-tie vs Stranding

Stranding is much faster than stopping to cut the yarn and tie knots at every colour change, but the quality of the stranded result depends on the width of the yarn that’s floated on the back of the piece:

colour changing experiment by PlanetJune - cutting vs stranding

For long stretches between colour changes, the floated yarn on the back of the piece can distort the shape of your work (if too tight), or cause the stitch before and after to work loose (if too loose). Cut-and-tie leaves yarn ends, but gives a consistent result.

However, for frequent colour changes of only a stitch or two, cut-and-tie is fiddly and leaves a big mess of ends on the inside of the piece. Stranding works very well for these shorter colour changes, provided you tension the stranded yarn so it sits snugly along the inside of the piece.

Conclusion: Stranding the yarn behind your stitches saves time and yarn vs cutting and tying at each colour change, but it works best when you’re only carrying the yarn for a short length before swapping back.

Tapestry crochet vs Normal crochet (cut or stranded)

There’s a big problem with using tapestry crochet for amigurumi – unless, of course, the pattern was designed to be worked this way! Let’s compare the stitches formed with standard crochet vs those with tapestry crochet:

colour changing experiment by PlanetJune - stitch bias difference between normal and tapestry crochet

Working in the round without turning always introduces a bias to your stitches – a stacked colour change will travel by approximately 1 stitch per 5 rounds (above, right). But with tapestry crochet (above, left), that bias is intensified, so a stacked colour changed will travel by approximately 1 stitch per 2 rounds. So, if you use the tapestry technique where it’s not intended (or, use non-tapestry for a pattern designed for tapestry), the colour pattern will become skewed.

The tapestry stitches are also slightly taller than standard stitches, but I’m not sure there’s enough of a difference there to skew the overall shaping significantly on the scale of an amigurumi piece. The colour shifting is a much more obvious problem, and a good enough reason to abandon this method for amigurumi colour changes without further investigation.

Conclusion: Don’t use tapestry crochet (working over the carried yarn with every stitch) for amigurumi with colour changes, unless the pattern specifies it.

Tapestry crochet (yarn on top vs yarn behind)

The modified tapestry crochet technique, where you carry the yarn just behind the back loop of the stitch instead of across the top, does make a difference: looking at the green stitches in the samples below, you can see that the carried (pink) yarn is less visible on the front of the piece, and more visible on the back (where it doesn’t matter for amigurumi).

colour changing experiment by PlanetJune - comparison of tapestry crochet with the yarn held on top or behind the stitches

Conclusion: If you’re going to work over yarn (to carry a yarn, to catch a floated yarn, or to work over a yarn end), for amigurumi it’s better to hold the yarn behind the back loop of your stitch instead of across the top of the stitch.

(This modification doesn’t help with the bias effect, so I still wouldn’t use it for amigurumi colourwork, unless the pattern was designed to be worked in tapestry crochet. But I have incorporated this technique into my recommendations in a specific scenario, as you’ll see…)

Verdict & Recommendations

managing yarns when changing colours tutorial

Putting it all together, we can see which techniques may be most effective when a pattern has frequent/infrequent colour changes that span few/many stitches, and I now have solid reasons for recommending different yarn-wrangling methods in different situations.

You always have a choice of how to deal with the other yarn(s) when you change colour, but I’ll give you my recommendations – together with some case studies so you can see how these methods work in practice for amigurumi – in my tutorial page:

Continue to ‘Changing Colour: Managing the Yarns’ >>

Comments (5)

tutorial: better BLO stitches for amigurumi

Link easily to this tutorial in your patterns: www.planetjune.com/blo

I always like to experiment and see if there are ways to improve amigurumi techniques to give better results, and today I have a new one to share with you.

Back loop only (BLO) stitches are often used to add detail in amigurumi designs, particularly for turning sharp corners. For example, look at the bottom of a crocheted plant pot (where you turn a sharp corner from the base of the pot to begin the sides) or the bottom of a foot (where you turn from the flat base to the side of the foot).

better BLO tutorial - examples of uses of back loops only at the edge of the base of feet or plant pots
Stegosaurus and Succulent plants both have a round of BLO around the bottom edge (of their feet and pot, respectively)

But BLO stitches are looser and more open than standard stitches worked in both loops, so the corner round will lose the solid, firm fabric of the rest of your amigurumi. My new modified BLO technique solves this problem!

better BLO tutorial - the holes above the unworked front loops are eliminated with my technique
The holes above the unworked front loops are eliminated with my technique

Now, before we get started, I should explain what this technique is not: this is not a new method for patterns that are worked in BLO throughout. Using it in that way would change the shape of the finished pieces (more about that later).

This technique is best used to replace occasional BLO details in a piece worked in both loops, e.g. the round of BLO stitches used for turning sharp corners in amigurumi patterns. Just as you can replace a “ch 2” start with a magic ring, and an “sc2tog” with an invisible decrease, you can replace that round of BLO with my modified BLO (in any amigurumi pattern) and it’ll give your amigurumi a much nicer result.

What’s wrong with BLO?

The problem with BLO stitches compared with stitches worked in both loops is that they can easily stretch open. When you’re making amigurumi, where the stitches are stretched by the stuffing, this results in taller stitches with larger gaps between each round.

better BLO tutorial - comparison of samples worked in normal sc and sc in back loops only
L-R: sc worked in both loops, sc in back loops only

(I discussed this in more detail in my tutorial Front Loops, Back Loops, Both Loops.)

Why Use BLO?

But BLO has several uses as an accent in amigurumi designs, for example:

  • to add textural detail with the unworked front loops
  • to add anchor points for additional stitches worked back into in the unworked front loops
  • to turn sharper corners than you can achieve with regular single crochet stitches

This last one is the main use of BLO in amigurumi, and the situation that you can most improve with my new technique! Although BLO makes a nice corner, it does leave the fabric looser and more floppy around that round, because the stitches can stretch open.

A Better BLO

When you look at a single crochet stitch, you usually work into both the front loop and the back loop at the top of the stitch:

better BLO tutorial - step 1

But, if you rotate your work forwards a bit, you can see that there’s another horizontal bar just beneath the back loop, at the back of the stitch (below, left).

To improve the appearance of your BLO, work each stitch into both the back loop and this back bar (below, right).

better BLO tutorial - step 2

Are you left-handed? Here’s how it’ll look for you:

better BLO tutorial - step 2 (left-handed)

You can see the stitch in action in the videos below:

Video Tutorial (right-handed)

Video Tutorial (left-handed)

Note: The videos may look a little small embedded in the blog: if so, you can fullscreen them or click through to YouTube (links: right-handed; left-handed) to watch them full-sized 🙂

Stitch Comparison

So you can see the difference this technique makes, let’s compare the modified BLO stitch with a standard single crochet (worked in both loops) and a standard BLO single crochet.

I’ve crocheted the same sample 3 times, once using each stitch.

better BLO tutorial - comparison of samples worked in normal sc, modified scBL, and standard scBL
#1: single crochet in both loops
#2: modified BLO single crochet
#3: BLO single crochet

As you can see, the modified BLO does not stretch out like a BLO stitch; the stitches are much closer in size to a standard single crochet (although very slightly smaller still, as the stitches are tighter).

Comparing the BLO and modified BLO in close-up:

better BLO tutorial - comparison of stitches worked in standard scBL and modified scBL
Left: BLO; right: modified BLO

You can see that the gaps that result from standard BLO stitches are eliminated with this technique, and the stuffing doesn’t show through between the stitches.

So this modified stitch is a much better match for a standard single crochet, as it keeps the tight, solid appearance of a regular amigurumi, and doesn’t leave any unwanted gaps.

Caveats

  • Do not use this technique for a piece designed to be worked in back loops only. As you can see, using the modified BLO stitch with a pattern designed to be worked entirely in BLO would give the same problem as working the pattern in both loops – the shape would be compressed vertically.
  • I recommend you use this technique only as an accent stitch for pieces crocheted predominantly in both loops. (The only reason I crocheted the above sample piece entirely in modified BLO is to give you a clear way to compare the differences between the size and shape of the stitches.) This stitch is more difficult to work than either standard or BLO single crochet, because the back bar is tighter, so I don’t suggest you ever crochet an entire piece using this technique!

In Practice

better BLO tutorial - sample piece with sharp corner made by modified BLO round at edge of base

I crocheted this little amigurumi-style pot as a sample to demonstrate this technique. The corner formed by the modified BLO round is neat and firm, and it’s actually a little sharper than the corner you get from a standard BLO stitch.

Conclusion

You can safely use the modified BLO to replace a single round of stitches (or any number of individual stitches) worked in back loops only in any amigurumi pattern.

It prevents the gap from forming below each BLO stitch as the fabric stretches, and it maintains the firm solidity of the amigurumi fabric throughout your piece.

While this isn’t an essential technique, it’s another ‘upgrade’ you can use with any pattern (like my invisible increase) to improve the look of your amigurumi.

I know I’ll be using it for all my BLO details in future, and I hope you’ll enjoy it too!


Do you find my tutorials helpful? If so, please consider making a contribution towards my time so I can continue to create clear and concise tutorials for you:

Thank you so much for your support! Now click below for loads more crochet video and photo tutorials (and do let me know what else you’d like me to cover in future tutorials…)

See more helpful PlanetJune crochet tips and technique tutorials

Comments (13)

Origami Poinsettia papercraft tutorial

In celebration of my new PlanetJune Papercraft ebook and donationware tutorials, I decided to design a papercraft poinsettia to add to my collection…

origami poinsettia by planetjune

The ‘petals’ of this Poinsettia are made with origami techniques, and the ‘flower’ is assembled with wire (with an option for sewing thread) – that can also be used to create a stem or hanging loop – and beads for the centre.

Did you know that the red ‘petals’ of a poinsettia are actually bracts – modified leaves – and only the central yellow parts are the flowers? So, while this isn’t actually a ‘flower’ in the case of a poinsettia, you can also make this design as a pretty flower at any time of year!

If you don’t have origami paper, inexpensive gift wrapping paper is the perfect thickness for paper folding. You only need to cut 3 squares to make a flower, and you’re bound to have some leftover wrapping paper before Christmas, so don’t throw it away! My origami poinsettia measures 3″ (7.5cm) in diameter, but it can be easily scaled to any size by starting with larger or smaller squares of paper. Beads or a button add the finishing touch to this lovely easy decoration.

The origami techniques in this design are very simple – this would be a fun introduction to paper folding if you haven’t tried it before – and once you’ve learnt how to fold a leaf you’ll be able to whip up a poinsettia (or several!) very quickly. If you’d like to give it a go, the link to the free tutorial is below, and, as always, if you choose to thank me with a donation, you’ll get the handy printable PDF version 🙂

Go to the Origami Poinsettia tutorial >>

The Poinsettia Collection

I only had one year off before I felt compelled to return to my tradition of crafting a new Poinsettia ornament every year. This new design brings the total up to 9! Here are all the previous PlanetJune Poinsettias:

tsumami kanzashi poinsettia by planetjunecrocheted poinsettia by planetjune
polymer clay poinsettia by planetjunepunchneedle poinsettia by planetjune
felt poinsettia by planetjunebeaded poinsettia by planetjune
thread crochet poinsettia by planetjuneknitted poinsettia by planetjune

Top (L-R): 2006 kanzashi poinsettia (no tutorial); 2007 crocheted poinsettia
2nd Row (L-R): 2008 polymer clay poinsettia; 2009 punchneedle poinsettia
3rd Row (L-R): 2010 felt poinsettia; 2011 beaded poinsettia
Bottom Row: 2012 thread crochet poinsettia; 2013 knitted poinsettia

(You can find all my Poinsettia designs as PDFs in my shop, or use the links above for the free online versions.)

Happy seasonal crafting!

Comments (5)

How to Fold a Triangular Shawl

how to fold a triangular shawl by planetjune

If you’ve been bitten by the shawl-crocheting bug, it can be easy to build up quite a collection! As part of the Accessories CAL (in the PlanetJune Ravelry group), I thought now would be a good time to discuss how you store your shawls. I used to hang mine in my closet, but I quickly ran out of hanging space, and now I prefer to keep them all neatly folded in a plastic storage box.

Triangular shawls, in particular, can be a bit tricky to fold for storage, so here’s my method to turn any size and style of triangular shawl into a tidy rectangle.

Step 1: Hold your shawl with the point facing down:

how to fold a triangular shawl by planetjune

Step 2: Bring the top left corner across to the top right corner:

how to fold a triangular shawl by planetjune

Step 3: Bring the bottom point up to the top left corner:

how to fold a triangular shawl by planetjune

Step 4: Bring the top right point across to the top left corner:

how to fold a triangular shawl by planetjune

And that’s it: a perfect rectangle. If your shawl is large, you may want to fold it in half again before you store it (but I think you can figure out how to do that without a photo…)

So now you can go from this:

Cozy Mesh and Palm Leaves shawl crochet patterns by planetjune

to this tidy little stack of crocheted loveliness!

Cozy Mesh and Palm Leaves shawl crochet patterns by planetjune

And – in case you’d like to make a few more shawls so you can practice your folding technique – you can find all my shawl patterns here 😉

Comments (6)

Tip: Feeding Yarn Through Button Holes or Beads

Whether you’ve made a sweater, a phone cosy, or jewellery, sometimes you want to add a button to your yarn project and run into a problem… For a perfect match, it’s nice to use the project’s yarn to attach the button – whether that’s to minimise ends to weave in, or just give a polished look. But, while it’s fairly easy to find a button with holes big enough to fit the yarn through, it’s very rare to find a button that has a hole large enough for both the yarn (doubled) and the eye of a yarn needle!

crochet braid bracelet pattern by planetjune

Below, I’ve shown an example (from a Crochet Braid Bracelet, pictured above). The hole on this shank-backed button is just large enough for my yarn to fit through, but the yarn is too floppy to push through the hole. When I try, it either bunches up and refuses to go through, or separates into plies.

feeding yarn through buttonholes

The simplest trick is to wet the end of the yarn to keep the plies together while you thread the end through the buttonhole – the same technique as licking your sewing thread before you thread a hand-sewing needle. But sometimes that just isn’t enough, and with a long buttonhole like this one and/or a close fit, the yarn is still too floppy to make it right through the buttonhole.

There’s just no way to get that yarn through that buttonhole… Or is there?

feeding yarn through buttonholes

Yes there is! Here’s the magic, you need to stiffen the end of the yarn before you thread it through the button, so it’ll act like its own needle and pass easily through any buttonhole that’s large enough to fit a single strand of the yarn.

The easiest way to do that is with basic white craft glue, and here’s how to do it:

  1. Squeeze a small drop of white glue onto the end of the yarn.
  2. Using your thumb and fingertips, press and roll the end of the yarn to distribute the glue through the fibres of the yarn. For threading normal buttons, you only need to dampen about 1/2″ (1 or 2 cm) of the yarn with glue.
  3. Twist the wet plies together by rolling between your fingertips in the direction of the twist of the yarn, to hold the plies neatly together.
  4. Press the tip of the yarn gently between your fingertips to form a nice rounded point (see above photo).
  5. Leave the glued yarn to dry for a few minutes (while you wash/rub the glue off your fingers) – although, if you’re impatient, it doesn’t need to be perfectly dry to work!
  6. Thread your yarn through your buttons as desired.
  7. Snip off the hardened end of the yarn with scissors.

Easy! It works the same way as the plastic-coated ends of your shoelaces: compressing the yarn into a tight, stiff point that can pass easily through the hole. This method also works on embroidery floss, crochet cotton, or any other type of thread you want to pass through a small hole.

Bonus tip: You can also use this technique for stringing beads onto yarn or thread where the bead hole is too small to fit a doubled strand of the yarn – perfect for bead crochet, or even stringing children’s necklaces!

I hope you find this helpful next time you’re trying to feed yarn through a buttonhole (or bead) – it’s a handy little trick. 🙂

Comments (14)

Crochet Terminology

This is the final post in my three-part series aimed predominantly at crocheters outside North America. For the rest of the series, see Yarn for Amigurumi and Crochet Hook Styles.

Non-Standardised Terminology

The names of the crochet stitches are, unfortunately, not standardised throughout the English-speaking world. Most crochet patterns you’ll find through online sources are written in US terminology (which is why I call this ‘standard’ terminology) – but if you buy/use a pattern written or published in UK/Aus, that may not be the case.

Conversely, if you learnt crochet from a British or Australian source, or some other countries with a historical British influence, you probably know the UK terminology. Your ‘double crochet’, for example, refers to a different stitch (US single crochet) than a US double crochet (which is equivalent to your ‘treble crochet’) – confusing, huh?

Note: If you’re not sure which terminology you use, look at my single crochet tutorial: right-handed or left-handed. If you know this stitch as a ‘double crochet’, you’re using UK terminology!

US/UK Conversion Table

Here are the most common stitches with their equivalent US and UK names:

US Stitch Name UK Stitch Name
chain chain
double crochet treble crochet
half double crochet half treble crochet
slip stitch slip stitch
single crochet double crochet
triple (or treble) crochet double treble crochet

The basic rule is that the UK stitches are always named one step higher than their US counterparts.

Converting Amigurumi Patterns

Amigurumi patterns aren’t too difficult to decipher, as they are (almost) always worked in (almost) all single crochet stitches (i.e. ‘double crochet’ stitches in UK terminology), so it’s very easy to convert these patterns between US/UK. Using the above table, you’ll see that chain and slip stitch are unchanged, so it’s just the single/double crochets you may need to change to convert to your preferred terminology.

Note: All PlanetJune patterns – amigurumi and accessories – are written in standard (US) terminology, but, to prevent confusion, my patterns always also include a conversion table at the start for all stitches used, so you can look up the pattern abbreviations and see which stitch should be used, whichever terminology you’re used to.

Terminology Tips

  • There is no stitch known as ‘single crochet’ anywhere in UK terminology, so, if you see any pattern that uses ‘sc’ stitches, you know it’s a standard/US pattern. UK/Aus: work a dc in place of every sc, and convert all other stitches.
  • If you see an amigurumi pattern worked in ‘dc’ stitches, but the stitches look like those of a regular amigurumi, it’s almost certainly a UK pattern and you should work a US single crochet everywhere the pattern calls for a double crochet. UK/Aus: work the pattern as written.
  • If in doubt when you use an indie pattern that doesn’t have a terminology table to clarify the stitches, check with the pattern designer.
  • A pattern in a book or magazine will almost always use the terminology of the publication’s country of origin, but you can check the description of the stitches used (usually at the start or end of the book/magazine) to make sure.

It’s very unfortunate that when you find a crochet pattern that calls for, for example, a ‘double crochet’ stitch, that may mean one of two different stitches depending on where the pattern was published (or which terminology the designer/publisher decides to use), but I hope this post will help to clear up the confusion!


Do you find my tutorials helpful? If so, please consider making a contribution towards my time so I can continue to create clear and concise tutorials for you:

Thank you so much for your support! Now click below for loads more crochet video and photo tutorials (and do let me know what else you’d like me to cover in future tutorials…)

See more helpful PlanetJune crochet tips and technique tutorials

Comments (4)

Crochet Hook Styles

This is the second of three information posts aimed predominantly at crocheters outside North America. See also last week’s Yarn for Amigurumi, and the final post: Crochet Terminology.

the differences between in-line and tapered crochet hooks

Crochet hooks come in two main styles: in-line, and tapered. Within North America, these are often known as Bates and Boye styles, respectively, for the most common brands of each style. Outside North America, the tapered hook shape is used almost exclusively, and you may not be able to find any in-line hooks locally.

I think this is unfortunate, as I find the in-line hook shape preferable for forming uniform-sized stitches, and for not snagging the tip of the hook on my previous stitches as I draw up each loop:

  • The head of an in-line hook has the same size, shape, and alignment as the shank (where your working stitch sits on the hook), so you can draw the hook back through each stitch in one straight line.
  • If you’re not careful when using a tapered hook, you can easily make too-small stitches by forming them over the narrow tapered neck (between the throat and the fixed-width shank).

I should be clear though: although I have a strong preference to use in my own crocheting, there is no ‘best’ style of hook; just as you may hold your hook differently to me, you may also prefer a different style of hook. I can’t guarantee that my preference will work for you, but if you plan to crochet a lot, I do recommend you try more than one hook style, if you have the option, so you can find a brand you find comfortable and easy to use.

Buying In-Line Hooks

Susan Bates hooks (also sometimes sold as Red Heart brand) are the most well-known in-line hook, and my preferred brand, both for making amigurumi and for crocheting accessories and larger items. If you live outside North America and are importing yarn from abroad or buying from an online shop that stocks them (see my Yarn for Amigurumi post for a selection of online yarn shops that ship worldwide), I recommend you add one Susan Bates aluminium (US: aluminum) hook in your most-used hook size to your order, so you can see if you like it. If you do, you can invest in a selection of all your favourite sizes (or even a complete set) in your next order.

Note: I find the bamboo-handed Susan Bates hooks are especially comfortable, if you can find them. This isn’t a sponsored post (I don’t do that sort of thing!) – just my real opinion. 🙂

If you can’t find a Bates hook, or just don’t like metal hooks, there are other brands that also make in-line hooks, so I suggest you look around your local (and online) shops to see what you can find. You can use my graphic above as a handy reference to compare with the hook you’re thinking of buying, so you can tell what you’re looking for.

UPDATE: I’ve done some sleuthing and there’s a shop on amazon.co.uk that sells US craft products – including all the Susan Bates hooks! They do ship from the US, but the postage is free, so if you’re in the UK, you may want to check out SuperMart on amazon.co.uk – that link will show you all the aluminium Susan Bates hooks, so you can find your favourite sizes, both bamboo-handled and the slightly cheaper all-metal hooks. 🙂


Which hook style do you favour: in-line or tapered? (I’d be especially interested to hear why you love tapered hooks, if you do!) Please leave your opinions and brand recommendations below!


Do you find my tutorials helpful? If so, please consider making a contribution towards my time so I can continue to create clear and concise tutorials for you:

Thank you so much for your support! Now click below for loads more crochet video and photo tutorials (and do let me know what else you’d like me to cover in future tutorials…)

See more helpful PlanetJune crochet tips and technique tutorials

Comments (41)

Next entries » · « Previous entries
  • Quick Links: Crochet

    navigation: arrow

    buy crochet patterns and accessories from my online store

    'Everyday Crochet' and 'The Essential Guide to Amigurumi' crochet books by June Gilbank

    Crochet video tutorials and step-by-step photo tutorials

    Free PlanetJune crochet patterns

    Frequently Asked Questions

    Quick Links: Crafts

    navigation: arrow

    Punchneedle Embroidery information, ebook & patterns

    Papercraft ebook & tutorials

    Free PlanetJune craft projects & tutorials

  • Blog Post Categories

  • Blog Archives

  • Welcome to PlanetJune!

    June Gilbank

    Hi, I'm June. Welcome to my world of nature-inspired crochet and crafting. I hope you enjoy your visit!

    If you'd like to get in touch, you can contact me here.
    crocheted Canadian flag by PlanetJune
  • A fanned-out pile of the books Everyday Crochet and The Essential Guide to Amigurumi, with text 'The answers to all your crochet questions at your fingertips - find out more'
  • Support PlanetJune!

    Want to say thanks? You can send me money in seconds at paypal.me/planetjune (over $20) or paypal.me/planetjune2 (under $20) or send me a donation through my shop.

    Or simply click through from my links before you shop at Amazon, Etsy, KnitPicks, LoveCrafts or Crochet.com, and I'll make a small commission on your purchase, at no cost to you! Start here:

    ♥ Support PlanetJune ♥

    Tip: This link is also in the footer of every page!

    Thank you so much for your support!