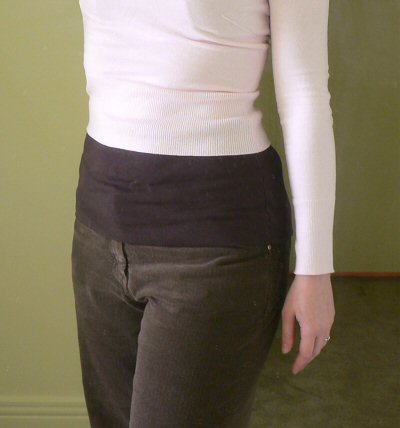
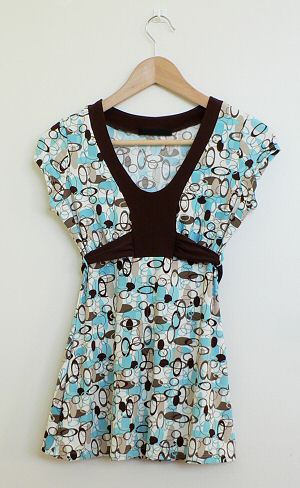
PlanetJune Craft Blog

Latest news and updates from June

Archive for Sewing

business card holder v1

This is just a quick prototype I made last night. It’s a bit uneven and a little smaller than I’d like (the finished holder only just holds 4 business cards). But I am pleased with the basic concept – I’ll add “make a proper business card holder” to my endless list of craft ideas!

business card holder closed

business card holder open

Comments (1)

how to take up trousers

A note before I begin: British trousers = American pants. I may use the terms interchangably in this tutorial after living in Canada for the past 4 years 🙂

As I am all of 5′ 2″ tall, it’s very rare that I find trousers that aren’t too long, and yet the petite ranges are typically just slightly too short for me. So, as I have to shorten my pants every time I buy a pair, I thought you might like to see how I do it.

The ‘regular’ way of taking up trousers involves ‘invisible’ stitching (i.e. only catching a couple of threads of the outside fabric). This is tricky, time-consuming, and if you’re not very careful, you can still see the stitches on the outside.

My method leaves a visible hem on the outside, but I don’t see anything wrong with one neat line of stitching, and for everyday or casual trousers, it can even leave a nicer finish than the hidden method. Maybe you won’t want to use this method for your best interview suit, but I use it for everything else!

You will need:

  • sewing machine
  • thread that matches the colour of your trousers
  • seam gauge (if you don’t have one, a measuring tape or ruler will do)
  • scissors
  • straight pins
  • sewing needle
  • marking pen/pencil
  • iron

Method:

  1. Try on your trousers so you can see how long they need to be. Note: remember to wear shoes while you do this, or your trousers will look too short when you wear them with shoes!
     
  2. Fold up the trousers to the length you want them to be (it helps if you have a mirror so you can see where they will fall when you are standing up straight). Adjust until you’re happy that they don’t scrape the floor but aren’t going to be too short either. Remember different heel heights will affect the apparent length, so keep that in mind.
     
  3. Pin the turn-up to the back of each trouser leg (just one pin) to stop the turn-up from falling down when you take off the trousers. This is just to give you the required length, so don’t worry about being neat. Have a final length check after pinning. Looks good? Okay, now you can get changed into something more comfortable (and don’t prick yourself on those pins!).
    taking up trousers
    Pinned to length at the back
     
  4. Measure the length of the turn-up on each leg. They should be the same, but if they aren’t, pick a measurement midway between the two.
    taking up trousers
    Comparing the turn-up lengths

    If they are very different, you should probably try the pants on again and check which one is right! Make a note of your measurement (for these trousers, mine is 9cm).

  5. Remove the pins and turn the trousers inside out.
     
  6. Fold up the bottom of each leg, to the length you measured above, and pin in place.
    taking up trousers
    Pinned 9cm turn-up
     
  7. Iron the fold so it is pressed into a crease.
     
  8. Mark 1 inch above the fold, all the way around both legs, then remove the pins.
    taking up trousers
    1 inch marked in white pencil
     
  9. Be brave – this is the scary part! Cut the turn-up around the lines you have just drawn, but be careful not to cut through both layers of fabric – just the turned up part – otherwise you’ll end up with capris!
    taking up trousers
    Starting to cut
    taking up trousers
    Partially cut
    taking up trousers
    After cutting

    Handy hint: you can even use the cut-offs to make hairbands.

  10. With your remaining 1-inch turn-up, begin to fold the raw edge inside, so you end up with a 1/2 inch turn-up with no raw edges visible. Pin in place as you go.
    taking up trousers
    Starting to fold in the raw edge and pin

    Continue folding and pinning all around the bottoms of both legs. You can iron this fold in place before sewing (I like to; it makes the sewing part easier) or just sew it at this point.

  11. Set up your sewing machine with a thread colour that matches the main colour in your fabric, for both the top and bobbin threads. Set it to a medium length straight stitch.
    taking up trousers
    Winding a matching bobbin
     
  12. Using the 1cm guide on your sewing machine (or whichever guide is just less than 1/2 an inch) sew around the bottom of each leg.
    taking up trousers
    Ready to start sewing
    When you get back to the start, sew over your first couple of stitches and then finish off.
     
  13. Pull the loose threads to the wrong side of the fabric. You can knot them together for added security, if desired, then thread them through a sewing needle. Push the needle into the turned up fabric, and out a couple of inches further along.
    taking up trousers
    Hiding the thread ends
    Pull the thread ends to make fabric scrunch up slightly, then snip off the threads flush with the fabric, so they disappear inside the fabric when you pull it flat.
    taking up trousers
    Snipping the ends
     
  14. Turn the trousers right side out and admire your handiwork!
    taking up trousers
    The finished seam as it appears on the outside of the trouser legs – crisp and neat.
    taking up trousers
    Perfect!

Comments (41)

haramaki (tummy warmer) tutorial

I saw this post on Craftzine yesterday about the new Japanese fashion of wearing colourful haramaki aka ‘belly warmers’. I think this is the best idea I’ve seen in a long time! Ever since the advent of low-rise jeans, women have been stuck with a little cold gap between the bottom of our shirts and the top of our jeans. This is a cool way to cover that gap, and why import one from Japan when we can all make our own?

I whipped this one up this morning as a prototype, so I left it plain, but just imagine how amazing it could look if you freezer paper stencilled a funky design on the fabric before sewing it…

haramaki

When it was finished, I tried it on and was surprised by how warm I felt – it really does work, even when it’s just made from 2 layers of t-shirt fabric.

To make your own haramaki:

You can use any fabric with some stretch, so you can pull your haramaki on and off. I used a knit jersey (i.e. t-shirt fabric).

You will also need a sewing machine with a stretch stitch (pictured below).
haramaki

  1. Work out the dimensions you need. The height is up to you – I decided to go for an 8″ tall haramaki but you could make it longer if you want. The length of the haramaki depends on the size of your tummy..! Of course it would be easier to estimate for a skinny straight up-and-down Japanese model than for a regular curvy lady. I decided to make mine 30″ around (without giving too much away, that’s halfway between the measurements for my waist and my hips). If you want to wear it high up, make it a bit shorter than your halfway measurement, and if you want it to cover your hips, you may need to make it a little longer, depending on how stretchy your fabric is.

    To get the fabric dimensions, the length is 1″ over the length you decided (mine is 30″ + 1″ = 31″) and the width is double the height plus 1″ (mine is 2×8″ + 1″ = 17″). Cut your fabric to these dimensions and lay out as shown (right side up):
    haramaki

  2. Fold your fabric in half so the top meets the bottom, as shown below:
    haramaki
  3. Pin the 2 long sides together, all the way along. It’s better to space the pins more closely than you normally would, as the stretch fabric can get out of alignment more easily than a regular fabric:
    haramaki
  4. Sew along the line you’ve pinned. You have 1/2″ seam allowance, but that 1/2″ includes the full width of the zig-zag stitch, so you may need to practice on scrap fabric first to see which guide line to follow on your sewing machine. Trim the extra seam allowance after sewing:
    haramaki
  5. You have just made a long tube. Stick your arm through the tube and grab onto the far edge of the tube:
    haramaki
  6. Pull your arm back out of the tube, bringing that far edge of the tube back through the middle of the tube. Stop when the raw edges meet up, and align the edges:
    haramaki
  7. Pin the inner and outer layers together, all around the raw edge:
    haramaki
  8. To clarify, you should now have a tube that is half as long as before, made from 2 thicknesses of fabric. The pins should not close off the end of the tube:
    haramaki
  9. Sew around the pinned edge (again, 1/2″ seam allowance), leaving a gap of about 3″. Turn the harimaki right side out through this gap:
    haramaki
  10. Fold the edges of the gap under, and hand-sew the opening shut. That’s it! All finished!
    haramaki

I’ve been wearing mine all day and it’s warm and comfy and like having a hug all day long 🙂
Please leave me a comment if you like this idea or if you make one!

Comments (71)

catnip mouse toy

It’s my cat Maui’s third birthday and I wanted to make him something special…

I had this brown patterned fabric in my stash, and the pattern was just mouse sized… I came up with this catnip-filled mouse, with a string tail, felt ears, and embroidered eyes and nose. I know it was a lot of work just for a cat toy (those ears won’t last for long!), but I think it’s just adorable.

And, most importantly, the birthday boy loves it:

Comments (4)

knickers!

Yes, I’m a Brit, and to me they are *knickers*, not panties 🙂 

My friend Allison and I decided to get together for an afternoon of crafty goodness and we thought the OneHourCraft sexy Valentine’s Day string panties tutorial would be a good place to start.

After we had spent a while giggling and examining animal prints in the fabric store, we settled on a subtle black floral pattern, with some fancy black elastic and purpley red ribbon ties.

We modified the pattern template because it looked a little too small (aka revealing) for us, and then we pinned and sewed and pinned and sewed and… no, this was not a “one hour” craft for us! And my poor hubby had to studiously avoid listening to us discussing underwear all afternoon. But it was so much fun – I can see why people are starting up craft groups all over the place now; crafting with a friend is a very different experience to crafting by yourself.

And, eventually, look what we made (click to supersize): 


Mine are the ones on the left

They ended up looking really good – I think we were both a little surprised by how well they turned out.

Thanks Allison – we’ll have to do it again some time! 

Comments (4)

patchwork embellished tote

patchwork embellished tote bag 

I made this bag for the January One Hour Craft Challenge. It’s a smallish tote because I made it to be a lunchbag-in-disguise so I can bring food into work without being too obvious 🙂

I made up the pattern using the size of my lunchbox as the base of the bag. I used a thick black fabric for the outside, so it won’t look grubby once I’ve used it for a while. I think it’s supposed to be suit fabric, but it works for me as bag fabric! I made the lining out of thin black vinyl, so the interior of the bag can be wiped clean – always useful when it’s going to carry food.


I made the handles from the same fabric as the outer bag, and the bag fastens with one snap in the middle of the top edges. I also added a pair of magnets on each side at the top (inside the lining) to stop the sides from sagging outwards when the bag is half empty.

The crowning glory is my machine-appliqued patchwork design on the front, inspired by Wee Wonderfuls’ Hillary’s zig-zag’d patchwork bag, which in turn came from the Japanese craft book Machine Made Patchworks. I changed the method a bit – I used HeatnBond to iron the patchwork squares into place on my fabric, and then used one careful line of zigzag stitching to anchor all the edges. I completed this step first, before even cutting the fabric for the bag. I’ve wanted to try this for months, and I am unfeasibly pleased with how it turned out. I’ve never even used anything other than straight stitch on my sewing machine before!

machine applique patchwork

Love love love this patchwork! I have some fabric left over, so I’ll definitely have to make something else to match my tote…

Comments (9)

there’s nothing more english…

…than a good cup of tea. We even import our tea from England because it’s just not the *same* in Canada. Our teapot is round and comforting, but our precious tea gets cold before hubby can have his third mug.

As a (slightly belated) Christmas gift, I’ve made him a quilted tea cosy. I’ve seen knitted tea cosies that have holes at the front and back for the spout and handle, but the only quilted tea cosies I’ve seen are like giant hats, and you have to remove them to pour the tea. Maybe it’s just easier that way, because the knitted fabric will stretch to fit over the teapot appendages, but quilted cotton obviously can’t do that. But why should that stop me – there has to be a way to make a quilted tea cosy that you don’t have to remove to pour the tea…

I played around with folding a piece of paper until I found something that looked about right:


Starting with a rectangle for each side (dimensions depend on the size of your teapot), sew line A to line B and line C to line D. Then sew the two sides together along lines E and F. These lines are dotted because the easiest way to get the angles right is to NOT measure these lines initially, but draw them in after sewing A-B and C-D so E and F form one straight line along the top of the cosy.

I started by quilting this cat and mouse fabric together with extra thick batting and some scrap cotton on the back (using curved lines to avoid cutting any cats in half with the quilting!) and then cutting it in half to make my two rectangles:


Left: front after quilting; right: back after quilting

I sewed my A-B, C-D, E-E and F-F lines. The double layer of extra thick batting proved too much for my sewing machine, so I had to finish them by hand. I then trimmed the resulting triangles of batting that I had created inside the cosy. I repeated the process using black cotton (unquilted) to form the lining, and tacked it wrong sides together with the cosy.

I handmade bias tape from the same fabric using the Dread Pirate Rodgers’ Continuous Bias Tape instructions. I have never made bias tape before, and this method worked really well for me – the best part was cutting the tube I had created into a long spiral and it magically turned into a perfect bias tape strip.

I applied one long strip of bias tape around all the edges using Heather Bailey’s wonderful Continuous Quilt-Binding instructions. I sewed the two sides together under the spout and then sewed a black hook and eye under the handle at the back, so the cosy can be removed.


Ooh, a nicely mitred corner (thanks Heather!)

Finally, I finished the top of the cosy with a fabric covered button with a mouse nicely centred on it!

Et voila!


Hubby is pleased – in our preliminary testing, it kept the tea nice and warm for 2 hours! I am entering this in the GIFT category in this month’s Whiplash contest.

Comments (17)

zippered pouch and flower

Now it’s Christmas, I can show you the present I made for my Mum. It’s a zippered pouch (based on the twelve22 tutorial) with a tsumami fabric flower in the same fabric as the lining of the pouch.

Happy Christmas Mum – hope you like it!

Comments (1)

Next entries » · « Previous entries
  • Quick Links: Crochet

    navigation: arrow

    buy crochet patterns and accessories from my online store

    'Everyday Crochet' and 'The Essential Guide to Amigurumi' crochet books by June Gilbank

    Crochet video tutorials and step-by-step photo tutorials

    Free PlanetJune crochet patterns

    Frequently Asked Questions

    Quick Links: Crafts

    navigation: arrow

    Punchneedle Embroidery information, ebook & patterns

    Papercraft ebook & tutorials

    Free PlanetJune craft projects & tutorials

  • Blog Post Categories

  • Blog Archives

  • Welcome to PlanetJune!

    June Gilbank

    Hi, I'm June. Welcome to my world of nature-inspired crochet and crafting. I hope you enjoy your visit!

    If you'd like to get in touch, you can contact me here.
    crocheted Canadian flag by PlanetJune
  • A fanned-out pile of the books Everyday Crochet and The Essential Guide to Amigurumi, with text 'The answers to all your crochet questions at your fingertips - find out more'
  • Support PlanetJune!

    Want to say thanks? You can send me money in seconds at paypal.me/planetjune (over $20) or paypal.me/planetjune2 (under $20) or send me a donation through my shop.

    Or simply click through from my links before you shop at Amazon, Etsy, KnitPicks, LoveCrafts or Crochet.com, and I'll make a small commission on your purchase, at no cost to you! Start here:

    ♥ Support PlanetJune ♥

    Tip: This link is also in the footer of every page!

    Thank you so much for your support!