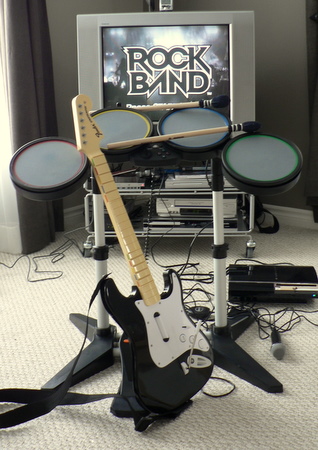
PlanetJune Craft Blog

Latest news and updates from June

Archive for Sewing

green zippered pouch

My parcel has arrived at its destination, so I can now show you the surprise present I made for my favourite (and only 😉 ) aunt:

green zippered pouch
Click for full size image

A little zippered pouch, loosely based on Splityarn’s zippered wristlet tutorial. I made a ribbon from the lining fabric to embellish the outside of the pouch. I love the tiny flower print fabric!

My new sewing machine is a dream to work with. I’m sure I made the right decision in buying it. If anyone else is in the market, from what I’ve seen, Husqvarna Vikings are a quality choice. Now I just need to get myself a good book so I can learn more about what I can do with my new toy.

Comments (2)

pincushions!

I have to share some of the gorgeous pincushions being made from my tutorial:

by Empty Elizabeth

by Hashiworks

by Creative Quilt Girl

by Florence

Great job, ladies – I love the variety of fabrics and ribbons/tape you all used.

I’d love to see any other projects based on my tutorials – please send them over to me 🙂

Comments

look at my new toy

Look what I’ve got! It’s a shiny new Husqvarna Viking Emerald 116 sewing machine!

viking sewing machine

It’s the basic model, but it still has 16 stitches and 8 (!) different feet. It even threads the needle for me! And, most importantly, it purrs away, stitching cleanly and easily through ANYTHING. This machine has some serious power behind it.

Thanks to everyone who gave me advice on which machine to buy. I hope people will continue to leave comments about their sewing machine experiences so that others in the same situation can google it and share the knowledge.

This is my first quick project to test it out – I made some ‘thumb support gloves’ (for want of a better word) for my poor thumbs which seem to have some arthritic tendencies at the basal joint. I made the gloves from two layers of a smooth and stretchy spandex knit jersey fabric that’s thin enough to let me drive, type and crochet without impediment. I’m in my second day of wearing them now, and it seems to be helping my sore thumbs.

first project

(This is just my first prototype – I’m planning to try making a pair with some stretchy interfacing between the 2 layers, to add even more support to the gloves.)

I’m really looking forward to putting my new machine through its paces. I have plenty of project ideas, now to try to find some time to actually make some of them…

Comments (5)

handmade holidays

Handmade Holidays

Welcome to all Sew,Mama,Sew! readers who are stopping by today!

Sew,Mama,Sew! Handmade Holidays: 30 Days of Gifts to Sew! is going to be a great resource – every day in November they will have a different theme with ideas and inspiration for holiday gifts you can sew.

And watch out for a few of my tutorials in there too!

Comments

sewing machine blues

I feel sad and stupid. A little over a year ago, I spent $100 and bought a proper sewing machine. It was a Singer, so I thought it would be a good investment and would last me for a decade or two.

Within days, it went wrong. The needle jammed down inside the machine and wouldn’t come up again. When I took it to the repair centre (luckily it was under warranty) the repairman said that the timing was off and Singer didn’t bother to tune them properly in the factory before selling them! He fixed it up, and it worked perfectly after that.

Fast forward to today… I finally have a chance to start on a new sewing project, and sit down at the machine. Clunk. I know that noise. It’s the timing again. The needle either jams in the down position, or goes through the fabric and then hits something and gets stopped before it gets to the bottom.

Of course, the warranty has now expired, and the repair centre tell me it’s going to cost about $40 to fix. But they also warned me that the machine is not a very good one and that whenever I try to sew anything heavy (jeans etc) it’s liable to happen again..!

So now what do I do? Spend the $40 and hope it lasts a while longer before it breaks again? Or give up on it and have to spend even more money for yet another new machine? I think I’m going to have to bite the bullet and go for a new one, but I’m going to do a lot of research this time before handing any money over.

And my project? Looks like I’ll have to put that on hold until I can find a sewing machine that works 🙁

Comments (34)

offset square wrist pincushion tutorial

This tutorial is Donationware – the instructions are available for free, but if you like it please consider sending me a donation to show your appreciation:

offset square wrist pincushion tutorial

Send me a donation and receive the easy-to-print PDF version of the tutorial as a thank you!

Donations of any size are much appreciated. Just add the amount you wish to donate, and, once you have checked out and paid, your PDF will instantly be available to download from your PlanetJune account.

The complete instructions are available below, regardless of whether or not you choose to pay for them 🙂

This is a PlanetJune original tutorial. Please do not share or reproduce this tutorial; instead post a link to www.planetjune.com/pincushion

I designed my pig wrist pincushion last summer, and it’s been so useful – I wear it whenever I use my sewing machine. This month’s Whiplash challenge theme is Zakka so I thought a tutorial for my pincushion might fit into that category. I have named this pincushion the Offset Square Wrist Pincushion because it’s made from two squares of fabric, offset before sewing, which results in an interesting shape in the finished pincushion:

wrist pincushions
Click for the full size picture

wrist pincushion materials

You will need:

2 squares of fabric, each 3.5″
3/4″ width twill tape, approx 10-12″ (depending on the size of your wrist)
3/4″ width Velcro, 1.5″
A small bead or button
Sewing thread in colours to match fabric and Velcro
A small quantity of polyester fibrefill stuffing

Instructions

  1. Measure the circumference of your wrist and add 3.5″. Cut a length of twill tape to this measurement.
  2. Lay the twill tape down on a flat surface, and fold up 1 inch at one end of the tape. Position the ‘hook’ piece of the Velcro at the same end so it covers the raw edge of the folded tape. Pin in place if required, then sew all around the edge of the Velcro.
    sew velcro to twill tape
  3. Turn the twill tape over so the Velcro is face down. Fold up 1 inch at the other end of the tape and position the ‘loop’ piece of the Velcro over this end so it covers the raw edge of the folded tape. Pin in place if required, then sew all around the edge of the Velcro.
  4. Cut two 3.5″ squares of fabric using scissors or a rotary cutter. Using a fast-fade fabric pen or tailor’s chalk, mark one square (square A) 3/8″ from the edge around all four edges, then mark the centre of each edge. Mark the second square (square B) with registration points 3/8″ down from the top, at each side.
    mark fabric squares
  5. Position A face up and lay the twill tape along a diagonal of the fabric with the loop side of the Velcro facing up, so that an equal amount of the tape extends over each corner of the fabric. Pin the tape to the fabric.
    pin strap to fabric
  6. Sew the tape to the fabric with a 1.5″ long rectangle in the middle of the fabric and tape (turned over in photo below so you can see the stitching).
    sew strap to fabric
  7. pin strap neatly

    Place B face up with the registration marks at the top edge. Close the wrist strap and pin to itself to keep it out of the way while you sew up the pincushion (see right), then place A face down on top of B. Now offset A by moving it upward until A’s centre marks are aligned with B’s registration marks. Pin the squares together along the right hand side.

    Now, to sew the squares together. You will be stitching 7 lines, each half the length of one side of the square, and then rotating either the upper or lower fabric square before stitching the next line. The fabric you have already sewn will get bunched up while you are sewing, but it will all work out in the end!

    diagram showing starting position for sewing

  8. Starting at the centre of the right edge of A (point a), sew the squares together from a to b. Make sure the sewing machine needle is down, then lift the presser foot. Rotate A so that the next side of A is aligned with the remainder of the first side of B and point c is directly over point d. Pin in place if desired (as the piece is so small, I find it easier to just hold the two pieces together and feed them through the machine), then lower the presser foot.
    rotate fabric to sew next side
  9. Sew along this edge until you reach point d. Make sure the sewing machine needle is down before raising the presser foot. Rotate B so the next side is aligned with the remainder of the side of A. Pin if desired, lower the presser foot, then sew along the next edge.
    hold both squares together while sewing
  10. Continue in this way, repeating 8 and 9, until you reach the final side. Leave this side open to turn the pincushion through. Finish off securely.
    before and after turning
  11. Clip the excess fabric from all the corners of the pincushion, then turn it right side out through the open side. It will be a tight fit so be patient with it. You can use a pen or your finger to push out the corners.
  12. Fill the pincushion with fibrefill until it is fairly solid, then fold the seam allowances inside the cushion and hand-stitch the gap closed.
    stuff and hand-sew closed
  13. Thread a needle with both ends of a length of strong sewing thread, leaving the loop of the thread longer than the two ends. Push the needle through the centre of the pincushion from the middle of the cushion top through to the middle of the tape. Do not pull the thread all the way through – leave the loop extending from the top. Insert the needle close to where it came out and stitch back up through the pincushion and through the loop. Pull tight to dimple the centre of the cushion.
    dimple centre of pincushion
  14. Add a small button or bead to cover your stitch and then go back through the pincushion, make one more small stitch on the back and come back through to the top. Unthread one of the two ends from your needle, go through the button or bead once more with the other end. Tie the two ends together and then lose them inside the pincushion.
  15. Attach the pincushion to your wrist, add some pins, and you’re ready to go!
    finished wrist pincushion

I hope you enjoyed this tutorial! Please leave me a comment if you did, and consider leaving me a donation. Thanks!

Comments (51)

quick refashion of a top

original top (before refashioning)

I bought this top because I loved the colour and the print, and the 60% off price tag didn’t hurt either. But when I tried it on, it just looked wrong to me. The dark brown fabric was too prominent and the ribbons that go under the bust and tie at the back just didn’t look good on me.

I figured there had to be a simple way to modify it so it wouldn’t look so strange. A quick bit of refashioning was in order…

After unpicking the seam between the brown neckline piece and the ribbon at each side, I looped the two ribbons over each other at the front for a gathered knot effect and then fed them through the unpicked areas to the wrong side of the top. I re-sewed the seam, sewing through the ribbons as well to keep them in place, then trimmed the excess ribbon from the inside. Finally, I snipped off the belt loop from each side and here’s my finished result:

refashioned top

Not bad for half an hour’s work!

There are some more modifications I considered (shortening the length slightly and/or adding some beading over the brown neck area), but sometimes the hardest part is knowing when to stop, and I like it the way it is now, so I will call this project done.

Comments (7)

bunny + flowers

Meet Ms Bun-Bun, my first attempt at softie making from one of my cute new Japanese craft books:

plush bunny

The fabric isn’t photographing very well – it’s a deep burgundy colour with a nice fuzzy feel to it. I bought it as a remnant, so I don’t know what the fabric really is.

To make the bunny, I traced the pattern pieces from the book onto freezer paper, cut them out and then ironed them onto the reverse side of the fabric, which made cutting out the fabric pieces really easy. Is this an established technique, or did I just invent it? I don’t know, but I highly recommend it! The freezer paper templates can be ironed on and peeled off several times, so you can even reuse them to make more toys.

The diagrams in the book were all so clear that I had no problem following the instructions, even though all the text was in Japanese. I didn’t have any plastic pellets to weigh down the bottom of the bunny, so I improvised with a handful of small buttons.

Apparently Japanese bunnies don’t have tails (I may fix this later):

plush bunny

Ms Bun-Bun’s favourite activities are sunbathing and picking fresh flowers:

plush bunny

I crocheted the flowers with a 2.35mm hook. I used black crochet cotton for the centres, and beautiful hand-dyed lambswool from Renaissance Dyeing for the petals. It’s actually Crewel embroidery wool – I bought it years ago and completely forgot I had it until I was looking for something to make Ms Bun-Bun an accessory with – what a nice surprise 🙂

crochet flowers

I love those flowers! They are under 3/4″ diameter. Now what else can I do with them… crocheted jewellery, hair accessories, maybe even clothing embellishments…?

Comments (8)

Next entries » · « Previous entries
  • Quick Links: Crochet

    navigation: arrow

    buy crochet patterns and accessories from my online store

    'Everyday Crochet' and 'The Essential Guide to Amigurumi' crochet books by June Gilbank

    Crochet video tutorials and step-by-step photo tutorials

    Free PlanetJune crochet patterns

    Frequently Asked Questions

    Quick Links: Crafts

    navigation: arrow

    Punchneedle Embroidery information, ebook & patterns

    Papercraft ebook & tutorials

    Free PlanetJune craft projects & tutorials

  • Blog Post Categories

  • Blog Archives

  • Welcome to PlanetJune!

    June Gilbank

    Hi, I'm June. Welcome to my world of nature-inspired crochet and crafting. I hope you enjoy your visit!

    If you'd like to get in touch, you can contact me here.
    crocheted Canadian flag by PlanetJune
  • A fanned-out pile of the books Everyday Crochet and The Essential Guide to Amigurumi, with text 'The answers to all your crochet questions at your fingertips - find out more'
  • Support PlanetJune!

    Want to say thanks? You can send me money in seconds at paypal.me/planetjune (over $20) or paypal.me/planetjune2 (under $20) or send me a donation through my shop.

    Or simply click through from my links before you shop at Amazon, Etsy, KnitPicks, LoveCrafts or Crochet.com, and I'll make a small commission on your purchase, at no cost to you! Start here:

    ♥ Support PlanetJune ♥

    Tip: This link is also in the footer of every page!

    Thank you so much for your support!