
PlanetJune by June Gilbank: Blog
PlanetJune Craft Blog
Latest news and updates from JuneColour Change Tutorials (right-handed)
Looking for the left-handed version? Or the video tutorial? Or tips on what to do with the other yarn colour? If not, read on:
Colour change after a single crochet stitch
Note: In the photographs, A = white, B = grey)
Crochet with colour A until you come to the last stitch in colour A:
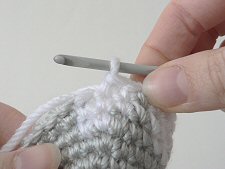
To make the last stitch of A, insert hook into next stitch, yarn over and draw up a loop:
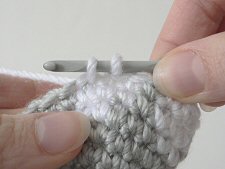
Holding the end of yarn B behind your work, yarn over with B, and draw through both loops on hook:
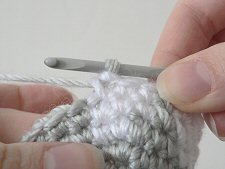
Make the next stitch as normal, using yarn B.
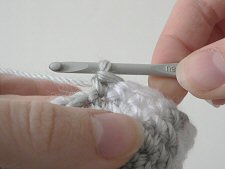
Colour change after a single crochet decrease
Insert hook into stitch, yarn over and draw up a loop. Insert hook into next stitch, yarn over and draw up a loop:
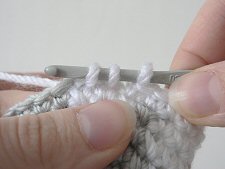
Yarn over with the new colour, and draw through all three loops on hook:
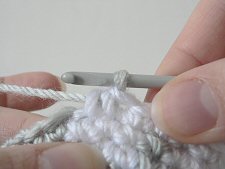
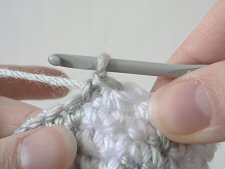
Make the next stitch as normal, using the new colour.
Return to Colour Changes in Amigurumi >>
Loved this tutorial? I have so many more amigurumi tips and tricks to share with you!
Boost your amigurumi skills with my latest book, The Essential Guide to Amigurumi, your comprehensive guide to amigurumi techniques and tips.
Do you find my tutorials helpful? If so, please consider making a contribution towards my time so I can continue to create clear and concise tutorials for you:
Thank you so much for your support! Now click below for loads more crochet video and photo tutorials (and do let me know what else you’d like me to cover in future tutorials…)


vale said
Hello I have problems to change color , the item become like this :
i.postimg.cc/4HpWMstM/Screenshot-20221212-174947-Chrome.jpg
What to do to avoid that? Thank you so much for the help
June said
To avoid that colour jog, you’ll have to switch to joined rounds instead of continuous spirals. For the best result, I recommend my Ultimate Stripes technique for this: www.planetjune.com/stripes
Ana garzón said
Hello, i am trying to do the face of Frodo, but even i count each thing and follow the material, it doesn’t look like the picture in the manual, it got like , i don’t know how to describe. What i am doing wrong??
June said
Ana, I’m afraid that’s not one of my patterns, so I can’t offer any advice. Please see my FAQ for where you can get more crochet help. 🙂
Camilla said
I have some issues with symmetry when I crochet say an animal with a base colour and a white tummy. My left side (from my perspective – i.e. the first colour change into white) looks neat and tidy while the right (i.e. changing back into the base colour) looks less tidy and the end result looks asymmetrical. I do use the above trick when doing every colour change. Is there something I’m missing?
June said
The differences you’re seeing are because single crochet stitches aren’t symmetrical, so the left and right side of each stitch will always look different, and the stitches also don’t stack perfectly on top of each other when you work in a rounds without turning the work between rounds, so the left and right edges of stacked colour changes will never look the same. See my Colour Changing Investigation for some examples. This is just a fact of amigurumi-style crochet!
In my patterns from the last few years, I’ve tried to design ways to improve the look and symmetry of patches of colour, but there’s no ‘best’ way to do this – it’s very dependent on the base shape and the shape and size of each patch, so I spend a lot of time refining each design to make the colour changes look smoother than you’ll see in other amigurumi patterns. See my Orca (Killer Whale) as an example.
Eve said
Hi June,
Thanks for the great tutorials – they’ve really improved my crochet! I have noticed though, when I change colors, it looks great until I crochet the next round – then a speckle of the “other” color becomes visible through the stitch above. Is there any way to remedy this?
Thanks,
Eve
Eve said
I’ve ready the “managing yarns changing colors” (properly this time!) And I think the #5 case is the answer for me! A combination of cut and tie and stranding should sort out the problem!
SARAH LANTHIER said
Hi June.
when using different colors, for contrast (eg. in Meerkat pattern, should I cut the beige yarn and knot the brown onto it, each time I need to switch yarns for this eye area……………or just allow the different yarns to hang in the back ?
By allowing them to hang in the back, it appears that it causes the premature rounding of the head.
Please advise.
Thanks.
June said
Sarah, for my advice on this, please see my tutorial Changing Colour: Managing the Yarns 🙂
Christine Chipman said
Could you tell me how you change colours in Amigurumi when working stripes so that there is no obvious change that shows in the row where the change is made?
Hugs
Christine
June said
Christine, see my comment about this on the main Colour Changes in Amigurumi page: www.planetjune.com/blog/amigurumi-help/changing-colour/comment-page-1/#comment-105583
June said
Lisa: yes, that’s right. The only way to make stripes without a ‘jog’ at the end of the rounds where you change colour is to join at the end of each round and then ch 1, instead of crocheting in a continuous spiral.
Lisa said
I have been using this method to change colours in for example, this pattern: www.lionbrand.com/patterns/80975AD.html
However, I find if I do use this method when working in a round, colour A interrupts colour B when I do change to it, and the whole colour A and B change is kind of abrupt. To remedy this, would I have to join, then chain one to start another round of the colour?
Bookworm said
This is helpful. I wanted to make something for a friend who’s beagle just died but wasn’t sure how to do this. Using your instructions, so far so good. I will say though, maybe the pictures would be slightly easier to follow if the color difference between the two yarns was more distinct, maybe a white and a blue? It was a little hard for me, sometimes the gray looked like the white and then things didn’t completely make sense to me.
Katja Majori said
OMG thanks I never knew how to do a clean color change. I kinda just improvised and it looked decent but damn… this it a lot better then my way! thanks much!
Brittany said
wow! now it all makes sense! thanks so much!!