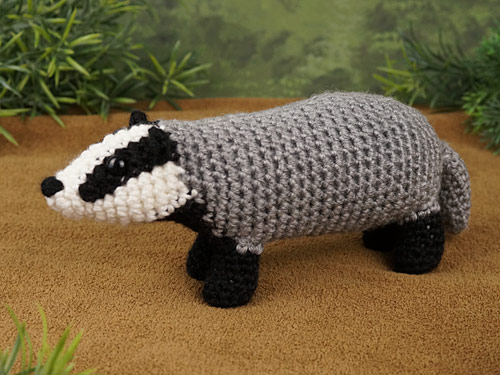
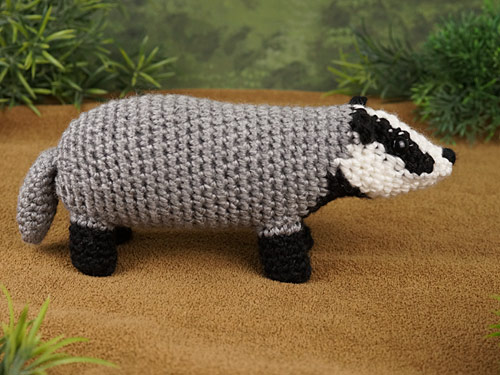
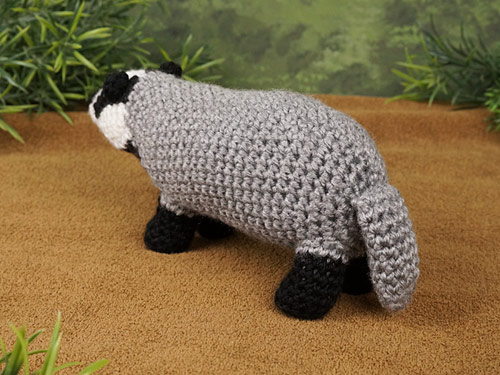
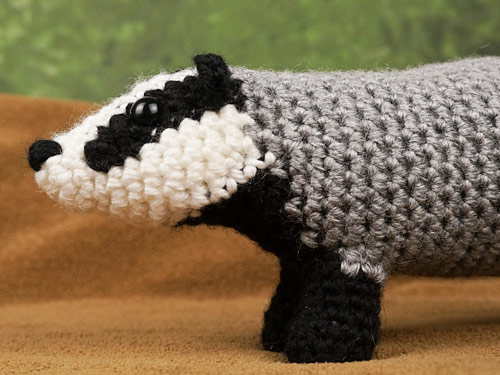
That’s right, it’s taken a while but I have a new pattern for you! It’s a Badger crochet pattern and I’m so happy to have finally brought this idea in my head to life! Badgers have such a distinctive shape with their stocky grey bodies, black and white striped faces, tiny ears, and cute upturned noses…
Looking back through my notes, I first started planning this design in March 2014… that’s over 7 years ago! So if I haven’t made your favourite animal yet, don’t think that means it’ll never get made – sometimes it just takes a while for the inspiration and available time to coincide…
Badger Fun Facts
Badgers are members of the weasel family, Mustelidae.
The variety of badger I’ve made for my pattern is the European badger, arguably the best-known and most beloved badger. You’ll find lots of European badgers as characters in classic children’s books like The Chronicles of Narnia, Fantastic Mr Fox and The Wind in the Willows – and of course, as the Hufflepuff emblem in the Harry Potter books!
Other types of badger around the world include the American badger, the honey badger from Africa, and various Asian badgers. They all look somewhat similar, but aren’t very closely related.
Badgers are masters of digging. They dig for food and live in family groups underground in burrows called setts.
They are largely nocturnal and eat a variety of food including worms, fruit and eggs. European Badgers can eat hundreds of earthworms per night!
About the Pattern
As always, the pattern includes full instructions and detailed step-by-step photographs for assembly and all special techniques used, so you can follow along and make a perfect badger.
You can’t have a badger without those unmistakable black and white face stripes, but there are only 12 rounds of follow-carefully colour changes, and the pattern includes lots of tips – specific to this pattern – to make the colour changing easier and ensure you’ll get a beautifully tidy result.
After you’ve finished the colourwork on the head and chest, it’s all plain sailing and you’ll be able to enjoy watching the rounded body of your badger take shape as you crochet! The head and body is all worked as one piece and there are only 3 pieces (plus the tiny ears) to sew onto the body, so the final finishing stage is quick and simple.
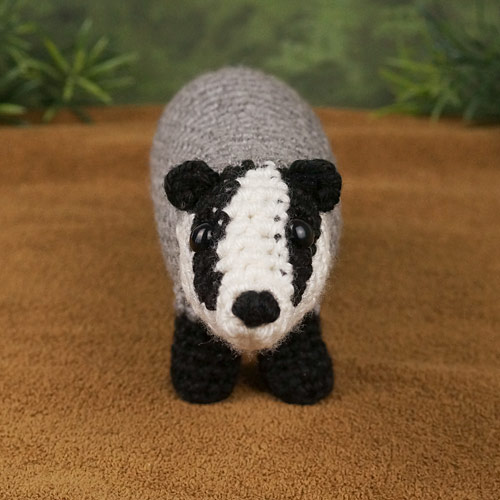
Colourwork Magic!
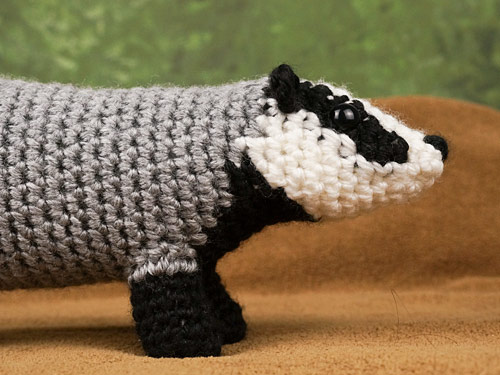
You’ll often see photos of amigurumi designs with colourwork that only show you one side of the completed item, because the colourwork on the other side looks much worse. There’s a good reason for that – amigurumi stitches don’t stack exactly on top of each other, so there’s a built-in slant, which makes symmetrical colourwork essentially impossible.
I’ve been working for years on techniques to make paired vertical or slanting stripes at various angles for my amigurumi (and I still haven’t mastered every effect I’m looking for – there’s lots more research for me to do for future designs!) but I never release a design without getting everything to match as closely as I can.
So here, for your viewing pleasure, are close-ups of both sides of my badger’s head and chest, so you can see how the colourwork looks good, with smooth black face stripes with matching angles and no awkward jagged transitions, from either side 🙂
Just follow the pattern and you’ll be able to achieve the same effect!
And for one week only, you can take an extra 50c off the price: add the Badger pattern to your shopping cart, and enter the discount code TRUFFLEHUNTER at checkout! (Offer ends Tuesday 6 July, 2021.)
Badgers play an essential part in popular culture, and their real-life counterparts are just adorable. I’ve never had the pleasure of seeing one in real life, but I always enjoy watching them on wildlife documentaries, and now I can see a (crocheted) badger whenever I want!
I really hope you’ll enjoy my Badger pattern. Don’t forget to share photos with me when you’ve made one:
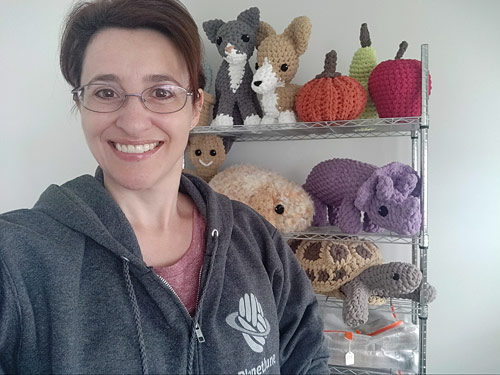
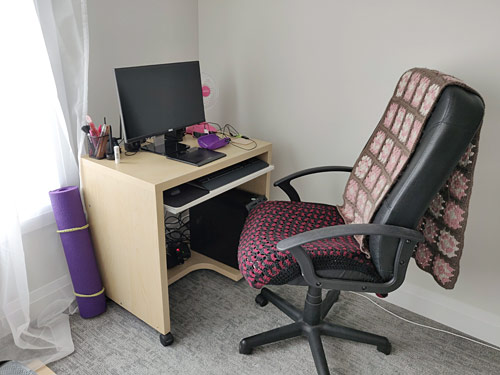
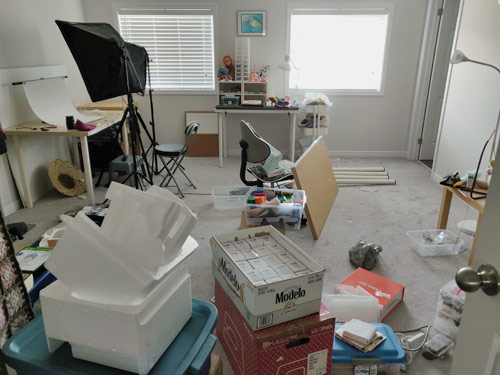
As you can see, I have a brand new home for all my giant amigurumi – yay!
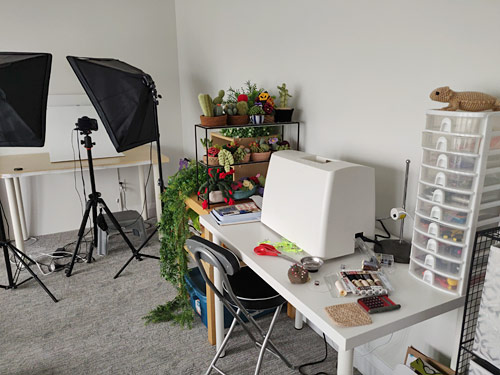
My new studio is still very much a work in progress. My vision is to set up different stations for all the aspects of PlanetJune – business and crafting – as I have a large space here, and I want to be able to get down to work on whatever I need to do without too much setup.
So far, my sewing station is set up (that was the first priority – sooo many curtains to hem for a brand new house!) and the photography station is just about ready to go:
My computer station is ready to process new patterns into pretty PDFs:
(Of course nothing goes as smoothly as planned; I was just about to get back to work when I discovered that the latest Windows update had broken something in my workflow and I can no longer lay out patterns any more using my old software.
This is a good thing really – I’ve been meaning to upgrade to better desktop publishing software for a long time, and this has given me the push to make it happen, so I’m working on developing a new template for PlanetJune patterns. Once it’s ready and I get up to speed with my new software, laying out new patterns and making edits and improvements should be much smoother in future.)
Now, back to today: I’ll give you a proper studio tour at a later date, once all the remaining boxes and piles of stuff have homes and I’ve decorated a bit, but these pics are a little preview of my beautiful space.
As you can see, I have lots of natural light in my studio (there are 6 windows!) which is going to come in very handy.
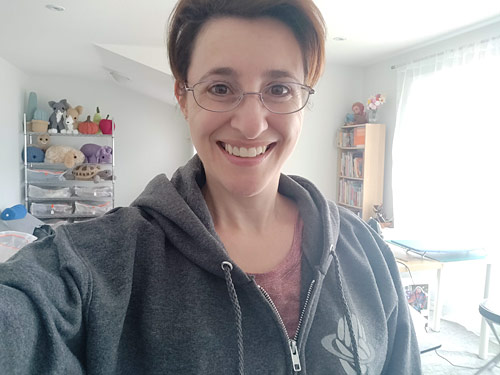
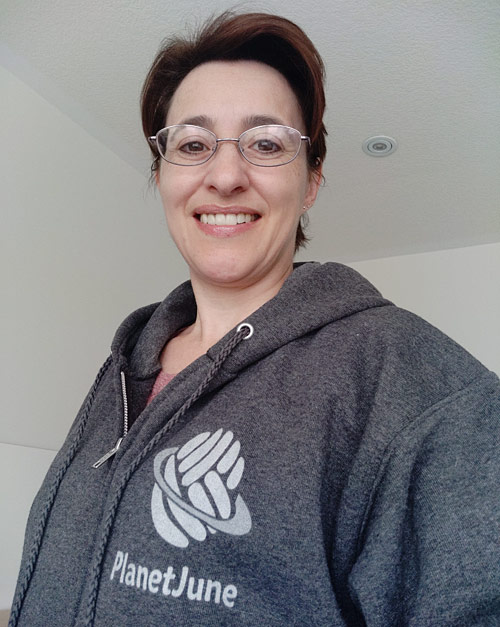
Hang on, is that a PlanetJune hoodie you’re wearing there, June? Why yes, it is! Isn’t it cool?
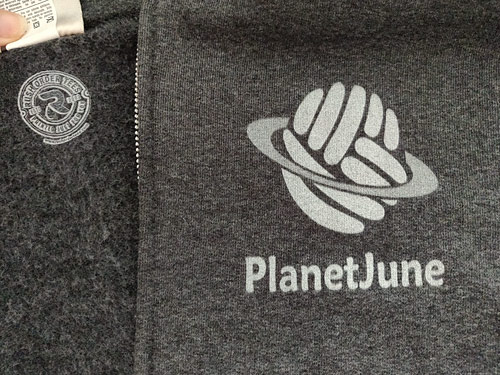
Rush Order Tees offered to send me a custom hoodie of my own design. I chose a dark grey men’s size small hoodie so I can wear it as a jacket, and I thought that printing my logo in white would look good against the dark grey.
The process was seamless: they have their own designers who optimize your logo or artwork for printing and check that the colours, alignment, etc are perfect. I approved the proof they sent me and they printed and shipped my hoodie within a couple of days.
Can you see, their designers actually optimized my logo so the ring around my yarn planet is actually a very pale grey instead of the white I originally asked for? It’s a nice touch (and of course I could have requested they change it back to white if I hadn’t liked it).
If you’d like to order some custom apparel too, Rush Order Tees offer t-shirts, hoodies, hats and more. I’m very happy with my hoodie – the quality of the Hanes Ultimate Cotton zip up hoodie is good, and the printing of my logo is clear and crisp. Plus it’s fun to walk around the neighbourhood (the only place I ever go these days…) wearing my own merch 😀
Now, back to setting up my new pattern template, and then I’ll finally be ready to publish a new pattern – it feels like it’s been forever since I was able to do that!
Hope you’ve enjoyed this glimpse into my new studio… More to come 🙂
We’ve moved into our new house! After a stressful and incredibly exhausting couple of weeks getting everything done, we’re all starting to settle in, and it’s wonderful to see design decisions we made months (and years!) ago for our home finally come to life.
Our new house is truly lovely, and I’ve been working hard getting it set up in a way that’ll make sense for the way we live, so we can hopefully stay more organised and really enjoy living here 🙂
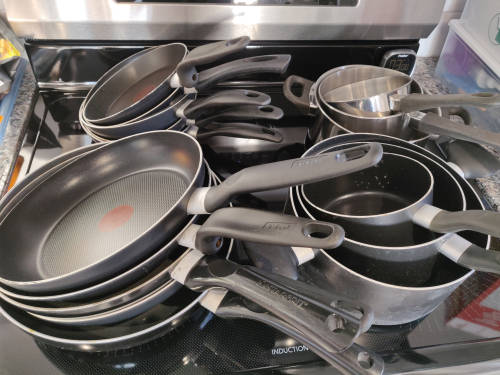
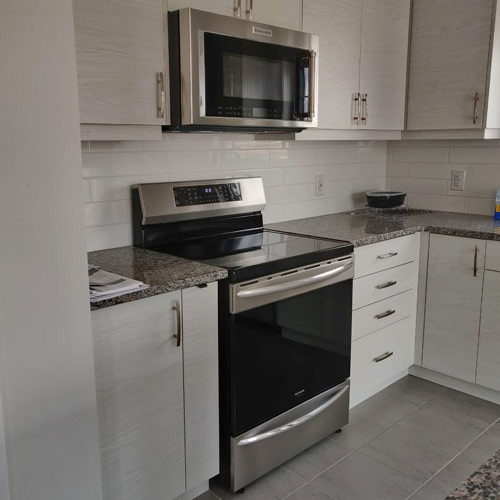
There’s been the odd unexpected flaw in my endless plans, such as discovering that almost all my pots and pans didn’t work with my new induction stove (oops…)
I’ve had to give away all the pans in this photo and buy new ones, but I’m looking on the bright side – this is an opportunity to re-buy just the pans I need for the way I cook, instead of having a cluttered cupboard full of pans that are rarely used.
It’s a challenge to play food tetris every day (trying to fit things into the mini fridges!) and figuring out which groceries I have fridge/freezer space to buy, but it’s all part of the new house fun, and at least this is only temporary.
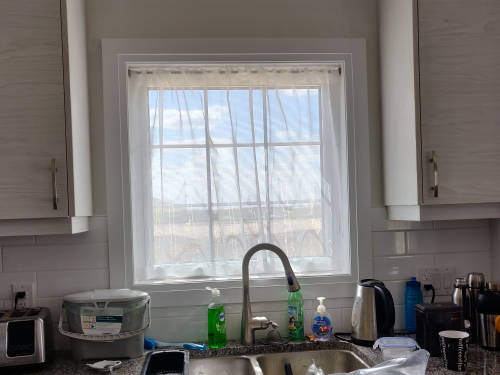
My PlanetJune work is still on the back burner, for the time being. Although I’ve set up most of my office and studio, there’s a layer of random clutter everywhere that’s waiting to find a new home, and pretty much all my creative energy is going into sewing curtains…
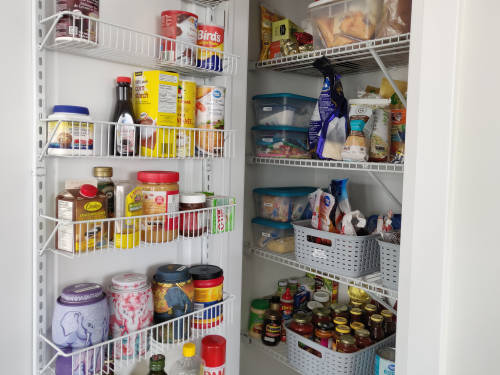
…and organising my pantry…
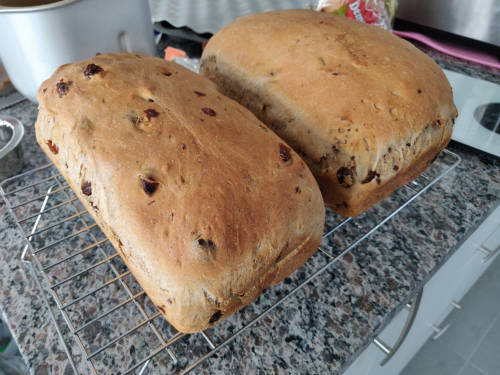
…and baking bread…
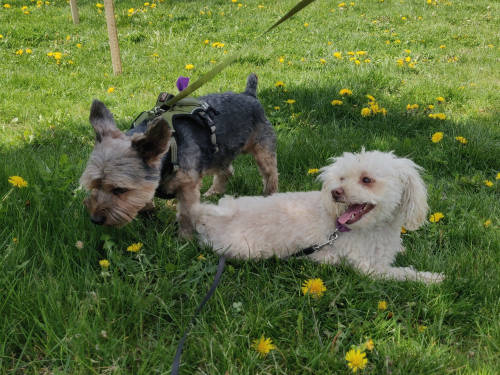
…and walking for an hour or two every day with Maggie (usually with her best friend Echo)…
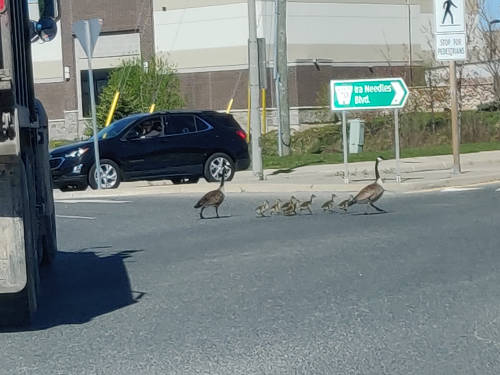
…and enjoying the springtime, like this very Canadian sight of a goose family stopping the traffic while they cross the road 🙂
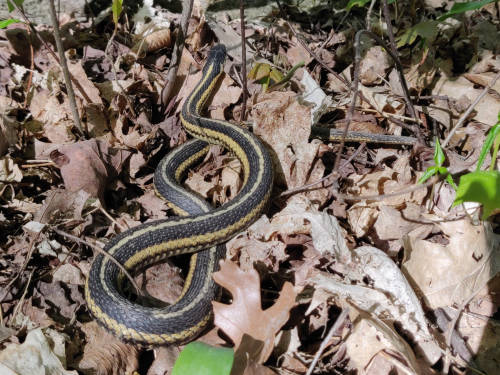
We have ponds and a forest close to our home, so I’m enjoying watching the birds and turtles (and this loopy garter snake I managed to catch with Dave’s phone camera, below).
I’m starting to learn a little about our native flora too, and I’ve even picked up my long-neglected camera once or twice – there’s wildlife everywhere at this time of year, so lots of opportunity for nature photos. (Hmmm, maybe I should resume my occasional nature blog posts?)
This ‘homey’ phase I’m in won’t last forever, and once all the curtains are sewn and the house is mostly organised, I should be ready to jump back into some of the pattern ideas I have for PlanetJune.
But, for now, please bear with me as I allow myself to enjoy this time. It feels amazing to have found a real home and to be putting down roots. I finally feel like I’m part of a community, and knowing I have no plans to ever leave here makes it all seem so real, unlike anywhere else I’ve ever lived before.
Summary: I’m moving house next week, and I’ll be mostly offline for the rest of the month (apart from answering customer support emails).
We closed on our new house in January, but haven’t been able to move in yet due to covid-related manufacture/supply delays in our new appliances (something we weren’t informed of until we’d already paid for them in full… )
I was told we’d have our appliances by the start of April, so I gave notice to our landlord and planned for an April move.
The Appliance Saga
This situation has been a comedy of errors. I was notified in March that the fridge we ordered in January was now discontinued, so they offered us the upgraded model instead. It was only two weeks later that they bothered to mention that our new fridge wouldn’t be in stock until… wait for it… August!
What to do?! We couldn’t keep paying for two houses for another four months (assuming the promised August delivery date even happens…), so I decided to proceed with the move and persuaded the appliance company to deliver and install everything else in the meantime.
Ooh, shiny! Don’t they look fancy?
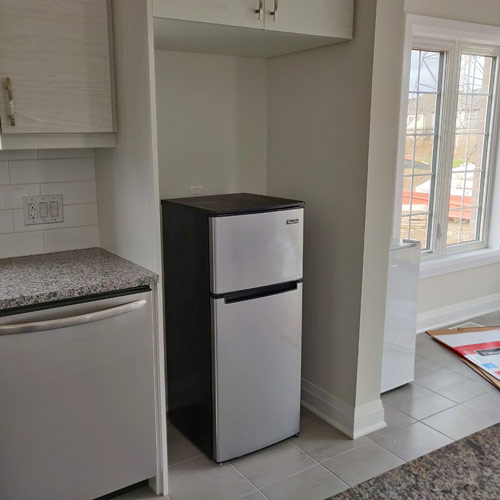
And, as for the fridge, I’ve bought a mini fridge in the meantime to tide us over:
Don’t laugh – my poor little fridge already has an inferiority complex from being in such a large space!
Living like this is going to be a ‘fun’ challenge for the next few months… We’re trying to eat as much fridge and freezer food as we can before we move, to minimise waste. And I’m looking forward to how luxurious it’ll feel when the new full size fridge/freezer finally arrives 😀
COVID Scare Update
Things were moving forwards, until I got an email warning me that I may have been exposed to COVID by one of the appliance installers..! We were all wearing masks, of course, and I tried to stay as far from them as possible in the house while they worked, but it was still a scary prospect. I had to get tested and faced the possibility of having to isolate and postpone the move if I tested positive.
Thank goodness, I dodged the bullet and my test came back negative, so we were back on track…
Move Update
Moving house is exhausting. I thought that a local move would be simple, but I still have to organise and pack, load and unload my little car hundreds of times, and unpack it all at the other end.
My bad knee means that carrying heavy things is not an option, and carrying even light things up and down stairs is a problem for me. (We’re hiring movers for the big things, but we want to get all our personal stuff moved over and organised before move day so we can enjoy living in our new house instead of being surrounded by boxes for weeks…)
It’s coming along, slowly but surely…
Half of the contents of the PlanetJune office/studio – including my full yarn stash – has already left here for the new house 🙂
PlanetJune Update
I have four (or more?) patterns in various stages of completion, but I don’t have the brainspace to finish any of them to my standards right now. So I’m officially taking the rest of April away from PlanetJune to concentrate on getting our forever home set up, and getting our rental home ready to return to the landlord.
(I’ll still be doing my daily tech and admin tasks and responding to customer support emails, of course – running a one-person business means there’s no such thing as true “time off”. So if you need me for anything, don’t worry – I’ll still be here for you, within a day or two.)
And now, I’d better get back to prepping for the move – wish me luck!
Have you ever wondered about Etsy advertising? I’ve been selling on Etsy for 14 years, but I’ve never looked into paying for Etsy ads until now. Read on to hear about my Etsy advertising experiment (and maybe save yourself some money on Etsy ads…)
I’m testing out a few new automated marketing options this year, in an attempt to make it easier for people to find PlanetJune and discover all the patterns and tutorials I have to offer. And in case this is useful for you too, I’ll share some of what I discover here.
About Etsy Ads
It’s important to realise that there are two types of Etsy ads – those that are internal and external to Etsy. I’ll briefly explain both so you know what we’re dealing with here.
External Etsy Ads: “Offsite Ads”
These are the ads you see if you search for a crochet pattern on e.g. Google. Lots of patterns sold on Etsy will come up in your Google results, and the pattern seller will pay Etsy a 12-15% commission on top of the usual Etsy fees if you click on the ad for their pattern and then buy it within the next 30 days.
As an Etsy seller, you can opt out of appearing in these ads if you make under $10,000/year via Etsy. I’m over that threshold so I have to participate, but I’ll show you my stats for 2021 (so far) so you can see how it’s working out for me:
It has actually proven worthwhile to me: yes, I’ve paid Etsy over $100 CAD already this year for the ads (that’s in addition to the usual listing fees, 5% sales commission, and payment processing fees), but I only pay when people actually buy something, and I sold an extra $880 CAD (about $700 USD) of patterns because of those ads, so I can’t complain.
Internal Etsy Ads: “Etsy Ads”
Internal Etsy Ads are the subject of my test. These are the adverts you see if you go to Etsy.com and search for something. The first row of results will show the seller’s name as “Ad by PlanetJune” instead of just “PlanetJune”, and the seller will pay for that prime placement if you click into one of those listings (whether or not you go on to buy the item).
The ads are run by Etsy using a bidding system, so the price the seller pays for that click depends on how much competition there was for that search term, up to a limit of the seller’s maximum remaining daily budget.
My Experiment
I’d read that you should setup your Etsy Ads and then leave them running for at least 30 days before making any changes, so you can monitor what’s effective.
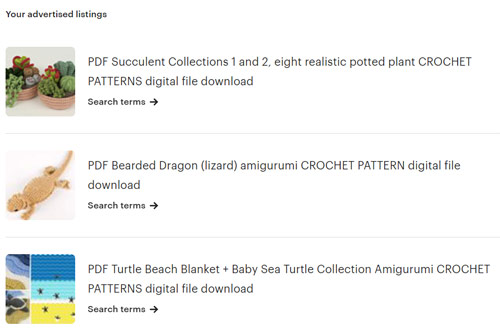
So I decided to run a 30-day experiment, for a budget of $1 per day (the minimum amount you can set), and featuring a mix of my most popular patterns (Succulent Collections 1 & 2, Bearded Dragon, and my Turtle Beach Blanket & Baby Sea Turtle Collection bundle):
With 30 days, 3 pattern options, and $30 worth of data, this should give me enough of an idea to see what’s working, what’s not, and what I could try for my next test.
Results
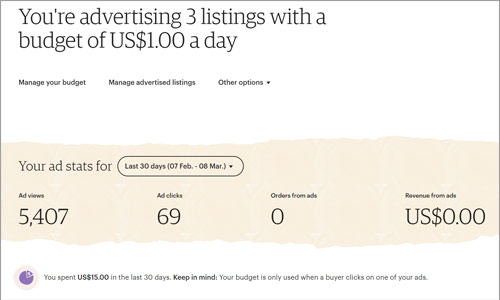
As the days progressed, I kept watching my ads to see what was happening. And it didn’t look good. Halfway through the experiment, my results looked like this:
As shown above, after spending $15 on Etsy ads, I had over 5000 views of my ads, and only 69 clicks. But, of those 69, not even one person went on to buy the pattern.
That’s not a good return, given that it had already cost me $15 in advertising – I’d need to sell at 2-3 items to cover that cost, let alone make a profit.
Before flushing another $15 down the toilet, I thought I’d dig a little deeper into what was going on, and what I found made me give up on the rest of the experiment!
What Went Wrong?
Almost all of my advertising budget was spent on my Succulent Collections listing (that’s not something I had any control over – it’s automated by Etsy), so I just looked at the results from that ad, as it had the most data.
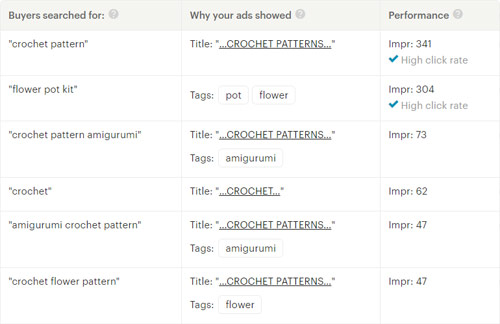
Here’s what buyers were searching for, when Etsy showed my succulent pattern to them:
The top two results were by far the highest performing in terms of views and clicks, but look what those people were actually searching for:
crochet patterns: that’s such a generic term, it’s no surprise that most of the people searching for ‘crochet patterns’ weren’t looking for potted realistic succulent patterns – they could have been looking for blanket patterns, or clothing, or dishcloths…
flower pot kit: I’m pretty sure that nobody searching for a flower pot kit was actually looking for a succulent crochet pattern – or anything related to crochet whatsoever.
It’s no wonder that none of these people went on to buy my pattern – Etsy’s targeting for these ads is woefully inadequate, and most of my budget was blown on showing my ads to people who weren’t at all interested in buying my patterns.
After seeing this, I decided to stop my experiment early. Spending another $15 wouldn’t make a difference to my conclusions. My adverts aren’t being shown to the right people, so I’d just be another $15 out of pocket.
(There is still a chance that one of the 69 people who clicked on one of my ads will return and buy the pattern, but it’s been several more days since I stopped the experiment and that hasn’t happened yet – I’m not holding my breath.)
Conclusions
Yes, this was only a small experiment, but I can confidently say that I doubt Etsy ads are a useful marketing tool for most people selling relatively low-priced items such as patterns and other digital downloads, or handmade toys (where the profit margin is already slim, as they are so time-consuming to make).
Not being able to customize your ads at all beyond selecting which items to advertise is a real problem. Your budget can disappear very quickly on people who like your photo but aren’t actually searching for the thing you’re selling, so you pay for their click but there’s no way they’re going to buy your item.
If we could target only specific search terms, or only a specific demographic, or only people who have bought items from a specific category in the past, I might give Etsy ads another go. But, unless Etsy significantly improves the customizability and targeting of their internal ads, I can’t recommend it for anyone with a business remotely similar to mine.
Of course, your results could be different from mine, but I’d recommend you save your hard-earned money for something more likely to pay off!
Have you had any success with Etsy ads? I’d love to know! Please share your experience and tips below 🙂
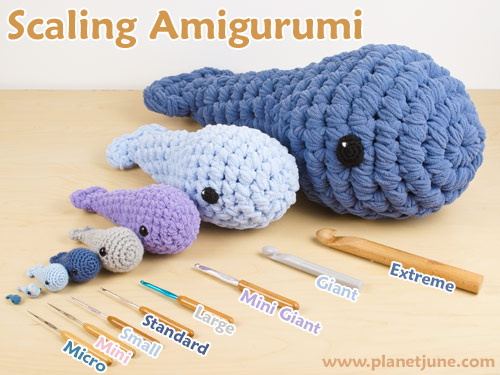
I’m often asked how to scale one of my amigurumi patterns up or down by a specific amount. It’s hard to answer that without relevant data, so that means it’s time for another crochet experiment – yay!
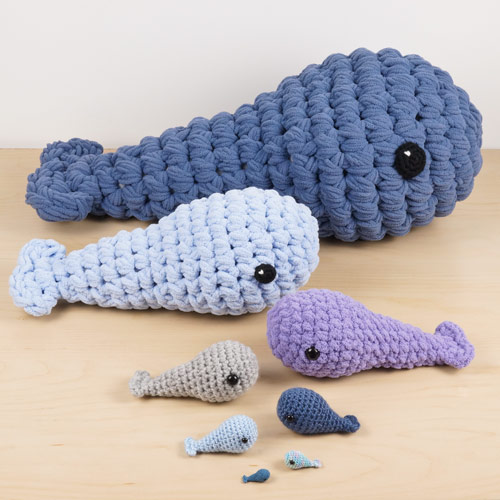
I made 8 versions of my Tiny Whale pattern, ranging from the largest 25mm hook I own down to the smallest hook I felt I could manage (0.9mm), and choosing the most appropriate yarn size for each hook.
Of course, it’s possible to crochet outside this range – massive 40mm hooks exist (or you can crochet using your whole hand instead of a hook!), and some talented people are able to crochet with sewing thread and a 0.4mm hook – but I had to set some limits for my experiment…
The three dark blue whales in my photos mark these limits: largest, smallest, and the standard size (made with worsted weight yarn and a US E/3.5mm hook).
I’ve named all eight sizes so we have something to refer to throughout this post, from largest to smallest (and top to bottom in the photo above):
Extreme Amigurumi
Giant Amigurumi
Mini Giant Amigurumi
Large Amigurumi
Standard Amigurumi – regular amigurumi!
Small Amigurumi
Mini Amigurumi
Micro Amigurumi
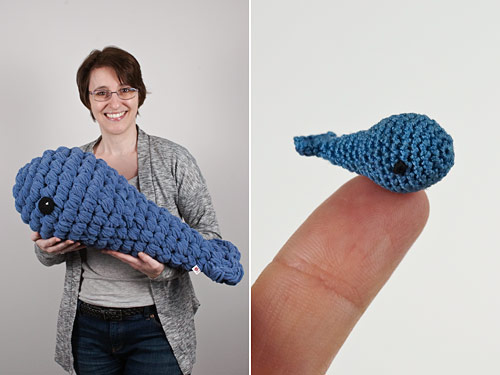
The difference in scale is incredible – one stitch of an Extreme Amigurumi whale is larger than an entire Micro Amigurumi whale!
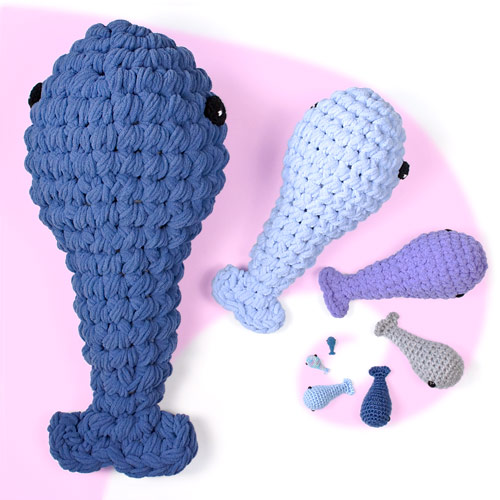
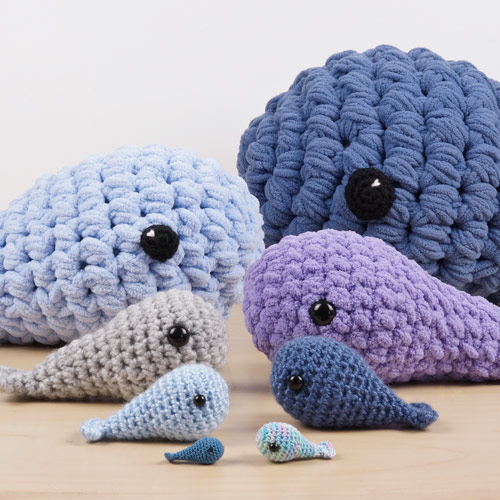
And here’s a top-down photo of all 8 sizes (this is a single photo so the scale is exact; the only editing I did was to add the pink spiral for clarity):
Look for the three dark blue whales to see the differences in size between the Standard size and the Micro (smallest) and Extreme (largest). Isn’t that something?!
Calculations
Time to quantify those differences. To get an idea of the scale change, I took four measurements from each of my whales:
the average width of one stitch (sampled over several stitches for higher accuracy)
the average height of one round (sampled over several rounds for higher accuracy)
the overall length of the whale
the width of the whale at its widest part
Then, for each whale, I compared each measurement with the same measurement on my standard sized whale (made with worsted weight yarn and a US E/3.5mm hook). I used the average of the four comparisons, rounded to a nice number, to give me an approximate overall scale factor for each amigurumi size.
There’s a lot of variability here – not only in the numbers I measured from my samples and the accuracy of my measurements, but in the difference between specific yarn and hook combinations and the individual crocheting style of each crocheter – so a rough conversion factor is the best we’re going to get.
My scale factor is not intended to be an accurate number, but a rough idea of the size difference you can expect from scaling up or down.
Results: Amigurumi Size Conversion Table
Pictured above are the main amigurumi sizes with the hooks used to crochet them (L-R): Micro, Mini, Small, Standard, Large, Mini Giant, Giant, Extreme
In the table below, for each amigurumi size I’ve given the yarn weight and hook you’ll need to make that size, and its approximate scale factor compared with standard amigurumi (the row marked in bold in the table below).
Amigurumi Size
Yarn
Hook1
Scale Factor
Micro2
crochet thread #30;
pearl cotton #12
0.9mm (14)
0.3
Mini
crochet thread #20;
pearl cotton #8
1.4mm (8)
0.4
Small
sport (#2) – DK (#3)
2.25-2.75mm
(B-C)
0.8
Standard
worsted (#4)
3.5mm (E)
1
Large
2 strands worsted (#4);
1 strand bulky (#5)
5mm (H)
1.5
Mini Giant
super bulky (#6)
8mm (L)
2.4
Giant
2 strands super bulky (#6);
1 strand jumbo (#7)4
15mm (P/Q-19)
3.6
Extreme3
6 strands super bulky #6;
1 strand jumbo (#7)4
25mm
6.5
Notes:
As hook size names can vary between brands, I’ve given the mm size first, followed by the common (US) size name. The best hook size for you will vary depending on the exact yarn you choose and how tightly you crochet – the hook sizes given here are good starting points, but you should choose an appropriate hook for your project, no matter the scale of the amigurumi:
If your stitches stretch open too much and the stuffing is clearly visible, reduce the hook size.
If you cannot insert the hook into your previous stitches, increase the hook size.
Micro Amigurumi refers to any extremely small amigurumi, so you may also find ‘micro amigurumi’ made with sewing thread and a 0.4-0.6mm hook – those could be much smaller than the sample I measured, so the scale factor would also be smaller.
Extreme Amigurumi refers to any extremely large amigurumi, so you may also find ‘extreme amigurumi’ made with unplied roving and a 40mm hook (or hand-crocheted with no hook) – those could be much larger than the sample I measured, so the scale factor would also be larger.
Jumbo #7 weight is a catch-all term for any yarn thicker than super bulky, so these yarns can range widely in weight, with recommended hook sizes of between 15mm and 40mm! For Giant Amigurumi, you’ll need a jumbo yarn that recommends using a 15-19mm hook; for Extreme Amigurumi you’ll need a jumbo yarn that recommends using at least a 25mm hook.
How to Use the Size Conversion Table
Note: There are many factors that affect the exact size of an amigurumi. As you can see from my worsted weight yarn comparison, even using the same hook and pattern with different worsted weight yarns can result in a remarkable range in size. (And that doesn’t account for other factors: the differences between our hook styles; how tall we each draw up our loops; our tension…)
So please be aware that the scale factor in my table is only a rough estimate. This isn’t an exact science; crochet is handmade, after all!
Reading the Scale Factor
I’ve given the scale factor as the difference from standard size (1), so, for example, 6.5 (for Extreme Amigurumi) means the amigurumi will be 6.5 times larger than standard.
How Large will my Amigurumi Be?
To find out roughly how large your amigurumi will be at a different scale, look at the standard size in the pattern, and find the scale factor that corresponds to the hook and yarn you want to use.
final size = [starting size] x [scale factor]
So, for a 4″ long standard amigurumi, converting it to Extreme Amigurumi scale (6.5) means:
final size = 4 x 6.5 = 26″
Resizing To a Specific Size
To find your scale factor, look at the standard size in the pattern, and the size you want your amigurumi to be.
scale factor = [desired size] / [starting size]
So, for a 6″ tall amigurumi that you’d like to reduce to 3″ tall:
scale factor = 3 / 6 = 0.5
Then find the closest scale factor from my table to find the hook and yarn you should use.
Resizing in Between the Options
If you’d like to go for a scale in between two of my options, look at the closest size option on either side and choose a yarn weight and hook size that lie in between the two.
Example 1: Half Size (0.5x)
From the table, you can see that Mini Amigurumi is 0.4 and Small Amigurumi is .08, so you’ll want to choose yarn and hook sizes between those listed for those two sizes, i.e. a yarn weight in between size 20 crochet thread and sport (#2) yarn, and a hook size between 1.4 and 2.25mm.
As a starting point, I’d try a size 10 or 5 crochet thread, or a super fine (#1) or lace (#0) yarn, and a 1.6-1.8mm hook.
Example 2: Double Size (2x)
From the table, you can see that Large Amigurumi is 1.5 and Mini Giant Amigurumi is 2.4, so you’ll want a yarn weight in between bulky (#5) and super bulky (#6), and a hook size between 5mm (H) and 8mm (L).
As a starting point, I’d try holding 3 strands of worsted weight (#4) yarn together, or 1 strand of bulky (#5) and 1 of worsted (#4), and a 6mm (J) hook.
So there you have it – a way to make amigurumi in any size from extremely small to extremely large! You can use my table of results as:
A starting point for figuring out how big your amigurumi will be when you use a different yarn and hook
A reference for the yarn and hook sizes to choose to make an amigurumi of a specific size
I hope you’ll find this conversion table as helpful as I will!
This is the perfect guide for all your Mini Giant, Giant and Extreme Amigurumi – every stage of making a super-sized amigurumi is slightly different from what you might expect, and I’ve designed this book as a comprehensive reference guide that covers everything from the absolute basics to tips for fixing problems and making complex amigurumi.
Do you find my tutorials helpful? If so, please consider making a contribution towards my time so I can continue to create clear and concise tutorials for you:
Thank you so much for your support! Now click below for loads more crochet video and photo tutorials (and do let me know what else you’d like me to cover in future tutorials…)
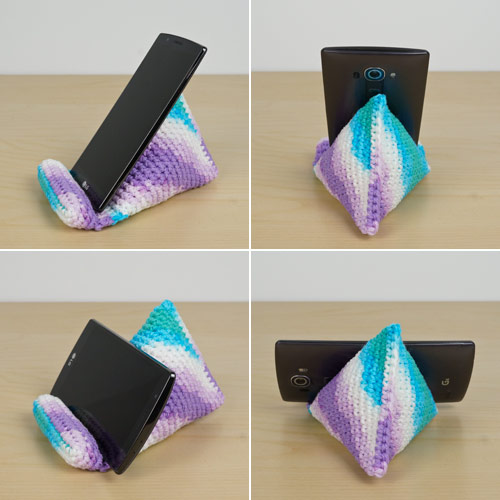
If you, like me, tend to spend a little too much time on your phone, you’re going to love my new pattern!
I use my phone for so many things these days – working, reading, playing games, video chats, shopping, watching videos – and it gets uncomfortable to hold after a while. To save my hands, I thought it’d be fun to try to recreate the old phone stand I sewed almost a decade ago, but this time in crochet, with dimensions better suited to today’s larger devices.
And look what I came up with! Crochet is the perfect medium for a stand like this: one piece, no sewing, basic stitches and techniques, and it makes a perfect support for a smartphone:
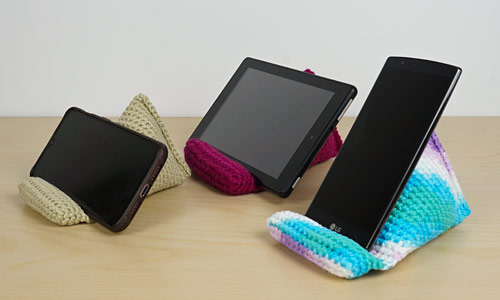
Isn’t it great?! it’s quick and easy to crochet, and makes a handy addition to any desk or bedside table. With only yarn and a little stuffing, you can make a stand that’s sturdy enough to support any phone (or a small tablet) in portrait or landscape mode.
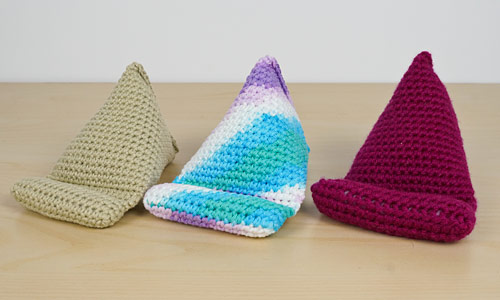
This pattern is a blank canvas for any yarn choice: get colourful with a variegated yarn, go for a subtle neutral shade, choose your favourite colour, or match your room decor.
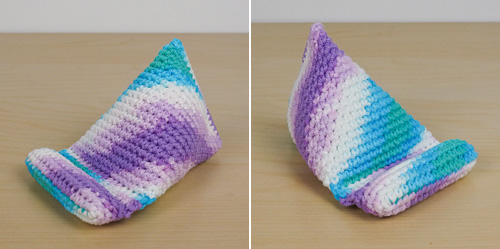
I especially love how my variegated phone stand turned out: the colours pooled into diagonal stripes, and because either side of the stand can be the top, I can flip it over to get a different colour pattern!
I’d recommend using a cotton yarn for your phone stand as it gives a neat smooth finish, but you can use acrylic if you prefer. This is a great pattern to use those striped or ombre cottons that look lovely in the skein but may not crochet up the way you’d expect! (In case you were about to ask, the specific yarn I used for the above sample is Bernat Handicrafter Cotton Stripes in Beach Ball Blue.)
Amigurumi-style crochet gives this stand enough stiffness to support a mobile device with just regular fibrefill stuffing, which also makes the stand light and portable. You can even comfortably rest it on your tummy so you can watch videos while lying in bed, if you’re so inclined…
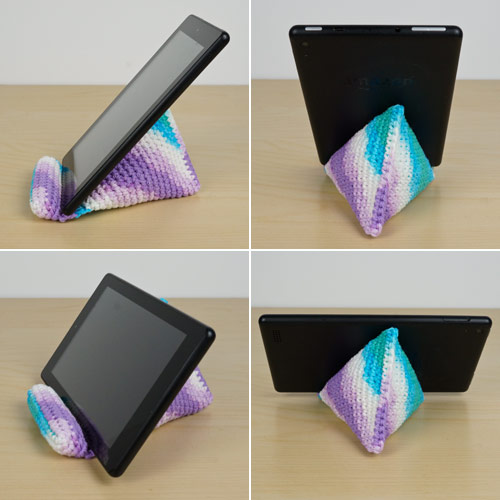
As you can see below, the phone stand is also big enough to support my 7″ tablet, which is very handy for video calls or watching YouTube!
As I like to reward people who choose to donate for my donationware patterns, the PDF version of the Crochet Phone Stand pattern also includes tips for stuffing, additional instructional photos, including left-handed photos, and instructions for resizing the pattern to fit a larger tablet or other device. As always, the pattern is free for you to use online, and you need only donate if you’d like to thank me for my time in creating it, or if you’d like the easy-to-print PDF version with the bonuses.
You may have noticed that I didn’t have a new pattern for you in January. I actually have four different crochet patterns in progress at the moment, but everything feels a bit scattered, because I have some very exciting news: we just bought a house!
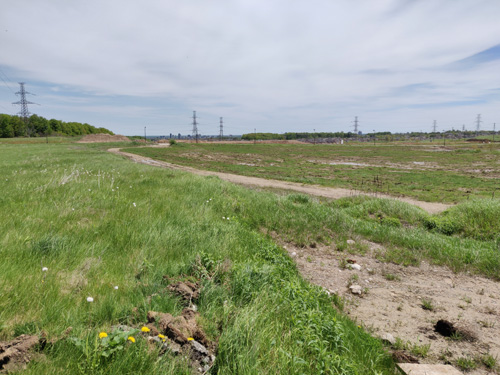
We’ve been waiting for a long time to get to this point. Almost two years ago, when we first signed the contract, our little plot of land sat somewhere in here…
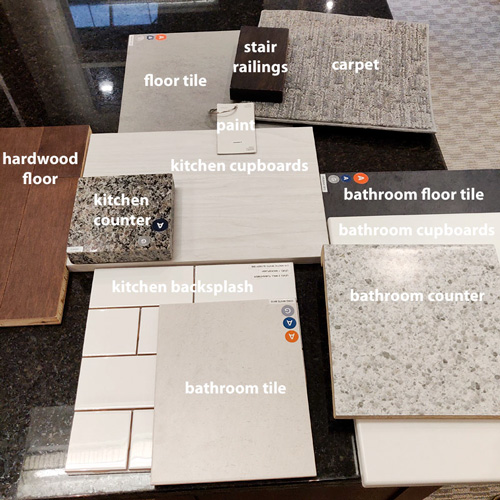
This time last year, we got to make hundreds of design decisions for the interior and exterior of our house – colours, flooring, lighting, bathroom suites, kitchen cabinets – it was endless.
And then, nothing, for a very long time. I was expecting this – multiple people had warned me that new house builds always run late, and the builders had emailed me last year to let me know there would be additional delays due to the pandemic, so I was expecting at least several months of delays.
A couple of weeks ago, we discovered that we wouldn’t be able to attend our own home inspection because of the lockdown, and then suddenly the original closing date was approaching and, although we hadn’t seen it for ourselves, everything was apparently going to be finished on time! That caught me by surprise, so I had a mad scramble talking to banks and lawyers and trying to get the money in place in time to close…
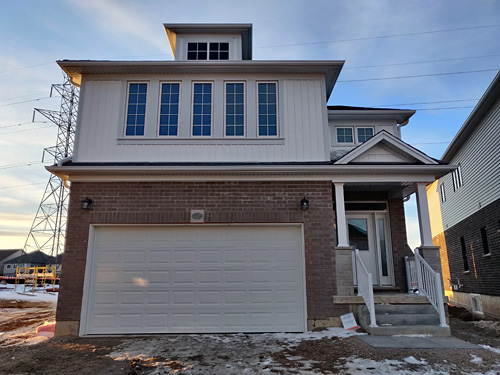
And then it was done, and we held the keys to our new home!
Yay!
But this isn’t the end of the story. There’s a lot more that goes into buying a brand new house than I’d anticipated: lots of unfinished and imperfect things that need to be identified and reported so they can be fixed, a full house-worth of appliances and window coverings to choose and buy and get delivered and installed, and all of this while we’re under a stay-at-home order in Ontario, which means a fun trip to IKEA to pick up all the other essentials we need is not an option at the moment.
So please bear with me – there definitely will be new PlanetJune patterns coming soon, but I need time and energy so I can focus on completing them, and both of those are in short supply right now. My ideas are tripping over each other to get out of my head (hence 4 patterns on the go at once…) but I need some calm and concentration to turn my notes into patterns you’ll enjoy.
Right now, things are both exciting and anticlimactic at the same time. It’ll be a long time before we can actually move into our new house, and there’s so much that I need to do for it in the meantime. So many decisions to make! It’s all quite overwhelming.
But I know it’ll all be worth it in the end – one day, all the pieces will have been slotted into place and everything will be ready for us to start enjoying it. And I can’t wait for Dave and Maui and Maggie and I to be settled in our lovely new home!
Or simply click through from my links before you shop at Amazon, Etsy, KnitPicks, LoveCrafts or Crochet.com, and I'll make a small commission on your purchase, at no cost to you! Start here: