Tiny Whale crochet pattern
© June Gilbank 2009
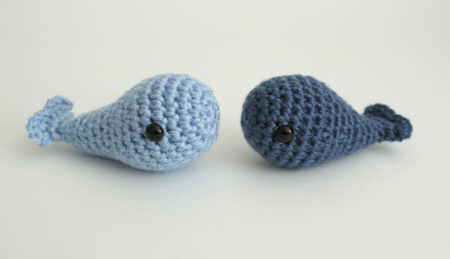
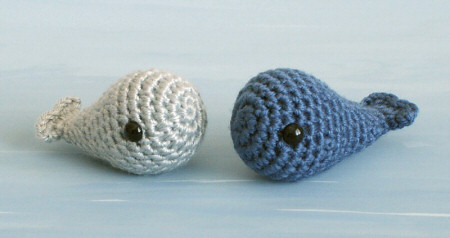
This little whale is the perfect size to sit in the palm of your hand! But even better than that: he’s crocheted all in one piece, so there’s no sewing involved to make him!
This pattern is Donationware – the pattern is available for free, but if you like it please consider sending me a donation to show your appreciation:
Send me a donation and receive the easy-to-print PDF version of the pattern as a thank you!
Donations of any size are much appreciated. Just add the amount you wish to donate, and, once you have checked out and paid, your pattern will instantly be available to download from your PlanetJune account.
The complete pattern and instructions are available below, regardless of whether or not you choose to pay for them 🙂
This is a PlanetJune original crochet pattern. Feel free to use items made from this pattern however you wish, but I’d appreciate credit as the pattern designer. Please do not reproduce the pattern anywhere else; instead post a link to www.planetjune.com/tinywhale
Not ready to make it yet? Add it to your Ravelry queue: 
Terminology
| ch | chain |
| invdec | invisible decrease Note: If you prefer, you may use a standard sc2tog decrease in place of each invdec. |
| sc | single crochet (double crochet for UK/Aus) |
| sl st | slip stitch |
| st | stitch |
You will need…
- E US/3.5mm crochet hook
- Small quantity of worsted weight yarn in blue, grey or white
- Stitch marker
- Yarn needle to weave in end
- Polyester fibrefill stuffing
- Eyes, approx 8mm diameter
Notes
- Do not join at the end of each round; rounds are worked in continuous spirals.
- Use a stitch marker to mark the beginning of each round. Move the marker up each time you start a new round.
Pattern
Make a magic ring, ch 1.
Rnd 1: 6 sc in magic ring. (6 st)
Rnd 2: 2 sc in each st around. (12 st)
Rnd 3: (2 sc in next st, sc in next st) six times. (18 st)
Rnd 4: sc in each st around. (18 st)
Rnd 5: (2 sc in next st, sc in next 2 st) six times. (24 st)
Rnds 6-8: sc in each st around. (24 st)
Rnd 9: (invdec, sc in next 2 st) six times. (18 st)
Rnd 10: sc in each st around. (18 st)
Insert the first eye just below the stitch you just made, approximately 5 rounds down (as pictured below).
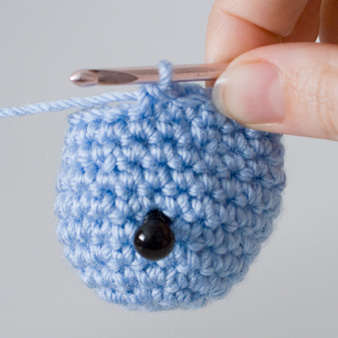
Insert the second eye in the same position on the other side of the whale.
Attach the backs of the eyes.
Rnd 11: (invdec, sc in next st) six times. (12 st)
Rnds 12-14: sc in each st around. (12 st). Stuff body firmly through hole.
Rnd 15: (invdec, sc in next 2 st) three times. (9 st)
Rnd 16: sc in each st around. (9 st). Add additional stuffing through hole.
Rnd 17: (invdec, sc in next st) three times. (6 st)
Rnd 18: sc in each st around. (6 st)
Rnd 19: 2 sc in each st around. (12 st)
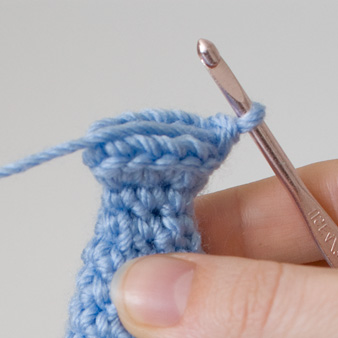
Using the position of the eyes as a guide, flatten the open end horizontally.
If the hook is positioned at one corner, continue to the tail instructions. If not, sc in each st around until the hook is at one corner (see pictures below), and then continue to the tail instructions.
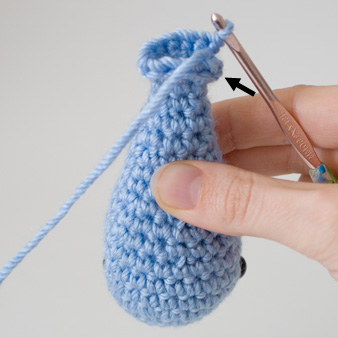
Hook is not at corner of flattened tail (marked by arrow)
Sc around until hook is at corner of flattened tail, as pictured
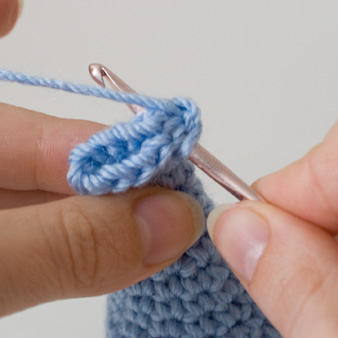
Beginning to sc through both layers of the tail
Tail
Crochet through both layers as follows:
3 sc in next st, sc in next st, sl st in next st, sc in next st, 3 sc in next st.
Cut the yarn, leaving a long end. Draw the end through the last loop on the hook, and pull tight to form a knot.
Using a yarn needle, weave the end down through the tail and part of the body. Draw the yarn tight, and snip the end close to the body. The yarn end should retract back inside the body after it is cut.
I hope you enjoy this pattern. Please leave me a comment below if you do, and consider leaving me a donation. Thanks!


Egg said
Many many years ago, this was one of the very first amigurumi patterns I learned, and I would crochet a few of these for my little dog. Now, about a decade later, I am much more experienced with crochet and wanted to find this pattern again, to make another of these tiny little whales for nostalgia’s sake. thank you so much for your patterns and your website, you have helped me find a lifelong love of crochet.
Anna Paradox said
Hi, June! I found your site about a week ago and I have been poring over it every day since. I’m pretty new to crochet. Really appreciate the careful attention to yarn sizes and the detailed instructions for the invdec and magic ring. My question is: I made the tiny whale and his fluke came out noticeably asymmetric. Is it supposed to be? I was making the final three sc one sc in from the side. Seems like twelve stitches folded in half should give six stitches to work into, but I thought I only saw 5 places to make stitches in the instructions. Any idea what I missed?
June said
Hi Anna, flattening the tail with the hook at the edge means there’ll be one stitch (directly below the hook) at the corner, so you’ll have 5 pairs of stitches to work across, and then one final stitch at the opposite corner that you’ll ignore (it’ll look perfect once you weave in that final end). If you’re trying to work back into the stitch you just created before flattening the tail, a) that’s very difficult, and b) that would introduce the problem you’re seeing!
You should find it’s much easier to crochet, and the numbers will work out correctly, if you ignore the stitch you’ve just completed and start by working into the next stitch of both the front and back layers 🙂
Anna said
Thanks, June! That does sound like what happened. Really appreciate the fast and detailed response. I had fun making the whale, so I’ll make another one! 🙂
Erica said
Love the pattern
June said
Erica, check the ‘Notes’ section at the top of the pattern – as it says there, this pattern is worked in a continuous spiral, not joined rounds. That means you won’t join at the end of each round or chain to start the next round; you just continue working around and around, using a stitch marker to mark the start of each round, as I explain in the notes section. See my amigurumi troubleshooter for more help with this 🙂
Lea said
Many thanks for this wonderful pattern, I’ve already made three and feel like I can’t stop! Also a big thank you for your left-handed tutorials, they have helped me a lot when doing amigurumi.
Abbey pavlik said
What does indecv mean in red 9
June said
Abbey, all my patterns have a terminology section at the start, that explains any abbreviations used in the pattern. Scroll back up to the Terminology section and you’ll see the link to my tutorial for invdec (invisible decrease) 🙂
Lucy said
I’ve just finished this wee whale and he is the first amiguri I’ve ever attempted. This a great little pattern.
Rheya said
So cute!!! I love it, just made my firs ever whale but its tail is kind of funny, I think I stuffed it to much. Well thanks for the pattern!!! 🙂
Kelly said
Well, the whale is pretty cute, but what puts this pattern over the edge is the amount of love my cat has for it. I’ve never seen him so obsessed with a toy before! He throws it all around and plays for hours. Thank you!!
Kamille said
I’m opening a shop on Etsy and I wanted to know if you would disapprove of me selling the amigurumi I make using your patterns. I would credit you as the source for the pattern, though. Is that okay? Thanks
June said
Kamille, you’re welcome to sell items you make from my patterns provided you credit me as the designer. Please see my selling items policy for details 🙂
Naomi said
I just finished this little whale for my whale-obsessed son. It was easy to do even though this is the first crochet project I’ve made in twenty years! Thank you! I found your instructions for the magic ring and invisible decrease very informative and easy to follow. He’s already put in his next order!!!
Gen said
Hi this pattern is amazing and I was wondering if I wanted to make a bigger whale would I just double up on all the stitches and use a bigger hook? Xxxxx
June said
You have a few options, Gen: take a look at my resizing tutorial for details!
mimilee said
I loved the pattern you had on this website and. Could you tell me where to buy eyes?
June said
Yes, I have a page of information for Eye Sources.
Gina said
Hello. I love your pattern and am currently making the whale! It is adorable and very easy to follow your directions. Thanks so much. I just have a question for you . what do you use for the eyes and how exactly so you attach them?
Thanks so much.
Gina
June said
Gina, I use standard 2-part animal/safety eyes – see my Eyes and Noses post for details of these, and some alternative options 🙂
Emily Wood said
Is it possible to add the eyes on towards the end?
June said
If you’re using 2-part safety eyes with backs, you need to add the eyes while the hole is still large enough to insert the backs and attach them, and before you stuff the whale. You could add them later than I specify in the pattern, but then you wouldn’t know where to position them so the tail ends up being horizontal – you may have to compensate by adding a stitch or 2 before you start the tail, so you don’t end up with a vertical tail fin!
If you’re using a different type of eyes (beads, buttons, embroidery, etc) you can attach the eyes right at the end, after the whale is complete – just make sure the whale is the right way up before you add the eyes, and you won’t have a problem.
Amy said
These are brilliant! They’re really quick and easy for even a child like me to make, and the results are fantastic! 😀
Tildog said
Thank you soo much! This is such a great pattern and I made one in no time!
Just one question, can I sell them?
June said
Short answer: yes! Please see my FAQ for details 🙂
Jenna said
Wow, these are adorable! I have made a lot of amigurumi and these are one of my favorites! Thanks!
Jenna
Erin said
Hello, June! I am twelve years old and I really wanted to learn how to crochet (specifically amigurumi), and here I am. I’m having trouble with the first part- how do I put in six single crochet in the magic ring after only chaining one??? Can you please help me? Thank you so much!
June said
Yes I can, Erin! Take a look at my magic ring tutorials to answer your question. If you need more crochet help, you’ll find all my handy crochet tutorials at www.planetjune.com/help 🙂
Gabriela said
Hello,
Awesome pattern! So cute! 🙂
I’m from Brasil and adore your website!
All the best!
Gabi
Maminti said
I would like to thank for the effort to manage this blog!! I’m so appreciated! I love your patterns so much! However I’m a beginner, but tried to make a cute little whale for my elder daughter and it became so nice. Soon I will make some for children who are in hospitals (they will be certainly so happy as well).
God bless you! I wish you a pleasant and smiling summer, also I send you my best wishes: Maminti, the little green fairy
Amber Martin said
I have been tryi to teach myself how to crochet and I was told to use a size g needle well it’s hard to pull through and my yard is coming part during he pull through. Is my needle to large or my yarn cheap?
June said
It’s probably a combination of the hook and yarn. If you stick with that yarn, try a larger hook to make it easier to work with. Or look for a different yarn to try with your G hook. If your yarn is cotton, try an acrylic, as cotton tends to be more splitty, especially with the smaller-than-recommended hook you need for amigurumi. I also recommend my book, The Complete Idiot’s Guide to Amigurumi, for lots more advice about hooks, yarn, and how to crochet!
ally m said
I’d like to say a big thank you for your super-cute whale pattern. I’m fond of crocheting but most amigurumi patterns on other sites are really confusing. Your pattern was easy to follow and the end-product was lovely!! Thanks so much. Do you have any more animal amigurumi patterns?
June said
I’m glad you enjoyed it, Ally! You can find about 100 more of my amigurumi animal patterns in my shop 🙂
Dani said
Hi! Just wanted to tell you, I’ve been teaching myself how to crochet and I’ve found this pattern to be a wonderful way to practice. It’s quite adorable!
Myx said
Hello,
really cute, thank you.
Myx
Aubree said
I just made this as my first amigarumi. Thanks!
Rosa said
Hi June, thanks for the pattern and your very helpful tutorials! I just finished my first amigurumi: a very tiny, cross-eyed whale 🙂
Carolyn said
Thank you so much for this pattern. My daughters and I were stuck in the house today (one of them has a cold), and it provided us with something sweet and relaxing to do. My daughters are not very experienced crocheters, but we ended up with two adorable whales (Steve and Moby). We did not have official eyes, but sewed on buttons, and they turned out to be very cute. My older daughter does crafts for charity, and she wants to teach the other members of her club this pattern.
Marcia Gravatt said
I love this little pattern. I am thinking about making enough of these for each of my kids in children’s church to have their own little whale when we study about Jonah and the whale.
Now, I guess I need to find a pattern for a Jonah 🙂
Thank you for the time you spend on creating such adorable patterns.
I’ve only made two amigurumi pieces – matching dolls for my two of my granddaughters. It was so much fun, I can’t wait to start a new project (have been busy crocheting baby afghans).
April said
Hey June! I had a question that seems kind of silly but for Rnd 1 do we work the 6 stitches into the center of the ring or around the outside stitches? I hope this makes sense.
Thank you so much!
June said
April, there are no silly questions! The stitches of Rnd 1 are worked directly into the ring (there are no other stitches to work into at that point), and you’ll draw the magic ring closed before beginning Rnd 2. If it’s still not clear, please see my Magic Ring tutorials at www.planetjune.com/magicring 🙂
April said
Oh! Thank you so much! I wasn’t counting the magic ring as the first round and that’s what was messing me up! Once again, thank you for such a quick reply! It’s a lovely & adorable pattern. 🙂
Savemylife said
Hi I need some easy and quick ideas to do with yarn. Please help!!!!!
June said
There are lots of options in my free patterns, or try my PocketAmi collections or pattern suggestions for beginners 🙂
Lilly said
This is such a cute pattern!!! I’m 11 and I have my own business that I started when I was 9. I’m definitely going to add this to the list of things I sell!!! Thanks again!
Tina said
Hi June, just finished this adorable whale. I´m still discovering amigurumis and looking around for help and loving everything. Even my 10 year old daughter got so interested that she started learnig how to crochet today.
Thanks
Tina
Cydne said
What were the measurements of your whales when they were finished
June said
About 3.5″ long, unless you make the Mega Whale option!
emily said
how do you start it?
June said
With a magic ring – see www.planetjune.com/magicring for photo and video tutorials 🙂
Emma said
Thank you so much for this pattern! Before today I have only been able to crochet blankets & other flat items. I also found your magic ring tutorial really helpful 🙂
Destiny said
Hello, My name is Destiny, I am a 17 year old student at the Academy of Techonology and Academics. I do not understand how to stich in a circle, it confuses me… Can you help or am I reading the directions wrong?
June said
Destiny, please see www.planetjune.com/magicring for a demonstration of how to get started working in the round.
Jenna P. said
Thanks for posting this! I just made a little whale in less than half an hour for my very happy five year old boy. He has named him Swimmer and they are currently “splashing” around my house. Only problem is, he saw the dinosaurs on my computer screen…Guess I’ll be making those next!
Gabs said
Hi there! I am new to ravelry and I appreciate this pattern very much! 🙂 However I am a bit confused on the tail when it says: Slip Stitch in to the next stitch, single crochet in to the next stitch… :/ I had just wondered if the statements on either side of the comma are on two different stitches or in the same. I look forward to your reply and Once again thanks for the great and cute pattern! <3
June said
Hi Gabs. I know it can be a bit confusing at first! If you see two instructions separated by a comma, each “next” stitch refers to a different stitch, so the sl st and sc should be made into 2 different stitches.
For future reference, if the sl st and sc were supposed to be made into the same stitch, the pattern would have said either “(sl st, sc) in next st” or “sl st in next st, sc in same st” – I hope you can see the difference now!
Gabs said
Okay that makes plenty of sense! Keep up the great work! Thanks again