Eyes and Noses
Looking for online eye sources? Or how to position eyes? Or how to securely stitch facial features? If not, read on:
Getting the face of your amigurumi just right is a very important step – they need that cute expression! I get a lot of questions about what to use for the eyes and noses. I’ve compiled a run-down of some options you can try.
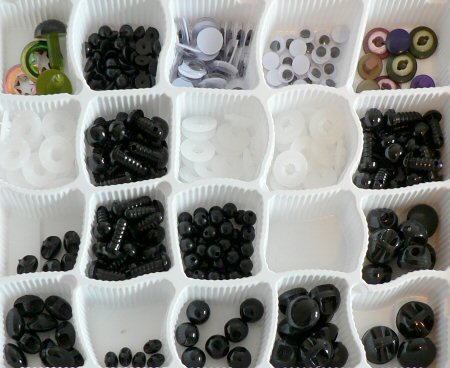
My box of ami eyes and noses (yes, it used to be a Jelly Belly box!)
Eyes
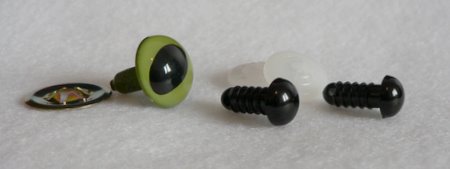
Animal eyes (aka ‘safety eyes’) come in two parts – the shaft behind the eye pokes through to the inside of the head, and is locked in place by the plastic or metal washer. These work really well for amigurumi, provided the washer is large enough to not pull through the gaps in your stitches.
I usually use the all black ones (centre and right of picture) e.g. I use these for my AmiDogs. You can also find them with round black pupils with various coloured irises (not pictured), or cat eyes (left of picture) which are great for making cats and snakes! They are also available in a wide range of sizes, but can sometimes be difficult to find in your local craft stores. Try looking in online stores and on eBay – they are easy to use and it’s worth the effort to find them. I’ve compiled a list of online sources that you may find useful.
A word of warning: if you’re going to use these, remember to attach the backs to the eyes before you stuff and close up the head!
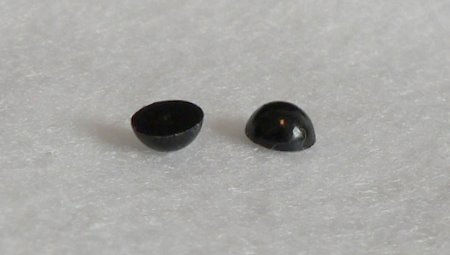
Half-round eyes are a solid black hemisphere. They are somewhat limited in use because there are no holes in them, so you have to attach them by gluing them on (not the most secure method). I have used these when I couldn’t find any other eyes in the right size but, given the choice, I prefer other types of eye.
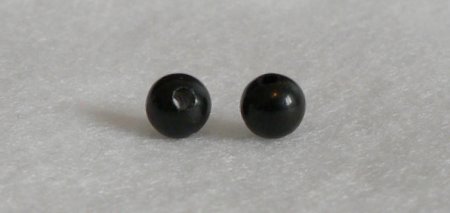
Black round beads – I buy black round onyx beads from various sellers on eBay. They are regular round beads with a small hole right through the middle and they are a really nice choice for tiny amis – I have them in 2mm, 4mm and 6mm sizes. The problem with using larger spherical beads for eyes is that they can look quite bulbous and stick out too much from the head.
If you’re looking for round beads, make sure to find beads with a narrow hole, so the hole isn’t too obvious when you stitch them in place. Also, to attach them, look for a transparent nylon thread, so the thread won’t be visible on the finished toy. If you can’t find transparent thread, just use black thread, and make sure to stitch very close to the eye so there aren’t big black stitches visible on your finished ami.
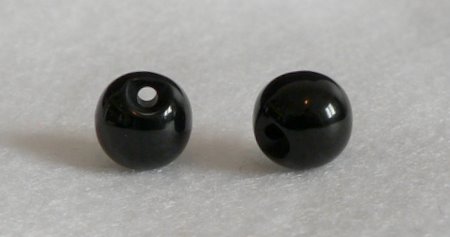
Round buttons from the fabric/dressmaking store. These are some of the buttons that come attached to a small white card, with 3, 4, or 5 per card. Look at the black buttons that are available; you can use any with a rounded or flat face and a shaft with a hole on the back of the button. These 10mm eyes are spherical, but the hole is at one edge (the back of the button) as opposed to a bead, where the hole goes right through the centre of the bead. This helps stop the eye from looking too bulbous, but this type of eye works best when using a fuzzy yarn, so the eye will be embedded in the fuzz.
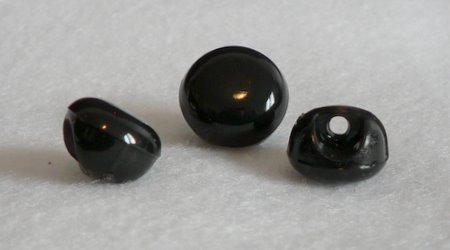
More round buttons from the fabric/dressmaking store. These buttons have a flat front and a hole on the back. These buttons work really well, but I’ve only found them in larger sizes (12 and 15mm). They are a great alternative to animal eyes for larger amis.
Other suggestions for eyes. You can make eyes by cutting a circle of black felt, and either gluing or stitching it to your ami. Or try embroidering an eye with black yarn directly onto the face. Both of these types of eye look much cuter if you add a tiny white highlight at one top corner of each eye, to simulate a glint of light reflecting from the eye (e.g. my dark brown Fuzzy Monkeys have embroidered eyes). For examples of other fun ideas for eyes (googly eyes, felt, buttons), see my Fuzzballs.
Noses
You can buy moulded plastic animal noses that look like the animal (safety) eyes above, with plastic washers to lock it in place. While they are detailed and realistic, I don’t personally like the look of them, and they are also difficult to find in smaller sizes.
Sometimes I use a button for a nose (e.g. Fuzzy Bear). These black oval buttons are available in several sizes from the fabric/dressmaking store:
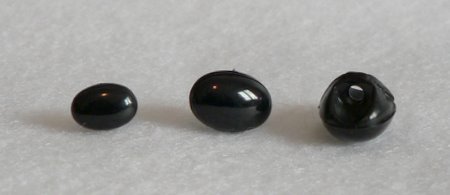
You can cut a small triangle from felt (e.g. Fuzzy Kitten) and use fabric glue to attach it to your ami’s face.
Alternatively, you can embroider a yarn nose onto your amis. Try stitching an inverted V shape (e.g. Fuzzy Guinea Pig), two nostrils (e.g. Fuzzy Monkeys), or make several stitches very close together to form a solid shape (e.g. all the AmiDogs).
Loved this tutorial? I have so many more amigurumi tips and tricks to share with you!
Boost your amigurumi skills with my latest book, The Essential Guide to Amigurumi, your comprehensive guide to amigurumi techniques and tips.
Do you find my tutorials helpful? If so, please consider making a contribution towards my time so I can continue to create clear and concise tutorials for you:
Thank you so much for your support! Now click below for loads more crochet video and photo tutorials (and do let me know what else you’d like me to cover in future tutorials…)


Erin Pimm said
Hi, do you have a solution for safety eyes with a smooth stem? I am considering using something sharp to form a ridge so the washer stays on. The supplier told me to use hot glue. Any other ideas?
June said
Erin, it sounds like you’ve been sold the wrong type or size of washers for your eyes. The smooth-stemmed eyes need metal one-way washers that grip tightly onto the stem and are impossible to remove (without bending the metal). You can see an example next to the green cat eye at the top of this page. If you have the plastic washers, you’ve been given the wrong type; if you have metal washers but they’re too loose so they don’t lock in place, you’ve been given the wrong size (different eye sizes have different stem diameter and so need different washers). If your supplier insists hot glue is an acceptable solution, I’d avoid that supplier in future!
Becky Jorgensen said
This is such a very helpful tutorial! I love the tips you shared! Thanks so much for sharing. I featured this in my blog.
Margaret K. said
I think I found an answer that might help. In a toolkit that I’ve had for years, I had a set of grommet pliers that I never used. Google “grommet pliers” and look at the images to see what tool I mean.
I just dug them out and gently used them to put the backs on some 6mm eyes, and it worked like a charm! You might want to put a piece of fabric between your eye and the tool so it doesn’t scratch the surface of the eye if you’re worried.
Hope this helps! It saved me some sore fingers after wrestling with those little eyes forever.
~M
Barbara said
I recently purchased these ready-made eyes to use on my animals but have not yet tried them out. My biggest concern is that the hole you need to punch through the fabric will cause the fabric to fray out and eventually ruin the finished product. What can you tell me about installing these in a way to alleviate this kind of problem? Thank you.
June said
Barbara, this isn’t an issue in amigurumi, as the posts of the eyes can be slipped between the crocheted stitches without damaging the crocheted fabric. I suspect you’re talking about toys made from sewn fabric though? In that case, the type of fabric you use would come into play – I’d imagine that a fabric that frays may need reinforcing, whereas a fabric like faux fur, fleece or felt (that doesn’t fray) wouldn’t have a problem. My recommendation would be to test a scrap of your fabric to see if it will fray once you’ve made a hole for the eye, and, if so, reinforce the back of the fabric with fusible interfacing before you attach the eye. Alternatively, you could stitch with buttonhole stitch around the hole before you insert the eye, although that would take more work. If you have more questions, I suggest you contact someone who specialises in plush toys instead of crocheted ones – that’s the limit of my knowledge!
Cheryl said
I found this page whilst looking for tips about using safety eyes. I can use the larger sizes with no problem, but the 5mm eyes are proving a problem. I soak the plastic washer in very hot water before use, but still can’t seem to get them placed properly. They washers either suddenly drop down to the bottom of the shaft and are in too tightly (and crush my crochet stitches out of the way so they look distorted), or they just won’t go on at all. What am I doing wrong?? Thanks for your very informative and interesting blog, btw.
June said
I’ve found the smallest washers can be problematic too – they are just so tight! What I like to do is poke a pen or pencil through the washer, jam it in and wiggle it around so it widens the hole slightly – then the washer goes on much more easily! I suppose in theory you could widen the hole too much and the washer would be useless, but I’ve found that it barely widens it at all – just enough to make it less of a battle to attach it. If you combined that with your hot water technique, you might be able to widen it with less effort than it takes me 🙂 Good luck!
crystal said
Another suggestion for eyes:
I’ve used scrap yarn to tie chinese button knots and threaded those into my ami’s face. Makes for a sort of rustic looking ami.
June said
sp, the tiniest eyes (4.5mm) sometimes don’t come with backs, but anything larger than that should have the backs. I would definitely ask at the store where you bought the eyes!
Monica said
I am 3mm plastic novelty eyes that do not have backs. They are the perfect size for the teeny tiny bunny I made, do you know of any way to use them? Is there a way to construct backs for them? There must be a way to use them since they sold me a bag of 144 of them! Thanks in advance for any ideas you may have. -Monica
June said
Hi Monica, the small eyes are supposed to be glued into place. I give instructions for how to do that on the shop page for my 4.5mm eyes (which also don’t come with backs) 🙂
Monica said
Thank you, June! Do you have a suggestion as to what type of glue works best? I haven’t ever tried gluing anything to yarn, so I’m not sure which glue to use. -Monica
June said
I use a white craft glue (Fast Grab Tacky Glue is my favourite, but any white glue is fine). I know it seems that a ‘stronger’ glue would be better, but when you’re working with plastics (plastic eye, polyester stuffing, possibly acrylic yarn) you need to make sure to use a glue that won’t damage your materials! (e.g. hot glue might melt them and superglue would dissolve them!)
Just make sure that you coat the back of the eye AND the stem with glue so that it will make contact and be glued to both the yarn AND the stuffing, and you’ll have a strong bond 🙂
sp said
I
mariax said
tambien podeis usar para los ojos de loa ami… botones de costura los hay en todos tama
June said
Holly: are they the eyes with the metal backs? I find them almost impossible too. If I were you, I would try to return them to the store and try to get the ones with the white plastic backs. They are MUCH easier to attach, although difficult to find in retail stores.
Debbe: I sell some (all sizes up to 15mm) in my store, or you can find a list of other online sellers on my Eye Sources page 🙂
holly said
GRRR. I purchased eyes at a retail store and the washers absolutely will not go on! I’ve tried everything. Even having my boyfriend try to push them on. I’ve switched to different ones in the package even. I bought three little packs of 18mm and can’t even use them =(
crystal said
You can try using a utility knife to shave down the ridges on the eye post. that has worked for me, just be sure to use a a sharp blade, a sturdy, flat surface and cut away from yourself to avoid injury. 😉
Debbe Palmer said
I am looking for a source of these eyes, any suggestions?
Thanks!
Helpless said
I can not get these God awful safety eyes on. They are almost impossible. Advice anyone? I am use the 15mm animal eyes.
June said
Helpless, look up at my comment from March 5, 2008 🙂
June said
Tracy, I have a list of online sources you can try 🙂
Tracy said
Where can you buy those eyes? I wanna know… And, yes, your article is great, thank you!
Aida said
Thank you for all, now i take advantage of Europe’s coin, so i think it is more cheap, isn
Aida said
Hello
Marie said
hi, is it really hard to put the washers in the eyes? Do you have to apply alot of pressure? This was really helpful though, thanks for telling all the eye options! I like the safety eyes but I dont know if its really hard to set them in place or not. Thank you!
June said
RC, to try applying more pressure. The shaft of the eye normally has several positions that the washer sort of ‘clicks into’, to account for different thicknesses of fabric. So it could be that you’ve pushed it to the first ‘click’ and not continued to push past that.
Try pressing against a hard surface like a table. Place your work so the curved side of the eye is facing down onto the table and the shaft is sticking up, then push the washer straight down onto the shaft of the eye.
RC said
Thank you for the info! I use the safety eyes, but I can never get the washer to fit snugly against the eye, so it always sticks out 🙁 Any tips?
Nyx said
Great! Thanks for the info!
futuregirl said
Great info! Thanks!
linda said
thanks so much!
now i can finish my bears. =)