PlanetJune by June Gilbank: Blog
PlanetJune Craft Blog
Latest news and updates from JuneMagic Ring (right-handed)
Looking for the left-handed instructions? Or the video tutorial? If not, read on…
What is this ‘Magic Ring’, anyway?
A magic ring is a way to begin crocheting in the round by crocheting over an adjustable loop and then pulling the loop tight. The advantage of the magic ring method (below, right) is that, unlike the regular “chain 2, x single crochet in 2nd chain from hook” method (below, left), there is no hole left in the middle of your starting round.
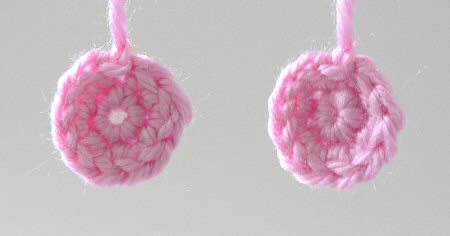
L: ch2, 6 sc in 2nd ch from hook, 2 sc in each st around.
R: magic ring, ch 1, 6 sc in magic ring, 2 sc in each st around.
How do I make a Magic Ring?
This demonstration shows a piece made using the following pattern:
Make a magic ring, ch 1.
Rnd 1: 6 sc in magic ring. ( 6 st)
Rnd 2: 2 sc in each st around. (12 st)If you’re following a different pattern, you’d complete steps 1-2 of this tutorial exactly as shown below, then work the chain and the stitches of Rnds 1 and 2 as specified in your pattern.
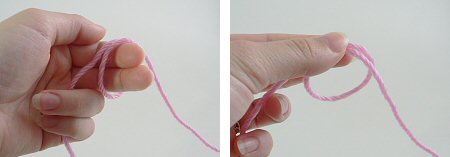
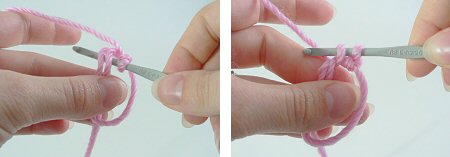
Please note: in the following photos, the starting yarn tail is always on the left and hanging down. The working yarn begins on the right and is then picked up over my left forefinger in Step 2.
- Make a loop a few inches from the end of your yarn. Grasp the join of the loop (where the 2 strands of yarn overlap) between your left thumb and forefinger:

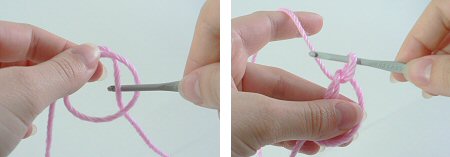
- Insert hook into the loop from front to back. Draw up a loop:
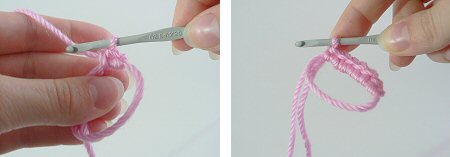
- Ch 1 (or as many as stated in your pattern). Note: this does NOT count as a stitch:
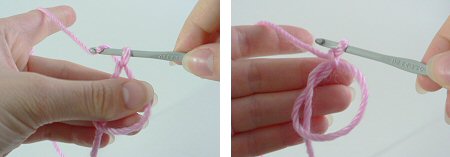
- Insert hook into the loop, so you are crocheting over the loop and the yarn tail. Draw up a loop to begin your first sc of Rnd 1:
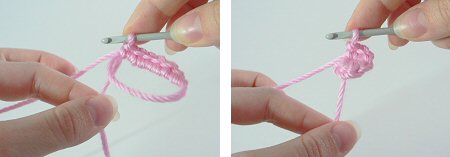
- Complete the sc. Continue to crochet over the loop and the yarn tail until you have the required number of sc for your first round (6 sc shown here):
- Grab the yarn tail and pull to draw the centre of the ring tightly closed:
- Begin your second round by crocheting into the first stitch of the first round (below, left). At the end of round 2 your work will look like this (below, right):

You’ll never go back to your old method again, I promise!
Do you find my tutorials helpful? If so, please consider making a contribution towards my time so I can continue to create clear and concise tutorials for you:
Thank you so much for your support! Now click below for loads more crochet video and photo tutorials (and do let me know what else you’d like me to cover in future tutorials…)

340 Comments »
Leave a Reply
Quick Links: Crochet
Quick Links: Crafts


Welcome to PlanetJune!
Hi, I'm June. Welcome to my world of nature-inspired crochet and crafting. I hope you enjoy your visit!
If you'd like to get in touch, you can contact me here.


Kirsten said
I just began learning to crochet a few days ago, so naturally I had no idea what to do when I tried to follow my first pattern and saw “SC 6 into magic ring”. This tutorial, when paired with another one that made it a little easier to see how to keep a grip on both the loop and the crochet, was IMMENSELY helpful. It took me a couple of tries, but I eventually figured it out. My first ring was rather sloppy, but it worked!
skrunkycat said
Wow I actually found a tutorial where the pictures matched the instructions clearly and everything was pointed out, not assuming you already know what they mean!
Thanks a bunch I am happy!
Cina said
So good tip ! I Love it !! thanks
KristaS said
Thank you so much 🙂 This is very comprehensive, SO much nicer than how I was doing it 🙂 Thanks again!!!
DianaG said
thank you, it’s been bothering me that there is always a hole in the middle of my amigurumi things… I hope I can grasp this and use it 😉 gonna give it a try soon
Ella Runciter said
Thank you so much for these clear, easy-to-follow instructions with photos! They were very helpful and much appreciated.
marion said
hello,
these explications with pictures are very, very useful…it`s really great to show it in this way. i thank you !!!
Venna said
Oh, my gosh!! It’s so beautiful.
Kristen said
Oooh that makes sense now, lol. I’m a beginner with crochet, and I want to start something simple 🙂 Thanks!
Kathy said
Quite a while back I contacted you on how to do the magic ring. You were so quick to get back to me with the instructions, and I negeleted to reply. I have used the magic ring on everything I have made that calls for joining to form a ring. I just showed it to my daughter, who makes a lot of hats. She is really impressed with the magic ring.
I
have it in my favorites, and when ever I need it, it is there.
My daughter is interested in the continueous spiral without joining. she has not found a pattern with it.
Thank you so much for your help and information.
Kathy
Tone Karlsen said
THANK YOU! I finally got it!
Angela said
Thanks so much for this! I was trying to learn a granny square this morning and starting off it just didn’t turn out right. This makes much more sense and I can’t wait to try it later!
Nicole said
i’m having a lot of difficulty with learning how to do this. i’ve gone around to many sites and this one has the most pictures and seems to go more step by step.
but being extremely new to crocheting, i’m having a little trouble. i can never seem to get the stitch that i did to tighten.
i’m not quite sure what i’m doing wrong, but i seem to be following all of the directions above. i’ve been trying to learn this for quite some time and it’s so frustrating!
any help would be greatly appreciated.
Melissa said
ah well, fifteenth time was the charm. i think. 🙂
Melissa said
Ugh, I just can’t do this. To keep the tail from getting twisted, I pull the loop down taught, but then it’s so hard to stich, my stitches are either too loose or too tight. 🙁
Chrissy said
Here is a video! HTH! Hugs, Chrissy
www.youtube.com/watch?v=WLuSVyKvoUg
tammy leisure said
i have been crocheting since i was 16yrs old as a thearpy it has truly helped.. just tonight i made a majic ring for the first time ..Crocheting is my favorite hobbie ..Friends&family think i was born with a hook in my hand my great aunt who has since instilled in me by sitting at her side and watching her as well my cousin debbie who showed me the chain the rest my friend miss judy who showed me things before i went to work..theese ppl are the the 1 who taught me what i know i thank as much as i couldthe majic ring i learned on my own..
Susan said
I’m sorry to bother you, but you’re the only person I’ve found who explains this WELL (Thank you for the explanation by the way! It is VERY useful!), so I thought maybe it would be alright if I asked?
I’m trying to follow your instructions, but I always go wrong somewhere around step 4. I try to crochet over the loop and tail, and I just end up with a continuation of the chain instead of any actual single stitches over the loop! I’m not sure what exactly I’m doing wrong, but as I can sort-of (in that nine times out of ten when I pull the tail end nothing really happens) do it in double-stitch, I imagine I’m going wrong somewhere around the actual working over the loop and tail part. Is there anything you can suggest to help?
Thank you!
Susan
June said
Helen, don’t be disheartened – I’m sure we can figure out the problem. I’m not quite sure what’s going wrong with your ring, so I’ll try to clarify a few things and maybe one of these points will help you to realise your problem:
1. In my photos, the starting yarn tail is always on the left and hanging down. The working yarn end (going to the ball of yarn) starts off pointing to the right in my pics, but is then picked up by my left hand so it’s at the top of the pic.
2. If you are crocheting right-handed (hook in your right hand), each stitch should always be made to the left of the previous stitch.
If you are following the two points I just clarified above, you should automatically crochet over your yarn tail, as you are crocheting right to left, and your yarn tail is pointing to the left.
If that’s not the case and you still can’t figure it out, please leave another comment with more details of what’s going wrong and I’ll see if I can help!
Helen said
Hi,
the pictures are really clear, but I really need your help, there’s something which is really confusing and frustrating me!
In Step 4 and 5 your crochet hook is pointing to the left, so when you pull the yarn it pulls through the hoop from left to right.
When I copy this, my row of stitches travels around the circle away from the yarn tail not over it, and my hook is at the right hand end of the row of stitches. In the second picture of Step 5, you have completed a row of stitches but your hook is on the left of the row and you have gone over the yarn tail.
I am pretty inexperienced so may be missing something – please can you help? Should I be turning the work, or my hook or something?
I’d be really really really grateful for your help, I’m probably being really stupid!
Christy said
Thank you, June, for this awesome tutorial. The magic ring has intimidated me for months, but after reading through your tutorial twice and then trying it myself, I got it! You are the best!
spiral said
I finally got it! This site has by far the clearest and best directions for making a magic ring. Thanks planetjune! A headhole-less ami is now in my future…
shay said
hi this is a great method. im making some very simple buttons for a bracelet i’ve made. this is good for making quick simple buttons as i have found out
shay
June said
Rebekah, the magic ring instructions include that first round of 6 sc. The “magic ring” is basically just wrapping the yarn around your fingers – the 6 sc you crochet into the ring before you pull tight is Rnd 1 of the pattern. So make the ring & stitches into it, pull tight, then continue with Rnd 2.
(If you have a pattern where Rnd 1 has e.g. 4 sc, you just make 4 sc into the ring before you pull it tight.)
Rebekah said
I am slightly confused and will try to explain it so it makes sense. 🙂 I am just starting the dachshund pattern. I got the magic ring down, but am confused where to start on the pattern after the magic ring is done….for instance. The pattern says this: make a magic ring, ch 1, round 1: 6sc in magic ring, round 2: 2 sc in each st round….ok…. when you say how to do the magic ring, you make the ring and then crochet 6 sc in it, then pull tight, then do another round of 6 and then there is the magic ring…..ok, so my question is after the magic ring is done….what part of the pattern do I start on? round one? round two? or the part where it says ch1.
I’m sorry if I explained my question in a confusing way. 🙁
Jenny said
I am stuck on step 4. What does it mean by draw up a loop? Loop one of the chains? I put my hook through the loop like instructed and I’m trying to sc but, when I pull the working yarn through the first loop it just goes in a circle, it’s not doing anything. Please help!
zabacorporation said
Thank you. This way of beginning is genial:)
SARA said
Thanks for this… one of those things I learnt last year and forgot! Very well explained, in fact best instructions I could find on the web.
Amie said
Wow, thankyou!
Tawny said
Thank you for the great instructions and wonderful idea. My Grandmother would have loved this. Creativity moves on!
Joy Abara said
Thanks a million for this! I’ve been struggling on my first amigurumi (the Lion Brand octopus for my little girl) because the starting loop always seems so small and difficult to work with, but now things should go ‘swimmingly’ 🙂
Jana said
Hi. Thanks for the directions! I tried to get on CrochetMe this morning (that was the most mentioned site for the magic ring on google) but I kept getting this weird “drugal” thing! If anyone knows what is going on with that site, please let me know! I have an account with them and everything and no way to contact anyone about this!
I got a great pattern for a dragon, but this is my first toy animal, so I was stumped on her directions! I am a teacher in Saudi Arabia (grade three) and I really want to start making crochet toys for my students (the GOOD ones, of course! 🙂 )
Thanks again!
anusha said
thanks a lot. it is very clear even to a dull head like me
Alyson said
Thanks, this is amazing. The instructions were really clear! HAve a great day! Go llamas!!!!!!!!!!!
Rebecca said
Nevermind! I just figured it out! I guess I just had it confused when you mentioned about making the stitches around the loop and the tail; I thought that you actually had to put the working yarn around it. That’s what I hate about learning new crafts, is that you always and up making things so much harder than they really need to be. Nevertheless, I’m so excited to buy a few of your patterns; I first saw them at your Etsy store and I fell in love with your hedgehog dude.
Rebecca said
Hey there,
I really like this tutorial because there are a lot of pictures to help me out. However, I’ve tried to do this magic loop thing so many times that I’m about to give up on crochet. I can’t do it. Your tutorial was a big aid in helping me figure out what I was doing wrong, but now that I’m doing it “right”, I’m getting the working yarn trapped inside of the loop, and it’s REALLY hard to work the stitches into it.
So I just tear my work apart and start again, but the same thing always happens. In all your pictures, the working yarn is never wound up inside the loop. How in the world do you prevent this from happening? I don’t understand what I am doing wrong. And I am so frustrated.
I’d love it if you could help a poor girl out.
Sandra said
Thank you so much for putting together this tutorial. Your instructions were clear, concise and well illustrated, and I am finally able to crochet a magic ring!
charu said
i always thought how not to leave that hole, your illustrations are neat and expalnationis simple. eep up the gud work!
syeda said
This is great and i am going to use this metod always.
heather.m said
Wow! That is the BEST tutorial on this method, that I have seen. I finally figured it out. Thank you SO much! I can’t wait to finish this amigurumi teddie for my son! I’ll post when finished.
futuregirl said
I *love* the magic ring technique. Since I learned it, I haven’t started a round in any other way. Great tutorial and wonderful photos. 🙂
Shellie said
That is a neat trick but the funny thing is if you make a ring with your chain, sl st, then sc or dc over the ring AND the tail, you can pull a regular ring tight at well. Since the tail is under all of the stitches you just created a drawstring.
I will have to try this one as well, I just thought I would mention the other method so there are choices. 🙂
Jessica said
Thank you so much. I love the magic ring. It is amazing.
ANGELOFIRE said
would this magic ring work on slippers because i found this sight and ive been tryin to crochet it put haveing problem with row 18 its not clear 2 me about do i put the first st past my sl st or do i start row 18 behind the sl st. i hope some one can help me here. the slippers name is snow kissed slippers the web site is www.marloscrochetcorner.com/snow%20kissed%20slippers.html
and i hope I can use this magic ring on it . plz someone help me im making them 4 my mom’s b-day ty from Denise a.k.a angelofire
Jessica said
Thanks, that makes it much clearer! I was finally able to do this one 🙂
June said
I’m sorry if this isn’t clear to you, Jessica. The starting yarn tail is always on the left and hanging down in all the photos.
You should be able to see the overlap by looking at the first two photos – the first photo shows the yarn wrapped over my fingers, then the next one shows the loop being held together with my thumb at the top of the loop (where the ends cross).
I hope that helps!
Jessica said
These pictures would help a lot if it showed which was the end of the yarn, as in all the pictures the end is out of the picture, so I can’t tell which way to hold the yarn. Also, the overlap is not clear, because of the fingers in the way.
June said
dulcet, no slip stitch required – amigurumi are typically worked in a continuous spiral with no joining between rounds.
Of course, you could also use the magic ring with the “join with sl st, ch1” method if you prefer – it’s a great starting technique either way!
dulcet said
Did you slip-stitch into the first single crochet to join the first round, before starting on the second round?
Rayne said
Cool. Bookmarking this site. I’ll have to remember this when I start my next granny project.