adventures in knooking
I bet many of you (unless you saw my tweets last weekend) are thinking ‘huh?’ right about now… But if you’re like me (a crocheter who doesn’t knit) you’re going to love this craft: knooking is knitting with a crochet hook. No, it’s not tunisian crochet, or any other type of crochet; when you knook you form genuine knitted stitches. The finished product is indistinguishable from a knit piece. Isn’t that cool?
I just don’t get along with the pointy sticks and I’ve often wished I could just put a hook on the end of a knitting needle so I could snag those stitches more easily, so the idea of knooking was very appealing. You do need to use a special hook to knook with – it has to be straight all the way down the length (i.e. no wider thumb grip) and have some way to attach a cord to the non-hooked end. You can modify a regular crochet hook, or a locker hook makes the perfect starter tool – you can find it in most craft stores, and it’s approximately equivalent in size to a G hook.
This weekend I had some time on my hands and thought I’d finally give knooking a try. I must be a bit of a masochist – I didn’t want to start with a boring swatch or dishcloth pattern; I wanted something that I could actually use once I’d finished it. I’d seen a free knitting pattern a few weeks ago for a Shaun the Sheep DS case and it seemed like it may be a feasible (and cute!) first project. Luckily it starts with the back, which is plain, before moving to the colourwork on the front, so I figured I’d have time to get used to the knit and purl stitches before introducing another element of difficulty.
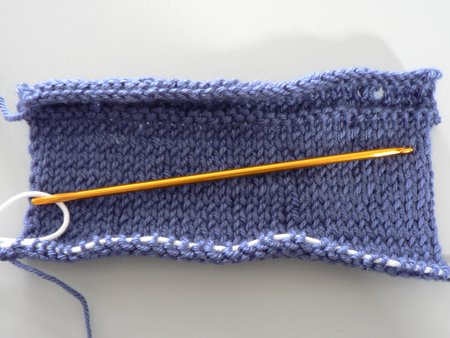
First knooking attempt in progress
Here it is after getting 2/3 through the back. (The hole at the top right is a buttonhole, not a mistake.) You can see my white cord running through the active stitches at the bottom of the picture. Each time you complete a row, you slide the stitches down off the bottom of the hook onto the cord, and then work into them again for the next row.
I think I may have wrapped the yarn wrongly a couple of times, because there are a couple of flubs in my beautiful knitted fabric. Also, my yarn was a bit splitty, which didn’t help when trying to form those awkward purl stitches. I was surprised that my stitches looked so even, considering this was my first ever attempt at knooking.
The colourwork was easier than I’d anticipated. I worked the design backwards (mirror image) because I’m left-handed and wasn’t 100% sure if knit stitches are symmetrical (although I think they are) so I thought I’d play it safe. I left yarn ends dangling on the inside while I knooked, and wove them all in later. My only difficulty was my choice of a bouclé yarn for the ‘wool’: it turns out that bouclé is just as challenging to knook with as it is to crochet with!
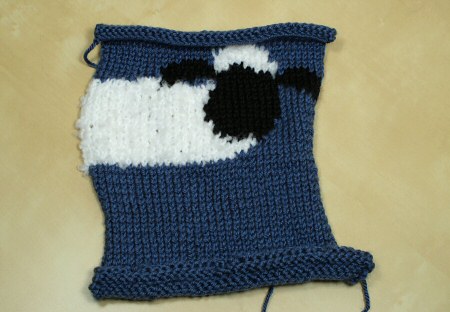
Before blocking
My finished piece was curling up a lot at the edges, so I used makeshift blocking wires (actually floral wire – I don’t have much need for real blocking wires in my daily life) and some steam blocking to straighten it out (yes, you can steam block acrylic!).

Blocking wires in place
When it was dry, I seamed the sides and attached some buttons to the top. I wasn’t sure how to make the eyes, but in the end I made some from black and white felt strengthened with embroidered buttonhole stitches around the edges. The whole project cost me nothing: all the materials came from my stash (yay!) – even the buttons!
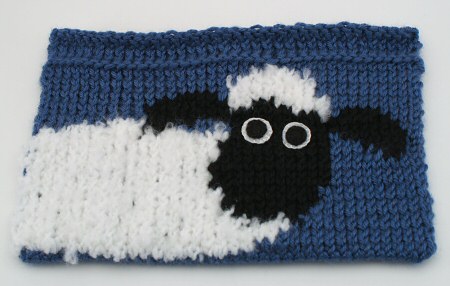
Front
I could see by the end (the top border) that I’d really got the hang of it: my stitches were much more consistent than they had been on the back of the piece, although they really hadn’t been bad to start with. I think I can say that I’ve conquered the basics of knooking, and I’m looking forward to trying out another knitting pattern with my hook!
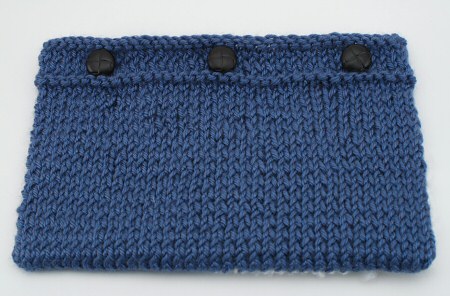
Back
Have I captured your interest? If you’d like to try knooking, I recommend you check out the Knooking blog (I learnt how to knook from Jen’s excellent how-to videos) and Knooking Ravelry group 🙂
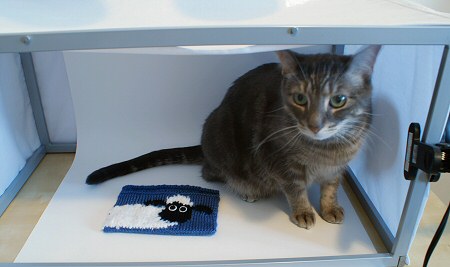
Maui insisted on ‘helping’ with the photoshoot!


Kairianne said
Ok so I am so curious about how to change colors it is driving me up the wall. I have tried to find videos but have been unsuccessful. Do you know of any videos?
June said
Kairianne, I don’t know of any videos – I just made the first stitch in the new colour by pulling up the loop for that stitch in the new colour, and then I wove the ends in later – but I recommend you ask in the Knooking group on Ravelry. I’m sure someone there can assist you!
Kairianne said
thank you!
Vi said
Its cute..I’m learning to knook too can you please tell me how to color change or maybe do a picture tutorial lol
Connie said
I recently purchased a book of patterns for crocheted socks. I tried my first pair and was saddened to see how tight it was. More like a surgical sock than a knitted sock. I’m not sure if you can do stiches like a shell stich with a knook, but would like to try a sock with this.
June said
Connie, crochet stitches have less stretch than knitted stitches (although some crochet stitches have more stretch than others, and it could be that the pattern you tried didn’t make the most of that). Stretch sock yarn, with an elastic content, is also helpful for crocheting socks with stretch!
Knooking makes knitting stitches, not crochet ones, so a knooked sock would be indistinguishable from a knitted one (you’d use a sock knitting pattern to make them, not a crochet pattern). This would give you the stretchy fabric you’re looking for, but the one potential problem I can see is that I’m not sure knook hooks are yet available in small enough sizes for knitting (knooking) socks…
Salem said
I’ll be honest, my first love was crochet and always will be and when I first had the thought to knit cross my mind (when I was but beginning to crochet) I thought immediately to myself, “I could never do that – how in the world you use two needles I don’t understand!” In the last two years however I have taught myself to knit finally crossing over to the dark side as I call it and realize how much easier it was for me than I’d thought it would be (I desperately want to make several things, such as socks, that really work better knitted)…Now I’ve discovered knooking (just got a kit today) and while I love it I’m kind of glad I found it after knitting (or likely I would have never tried that).
I think your piece, as with all of your work, looks great and I’m glad my favorite crocheter put this blog up! 😀
Karen said
Hi June,
I just started knooking yesterday so far so good. I taught myself to knit a few years ago and my mother crochets. While I don’t knit very well I’ve made a few hats and I can make the basic crochet stitch. I think knooking will work better for me. Easier. Can I use regular knit patterns to make things.
June said
That’s right, Karen, you can knook using regular knitting patterns – you just have to learn the right way to knook any additional stitches (e.g. increases and decreases). If you need help, I recommend the Knooking group on ravelry 🙂
Kimi said
I read this post last night and was so excited I dreamed about it. *lol* Can’t wait to try knooking! Thanks for opening my eyes to this one!!
Jeannine said
Hi June!
Love this new style of knitting. I too, wanted to learn to knit, but I am all thumbs with two needles. And this looks pretty easy. I will give this a try. I crocheted for many years so hopefully this would be a piece of cake for me. I justed to know though, how would you do knooking in rounds? Like to make a knitted doily, or round no seam sweater? I tried to google for some info and came up with nothing on it.
June said
Hi Jeannine! Sorry for the slow reply. I’m no knooking expert, but I highly recommend you join the Knooking group at Ravelry – there are lots of people there who can answer all your questions! People are knooking socks etc, which I’m sure are worked in the round, so they can definitely advise you on how to do it 🙂
Amanda said
I found knooking after stumbling onto Portuguese knitting… a MUCH easier way of knitting.. but I do think Knooking is the way I’ll end up going… as soon as I can find the proper hook for it. The “joys” of living in a small town. ^_^
Emily Grant said
Hi June!
Love the DS cozy! I am very intrigued by this knooking business. I think all of my crochet needles have a wider middle so I have to try to find one like you have so I can try this out for myself. I have never heard of intarsia, but it looks like it’s a pretty awesome technique 🙂
Wendy said
I saw your tweet the other day and had to go and try this method for myself. I’ve always been slightly retarded with knitting (although I did buy some needles recently and reteach myself). It stresses me out for some reason.
So, what I did was attach the hollow tube cable from a pair of circular bamboo knitting needles to a 3.5mm crochet hook, and that’s working out fine for me. I love knit fabric but was never able to concentrate on knitting for long enough.
As far as I can tell (and what was also mentioned on the knooking blog) is that knooking is somewhere between crochet and knitting in terms of speed.
I was doing some ribbing last night on a circular swatch to see what it would look like (it currently looks like the end of a sweater cuff), and found that, because the tube I’m using is about 3.5mm, it was making holes in the fabric if I left it in there until the end of the round (because I was switching from knit to purl). So, I ended up taking each stitch off the end (like knitting), and will try to attach a cable needle to the other end for next time.
As for your twisting, this happened to me in the beginning, and I actually had to just reteach myself to do the method to make it right. It really depends on how you’re hooking the wool through, too. You just have to make sure that whichever way you’re pulling the wool through, the stitch on the cable is in an open inverted u shape. It’s a bit hard to describe, and probably worse because you’re left-handed and I’m not! But, good luck!
Sorry about the long comment, should probably have left it on the knooking blog. 🙂
melissa said
hi june!
oh my gosh!
how fun!
i have never heard of knooking before!
i will have to check this out!
your sheep is just amazing!
kris said
once again absoultly AMAZING
Tobey said
There is a set of interchangeable crochet hooks on a cable, just like circular knitting needles made by Denise
www.knitdenise.com/pages/new-crochet-hooks
I’ve never used them, but did want to let you know there were out there. Knit Picks products sold in Europe and Australia also have crochet hooks and they would go VERY nicely with my KP interchangeable knitting needles.
I am a life-time crocheter that learned to knit nearly 2 years ago. I find knitting to be a LOT more restful on my hands than crochet. It is nice to switch back and forth AND have the option of following whatever pattern strikes your fancy.
June said
I saw those Denise hooks in the Knooking Ravelry group (there’s lots of great info in there!) – they do look really nice, but for now, I’ll save the money and stick with my locker hook 🙂 Now that I’m self-employed I try to spend as little as possible!
Abigail said
I’d never heard of knooking before, but am itching to give it a try now! I wonder if it’s possible to do with a Tunisian crochet hook? (i.e. the long ones) – I have a couple of those around somewhere.
Nice work on the intarsia by the way! That’s a technique that has eluded me so far *lol*
June said
I tried using a Tunisian hook first, by tying a string to the other hook end, but it’s really difficult transferring the stitches from the hook to the string that way (the hook, and the knot I’d tied, got in the way). The locker hook is much better – the stitches slide right off the end of the hook onto the string. I’d definitely recommend you pick up a locker hook if you want to try knooking.
Steph said
I abandoned attempting to knit after many many failed tries and picked up crochet instead. I LOVE crochet but I still want to learn to knit. This might be what it takes for me to get it. Thanks for mentioning it.
Jennifer said
this is so exciting!! i saw the CUTEST knitting pattern just last night and was pretty bummed i don’t know how to knit well so i couldnt make it…..but now I can!!
Sherry said
Hi June, I am a self taught knitter, (Used the website videos from Knittinghelp.com ) “Ive been knitting for 4 years! I have made everything from socks , sweaters, scarfs, blankets, and toys! Toys and socks being my favorite thing to knit. Two pointy needle method…… ;o)
This technique of Knooking is very interesting, and you did a great job on your first project… ( I have crocheted for 30+ years) as an avid crocheter had I not learned to knit, I would have loved to have learned this technique.
But now I feel the warmth of those two needles in my hand’s are a must, it is so relaxing to knit, as crochet is very taxing on the arthritis in my hands. So being able to take a break from crochet and knit has helped me a lot.
Now that you know my whole craft story, (he, he) I actually wanted to suggest using a locker Hook for this technique. You may view one here;
www.ravelry.com/discuss/knooking/962106/1-25
Looks like they would work really great, and you dont have to modify any of your regualr hooks.
All the best
Sherry
June said
I love hearing people’s stories! Thanks for sharing yours, Sherry 🙂
The locker hook that you linked to is actually exactly the same as the one I’m using! You’re right, it does work very well. The only downside is that (as far as I know) locker hooks are only available in one size, so I’m limited as to what I can knit/knook with it…
Missie @ Crafting with Cat Hair said
This is awesome! There are so many super cute knit projects that I want to try but can’t because I don’t knit.
My friend and I were just saying this past weekend how we can totally crochet but can’t knit worth a darn. Maybe we’ll have to have a knooking party. 🙂
June said
Oh, you should! I’m so excited that other people want to try knooking too 🙂
Rose said
This is really cool my brothers love shaun the sheep and one of them has a ds so I would like to make it for him. I am going to try knooking but I was wondering if you could adapt it to a chrochet pattern? free if possible 12 year olds dont have a whole lot of money to spend. By the way I love your blog I only read two and this is one of them!
June said
Glad you like it, Rose! I’m afraid I can’t convert it to crochet for 2 reasons:
It’s not my design to convert (I’d be very upset if someone converted one of my designs to knit and published the pattern as their own!)
I don’t have the copyright on Shaun the Sheep. I don’t make patterns of copyrighted characters because it’s not legal (although that doesn’t seem to stop some people)
You can easily make your own crochet chart though – just find a nice picture of Shaun and convert it (free!) using KnitPro 🙂
Rose said
I just tried that and it is really cool but I have no clue how to follow a grid! Any Help? BTW sorry about the email deal.
June said
Each square of the chart represents one single crochet stitch. Work along the bottom row (right to left if you’re right-handed, otherwise left to right), changing colour where necessary. When you get to the end of the row, turn your work and ch 1. Then begin the second row, following the chart back in the other direction (left to right if you’re right-handed). Continue in this way, working up the chart, until you’ve worked the entire chart! You’ll end up with a rectangle with the same pattern as your chart 🙂
Rose said
Thanks! It looks really cool. Have you ever tried doing it with a photograph? How do you think it would turn out?
Rose said
I forgot to say that I am going to try knooking it looks really cool! And I love your site!
Eleanor (undeadgoat) said
Wow–very nice! Plenty of people twist their stitches when they learn to knit with two needles too–this is not at all unique to “knooking”. If you want to move on to regular knit patterns, not special knook ones, I wonder if it is possible to have two crochet hooks on each end of a cord, similar to a circular needle? In the round you could even have a crochet hook on one end and a knitting needle on the other, which is an elusive but totally real knitting tool. There’s not a lot you can do stitch-pattern-wise without moving stitches between two “needles”, and it might be easier to use some beginner knitted visuals, like how not to twist stitches. Of course, this technique totally intrigues me, but in the same way loom or machine knitting does–I’m not likely to use it any time soon. Has anyone invented a way to crochet with two pointy sticks yet? 😛
Oh, and I’m very impressed by your intarsia work and really want to see the back!
June said
LOL, I did intarsia?! That’s one of the schmancy-sounding knitting techniques that I had no idea what it even was! It’s really just swapping colours?
Your wish, my command – here’s the inside! (click to see it bigger):
ETA: This was a regular knit pattern – as far as I know you can knook any knit pattern 🙂
June said
This looks like lots of fun!
I too could never master the 2 pointy stick thing but I’m sure going to give this a try!
Thanx for the great info! I’ve join the Ravelry group and bookmarked the blog. Now I’m headed back to both to find out more about it! Wish me luck! LOL
June said
June (nice name!) – good luck, I hope you’ll enjoy it!
Silverlotus said
Wow, June, I’m very impressed. It looks like knooking is a great way for a some who knows how to crochet to knit. I’m curious, though, would you want to make a sweater with knooking? By that I guess I mean does it take a long time, or is it hard on your hands?
June said
Hmm, well it takes longer than crocheting for me, but that may just be because I’m new to it. I certainly got a lot faster as my piece progressed. I can’t speak to the speed vs knitting; again, it may just be that whatever you’re used to is faster!
I found it to be as hard on my hands as crocheting amigurumi, so, for me, I’ll have to limit it (as I limit everything else) to try to prevent the return of my hand problems. I can certainly feel it in my right thumb today after knooking that piece all weekend, but I think I would be equally pained if I’d been crocheting for that long. My hands are very delicate instruments 😀
I would definitely consider making a knooked sweater at some point though (over a long period of time, with many rest breaks) – the drape of knitwear is a big draw!
Rachel said
Heya, June, very cool! 😀
I haven’t knooked yet, but I did learn to knit after learning to crochet, and I think you may be doing the same thing I was. Are you wrapping the yarn around the needle the same way to you for crochet? If so, all your stitches are twisted! (Which is very nice if you intended it!) In knitting, you wrap the yarn around the opposite way. (So for me, crocheting brings the yarn from the side of the hook furthest from me to the side closest to me. Knitting moves the yarn from the side of the needle/knook closest to me to the side furthest from me. Knitting moves away from me, crocheting moves towards me.)
So I’m curious to know if your knit stitches are twisted! Also, I was wrapping the yarn correctly for my purls, and incorrectly for my knits, so my flat stockinette knitting looked very like yours does! All of my knit rows were twisted, all of my purl rows were not, so it was very odd! My ribbing didn’t work either! *g*
June said
Rachel, I know that I have something not quite right, although I haven’t looked into it enough to figure out which of my stitches is twisted! I did notice that every other row of ‘V’s has a twist, so I assume that I’m doing either the knit or the purl wrongly. It’s hard, because I don’t knit, so I didn’t really know what the stitches were supposed to look like. And being left-handed and learning from right-handed videos gives another dimension of brain-bending! So let’s just pretend this project was an intentional variant on the stitches – at least they are all consistently twisted 😀
When I have more time I’ll have to try one of those pesky (boring) swatches and see if I can figure out whether it’s my knit or my purl that’s at fault! I’m guessing it’s the purl, as I tried one ‘purl’ row by ‘knitting’ it instead with the wrong hand and that row didn’t look twisted, but the tension was way too tight, so I had to abandon that idea! I didn’t mention any of this in the post because I felt it was long enough and didn’t want to detract from the coolness of knooking! But yeah, I’ll figure it out before I attempt to knit/knook anything else. Thanks for your comment!
Rachel said
*g* I understand not wanting to lengthen the post too much!
I’ve link to TECHKnitter’s blog in my name, but here are some of her posts that might help you see how knit fabric is formed. It was TECHKnitter’s posts that helped me figure out what I was doing wrong! 😀 She has the most amazing illustrations!
techknitting.blogspot.com/2006/11/what-knitting-is.html
techknitting.blogspot.com/2007/03/mysteries-of-knitting-part-1-tale-of.html
Hope this helps! (And I do recommend trying knitting too, because the hand motions are quite different than crocheting, so that might help your hands! Also, to Eleanor: there are Tunisian/Afghan crochet hooks in tons of sizes, why not use them to knit? I’ve thought of it, and only haven’t due to lack of time!)