Tip: Feeding Yarn Through Button Holes or Beads
Whether you’ve made a sweater, a phone cosy, or jewellery, sometimes you want to add a button to your yarn project and run into a problem… For a perfect match, it’s nice to use the project’s yarn to attach the button – whether that’s to minimise ends to weave in, or just give a polished look. But, while it’s fairly easy to find a button with holes big enough to fit the yarn through, it’s very rare to find a button that has a hole large enough for both the yarn (doubled) and the eye of a yarn needle!

Below, I’ve shown an example (from a Crochet Braid Bracelet, pictured above). The hole on this shank-backed button is just large enough for my yarn to fit through, but the yarn is too floppy to push through the hole. When I try, it either bunches up and refuses to go through, or separates into plies.
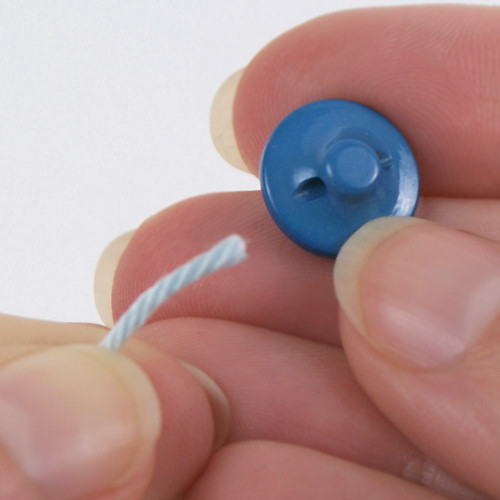
The simplest trick is to wet the end of the yarn to keep the plies together while you thread the end through the buttonhole – the same technique as licking your sewing thread before you thread a hand-sewing needle. But sometimes that just isn’t enough, and with a long buttonhole like this one and/or a close fit, the yarn is still too floppy to make it right through the buttonhole.
There’s just no way to get that yarn through that buttonhole… Or is there?
Yes there is! Here’s the magic, you need to stiffen the end of the yarn before you thread it through the button, so it’ll act like its own needle and pass easily through any buttonhole that’s large enough to fit a single strand of the yarn.
The easiest way to do that is with basic white craft glue, and here’s how to do it:
- Squeeze a small drop of white glue onto the end of the yarn.
- Using your thumb and fingertips, press and roll the end of the yarn to distribute the glue through the fibres of the yarn. For threading normal buttons, you only need to dampen about 1/2″ (1 or 2 cm) of the yarn with glue.
- Twist the wet plies together by rolling between your fingertips in the direction of the twist of the yarn, to hold the plies neatly together.
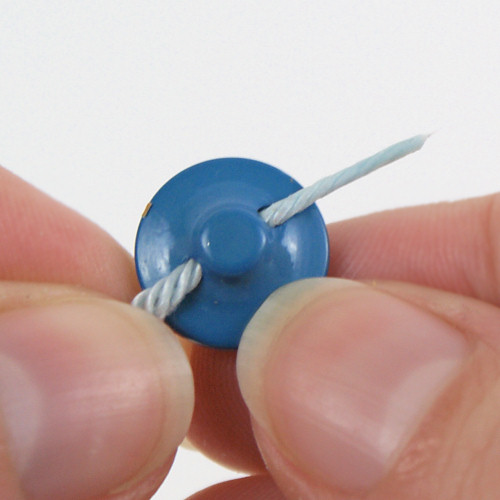
- Press the tip of the yarn gently between your fingertips to form a nice rounded point (see above photo).
- Leave the glued yarn to dry for a few minutes (while you wash/rub the glue off your fingers) – although, if you’re impatient, it doesn’t need to be perfectly dry to work!
- Thread your yarn through your buttons as desired.
- Snip off the hardened end of the yarn with scissors.
Easy! It works the same way as the plastic-coated ends of your shoelaces: compressing the yarn into a tight, stiff point that can pass easily through the hole. This method also works on embroidery floss, crochet cotton, or any other type of thread you want to pass through a small hole.
Bonus tip: You can also use this technique for stringing beads onto yarn or thread where the bead hole is too small to fit a doubled strand of the yarn – perfect for bead crochet, or even stringing children’s necklaces!
I hope you find this helpful next time you’re trying to feed yarn through a buttonhole (or bead) – it’s a handy little trick. 🙂


Elizabeth said
THANK YOU. I was getting really frustrated as I’m new to macrame and am struggling to get my cotton cord through these wooden beads. i was shoving it through with a needle when i happened to think, other people have to have this problem. thanks for saving my night!!
Sharon said
Thank you so much for these tips on how to thread yarn thru beads, buttonholes, etc. Thank you also to all those who left comments with their own tips!
Caroline Sandford said
I sometimes use a piece of sewing thread or dental floss – fold it, push a loop through the button and use it to catch the yarn and pull it through the button. Like a needle threader.
Also works with hair if you’re really stuck for tools!
wendy said
just a tip for you . i thread all my buttons with a 1.50 hook or if the button smaller i use a smaller one. hold tight and pull through. hope this helps
June said
Thanks Wendy, that’s a great tip to remember for those buttonholes that are slightly larger than the ones I was using (the doubled yarn would never have fitted through mine, no matter how tiny the crochet hook!) but that are still too small to accommodate the eye of a yarn needle.
Beadahs said
Great tip. Sometimes it’s the simplest solutions that evade you when you’re stuck on a project. I also like the fact that it doesn’t require you to buy anything (if a crafter doesn’t have access to some craft glue then there are bigger problems there). 🙂
Ann Connellan said
You are welcome, June. And thank you as well for all the tips and beautiful patterns you post on your blog. I love reading it and learning new things. Hope you are well, Ann
Ann Connellan said
Hi June, I have done this by running my yarn over beeswax like the cake I use for my sewing thread. I usually take the wax cake out of the holder and press the yarn against the wax with my thumb and pull so the end of the strand is coated with wax. I do this several times to coat it well, then roll it between my fingers to shape it as you do with the glue. Trim the end to get rid of any fuzzy bits and thread it through the button or whatever. It works like a charm. No waiting for glue to dry, either. I hope this helps you and others. I like the idea of using a bit of glue on any knots made in the yarn after sewing the button.
June said
Thanks for adding this info, Ann – I’m sure it’ll be useful for those who have beeswax on hand 🙂
Doug said
I wonder if nail polish would work (that was my guess until I read glue).
Cool!
June said
I think nail polish might get a bit messy while you twist the plies together and shape them… One extra advantage of white glue is the easy clean-up: it’ll just rub off your fingers if you rub your fingertips together, or you can wash it off (no nail polish remover required!)
Diana said
Actually I’ve always used nail polish for this. Clear nail polish of course, since it’s a lot easier in my house to find nail polish than liquid craft glue. I never found the mess on my fingers to be too much. When you touch nail polish right away you can rub it off your fingers pretty quickly 🙂
June said
I stand corrected! Thanks 🙂
michelle said
great idea thanks for the tip