PlanetJune by June Gilbank: Blog
PlanetJune Craft Blog
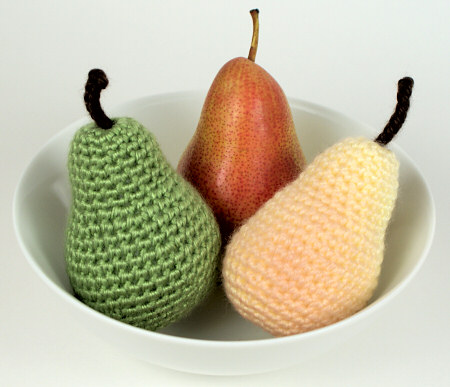
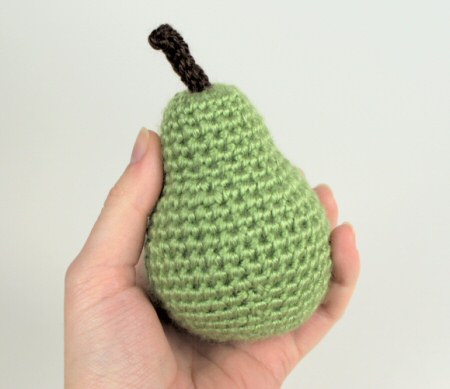
Latest news and updates from JuneAmigurumi Pears
© June Gilbank 2011
A realistic, beautifully shaped amigurumi pear. Crochet a bowlful in greens, browns, yellows, and/or reds, to make a stylish decorative centrepiece, or add a pair of safety eyes and an embroidered smile to make a sweet toy 🙂
This pattern is Donationware – the pattern is available for free, but if you like it please consider sending me a donation to show your appreciation:
Send me a donation and receive the easy-to-print PDF version of the pattern as a thank you!
Donations of any size are much appreciated. Just add the amount you wish to donate, and, once you have checked out and paid, your pattern will instantly be available to download from your PlanetJune account.
The complete pattern and instructions are available below, regardless of whether or not you choose to pay for them 🙂
This is a PlanetJune original crochet pattern. Feel free to use items made from this pattern however you wish, but I’d appreciate credit as the pattern designer. Please do not reproduce the pattern anywhere else; instead post a link to www.planetjune.com/pears
Not ready to make it yet? Add it to your Ravelry queue: 
Terminology
| ch | chain |
| invdec | invisible decrease Note: If you prefer, you may use a standard sc2tog decrease in place of each invdec. |
| sc | single crochet (double crochet for UK/Aus) |
| sl st | slip stitch |
| st | stitch |
You will need…
- E US/3.5mm crochet hook
- Small quantity of worsted weight yarn in green, yellow, light brown or red, and dark brown or black (for the stalk)
- Stitch marker
- Yarn needle to weave in ends
- Polyester fibrefill stuffing
- Optional: blush makeup and a large makeup brush
Notes
- Do not join at the end of each round; rounds are worked in continuous spirals.
- Use a stitch marker to mark the beginning of each round. Move the marker up each time you start a new round.
Pear
worked from top down
With a pear-coloured yarn, make a magic ring, ch 1.
Rnd 1: 6 sc in magic ring. (6 st)
Rnd 2: 2 sc in each st around. (12 st)
Rnd 3: (2 sc in next st, sc in next 3 st) three times. (15 st)
Rnd 4: sc in each st around. (15 st)
Rnd 5: (sc in next 2 st, 2 sc in next st, sc in next 2 st) three times. (18 st)
Rnds 6-9: sc in each st around. (18 st)
Rnd 10: (2 sc in next st, sc in next 2 st) six times. (24 st)
Rnd 11: (2 sc in next st, sc in next 3 st) six times. (30 st)
Rnds 12-13: sc in each st around. (30 st)
Rnd 14: (2 sc in next st, sc in next 4 st) six times. (36 st)
Rnds 15-17: sc in each st around. (36 st)
Rnd 18: (invdec, sc in next 4 st) six times. (30 st)
Rnd 19: sc in each st around. (30 st)
Rnd 20: (invdec, sc in next 3 st) six times. (24 st)
Rnd 21: sc in each st around. (24 st)
Rnd 22: (invdec, sc in next 2 st) six times. (18 st)
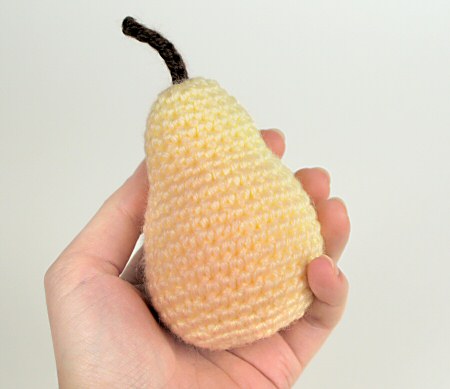
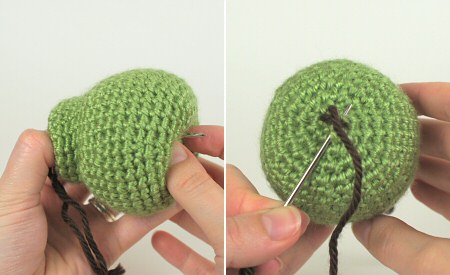
Rnd 23: (invdec, sc in next st) six times. (12 st). Stuff pear through hole, making sure to push the stuffing right up to the tip of the pear.
Rnd 24: invdec six times. (6 st). Cut the yarn, leaving a long (approx 12″/30cm) yarn end.
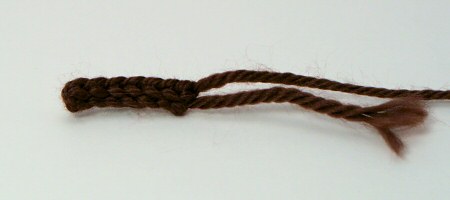
Stalk
With brown or black yarn, ch 7.
Row 1: sl st in 2nd chain from hook and in each remaining chain. (6 st)
Note: I like to work into the back bumps of the chain, but you can work into the chain normally if you prefer.
Cut yarn, leaving a long (approx 12″/30cm) yarn end. Draw end through last loop and pull tight to fasten off.
Finishing
Using a yarn needle and the long yarn end from the pear, close up the remaining hole at the bottom of the pear. Pass the yarn end through the pear, coming out somewhere along its side. Draw the yarn tight, and snip the end close to the pear. The yarn end should retract back inside the pear after it is cut.
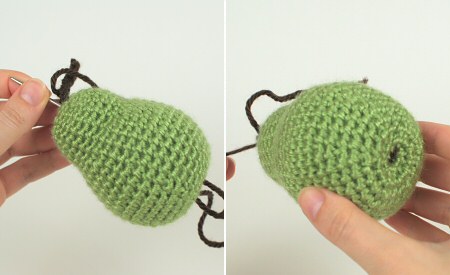
Using a yarn needle and the long yarn end from the stalk, pass the yarn through the pear from top middle to bottom middle (you’ll have to squash the pear to get the needle all the way through!), so the base of the stalk sits over the magic ring at the top of the pear.
Make 3 small overlapping stitches at the bottom of the pear, to form an asterisk shape.
Pass the yarn end back up through the pear to the top, then pull the yarn tighter so that the bottom of the pear is drawn up slightly to help flatten the base.
The top of the pear may have been squashed down when you tightened the yarn. If so, insert the yarn needle under a few stitches at the top and pull up to lift the top of the pear back into shape.
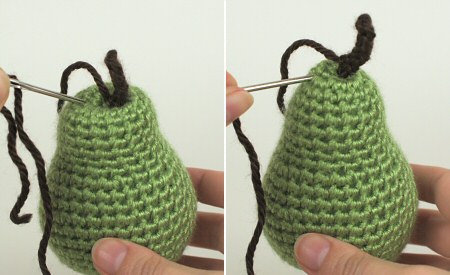
Knot the yarn end and the starting tail from the stalk together, then thread both ends onto the yarn needle and pass them through the pear, coming out somewhere along its side. Draw the yarn tight, and snip the ends close to the pear. The yarn ends should retract back inside the pear after they are cut.
Squeeze and squash the pear to redistribute the stuffing inside and coax the pear back into its perfect shape.
Optional: blushed pear effect
To give your pear a realistic ripe-and-juicy glow, load up a large makeup brush with blush makeup, and pounce the colour onto one side of the pear. Keep it as a subtle shading, or build up the colour with additional blush.
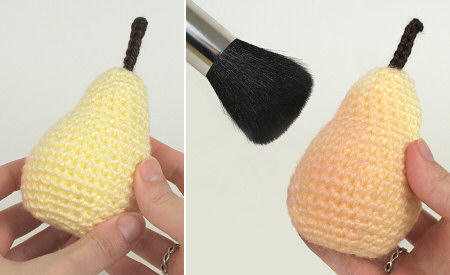
Note: The blush colour obviously won’t stand up to a lot of playing, or washing, so keep this addition for a purely ornamental pear, not a toy!
I hope you enjoy this pattern. Please leave me a comment below if you do, and consider leaving me a donation. Thanks!
38 Comments »
Leave a Reply
Quick Links: Crochet

Quick Links: Crafts


Welcome to PlanetJune!
Hi, I'm June. Welcome to my world of nature-inspired crochet and crafting. I hope you enjoy your visit!
If you'd like to get in touch, you can contact me here.


Gina said
Thank you so much for this pattern.
In June I got diagnosed with a brain tumor. After the 12 hour operation, what my Dr thought was going to be the size of a mandarin orange, ended up being the size of a pear. The pattern, using an e hook and standard weight yarn is identical to what the dr removed.
I made this as a Christmas ornament because a pear really signifies 2023 for my husband and I. That I got through and am doing well.
Thanks so much.~G
Katie said
Thank you for all your wonderful patterns. I can’t wait to finish my very hungry caterpillar set with many thanks to you for providing these great patterns
Bev said
Thank you for the pear pattern. It turned out great. I’m struggling with getting a yarn needle to go from the top of the pear to the bottom through the fiber fill. What size needle do you recommend?
June said
I just used a regular yarn needle. If you look at my photos, you can see that I squashed the pear a lot to get the needle to pass all the way through from top to bottom – don’t worry, it’ll bounce back once you release it! (If your stuffing is too firmly packed to let you do that, you can skip this step, but your pear will have more of a rounded base.)
Sue Bee said
Thank you for the great pattern – I have made 5 so far!
About the blush effect, I think you could probably keep the blush color longer if you (after you apply the blush) spray it with some fixative for pastel paintings or even hair spray. Even then, it would not withstand a lot of handling. Also, you could use artists’ pastel powder (shave a little bit with a knife or file) for any color blush, not just makeup blush.
Sussi said
Hello! I was wondering… This shape is perfect for a amigurumi I wanted to make, but I want to make it huge! At least a foot in length head to (pear)toe. How would I math it to make it that size but keep the shape you think?
Thank you for the sweet pattern!
June said
Sussi, please see my Resizing Amigurumi article for tips on this 🙂
ELie said
Thank you! I am trying to make my mom a fruit bowl and this pear is just what is needed!
Mandi Towne said
Thank you so much for the wonderful pattern for the pear. You made it so easy to follow! I also wanted to than you for introducing me to the invisible crochet together stitch, I love it!
My pear came out so lovely?
Sharen said
Hello June – Thank you so much for the fruit patterns. I have a new great-grandbaby and my granddaughter has asked me to crochet fruit/foods so her baby isn’t playing with a lot of plastic. I made the apple in Sugar’ncreme red, and am working on a lemon in Loops & Threads yellow. What yarn & colors did you use for the pears?
June said
Sharen, I used Bernat Satin for my pears, but the most important thing is to look for a green, yellow or brown yarn so it looks like a pear – any worsted weight yarn you have in an appropriate shade will work 🙂
Aran said
Thank you for the pattern!
Vidya rajarao said
Planet june thank you very much for your amigurmi crochet patterns. I learnt heart, pears from your blog. Still i am the beginner. I will go through all your patterns. Thank you once again.
Lori Verbrugge said
I had just learned to crochet and had no idea what I was doing–invisible decrease? Huh? 🙂 I was amazed how easy this was, though, the the thorough instructions and detailed photos. It was so fun and easy I had to make several more pears (in fun colors) and a couple apples for a colorful fruit basket! This project gave me the confidence to tackle LOTS of other amigirumi patterns!
Summer Van said
love the blush idea! so not only can I wear my makeup, but I can put it on the stuff I make too! I’s a win, win situation!
susy said
this are so beautiful, I’m making every fruit I found, I’ve making smaller ones in the past, this r much bigger. wonder if u have smaller ones
June said
Hi Susy, they are designed to be life-sized, but you can scale them down by using a smaller hook and finer yarn – see my post Sizing Up (and Down) for details 🙂
Audrey said
would look so cute w/ eyes and mouth!!
Georgina Santos said
wow! amazing tutorial!!! thank you so much!!! 🙂
shanthi dene said
Your patterns are very good, easy to follow and comes out exactly like the picture.
Thanks.
Anna said
Hi! (: I love your designs!~ They give a home kind of feeling. (: I was just wondering what the name of the yarn–or any good soft yarn that you use–is because I’m not sure what to get. Sometimes I end of getting the rough ones when I don’t want to! Thanks 🙂
June said
Anna, I wrote about my favourite yarns here (just read the top part of that post) – hope that helps!
Anna said
Thank you so much!! (:
Debbie Morrison said
i thought i would let you know their is a misprint on rnd 5 it says sc in next 2 st,2 sc in next st sc in next 2 it should be sc and next 3 st, 2 sc in next st sc in next 3 st 3 times to come up with 18 sc
June said
Thanks Debbie, but there’s no misprint: (sc in next 2 st, 2 sc in next st, sc in next 2 st) gives a total of 6 stitches. Repeating that 3 times brings you up to the 18 st total for the round 🙂
Debbie Morrison said
i don’t know i did it my way and came out with 18 sts
sue said
It may come up with 18 stitches, but there are two left over doing it your way. Doing it Debbie’s way gives the 18 stitch count you are asking for. Thanks.
June said
I promise there is no mistake in the pattern! I believe you must both have misunderstood how the brackets work, or are misreading the pattern. Let me write the round out for you in full:
Follow this exactly and you’ll turn the 15 sts from Rnd 4 into the 18 sts at the end of Rnd 5! I hope it makes more sense to you now 🙂
Superknitter said
Thanks for this pattern. I knocked up a pear shaped doorstop using a 12mm hook and a sock filled with rice! Looks great I just hope my kids leave it alone coz they like it so much! Photo of it on my site .
cher said
The crochet fruit is so realistic, it like those wooden fruits… I like to try this to see how turn out.
SOLANGE said
Wow, that’s gorgeous! You did a great job!
Amalia said
Lovely! Thanks a bunch for the pattern
Hugs
Amalia
Megan said
I am so going to learn to crochet just so I can make these for my boyfriend’s mother for Christmas. Thank you!
Barbara said
It’s just perfect and so is the aardvark. Just saw an aardvark on Jay Leno several nights ago and yours looks exactly like that one.
Novella G said
As usually great job. Miss you, glad to see your site back up. I’m not using my old email n_o_v_c_g@yahoo.com. I look for a Deer Buck to make for a little boy. You have any ideas. Will come back very very soon.
Thanks again
tara said
thank YOU sOOOOOOOOOOOO Much**********
bisous*** from France!!!^^
Katie said
Love the blush idea! They are really sweet.
Lindy said
Lovely – really gorgeous pears – good enough to eat 🙂
Love, Lindy xx