PlanetJune Craft Blog

Latest news and updates from June

the ultimate finish for amigurumi

Would you prefer to see the video tutorial demonstrating this method? If not, read on:

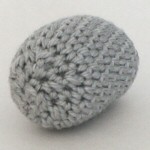
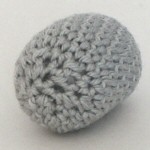
I’ve written before about how there are several ways you can finish off a closed piece in amigurumi, and there’s no one ‘best’ method for closing that remaining hole to give the neatest finish. I’d like to officially change my opinion on that point! Here are my previous results:

Since I wrote that post, I’ve been doing more experimenting, and I think I’ve finally found the definitive method to give the best possible finish to a closed piece in amigurumi. It works almost like a Magic Ring (and we all know how good that is!) so that’s why I’ve named this technique the Ultimate Finish for amigurumi:

ultimate finish for amigurumi by planetjune
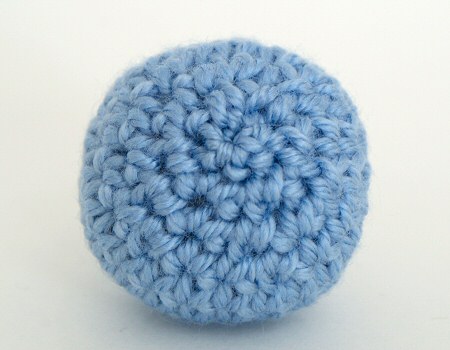
Where’s the hole? This is the beauty of the Ultimate Finish

(Of course, to get the best finish, you’ll also want to use the Invisible Decrease instead of sc2tog for all your decreases – but that goes without saying, right?)

Ultimate Finish for Amigurumi

The almost-finished stuffed piece, with 6 sc remaining:

ultimate finish for amigurumi by planetjune

Cut the yarn, leaving a long yarn end. Draw the end through the final loop on the hook and thread it onto a yarn needle.

You’ll be using the front loops only for the next stage; those are the loops that are furthest from the hole:

ultimate finish for amigurumi by planetjune

Working in the same direction as you crochet (clockwise for right-handers; anticlockwise for left-handers), insert your needle under the front loop of the next stitch, so the needle goes from the centre of the hole to the outside (below, left). Draw the yarn taut.

Move to the next stitch and repeat: insert the hook under the front loop of the stitch, again going from the middle of the hole to the outside (below, right). Draw the yarn taut, but don’t tighten it fully yet.

ultimate finish for amigurumi by planetjune ultimate finish for amigurumi by planetjune

Repeat for the remaining stitches until you have woven the needle through all 6 stitches, going from the middle to the outside each time (below, left). Now pull the yarn tight (below, right). The hole will close up just like a magic ring! It does leave a small bump on the outside though…

ultimate finish for amigurumi by planetjune ultimate finish for amigurumi by planetjune

To get rid of the bump, insert the needle through the middle of the ring you’ve created, going into the piece, and bring it out an inch or two away. Pull the yarn tight and the bump at the closed end will disappear, leaving a nice smooth finish.

ultimate finish for amigurumi by planetjune ultimate finish for amigurumi by planetjune

Finally, snip the end close to the surface, and the cut end will retract back inside the piece.

ultimate finish for amigurumi by planetjune

It’s nothing revolutionary, but weaving through the loops in this way (always going from middle to outside) and then pulling it closed like a magic ring really does give the best finish I’ve found. Give it a go and let me know what you think of my Ultimate Finish!


Do you find my tutorials helpful? If so, please consider making a contribution towards my time so I can continue to create clear and concise tutorials for you:

Thank you so much for your support! Now click below for loads more crochet video and photo tutorials (and do let me know what else you’d like me to cover in future tutorials…)

See more helpful PlanetJune crochet tips and technique tutorials

70 Comments »

  1. hellbilliegirl78 said

    I

  2. KiboSanti said

    Well I feel like a dummins. I’ve been stitching bottom-up, thinking I was doing this, and wondering why it looked that -teeny tiny- bit off.

    Thanks for the refresher!

  3. BRENDA Jones said

    June, I must thank you! my invisible decreases were awful, the method I learned first was to yarn over before going thru the second front loop, I had big horrible gaps! Now with your tips and method they are perfect! The only thing I am sad about is that I did not read this tip for the perfect finish before I closed up what would have been my best effort yet!
    Ah well, I have book marked your page and will be following your tips from now on!
    Thank you again.

  4. Nicole said

    Your tutorial was very good, I have been crocheting for 40 years and it was easy for me to understand and I feel like a beginner could understand it as well. Awesome job!

  5. Nancy L Gessner said

    This is wonderful! I was making Easter eggs and found the link to this page on the pattern page. It is so easy and makes a great finish! Then I followed the link to your instructions for the ‘Invisible Decrease”. That is wonderful also. No more ‘holes’ that appear when I am decreasing with sc 2 tog! You are the best! I always felt that there had to be a better to way to decrease that wouldn’t leave a large space between stitches. Thanks again!

  6. Tam said

    Oh my gosh! This totally worked and my finish is beautiful Thank you so much for sharing this. So stoked right now!

  7. Lindsay said

    Thank you so much!! I’ve made so many stuffed animals but the finish always looked so messy, but not anymore!!

  8. June Waterhouse said

    Gave up making balls some time ago as never happy with the decreasing and closure but really glad to have found your tips.big soft balls are lovely for little ones to play with indoors.
    June

  9. Madhavi said

    This is so nice and perfect . I am so very thankful to you and very happy to learn such a fabulous skill . Thank you for taking all the efforts and explaining this so nicely .

  10. Kristine Smith said

    I love this technique, especially the invisible decrease. I am making crochet dogs and the pattern calls for lots of decreases. This was leaving lots of gaps into the project where the stuffing was showing through. Not anymore.

  11. T said

    I loved so much! Thank you soooooooo much.

  12. Sonia said

    Thank for takigng the time and trouble to show with details and precision this lovely method

  13. Wenona Rigali said

    Thank you sooo much for taking the time to show this. I’d long ago resigned myself to either stay away from balls or make them not so well. It took one try with the magic ring closure and with the invisible decrease to make a beautiful ball!!! So happy!!
    Thank you again!!!!

  14. Celia said

    Love this technique! I’m making Olaf for my granddaughter & this worked wonderfully! Thank you so much for sharing!

  15. Vicky said

    Thank you so much for sharing! This is a fantastic technique! I also used the invisible decrease. They have made my Easter eggs look so much better! Thanks again!

  16. Julie Dawson said

    Fabulous. I’m relatively new to amigurumi and really struggle with a neat close. This worked perfectly. Thank you.

RSS feed for comments on this post

Leave a Reply

Thank you so much for taking the time to leave a comment here! I read and appreciate every comment. I only respond to questions here on the blog, so please return to this page to see my reply, or check the box below to subscribe to new comments by email.

Please note that I can only answer questions related to PlanetJune patterns and tutorials (see details), and I can only respond to questions or comments written in English. Thank you :) - June

Your email address will not be published. Required fields are marked *

  • Quick Links: Crochet

    navigation: arrow

    buy crochet patterns and accessories from my online store

    'Everyday Crochet' and 'The Essential Guide to Amigurumi' crochet books by June Gilbank

    Crochet video tutorials and step-by-step photo tutorials

    Free PlanetJune crochet patterns

    Frequently Asked Questions

    Quick Links: Crafts

    navigation: arrow

    Punchneedle Embroidery information, ebook & patterns

    Papercraft ebook & tutorials

    Free PlanetJune craft projects & tutorials

  • Blog Post Categories

  • Blog Archives

  • Welcome to PlanetJune!

    June Gilbank

    Hi, I'm June. Welcome to my world of nature-inspired crochet and crafting. I hope you enjoy your visit!

    If you'd like to get in touch, you can contact me here.
    crocheted Canadian flag by PlanetJune
  • A fanned-out pile of the books Everyday Crochet and The Essential Guide to Amigurumi, with text 'The answers to all your crochet questions at your fingertips - find out more'
  • Support PlanetJune!

    Want to say thanks? You can send me money in seconds at paypal.me/planetjune (over $20) or paypal.me/planetjune2 (under $20) or send me a donation through my shop.

    Or simply click through from my links before you shop at Amazon, Etsy, KnitPicks, LoveCrafts or Crochet.com, and I'll make a small commission on your purchase, at no cost to you! Start here:

    ♥ Support PlanetJune ♥

    Tip: This link is also in the footer of every page!

    Thank you so much for your support!