Fastening Off
Fastening off neatly can make the difference between a really nice finish and a messy look. Most crochet patterns will just tell you to “fasten off”, “finish off” or even just to “FO”, with no explanation of what that actually means! There is no one definitive answer for how to finish the ends, so I’m going to cover a few options that you may find useful.
I’m going to cover three different scenarios in this tutorial:
- Closing up a piece
- Finishing an open edge that will be joined to another piece
- Finishing an open edge that will be visible (Invisible Finish)
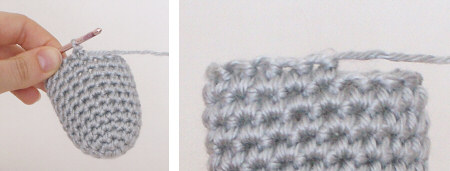
Closing up a piece
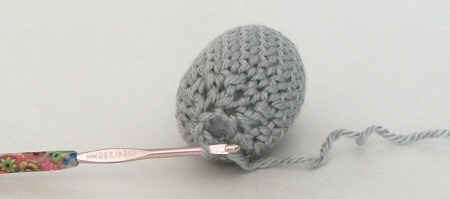
When you’ve finished the last round, you’ll probably have about 6 sts left in a ring (this will vary depending on your pattern). There are several methods you can use to close up that last gap:
 |
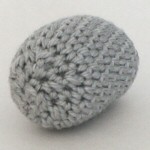
Weave through front loops: Cut the yarn leaving a long yarn end, then draw the cut end through the last loop and pull tight. Thread the yarn end through a yarn needle and gather the final stitches by weaving the needle through the front loop of each st around the gap. Pull tight to close the gap, then knot the yarn around the post of a stitch. |
 |
Sc2tog across the gap: (skip 1st st, insert hook into 2nd st and draw up a loop, skip 3rd st, insert hook into 4th st and draw up a loop, yarn over and draw through all 3 loops on hook). Cut the yarn leaving a long yarn end, draw the cut end through the last loop and pull tight to fasten off. |
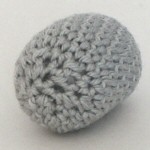 |
Spoke stitches through centre: Cut the yarn leaving a long yarn end, then draw the cut end through the last loop and pull tight. Thread the yarn end through a yarn needle and stitch up through a stitch, inserting the needle in the middle of the hole and coming up to the outside, under the ‘V’ of the stitch. Cross to the other side of the ring and repeat. Repeat for as many stitches as desired. Knot the yarn around the post of a stitch. |
All methods: Pass the yarn through the inside of the piece and come out on the other side. Pull tight, then snip the end off close to the surface so it will draw back inside the piece.
Which method is best? As you can see from the photos, any of the above methods work, or you could invent one of your own. After careful examination I think the first method (weaving through all the front loops) is the neatest, but it’s a close call. Just experiment and see which finish you like best – the most important thing is that you don’t leave a large hole!
UPDATED: I’ve changed my opinion on closing up a piece! See my Ultimate Finish for Amigurumi for the neatest method, in my opinion.
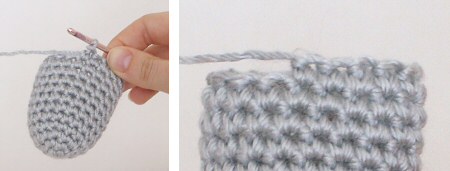
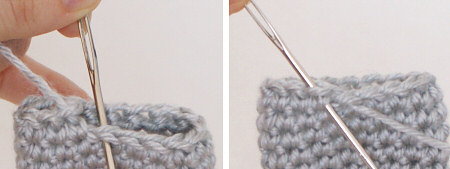
Finishing an open piece that will be attached to another piece
This is really quick and easy!
Join with a sl st to the next st (this will help to minimize the jog in height if you’ve been working in a spiral, and make it easier to join the piece without leaving a hole). Cut the yarn leaving a long yarn end, draw the cut end through the last loop and pull tight to fasten off.
Leave the yarn end for now – you can use it to stitch the join to the next piece.
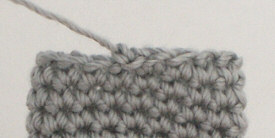
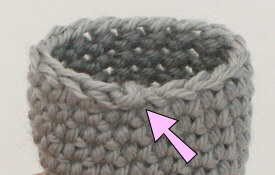
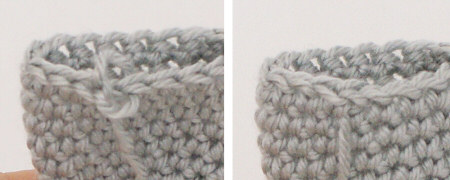
Finishing an open piece that will be visible (Invisible Finish)
If you look at the sl st join (marked with an arrow) above, it’s not the neatest join in the world. It doesn’t matter if it will be covered up, but what if you’re making something like a crocheted teacup and that top edge is going to be visible? Here’s a way to create an invisible finish!
Note: For this join to be truly invisible, you need to work in joined rounds, not a spiral (i.e. at the end of each round, join with sl st to next st, and ch 1 to begin the next round). But it also gives a much neater finish to regular spiral-crocheted amigurumi, as I will show below.
(Left handed? Jump down to the lefty version below – it’ll be clearer for you :))
Invisible Finish (right-handed)
L: Do not join at the end of the last round. Cut yarn, leaving a long yarn end.
R: Pull on the remaining loop on the hook, increasing its size until the cut end is drawn through to the top.
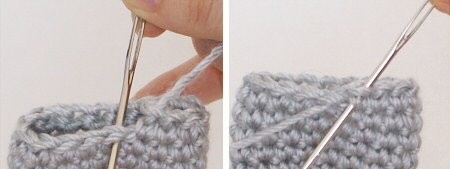
L: Thread cut end onto yarn needle. Insert needle from the back under both loops of the next stitch and pull through – do not draw too tightly.
R: Insert needle back into the middle of the previous stitch, between the two loops, and going down under the front vertical bar of the stitch.

L: The loop you have formed (exaggerated in size above so you can see it clearly)
R: Pull the yarn end gently until the loop is the same size as the ‘V’ at the top of all your other stitches.
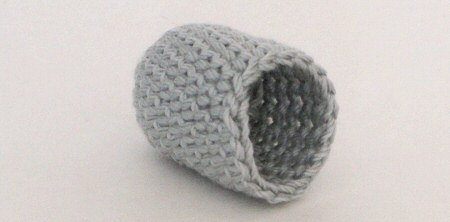
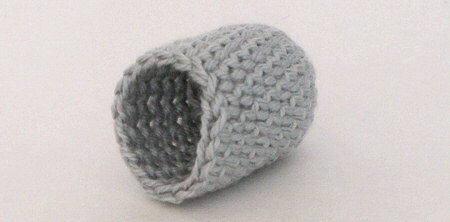
Draw the yarn end to the inside (or back) of the piece and weave the end through several stitches. Change the direction of your weaving to lock the end in place. Cut yarn end and admire your invisible join!
And again for the left handers…
Invisible Finish (left-handed)
L: Do not join at the end of the last round. Cut yarn, leaving a long yarn end.
R: Pull on the remaining loop on the hook, increasing its size until the cut end is drawn through to the top.
L: Thread cut end onto yarn needle. Insert needle from the back under both loops of the next stitch and pull through – do not draw too tightly.
R: Insert needle back into the middle of the previous stitch, between the two loops, and going down under the front vertical bar of the stitch.
L: The loop you have formed (exaggerated in size above so you can see it clearly)
R: Pull the yarn end gently until the loop is the same size as the ‘V’ at the top of all your other stitches.
Draw the yarn end to the inside (or back) of the piece and weave the end through several stitches. Change the direction of your weaving to lock the end in place. Cut yarn end and admire your invisible join!

Loved this tutorial? I have so many more amigurumi tips and tricks to share with you!
Boost your amigurumi skills with my latest book, The Essential Guide to Amigurumi, your comprehensive guide to amigurumi techniques and tips.
Do you find my tutorials helpful? If so, please consider making a contribution towards my time so I can continue to create clear and concise tutorials for you:
Thank you so much for your support! Now click below for loads more crochet video and photo tutorials (and do let me know what else you’d like me to cover in future tutorials…)


Jana Hunter said
I’m sure glad I’ve come back to revisit some of your tutorials! I’ve been doing the “invisible join” for a long time, but I’ve been doing it WRONG! LOL! I’ve been inserting my needle through the FRONT of the next stitch instead of from the back. I’ve been thinking they don’t look as neat as they should, and this is likely why!
Something I started doing when I have to join rounds is ch1 (or however many) and then doing the first stitch in that SAME stitch I ss’d into. Works very well for not leaving a gap, especially when doing a dc.
Thanks for all of your tutorials!
June said
That’s not really wrong, Jana – the Invisible Finish just duplicates the ‘V’ at the top of the next stitch, so you can choose to start it by going from back-to-front or front-to-back and you should end up with essentially the same result. The neatness of the finish is mostly due to making sure you insert the needle right down through the middle of the previous stitch, not just under the top loop – maybe that’s what you’ve been missing!
Amanda said
I love this tutorial, but what I’m trying to figure out is how to fasten off my piece. The pattern just says fasten off, but it’s worked in one continuous spiral, as in there is no ch 1 in between each round. I have to make another foot and then join them to the body, so I’m trying to figure out which is the best fasten off for me from this tutorial. I would love any help and advice that I could get with this. This piece is rather important and it needs to look as neat as possible. Thank you for reading! ^_^
June said
I assume this isn’t a PlanetJune pattern, Amanda? My patterns always explain how to fasten off each piece – whether you need to slip stitch first, or use an invisible join, or just fasten off – but if it is one of mine, please let me know which, so I can advise further. If not, I suggest you contact the pattern designer for further clarification on what they intended, or just experiment to see which method gives you a finish you’re happy with.
Ally said
June, thanks for this. I’m still new at amigurumi and knowing how to finish off nicer is a huge help.
natalie said
Hi , do you have any video tutorials that show how to sew the head to the body ? when I try , it always comes wobbly or not enough stuffing for the neck, and even the head ends up looking sideways.
Thanks
June said
Natalie, the method for sewing the head to the body depends on the pattern you’re using – there isn’t just one technique to use for all amigurumi. If you’re having problems with a PlanetJune pattern, please let me know which one and I’d be happy to help!
Zoe said
Thank you very much for this. Especially the invisible one for visible edges. It was very helpful, my baskets look a lot more professional. Zoe.
Dorothy Craik said
When it says to not finish off does it just mean to cut the yarn and
leave a long end. It’s not clear. Thanks.
June said
Are you talking about a specific pattern, Dorothy? I’m not sure I can answer that without some context… I don’t think I use that phrase in any of my patterns, but, if it is in one of mine, I’d be happy to clarify it for you! If it’s someone else’s pattern and the meaning isn’t clear, you should contact the designer for clarification of what they meant.
Vickie said
Thank you so much for sharing your knowledge. This is very simple and makes the finish product beautiful.
Desireepica said
Hi June!
Thank you so very much for the instructions. I am making a lalaloopsy doll and had a number of stitches left and did not want to leave a bump on top of her head. Working through the front loops and closing it off really worked! Thank you.
Mewsicat said
This is the clearest ‘invisible fasten off’ I have seen yet! Thanks so much! It works on Granny Squares, too!
>^,,^<~
Julie said
This blog rocks!!!! I’m trying to learn and the lack of simple instructions to teach is terrible. You are a life saver! Thank you!!!!
Amy said
These look like some very helpful pointers! I’m having trouble with the late one, though (finishing a visible row)… I’m not following what you mean in the second step where you say, “R: Pull on the remaining loop on the hook, increasing its size until the cut end is drawn through to the top.” Do you mean I should pull on the loop to make it bigger and then pull the cut end through the loop? If so, should I pull it tight? Thanks!
June said
Amy, as you pull the loop it will get bigger and the cut end will get shorter. Just keep pulling on the loop until the cut end is pulled right through to the top and the loop becomes one long length of yarn. (It’s easier to do than to describe!) Don’t pull it tight after that: move straight onto the next step.
Suma said
Hello June!! I like ur blog very much. I am in beginner level but I am able to do well by following ur instructions. Now I started crocheting cute lil animals for my baby.
MELISSA KROLL said
I love this one. I have been thinking about doing some crocheting of animals and with your site as a guide in the difficult times, I know that I am going to do well.
June said
Joanne: Not quite sure what you’re asking, but I’ll email you – I’m sure we can figure it out 🙂
Joanne Davies said
Hi everyone. This site is so helpful! I’m working on a doll, and the pattern calls for me to go from working in rounds to working in rows. I know in June’s Finishing Tutorial she says … For this join to be truly invisible, you need to work in joined rounds, not a spiral (i.e. at the end of each round, join with sl st to next st, and ch 1 to begin the next round). … but i’m having trouble starting to work in rows after i’ve got a raised up round. does this make sense? Can anyone help me with this? Thanks so much! Joanne
Angelica Bays said
Wow…so simple yet…Wow!
Bookworm said
I would love to see this done in a video. I think I get what your saying, but it’s always more clear when you can see it live and happening.
Blue said
Oooh! Totally bookmarked, June.
Thank you!