I’ve had a couple of requests lately from people who like my patterns, but want to make a larger version. So, the question is, is it easily possible to ‘size up’ amigurumi designs?
There are a few of ways I can think of to adjust a pattern, so here are my thoughts on this…
METHOD 1: Double everything. By this I mean, every time the pattern calls for 1 stitch, you make 2 (so e.g. if Rnd 1 is 6 sc, you will do 12 sc) AND double the number of Rnds (so you would repeat your new Rnd 1 with a second Rnd of 12 sc). Note: this is not my recommended method! It would be hard to keep track of your rounds and stitch counts, when you are turning each stitch into four stitches.
If you do want to attempt it, it should work fairly well, as sc is a square stitch (same height and width) so by doubling the length and width you are essentially making each stitch into a 2×2 square of stitches, but it’s not perfect – if I was designing a double sized animal I would even up the rounds – e.g. this method will give you stitch counts like this at the end of the rounds: 12 st, 12 st, 24 st, 24 st, 36 st, 36 st… If I was designing it I would even it up to something like 6 st, 12 st, 18 st, 24 st, 30 st, 36 st so the increases are made evenly and not stepped every 2 rounds.
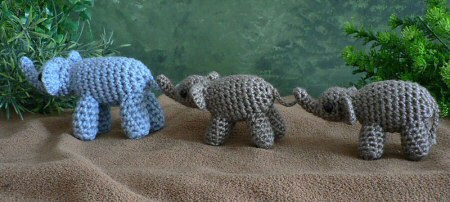
METHOD 2: Use thicker yarn and a larger hook. If you compare the blue and grey elephants below, the greys are made with worsted weight yarn and an E hook and the blue is made with bulky weight yarn and a G7 hook. You can see this has made the blue elephant quite a bit larger.
METHOD 3: Double your yarn (use 2 strands held together) and use a larger hook. You can see the effect of this here:
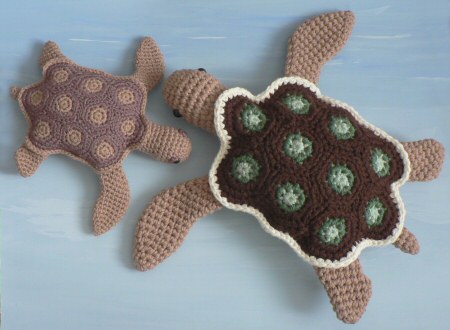
The two turtles use the same pattern, but one uses doubled yarn and a correspondingly larger hook (L instead of G7). The result is a turtle that’s about 1.5 times the size.
Now you could combine methods 2 and 3 to make an ami that’s about double the size of the original, by using 2 strands of a bulkier weight yarn (than the pattern calls for) held together, and a much larger hook. This would be much quicker to make and easier to calculate than method 1, as you would follow the pattern stitches exactly as written.
The downside of using methods 2+3 is that, because each stitch is much larger, the space between the stitches is more noticeable because it’s correspondingly larger. The stitches are also more chunky, so it doesn’t give as smooth a finish as using the finer yarn and smaller hook.
You could also apply Method 2 in reverse to size down a pattern, by using a finer yarn than the pattern calls for, and a correspondingly smaller hook. You can go right down to crochet thread and a steel hook, as shown by bettika67, who turned my life sized guinea pigs:
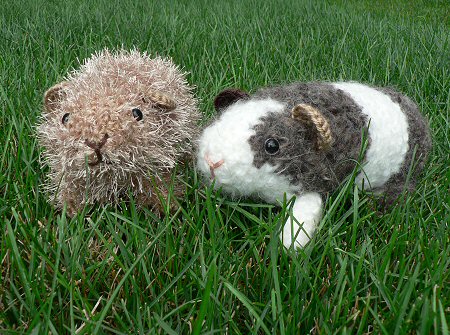
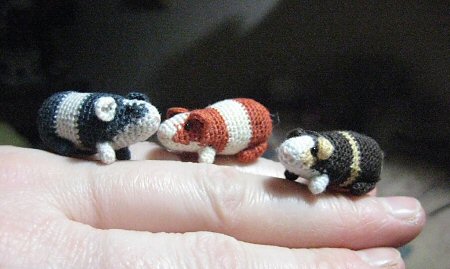
into the most adorable 1-inch piggies, just by using very fine thread and a tiny hook:
So there you go, 3 ways you could increase the size of a pattern, plus one easy method for reducing the size. This advice isn’t limited to amigurumi (although Method 1 is limited to patterns worked in single crochet). For example, you could turn a pattern for something like a baby hat into a child-sized or even adult-sized hat, or reduce a full-size pattern down to child-sized, by using some of these methods. Hopefully this will give some of you more confidence to attempt some resizing of your own!


yanting said
Hi June, would like to know if I use 2 strands of yarn, what size of the crochet hook should I use, ie use one size larger or use double the size, of the crochet hook that I will use for 1 strand of yarn, pls?
Thanks!!
Regards,
Yanting
Gillian Sutherland said
Thank you for the tutorials – I’m currently collecting links to useful sites in order to enable a friend’s granddaughter, who’s learning to crochet. She’s started at school in her home economics classes, and i felt that as she’s an intelligent young woman (13yrs), she’ll easily get the hang of things with the added assistance provided by such sites. I vet each one to see how good they are, and am delighted to add yours to her list.
Anna-Marie said
Fantastic work, the best I came across so far. I need help, i’m fearly new to this. If I use 2 strands of yarn of Vinnis Nikkim (double knit) and 2 strands of Vinnis Serina (4 ply) what size hook should I use for each in amigurumi? or what yarn would you recommend that a available South Africa to use for ami
Thank you.
Kind regards
Anna-Marie..
June said
Anna-Marie, I’m afraid I’m not really familiar with SA yarns – I still use worsted weight yarn from North America for my amigurumi!
For any amigurumi, though, you need the hook to be large enough to hook the yarn without splitting it, but small enough that the stuffing won’t show through between your stitches – you should use a smaller hook than you’d use for normal crocheting.
The hook size depends on both the yarn you use and how tightly you crochet, but, as a starting point, I’d try 3.5-4mm for the doubled DK and 3-3.5mm for the doubled 4-ply. That’s just a guess – you may need to experiment and see what works with your particular yarn and tension.
Anna-Marie said
Thanks June I appreciate it.:)
Anna said
Hi there! In method three, it said to use two strands of yarn together. Would that mean I would have to have two balls of yarn the same colour?
Thanks for this post! I’ve been looking for answers everywhere!
June said
Hi Anna, you have 3 options:
Tiffany Wilson said
Here’s my recommendation for making an amigurumi bigger or smaller – change the number of stitches you start with.
1. Say a pattern calls for you to start with 5 stitches in your magic ring … begin with 6 instead of 5. You might want to make a note of how this will affect the rest of the pattern before you get going – the 2nd round will double, so 12 stitches (instead of 10), the 3rd round of inc, sc 1 will be 3 x 6 = 18 stitches (instead of 15), the 4th round will of inc, sc 2 will be 4 x 6 = 24 stitches (instead of 20), etc. This will yield a tiny bit bigger amigurumi. The more you increase the original number of stitches, the greater the change to the original size of the amigurumi. To make something slightly smaller, decrease the number of stitches from the original pattern.
2. The second step to increase size is to add an extra row(s) in three places : one extra row of increase, one extra row of sc only, one extra row of decrease. So, if the original pattern calls for you inc, sc in 1 st; inc, sc in 2st; etc, through inc, sc in 5 st. Add a row of inc here: inc, sc in 6 st. After the increase rows, most amigurumi patterns have rows of sc in ea st around. If we were making a round body and had 5 rows of inc, the pattern would typically call for 5 rows of sc around. Add one extra row of sc around; in our case we’d sc for 6 rows around. Now add an additional row of dec, so we would start with dec, sc in 6; then dec, sc in 5, etc. If you’re looking for a more dramatic increase in size, you can add more than one row – just always remember that however many rows you add, you need to add them in all three places: increase, plain sc, and decrease.
June said
Thanks Tiffany, these are good general tips for tweaking your basic pattern if you’re designing an amigurumi and find it’s not coming out to be the size you were hoping for!
But (for other readers) if you’re following an amigurumi pattern and want your end product to be larger or smaller than in the original pattern – the point of this post – these tips won’t necessarily work, as:
Vanda said
Hello June.
My name is Vanda and I’m portuguese.
I love amigurumi as well as other handcrafts.
I’ve been looking for amigurumi tutorials in ter internet for so long! But it was very difficult to find anything about it til I found your site. 🙂
Thank you SO MUCH!
I’m sure that with your help I can do something.
Once more: Thank You!
Love
Vanda
iHanna said
Amazing photos all of these and great tips. I hadn’t seen the guinepigs but they are amazing! Great work of art!
June said
Lizzie, Brittany: I know, they are amazing, aren’t they?! Bettika specializes in miniature crochet like that – I can’t really do thread crochet any more because of my hand problems.
Gina: you can buy the pattern from my shop, or commission me to make a finished one for you – I’ve e-mailed more details to you.
Gina @ Six in the Country said
Do you have a shop where I could buy one of those turtles?
Brittany said
o my gosh. either those piggies really are only one inch long, or your hands are HUGE!! I want the piggies! AAAAAAAAAAH! so cute!!!
Lizzie said
OMG those tiny piggies are so adorable! It makes me want to crochet more!