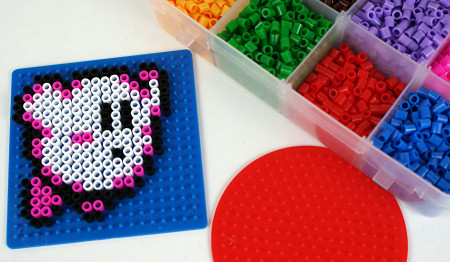
A couple of years ago, I bought 2 bottles of IKEA Pyssla – more commonly known as Perler or Hama beads, or the generic name, fuse beads. If you’re not familiar with them, they’re little plastic beads that you arrange into a pattern or picture on a special pegboard, then heat using your iron to melt and fuse the beads together. You end up with a plastic sheet you can use for keychains, coasters, or as decoration.
On a regular pegboard, each bead melts into a square shape, so you can use any pixelated sprite (a character from an 8-bit video game, for example) as an instant pattern. One square per pixel – it’s like an instant gratification version of cross-stitching, as you can complete a coaster-sized picture in just a few minutes.
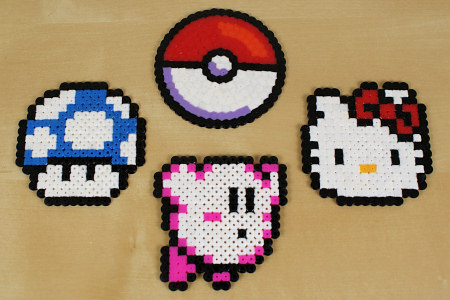
So I borrowed some ideas from sprites other people have made, and searched for game sprite images to make some of my own. Here are my first few:
New coasters! Don’t worry, I’ve tested them and the heat of the hottest mug of tea isn’t enough to melt them 🙂 And, because they’re made of plastic, they’ll be easy to wash clean if they get dirty. You can add a background colour to make your coasters into squares, but I purposely chose round-ish sprites that are large enough to function as a coaster without a background – saves time and beads!
My tips if you’d like to try fuse bead crafting:
If you have access to IKEA, PYSSLA beads and shape boards are much cheaper than the Perler/Hama equivalents (and the bottle of beads is huge and will probably last forever!)
Pre-sort your beads by colour – it makes it much easier to create your designs.
Use tweezers to position the beads onto the pegboard more easily.
I ironed my coasters for longer than the instructions suggest, so they’d melt together more and bond together more strongly.
Before our inter-continental move, I pared down my wardrobe by about half, getting rid of anything worn out, badly fitting, or no longer my style. That’s left me with a very minimal wardrobe, and now I really need to replace some of the items I purged.
Shopping catastrophe
I went clothes shopping for the first time last weekend and it was an absolute disaster… Everything is far more expensive here than in Canada. I have a gut feeling about how much I’d be willing to pay for something that’s okay (not bad looking, functional, plain, fits well enough or can be easily modified, a good basic piece) vs something that’s perfect (I love it and know I’ll enjoy wearing for years, great style and/or detailing, the perfect fit) and these prices were far, far higher than my range. There’s no way I’m ever going to be able to justify paying more than my perfect piece price for a merely okay item.
I spent 2 hours browsing and getting more and more despondent. The only thing I even liked enough to consider was a t-shirt in a sale rack, but then I saw the price tag: reduced from $45 equivalent to $30 equivalent! I’ve paid $30 for a t-shirt once, but it’s my favourite top and has loads of detailing (fitted bodice, lace, pleats, gathered neckline) that, for me, justified the price. This was just a plain striped t-shirt… Um, no.
I left the shirt on the rack and gave up on the whole clothes shopping idea. On my way out, I stopped at the craft store and bought some beads, and then I went home to cheer myself up by making something…
Making is fun
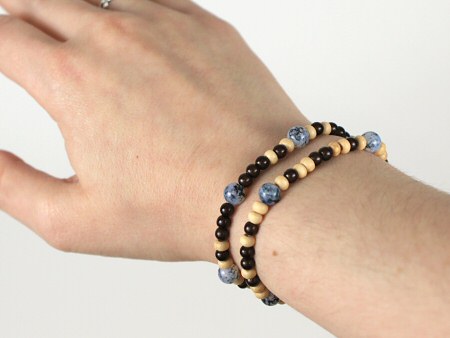
(Please excuse my translucently pale skin – being sick for 6 months does takes a toll on a girl’s complexion…)
Two bracelets and a necklace for under $2 – now that’s my kind of shopping! And because I chose all the supplies myself, I could make sure that the necklace is subtle and will go with all my pink and purple tops, and that the bracelets are bolder and will look perfect next to indigo denim. Being crafty is so much more fun than buying mass-produced, over-priced stuff.
When life gives you lemons…
And that gave me the idea to try turning this disappointment into an opportunity: maybe I can make my own clothes in future..? I can take the time that I used to spend wandering malls looking for the elusive piece that has a June-approved style, colour, fit, and price, and use it to learn to stitch garments that I’m guaranteed to like. And so the idea for the Handmade Clothing Project was born.
This will be a huge challenge for me: I’m by no means an expert at sewing, and very inexperienced at making garments from scratch – shortening or modifying existing clothes to fit is more my level at the moment. But I have designed and stitched up bags, a skirt and a t-shirt from scratch in the past, so I think I should be able to do this, if I start with very simple items.
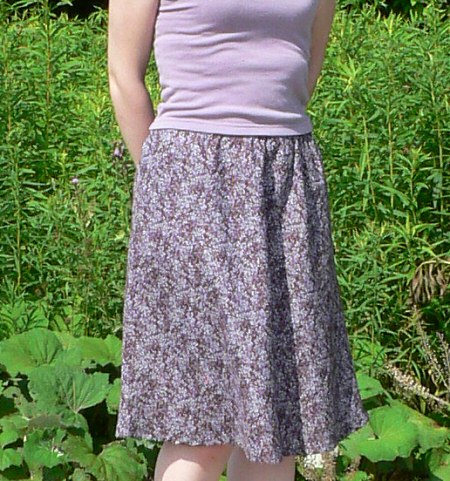
I made this simple skirt in 2008 and it’s still one of my favourites – plus I get the bonus “yay, I made this!” feeling every time I put it on.
Gearing up
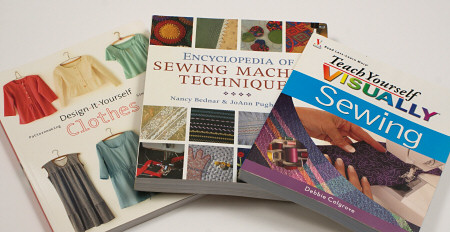
I can begin the Handmade Clothing Project with almost no costs: I already have a moderate fabric stash (acquired over the years from remnant bins – I can’t resist a bargain), a wonderful sewing machine, and a small library of books to help me on my way:
Teach Yourself Visually Sewing (by Debbie Colgrove), a really helpful reference for all the basics of using a sewing machine.
Encyclopedia of Sewing Machine Techniques (by Nancy Bednar and JoAnn Pugh-Gannon), for more advanced finishing and embellishment techniques (if I ever get to that stage)
Now all I need is to buy a voltage converter so I can plug my 110V sewing machine into a 240V socket, and I’ll be ready to go! This will obviously be a time-consuming process for me, and I’m still busy trying to get my business back up to speed, so don’t expect new clothing posts every week. But I will share my Handmade Clothing Project successes (and failures) here as they occur – maybe it’ll inspire you to try making clothing too.
Do you make any of your own clothes, or have you ever considered trying it? If so, feel free to join in with the Handmade Clothing Project. (You can still buy clothes too – this isn’t a hardcore “I will never buy clothing again” pledge!) There are no time limits or deadlines, and the only Clothing Project rules are to make stuff you can wear and have fun with it. Crocheting and knitting clothes counts too – you don’t have to sew. Just think how good it’ll feel every time you put on a handmade item – I’m pretty sure you won’t ever get that feeling from anything you bought at the mall…
I’m filing this as a tutorial because you could use the same methods to add pretty bead embellishments to any pair of shoes!
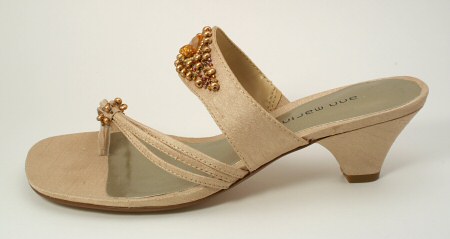
My sister’s getting married next week and I, being the maid of honour, need to have pretty shoes for the occasion. This is a huge problem for me; I’m not a girly shoe kind of girl, and I’ll go for comfort over style any day: heels hurt my feet, pointed toes hurt my feet, unpadded footbeds hurt my feet… However, I’m not stupid, and I don’t think running shoes would be the right look for this occasion! I thought silver would be best with my purple maid of honour dress, but all the silver shoes I saw looked totally tacky or ridiculously expensive. After a marathon 2.5 hour shopping trip covering 7 shoe shops, there was only one pair that looked nice (i.e. not flip flops), were fairly comfortable (i.e. standing in them for 2 seconds didn’t make me say “ouch!”), and reasonably priced. So we went back to the first store (of course that’s where they were!) to buy them.
But. Slight problem: on closer inspection, the beading on the shoes was quite nice, apart from a hideous misshapen lump in the middle of each band, surrounded by a border of tacky-as-anything gold seed beads. Why would they do this?! I despaired for a moment and then remembered that I’m crafty and can totally fix stuff like this. I bought the shoes.
Before. Hideosity.
The beads were stitched on with invisible nylon thread, and the fabric (and hence the threads) were all glued down to the layer below, so I could snip the threads on the offending beads without all the other beads falling off.
Offending beads removed.
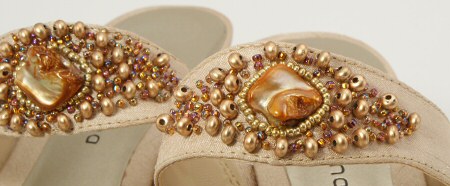
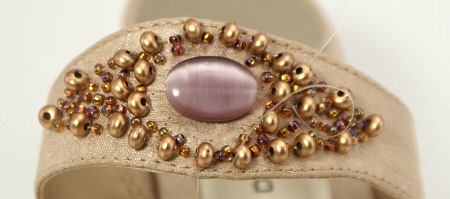
I wanted to replace the focal bead with something that would tie it more closely to my purple dress. I found some flat oval cats eye beads that are subtly purple, without looking out of place on the shoe (some of the existing beads are pinkish so the tones match). I couldn’t glue the focal beads to the shoe because the surface was too uneven and the beads were too slippery, so I used some invisible nylon beading thread to go through the focal bead and through an existing bead on each side to lock it in place. A little superglue on the knot to stop it from coming undone when I snipped off the ends of the thread, and the focal beads were secured.
Focal beads attached.
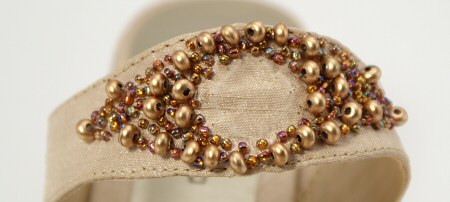
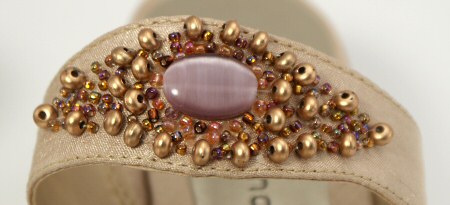
Now I just needed to fill the empty space around the new focal beads. I bought some glass seed beads in similar shades to the seed beads already on the shoe, and used some Aleene’s Jewel-It glue (specifically designed for permanently sticking gems onto clothing – I happened to have bought an Aleene’s trial size multipack a couple of years ago, and never had a use for this type of glue until now!) to attach them. I put a bead on the tip of a needle, dipped one side into the glue, and used the needle to position the bead. Then I used a pin to keep the bead in place while I removed the needle, and waited for the glue to dry. Easy, if a little fiddly.
Seed beads fill the gaps
I love the finished shoes – well, as much as I could love impractical women’s shoes. No idea how I’ll cope with those little heels; I’ll probably trip up the aisle! Wish me luck!
Shoes: $35. Beads: $7.50. Wearing a pair of shoes I actually like to my sister’s wedding: priceless.
Thank you to everyone who requested a shrinkydinks ring tutorial! This tutorial is an experimental method, not an exact science – you should have fun playing with it…
UPDATE: Since posting this very popular tutorial in 2008, I’ve answered every question imaginable in the comments of this post. If you have questions, you’re welcome to trawl back through the hundreds of comments to find my answers, or, to make things easier, I’ve compiled a 3-page shrinky rings FAQ, which is available exclusively when you donate $2 or more towards my tutorial (this also entitles you to further help from me by email, should you need it). Please see the end of this post for more details about this policy 🙂
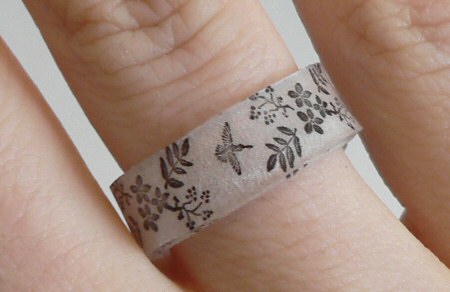
Please note: if you’ve come here via the lovely bird ‘ring’ picture on Pinterest, read this post to answer your questions.
This tutorial is Donationware – the instructions are available for free, but if you like it please consider sending me a donation to show your appreciation:
Send me a donation and receive the easy-to-print PDF version of the tutorial as a thank you! The PDF also includes a bonus 3-page FAQ compiled from all the tips I’ve shared in the comments since creating this tutorial.
Donations of any size are much appreciated. Just add the amount you wish to donate, and, once you have checked out and paid, your PDF will instantly be available to download from your PlanetJune account.
The complete instructions are available below, regardless of whether or not you choose to pay for them 🙂
This is a PlanetJune original tutorial. Please do not share or reproduce this tutorial; instead post a link to www.planetjune.com/shrinkydinks
I’ll answer some questions from the comments on my previous shrinky rings post before I get started, and add more hints and tips throughout the tutorial.
Shrink plastic, for the uninitiated, was originally marketed as a toy for kids. It starts life thin and flexible. You draw on it and then bake it in the oven, and it shrinks to become about 1/3 of the starting size, but 9 times as thick. This thickness makes it strong and hard. It will not bend after baking, so if you try to pull your ring open, or stand on it, it may snap, but it is strong enough to withstand regular use as a ring.
The last step (bending the ring into shape) is the most difficult, so I highly recommend that 1) you read through all the instructions before starting, and 2) practice on a blank piece of shrink plastic so you can get a feel for it and test your size and bending technique before putting too much effort into your design!
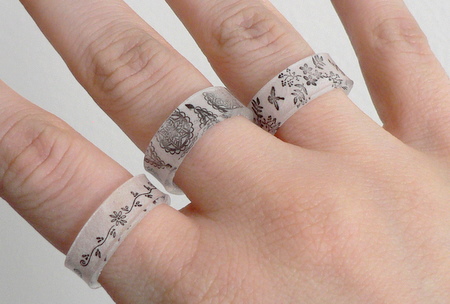
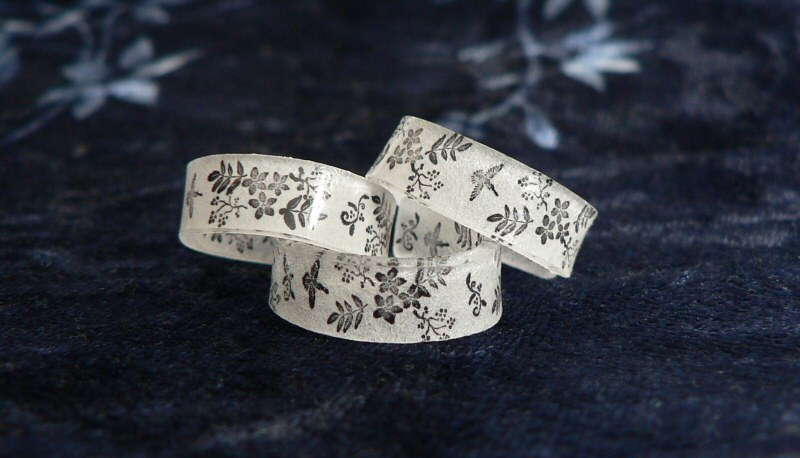
I’ve wanted to try making shrink plastic jewellery for months, but I found some lovely rubber stamps yesterday that are only 3/8″ long, so when the stamped images are shrunk they are beautifully delicate.
I made this prototype ring in just a few minutes, to test the concept. It’s not perfect – I’m very inexperienced with stamping so I didn’t quite get the positioning I wanted, and the length shrunk slightly more than I expected, so the ends of the ring don’t meet on the inside, but I think the idea has promise:
What do you think?
I’ll try to make a better one, and then I’ll give you a close-up of the stamped design once I’ve perfected it…
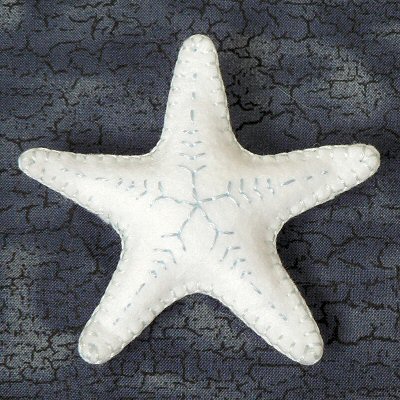
I was lucky enough to receive a free copy of Futuregirl’s Supercute Sea Creatures pattern a few days ago (thanks Alice!) so that means it’s time for me to learn another new craft – how to sew felt softies!
The last time I attempted blanket stitch was well over 20 years ago (now doesn’t that make me sound old! I was a very small child at the time) so I had a little apprehension, but I needn’t have worried. The pattern is very clear and easy to follow, even for a novice like me, especially when supplemented with Alice’s tutorials on how to hand sew felt.
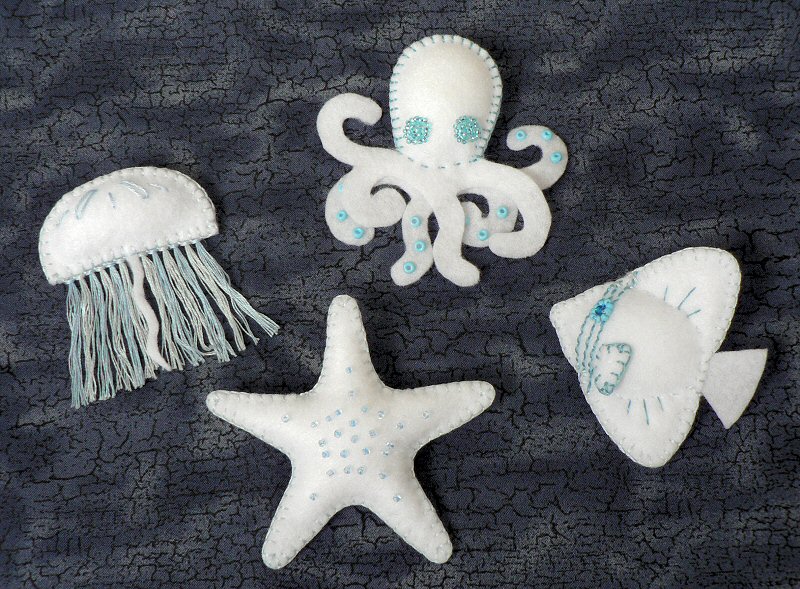
I decided to go with a colour theme – white with blue embellishments – but to try to find subtle variations within the theme for each creature. I also wanted it to be a stash-busting project (i.e. I wouldn’t buy anything new in order to complete it), so the whole thing cost an amazing 28 cents (for 1 sheet of white craft felt).
First up was the starfish. I stitched seed beads (clear with a blue core) onto the front, embroidered a pattern on the underside, and then blanket-stitched them together. I really love the embroidered back, although it does look a bit like a 5-sided snowflake… hey, there’s another craft idea! The starfish took me 2 hours to make.
Next up, the octopus. Wow, cutting out all those legs was a lot of work! For the suckers, I found some blue plastic beads that were once part of an ugly beaded belt that came free with a pair of trousers. I had unpicked the entire belt a few months ago, and now have little piles of red and black wooden beads, and the blue plastic beads, waiting for a use. I figured out a way to sew them on invisibly with transparent nylon thread, which I threaded inside the thickness of the felt between each bead so the thread doesn’t show on the back side either. The eyes were more difficult… I don’t have any sequins or suitable-sized buttons in my colour scheme. Finally, I decided to make a sead bead cluster for each eye and I think it has a nice effect!
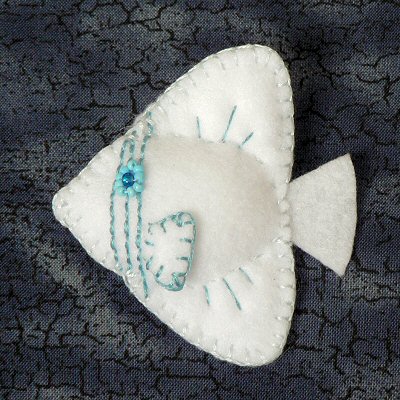
Thirdly, the fish. I’m getting the hang of the felt cutting etc by now, and I’m racing through the blanket stitching. My white fins didn’t show up against the white body, so I blanket stitched around them. Again, I had the problem of what to use for the eye, and I didn’t want to do the same thing as I’d used for the octopus, so I came up with a ring of opaque seed beads with one larger blue glass bead in the centre.
And lastly, the jellyfish. I left it to last because I thought it would be the most difficult, but either I was super-experienced by this point (haha), or it was very easy. I made the entire jellyfish (except the trailing floss tentacles) during a 25-minute wait at the US border! I’d made a little kit of the pattern, some felt, embroidery floss and needle, my sewing scissors and a tiny bit of fiberfill stuffing in a zip-lock bag, and put it in my handbag in case I was stuck waiting at the border. While everyone else was complaining about the length of their wait, I was happily cutting and sewing. I was almost annoyed when they called my name. I felt a bit self-conscious of my public crafting at first, but I don’t think anyone even took any notice (although I didn’t look up to check, just in case anyone was laughing at me).
So there you go – the set is complete. I really enjoyed making it. Cutting out the fiddly shapes (why oh why do octopi have to have so many legs?!) and the beading took the longest time. But I was surprised at how much I enjoyed working with the felt and floss. Maybe it’s because I’m a perfectionist freak, but seeing all those little neat stitches take shape made me very happy. I can definitely see myself doing some more work with felt and floss in future.
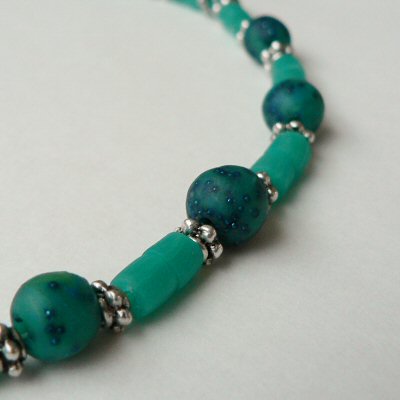
April’s OneHourCraft Challenge is “to make an impossibly gorgeous necklace”, so I got the polymer clay out and started playing.
I used a base of translucent Fimo Soft, with snakes of green and blue running through it. I also added dark greeny-blue micro beads (tiny glass beads with no holes) to the rounded beads, which is why they look darker than the others. I had a bit of a surprise when I baked the beads – they darkened and went from greenish blue to a definite green, but that’s okay:
I strung the beads with silver (coloured) spacers and findings. The finished necklace length is 14″ so it’s just longer than a choker and sits around the base of my neck.
Click for full-size version
Thanks Mia for the inspiration to make a necklace! This was a fun quick craft to try.
Or simply click through from my links before you shop at Amazon, Etsy, KnitPicks, LoveCrafts or Crochet.com, and I'll make a small commission on your purchase, at no cost to you! Start here: