Thank you to everyone who requested a shrinkydinks ring tutorial! This tutorial is an experimental method, not an exact science – you should have fun playing with it…
UPDATE: Since posting this very popular tutorial in 2008, I’ve answered every question imaginable in the comments of this post. If you have questions, you’re welcome to trawl back through the hundreds of comments to find my answers, or, to make things easier, I’ve compiled a 3-page shrinky rings FAQ, which is available exclusively when you donate $2 or more towards my tutorial (this also entitles you to further help from me by email, should you need it). Please see the end of this post for more details about this policy 🙂
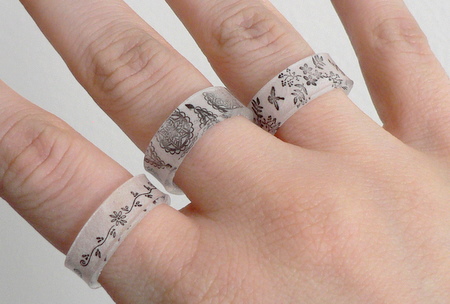
Please note: if you’ve come here via the lovely bird ‘ring’ picture on Pinterest, read this post to answer your questions.
This tutorial is Donationware – the instructions are available for free, but if you like it please consider sending me a donation to show your appreciation:
Send me a donation and receive the easy-to-print PDF version of the tutorial as a thank you! The PDF also includes a bonus 3-page FAQ compiled from all the tips I’ve shared in the comments since creating this tutorial.
Donations of any size are much appreciated. Just add the amount you wish to donate, and, once you have checked out and paid, your PDF will instantly be available to download from your PlanetJune account.
The complete instructions are available below, regardless of whether or not you choose to pay for them 🙂
This is a PlanetJune original tutorial. Please do not share or reproduce this tutorial; instead post a link to www.planetjune.com/shrinkydinks
I’ll answer some questions from the comments on my previous shrinky rings post before I get started, and add more hints and tips throughout the tutorial.
Shrink plastic, for the uninitiated, was originally marketed as a toy for kids. It starts life thin and flexible. You draw on it and then bake it in the oven, and it shrinks to become about 1/3 of the starting size, but 9 times as thick. This thickness makes it strong and hard. It will not bend after baking, so if you try to pull your ring open, or stand on it, it may snap, but it is strong enough to withstand regular use as a ring.
The last step (bending the ring into shape) is the most difficult, so I highly recommend that 1) you read through all the instructions before starting, and 2) practice on a blank piece of shrink plastic so you can get a feel for it and test your size and bending technique before putting too much effort into your design!
Full tutorial instructions are after the jump…
1. Find your shrink plastic
I use Shrinky Dinks Frosted Ruff N’ Ready, which accepts rubber stamped images beautifully. Any transparent shrink plastic will work. If you use the coloured opaque shrink plastic, you would have to decorate the outside of your ring instead of the inside. You could also use the inkjet printable type of shrink plastic.
An alternative source for shrinkable plastic is #6 plastic, commonly used in food packaging. Look for the ‘6’ recycling symbol to make sure you’re using the right type! You’ll have to sand one side before use, as the plastic needs a rough (not shiny) surface so the ink won’t smudge and rub off.
Note: If you are looking for sources, search for “shrink plastic” (generic term) not “shrinkydinks” (brand name) and you may have more luck. For example, if you’re in the UK, googling ‘Shrink Plastic UK’ (without the quotes) will give you lots of online stores that sell it. You’re looking for large sheets of it, not pre-cut shapes.
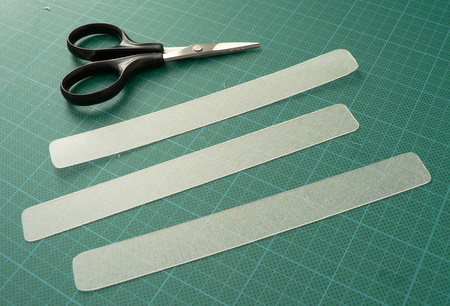
2. Measure and cut to size
Note: Different brand of shrink plastic may shrink by different amounts, so you might want to try baking a plain test piece to make sure you’ve got the size right before spending time on decoration.
Measure: The best method to find the right length for your strip of plastic is by trial and error.
- A: Simple Method: Use my measurements for your first attempt, then modify the length if they turn out too small or big! My rings fit small ladies’ fingers, and are 6mm (1/4″) tall.
My starting dimensions were 14.2 x 1.6cm (5 5/8 x 5/8″). - B: Attempt to Calculate Size: If you know your ring size, you could calculate the desired circumference of your ring with a ring size converter. (The circumference would be equal to the length of your strip of plastic after shrinking.) However, I found that, although Shrinkydinks is supposed to shrink by ~3 times, my strips needed to be ~10% longer than the length I calculated in this way.
This isn’t an exact science. I recommend you just use your best guess to make a test ring; you’ll soon find out if your strip should have been longer or shorter!
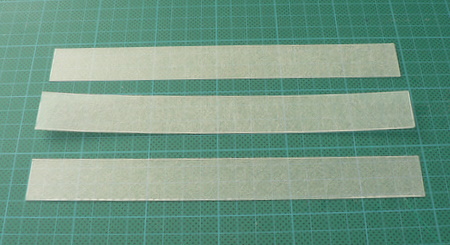
Cut to Size: To cut the plastic, I like to use a guillotine (paper cutter) to get straight lines, but it’s probably not good for the cutter blade (I use an old cutter blade). You could also use an xacto knife and metal ruler, or just cut the plastic with scissors.
The corners can be very sharp, so I like to round them off slightly with scissors before baking (don’t worry if you forget this step; you can file or sand them down after baking).
3. Decorate shrink plastic
Follow the decorating instructions that come with your shrink plastic. Here are some ideas:
- Rubber stamps + alcohol-based permanent inks (be warned: other types of stamp ink will smudge)
- Fine-point permanent marker (e.g. Sharpie) to draw or trace your designs
- Coloured pencils (use in combination with the above to add colour)
- Print designs directly onto your plastic (inkjet shrink plastic ONLY)
If you’re using the frosted type, remember to decorate the rough (frosted) side. For other types, consult your instructions.
I used peg stamps to decorate my first rings. The designs are only 1cm tall so fit my rings perfectly. Below I have also tried some other rubber stamps:
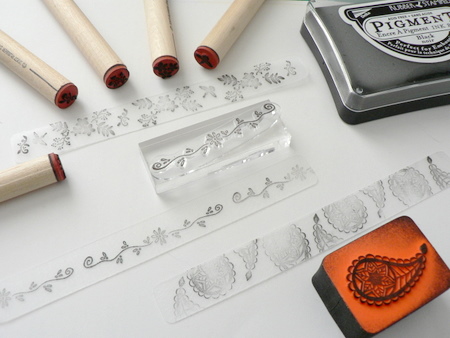
Don’t forget to let your ink dry before adding any coloured pencil embellishments, and remember that colours will become more saturated and vibrant after baking, so less is more in this case.
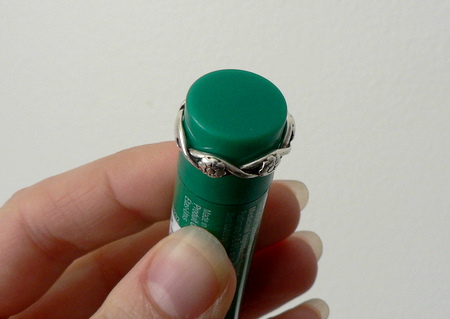
4. Find a suitable form to bend plastic around
Here’s a useful tip to find an object of the right size to create your ring: take an existing ring, and try to slip it over various thin cylindrical household objects, e.g. marker pen barrel, wooden spoon handle, lip balm tube. You are looking for an object that is a tight fit inside your ring. If you don’t have anything suitable, you could buy a short length of wooden dowel of the right diameter. Your object will come into contact with hot plastic, so don’t use any treasured possessions for this step.
5. Shrink your plastic
This is the fun part!
Preheat a toaster oven or conventional oven to the temperature specified on your packaging. Make sure you are in a well-ventilated area so any fumes don’t build up.
Note: Please read the instructions below all the way to the end before baking your ring – the shaping happens very quickly after baking so you need to be ready…
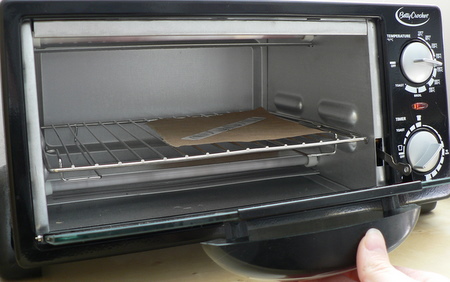
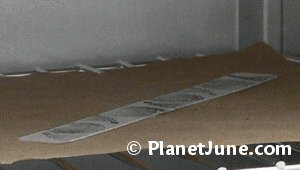
Place your strip (decorated side up) on a piece of brown paper on an oven tray, and put it in the oven. Keep watching… this is where the magic happens. Your strip will begin to curl up and wiggle about as some parts heat more quickly than others and so begin to shrink more quickly. Don’t worry if it looks like it’s stuck together – in my experience it always flattens out as it continues to shrink. When it has finished shrinking, leave it in the oven for another 30 seconds to heat through evenly.
Here’s an animation of the shrinking process:
6. Shape your ring
When your strip comes out of the oven, you’ll have to work quickly – you only have about 10 seconds before it has cooled and becomes rigid. Disclaimer: to protect your hands from the hot plastic, you should probably wear a thin glove (for more control) or an oven mitt (for better protection against the heat) but I don’t bother – it is very hot, but the plastic doesn’t stay hot for long enough to burn my skin.
Remove the brown paper from the oven. Wait for about 2 seconds (so it’s not too hot to touch), then carefully wrap the strip around your forming tool, with your decorated side facing in towards the tool. Hold it in place for a few seconds until it becomes cool and rigid.
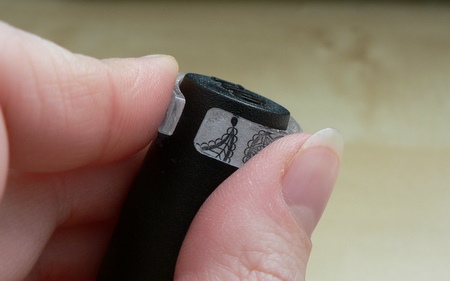
I’m not going to lie, this step is tricky. You really do have to work quickly, and not make any mistakes, otherwise you won’t have time to wrap the entire strip around your object before it cools. But don’t lose hope! There is a magic fix for a badly-formed ring like the one below…
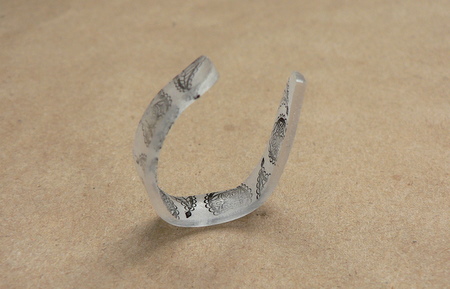
Pop your misshapen ring back into the oven on the brown paper, balancing it upright on its curved surface so the join is at the top (as in the picture above). After a minute or so, the plastic will relax back out of its shape, and revert back into a flat strip… I told you this stuff was magic! Let it heat through for about 20-30 seconds, then try to form the ring around your tool again.
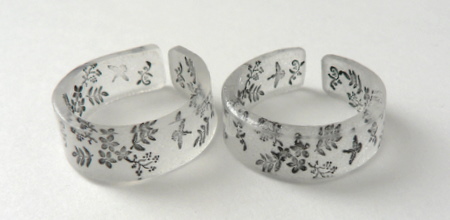
Left: unsanded edges; Right: sanded edges
That’s it! You can sand down the edges to give a smoother finish, but this may partially obscure your design. You could also paint the edges after forming for a different effect. For more durability of your design, use a clear coat to carefully varnish the inside of the ring (one coat should be enough).
You can make matching earrings, charm bracelets or necklace pendants – just punch holes for the jewellery findings before shrinking the plastic, and remember that the holes will also shrink, so don’t worry that they’ll be too large.
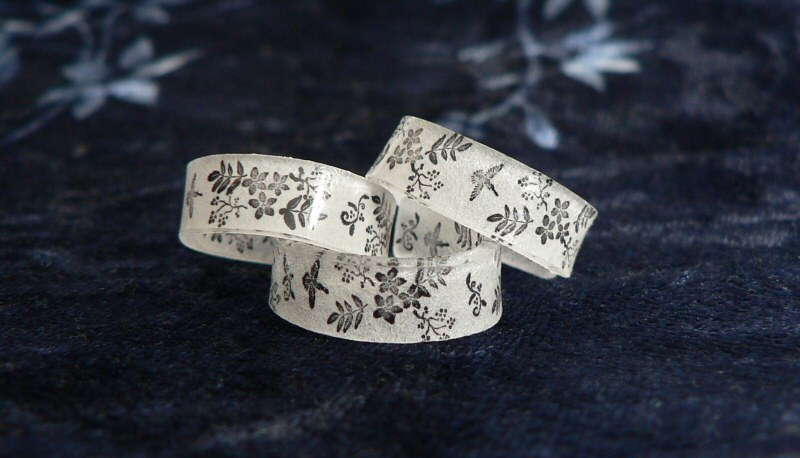
Enjoy your new jewellery!
Please note: if you’ve donated for this tutorial and read the included 3-page FAQ, and still have problems or questions relating to the instructions in my tutorial, you’re very welcome to email me for further help; please include your order number in your email.
I do not have time to respond to any other questions – if you look back through my many past answers to questions left in the comments here, you’ll probably find the answer anyway, or you can just donate $2 or more and receive the PDF version of this tutorial together with a 3-page FAQ which should answer any remaining questions 🙂
Happy shrinky ring making!
Please leave me a comment if you enjoyed this tutorial, and consider leaving me a donation. Thanks!


Kathy Tanner said
Thank you for sharing this tutorial on shrink plastic.
There have been many times that I’ve searched for a ring and couldn’t find one. Sometimes it was about style, but other times it was size, cost, availability.
When it came time to share with my daughters it wasn’t easy either. Something like this would have been very handy.
Ghj said
What plastic use
June said
See Step 1 in the tutorial above 🙂
v said
hi! i’ve been trying to figure out some way to DIY an ace ring, as i haven’t come out to my parents yet. shrink plastic sounds like a good idea, ad i can say i want to use it for crafting (which, essentially, i am), but ace rings are supposed to be solid black. if i were to color the whole ring, would it interfere with the baking process?
thank you!!
June said
I’d recommend you look for black shrink plastic (e.g. here’s an assorted colour pack or a pack of all black), as it’ll give you the most even result and a good shiny black colour. Good luck!
katie Houghton said
Hi
What size do you cut the original strips? What if once shrunk it’s too long? Thank you ?
June said
Katie, please see step 2 (‘Measure and cut to size’) for the answers to your questions 🙂
William W. said
This method really works! Thanks for sharing such useful tutorial.
sherrie patton said
Just wanted to thank you for very good instructions on the ring. I have the clear shrink plastic hoping this will work the same.
Kimi said
So cool. :d
Sally Lawler said
Thank you for the tutorial! I don’t have much cash, but I will give you a tip that might help you. Trade for Trade kinda thing. Have you ever thought about using a ring mandrel? It is a long metal rod that slowly tapers at the end and has measurements related to ring size down the side of it. Hope this helps! Thank you!
Sally
Cherie said
I have some shrink plastic in my craft stash. This is a really good tutorial and one I will try
Martha said
I’m loving this. Such a great kids craft
karen mcclure said
You put a band-aide around the finger your. trying to size and let it cool that way but be carful.
Majella said
Hi,
I’ve just tried searching for a stamp similar to the one you used in the main ring picture with birds on branches. I just can’t find one so, if you could, please tell me the supplier of your stamp? I will contact them to see if they still do this and if I can get it in the UK.
Regards,
Majella
Richard Yusuf said
I saw this on Pinterest also.
Aurora said
Hi,
Thank you for your tutorial ! It’s wonderful because I have little finders and it’s hard to find my size for a nice ring.
I saw your photo on Pinterest too and as Kimber said, the ring look like a solid ring.
What is your method to completely close the ring, please ? Is it possible ?
Thank you
Aurora
StoneMaven said
Love your tutorial! I have done something somewhat similar by making cabochons out of shrink plastic with a heat gun and my dopping block (Block with a dished depression of varying sizes to make domes). I shrink the round to size, set it in the proper depression, slump it with the heat gun on low, and press it into shape with the dopping die (Metal or wooden stick with a round end that fits in the sized depression). Set it in a bezel and easy-peasy-lemon-squeezy, necklace component. I’ve made the most fantastic owl inspired neck pieces this way, and now you’ve inspired me to make matching rings! Thank you so much!
junaid said
i like it…..its a light weight..thanx for sharing great information…
Ananasa said
Really cool concept, very different! We love it! Thank you for sharing your creativity!
Autumn said
The ring featured in the main picture, with the crows (birds) and trees, I would
Like to purchase it but I need a certain size/s. can you do that for me? Thank you!
Autumn Woodward
Kimber said
I noticed that the photo of the rings on Pinterest look like they are solid rings but the ones shown in the tutorial have the break in them. Is it possible to make a solid ring?
janie goines said
@ planet June , Thanks for sharing your talent , you are so gifted.
augie said
have to say it is my first time, and first craft idea I’ve looked at. What FUN! Thank you so much for the intrusions. I’ll be getting back to you. augie
Pam said
Hi June –
Thank you for so generously sharing this tutorial with us! I found this via Pinterest and can’t wait to give it a try!
Just one question for you: what do you use for sanding the finished items? Is it just plain old sandpaper? (fine grit, I’m guessing)
Thanks!
lvc200 said
Hi June
Just found this on pinterest and wanted to thank you for your generosity in sharing this design. This craft plastic is called “Shrinkles” in the UK. I use it a lot in the craft group I run for people with depression because it is a great way to use ‘colouring in’ as an activity whilst crafting a whole new item. I have been wondering how to take the shrinkles activity further and this tutorial is full of really great detailed information which will help me to make my next session so much more enriching. Thanks again.
Lx
Lisa said
Thank you so much for this awesome idea. I made some little wine charms a few years ago as gifts using the shrink plastic and they were darling! I think this would be a beautiful craft for the “tween” age girls in my daughters class. Of course, all the baking and shaping would be done by adults but they could design them and maybe even do a swap amongst themselves as a friendship ring.
Thank you again for being so descriptive and patient with this lovely tutorial…..and thank you for your generosity in sharing it with us all!
Xoxo,
Lisa
Vanessa said
Great tutorial. My shrink plastic is bending too much in the oven and melting to itself. Also not forming it quick enough 🙁 can see how it would work however 🙂
Kelly Braund said
Thanks for the great tutorial! Gives me lots if other ideas too!