Spoiler alert: in doing this amigurumi stripe technique experiment, I invented 2 new techniques that make much neater stripes than I’ve ever seen before! If you’re not interested in my experiments, jump straight to the Perfect Stripes for Amigurumi video tutorial 🙂
It’s usually best to work amigurumi in a continuous spiral, to avoid any visible seams. The most useful reason to use joined rounds instead is if you’re forming stripes: you end up with a very obvious ‘jog’ between the start and end of each stripe with spiralled rounds, as the ends don’t meet.
Some examples of stripes in amigurumi
I’ve had requests for a video showing how to crochet neatly in joined rounds, and, while making my sample for the video, I didn’t like the results I was getting, so I thought I’d try a little experimentation to make sure I’d demonstrate the best way to make joined rounds for stripes, with the joins as seamless and jogless as possible…
Joining: the basics
To form joined rounds in single crochet, when you reach the end of a round, you sl st into the first stitch of that round. Then, to raise your hook to the height of the next round, you ch 1. But there are several ways to accomplish this, so I tried every option I could think of, to see what gave the best result and whether it’s worth joining your rounds or not…
Spiral (no join)
The standard amigurumi continuous spiral.
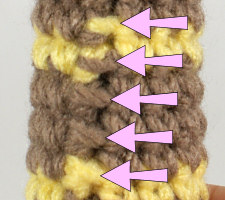
#1: Change to new colour in the last loop of the stitch before the colour change, sc in each st around.
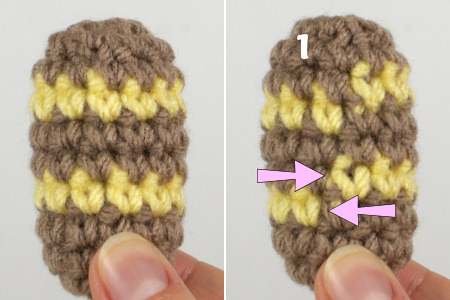
It’s the bane of amigurumists: perfect stripes from the front (left), but a ‘jog’ at the back (right, marked by arrows).
The stitches are all even – there’s no seam at all – but the ends of the stripe don’t meet up at all.
Travelling Join
#2 and #3 are the same except for the point where you change colour (before or after the sl st).
Ch 1, sc in next st and in each st around, sc in sl st, skip ch 1. With [#2: same; #3: new] colour, join with sl st to first st.

The seam is almost invisible but the colour jog is still fairly prominent with both options. #2 has too much yellow, and #3 has distracting bars of brown showing at the join of the yellow.
And here’s the main problem with using either of these Travelling Join methods: the end of the round travels forward by one stitch with each round (marked by dotted lines in the pic to the right). This means it’s impossible to hide your seam at the back of the piece, because the seam moves with every stripe.
Stacked Join
#4 and #5 are the same except for the point where you change colour (before or after the sl st).
Ch 1, sc in first st (the same stitch you sl st’d into), sc in next st and in each st around. Skip sl st, skip ch 1. With [#4: same; #5: new] colour, join with sl st to first st.

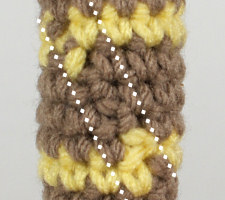
The stripe ends match up more closely, and the start of the round doesn’t travel. #4 is the method I’ve recommended in the past, and it’s reasonable, although you can see that the yellow has a little jump in the last stitch. #5 has very obvious brown bars at the join of the yellow.
The downside with these Stacked Join methods is the series of visible horizontal bars along the seam (marked by arrows here). They’re caused by the sl sts that you don’t work back into, but the end result is that it looks like you’ve stitched along this seam with a series of too-loose whipstitches – and it’s even more obvious in reality than in my photo.
Experimentation
With my research done, it was time to invent my own join. The requirements were:
- The seam must line up at the back to minimise visibility – it can’t travel around the piece.
- The horizontal bar from my other stacked joins must be reduced as much as possible.
To save you from boredom, I’ll skip a full summary of the couple of dozen variants I tried (you can see some of the rejects in my samples above!) and just present the winners…
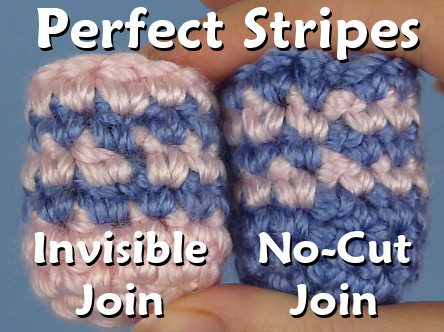
Perfect Stripes
I’ve created 2 methods to create the best stripes in amigurumi: the Invisible Join and the No-Cut Join.
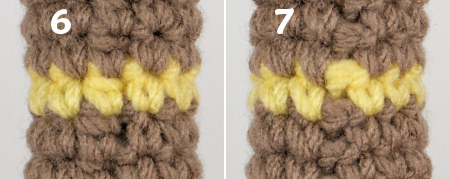
#6: Invisible Join; #7: No-Cut Join
Can you see how much better they are than any of the standard joins?! The Invisible Join (as the name suggests) gives a slightly better finish, but the No-Cut Join is faster and less fiddly, so I recommend using a combination of the two for any pattern where you need to single crochet in joined rounds and/or make stripes. (More about that on the tutorial page.)
Now I have these new techniques at my disposal, you may well see more PlanetJune patterns involving stripes in the future! Curious how they are done? Allow me to demonstrate…
Continue to the Perfect Stripes for Amigurumi video tutorial >>


Natalie said
Hi there! thanks for the fab tutorial! I tried out your techniques on my latest project and am delighted with how it turned out! so thank you! I shared a few piccys and also linked you blog on mine if you fancy a nosey at how it turned out 🙂
mywideeyedworld.wordpress.com/2013/08/06/stripy-crochet-cuddles/
Laura Head said
Hi June,
Thanks for the video, I am crocheting a teacup in a spiral and need to have two stripes through the middle of it. If I use the no cut method, please could you explain how I go bak to crocheting in the spiral once I have finished the stripes?
Thank you so much for your help and advice
Best wishes
Laura
June said
Laura, once you’ve complete the first round of the ongoing colour, don’t join at the end of the round; just make the final single crochet, then continue as a spiral by crocheting the first stitch of the following round directly into the top of the first stitch of the preceding round.
pam said
I know i am going to be very happy to have these new techniques at my fingertips very soon! Like as soon as i figure out where to order those beautiful ornament patterns! (I have a pretty good idea!!) Your shop – right?
Just found them and ordered and both the ornaments and the adorable tree pattern are mine – all mine! Can not wait to begin stitching!
Johanna said
Wow it’s awesome how much work you put into this stuff. A fascinating look into your processes… you’re like some kind of crochet genius! 🙂
June said
I did get a little obsessed over finding the best method – the others I tried just looked so bad I was too embarrassed to demonstrate them on video! I must admit it’s more determination than genius though 😉
Johanna said
Well they do say “Genius is one percent inspiration, ninety-nine percent perspiration”. Heh heh! 😀
I’m going to the yarn store soon to buy yarn for your little succulents set! Yay!
Sandy G. said
Brilliant, as always! I have avoided making things with stripes for many years for that very reason, so now I’ll have to start collecting patterns for creatures with stripes! Thank you!
Amy in TX said
Brilliant, as usual! I LOVE that you show your process. I made a Mexican Red Knee tarantula once and each leg took 30 $!@$& minutes, thanks to the stripes and my need to make them even. I can’t even remember how I did it, my traumatized brain has blocked it from my memory. (4 hours on crocheted tarantula legs? Totally worth it.)