I bought a cute summer top last week. It was very inexpensive, the colour was lovely, the fabric had a nice texture, and it looked like it would be a cool, pretty, summer top.
And then I tried it on. Um…
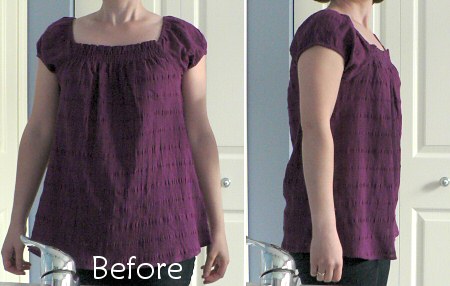
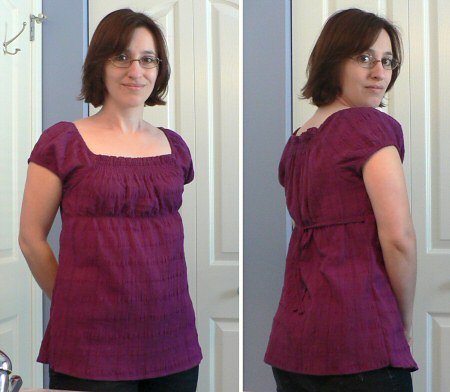
Please excuse the bathroom fixtures in these photos – it’s the only place I have to take photos of myself in the mirror!
I don’t know which body types the ‘potato sack’ look would flatter, but it’s certainly not mine. Is it a maternity top? No it’s not – I did check after seeing the fit, or lack thereof! Do I need a smaller size? No – it’s a size XS. Ridiculous.
I thought of returning the top, but then I decided to try a little refashioning instead to see if I could improve it. The fabric doesn’t stretch, so I had to take care not to make it too fitted – I need to be able to get it on and off!
Step 1: Measure for new side seams. I turned the top inside out, tried it on, and pinned new seamlines down each side. I took in about an inch and a half on each side, tapering out a bit at the bottom because I didn’t want it to get too tight around my hips. (Turning the top inside out first lets you pin the new shape while you wear the top, and means that you can stitch directly along your pin lines once you take it off.)
Step 2: Sew new side seams and cut off excess fabric. I stitched along my pinned lines with a straight stitch, and then cut off the excess fabric 1/4″ outside my new seams. A serger would be helpful here, but I don’t have one, so I used a zig zag stitch to overcast the new raw edges so they wouldn’t unravel after cutting the fabric.
L: pinning the new seams; R: the top after sewing the new seams
Already a little improvement, but I think we can do more…
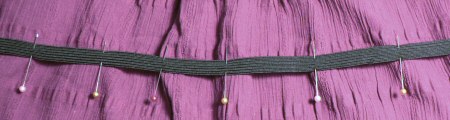
Step 3: Add an elastic empire waist at the front. I tried on the top and pinned an empire waistline under the bust, from one side seam to the other. Next, I measured myself along that line and cut a piece of 1/4″ elastic to the same length. I pinned the ends of the elastic to the side seams at the front along the empire waistline. To keep the resulting gathers in the fabric even, I stretched the elastic so that the fabric was flat, and pinned the two together at several points along the elastic.
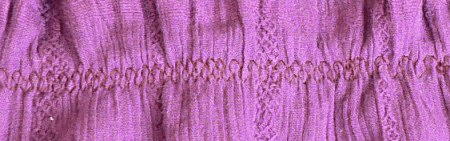
Step 4: Stitch elastic in place. I picked a pretty stretch stitch that happened to match the texture of my fabric, and stitched the elastic to the front of the top, stretching the elastic as I went so that the fabric lay flat as I sewed.
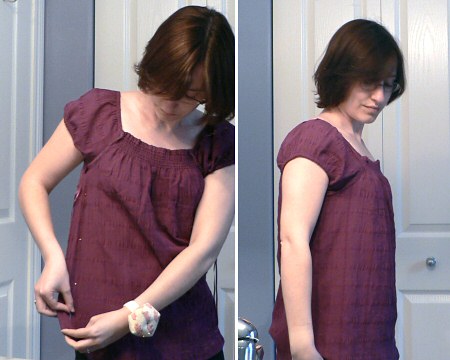
Now the front looked good, but the back was still bulging with excess fabric.
Step 5: Make ribbon ties. I salvaged the strips of fabric I had cut from each side and unpicked the original seams so I had 2 strips of fabric from each side of the top. I ironed them flat and trimmed each pieces into a 1″ wide strip. Then I stitched each pair together to make two longer strips, and ironed the long edges into the middle (using my 1/2″ bias tape maker to keep the strips straight). I couldn’t hide the raw edges because I didn’t have enough fabric width to fold the strip in half again, so I just zigzag stitched down the middle of each strip, catching both raw edges as I went. I ended up with two 24″ ribbons to tie together at the back of the top.

Step 6: Attach ribbon ties. I unpicked enough of each side seam just underneath the elastic to insert the unfinished end of the tie to the inside. I then turned the top inside out and re-stitched the side seams, trapping each tie in place as I sewed.
Turn it back the right way out and… Ta-da!
Still loose and floaty, but it has enough shape to not make me look horribly dumpy – which, as I’m only 5’2″ tall, is a prime consideration for me! Potato sack into cute summer top in 6 easy steps 🙂


Barbara said
I am sooo happy that I came across your blog! I can usually copy something or figure how to make alot of different projects anywhere from knitting or crocheting or crafting projects to designing quilts, kids and baby clothes. but when it comes to making clothes for me. I really become unsure. It all has to do with fitting and shaping. On your site I have come across several references to very helpful blogs and comments from others. You have one of the best blogs I’ve come across in A VERY LONG time!!
Kuddos to you and I am definately bookmarking your site!
Sincerely, Barbara H.
Alanna said
I found your post via CraftZine, and the tutorial worked beautifully! I had a gauzy brown shirt with a drawstring at the hem, and it looked *awful* on my top-heavy-with-belly body. The process I used was slightly different (I took out the drawstring and used muslin to create a pocket for the drawstring under the bust), but I never would’ve even thought of doing that until I saw this tutorial. Thanks so much!
June said
I’m glad I inspired you, Alanna! Your drawstring idea sounds perfect, btw. It’s amazing what a difference it makes to the appearance by gathering under the bust!
Gill said
I’ve done similar with sack like tops, usually just fashioning ties and attaching them to the side seams just below the bra line so that I can pull it in under my bust and tie them in the back, so simple but it gives you an instant shape and takes away the mystery of whether you’re pregnant or not!
Jessica said
That’s so very cute – great work! I’ve got a top in my wardrobe that has a similar potato sack look to it which I’m now very tempted to try refashoning into something that will fit better.
finnyknits said
Oh nice work! That top is WAY cuter and more flattering now. And, yes, apparently we all want to look like sacks of party ice rather than women. Thank you, fashion world.
Abigail said
What a fantasic idea! I’m rather, um, top-heavy, and most of the tops I find that will fit over the girls hang straight down like a sack, making me look like I have no waist whatsoever (if you think ‘plus size’ fashion in the US is ugly, try Japan!)
I’m going to try this 🙂
Ribs said
Well done you – that looks great now. Only yesterday I was looking in my wardrobe at all the tops and dresses that I never wear, but love the fabric of and pondering over some refashioning. Today I read your post. I reckon that’s fate telling me to get on with it 😉
sam elliott said
That is just brilliant ! Thank you for sharing, I think i will have a go myself, I am only 5ft 3ins! Very flattering indeed.
Best wishes
Sam
cucicucicoo said
what an improvement! i have a shirt that i need to do the same thing with. thanks! lisa
Carat said
I wonder if this process would work with over sized T Shirts. I have a few that I would wear from university freebies etc if it weren’t for the fact that they were XLs
June said
It should work with an oversized T shirt, unless it has a big logo or design – if the empire waistline cuts through the logo, you’ll end up with an unrecognisable design and a very strange look! There are loads of things you can do with an oversized T though; I’d suggest you take a look at the Reconstructed Clothing board on Craftster for some ideas.
Jessica said
I have several tops like this that I purchased last summer and they never looked good. I’m going to give it a try – thanks!!!
Nikki said
Super cool, June- I’m always reworking stuff like that, too…Cuz I find something cool at Goodwill, and it’s just a little too big, or love the color & fabric, but ‘not exactly flattering’…Awesome, Girl!
Jona said
What a smart re-fashion!! Now it’s darling and super flattering! Thanks for sharing that!
Christie said
This is one of the best tutorials I have seen here. It is clearly illustrated, easy to understand even for a novice and a great idea. Thank you so much for posting this for us to share!
June said
LOL Now I liked it the way it was but it is lovely after your clever alterations too!
kern said
This is brilliant! And I really like the finished shirt.
kris said
WOW!! – just WOW!
Silverlotus said
You are super cool, June. I’m trying learn to alter my knitting so it fits my shape better.
June said
I hope you’re reading the Fit to Flatter series of blog posts from Stash, Knit, Repeat – it’s all about knitting for your body shape (and I’m reading it avidly too, because the same techniques apply to crocheted and sewn garments!)
Silverlotus said
Thank you, June. I hadn’t seen that yet. There is a Rav group I’ve been reading, The Bust Line, that has been helpful.
IdaDown said
Looks great June! I do wonder who half the clothes are supposed to fit. And I have found that price doesn’t seem to improve the problem.
Lynne said
When I saw the photo the first word that came to my head… elastic. You did a great job of turning it into a wonderful top.
Claire said
I’m just learning to sew to be able to do precisely this – so many women buy cheap clothing and then throw them out because they don’t last or don’t fit properly. If we all learned the skills to alter and repair things, clothes would last ten times longer, and they’d look better. Great post, well done. x
June said
Thanks Claire; I agree. I’m finding it very difficult to find clothes that fit all three of my criteria: 1) I like the look, 2) it fits me, 3) it fits my budget! I’ve decided that if the price is right and I think I can make it work for me with some basic modifications, that’s what I’m going to do. I think I’ll also enjoy wearing the clothing a lot more, knowing that I had a hand in making it!
T said
Adorable! I need you over ASAP to fix my wardrobe LOL
Such a wonderful difference 🙂
Lindy said
You’ve made that into a lovely summer top, and it’s a gorgeous colour. Enjoy it!