PlanetJune by June Gilbank: Blog
PlanetJune Craft Blog
Latest news and updates from JunePunchneedle Tutorial
See my Punchneedle info page.
The following is a modified excerpt from the left-handed version of my eBook, The Punchneedle Handbook: Miniature Punchneedle Embroidery Basics & Beyond, now available for purchase from my online shop in a new 2nd edition, which comes in both right-handed and left-handed versions, so you can buy whichever you need!
What is Punchneedle?
Punchneedle is a form of embroidery that uses a hollow needle to create loops of thread on fabric. Also known as thread painting for the complexity and texture of design that can be created with this technique, it creates a textured pile surface akin to a miniature version of a hooked rug.
It is worked on the back of the fabric, which is why all punchneedle patterns are a mirror-image of the completed design. When you punch, you form lines of running stitches on the top of the fabric while forming the loops of the stitches on the front of the fabric (the underside as you are punching). The fabric has to be stretched as tight as a drum in an embroidery hoop.
The Basics
Punchneedles and weaver’s cloth fabric are available to buy from most craft stores (if you’re in the US, I know that JoAnn has a good selection of the fabric).
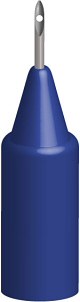
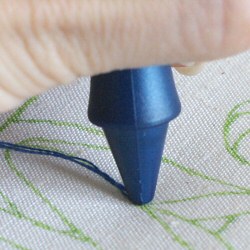
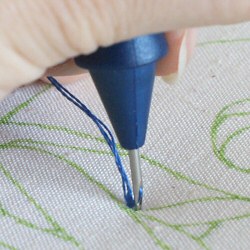
Hold the punchneedle in the same way you hold a pen, or however feels comfortable to you. The punchneedle should be held upright so it is almost perpendicular to the fabric, and with the bevelled (slanted) edge facing in the direction you are going to punch your stitches.
Note: I am left-handed, so, as you’ll see in these images, I punch from left to right. Right-handers, punch from right to left.
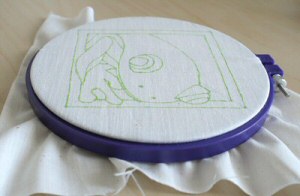
Begin at any point around the outline, or as instructed in your pattern.
- Push the punchneedle straight down into the fabric, until it stops:

- Bring the needle back up slowly, stopping as soon as the tip is clear of the surface of the fabric:
- Slide the needle tip across the fabric by approximately the width of the needle:

Now repeat – punch the needle into the fabric again, lift it to the surface, slide it across the surface. That’s all there is to the basic punch stitch!
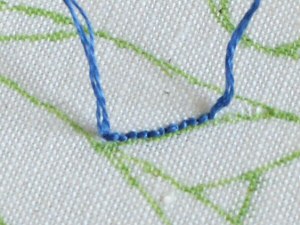
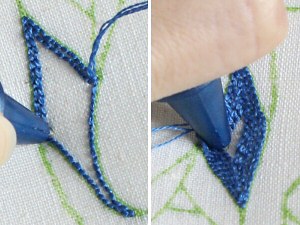
As you punch on the back of the fabric, the stitches will appear as a line of running stitches:
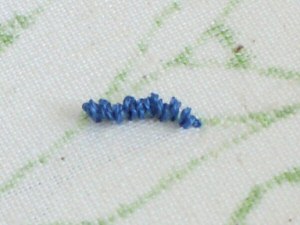
If you turn over the work to look at the front, you’ll see the loops:
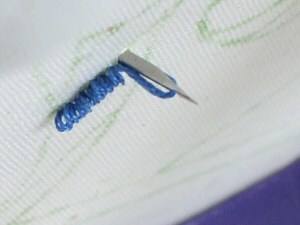
If you were to look at the underside of the work as you punch, you would see the needle forming the next loop:
When you reach a corner, stop with the needle in the down position, rotate the hoop, and then continue to punch along the new line. This means you’ll always be punching right to left (left-handers: left to right) and the bevelled edge of the needle will always stay facing forwards.
Once the outline is complete, fill in the area by working in a spiral fashion towards the middle of the area, following the contour of the previous row. Leave about half a needle width of space between each row.
Continue working in a spiral towards the middle until the entire area has been filled in:
In this way, you can complete the entire design by first outlining each area and then filling it in. Punchneedle works up very quickly and gives stunning results:
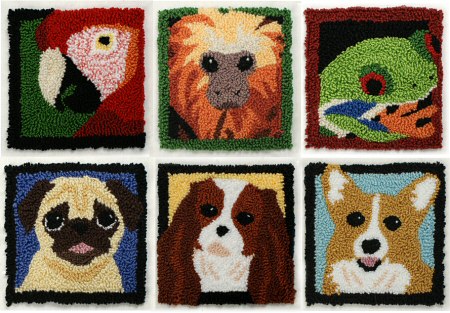
It’s a lot of fun and very simple to master. I hope this brief overview has tempted you to try punchneedle yourself!
This is a brief excerpt from my eBook The Punchneedle Handbook, which covers everything you need to know to get started in punchneedle, from equipment advice to detailed instructions on how to punch, with tips, techniques and troubleshooting solutions that will help you to create beautiful punchneedle embroideries in no time. For more details, or to buy the eBook, click through to the PlanetJune shop, where you can also find all of my punchneedle designs!
Questions?
I have answers! Although I can’t answer specific questions (unless they’re about PlanetJune patterns, in which case email me for customer support), check my Punchneedle FAQ for answers to the most common questions I receive. And if you have further questions about the punching technique, materials, finishing, etc, you’ll find all the answers in The Punchneedle Handbook 🙂
74 Comments
Quick Links: Crochet
Quick Links: Crafts


Welcome to PlanetJune!
Hi, I'm June. Welcome to my world of nature-inspired crochet and crafting. I hope you enjoy your visit!
If you'd like to get in touch, you can contact me here.


Mary Puskar said
can you tell me where I would find the pattern for the little pug’s face shown on this page? thank you very much.
Mary
June said
Hi Mary – thanks for asking! You can find all my punchneedle patterns, including the Pug, in my shop 🙂
margaret thomson said
Having problems with stitches being lose and coming out of fabric.
Manyou thanks
June said
Margaret, there could be several reasons for your problem (e.g. you’re holding the punchneedle facing the wrong way or you’re sliding the needle too far between stitches). It could also be that your fabric doesn’t have a sufficiently tight weave to hold your loops in place. If you’d like further assistance, my Punchneedle Handbook explains the correct punching technique with close-up photos and has a detailed troubleshooting section for when things go wrong like this. Good luck!
karina said
hi, i bought a punch needle cause my hands are very shaky and so i thought it would be easier for me but the truth is that i cant get it to work cause none of the stitches stay put. As I advance the loops start to get undone. What am I doing wrong? I feel like it should be something so simple but I cant understand.
June said
Karina, there could be several reasons for your problem (e.g. you’re holding the punchneedle facing the wrong way or you’re sliding the needle too far between stitches). If you’d like further assistance, my Punchneedle Handbook explains the correct punching technique with close-up photos and has a detailed troubleshooting section for when things go wrong like this. Good luck!
Maulden Dainty said
I am new to needle punch embroidery. I have bought a Hemline needle punch but am having problems. My stitches don’t “lock” into place and just undo if I pull the tail of thread at the beginning. I followed threading instructions and believe I have done it correctly. I have to the best of my knowledge followed the punching technique. However, it seems that something is not right. Can you help?
Regards,
Maureen
June said
That sounds right to me, Maulden! Punchneedle stitches are only secure from the front of the work – you can always pull them out from the back (the side that faces you while you punch). My Punchneedle Handbook includes information about options for finishing and securing your work 🙂
Katheryn hamilton said
If stitches are only secure on front of fabric how could you ever wash it.
June said
It would depend on the purpose of the embroidery, but I use a thin layer of washable fabric glue on the back of each piece, to permanently lock all the loops in place (see The Punchneedle Handbook for full instructions!)
Doris Zielinski said
I am addicted to punch needle–so much more rewarding than playing Candy Crush :-). I use clipart and also try my own designs. I use several different brands of needles (Cameos are great, but I don’t want to limit my projects) and all kinds of threads, yarns and ribbon. I trim and sculpture as well to give a lot of texture to my pictures. I am aware of licensing limitations so I just use these items for my use or give them away as gifts to the young ones in my family.
But I will be ordering your book soon since I have problems with fine details. I hope to sell my own designed finished projects at the senior center gift shop when I retire so I have to improve my finished product.
Thank you for your site, it is helpful!
Mary Ann Schumacher said
I am working with DMC embroidery floss (3 strands) and my thread keeps breaking. What am I doing wrong? It’s very frustrating as threading the punch needle is not my favorite part of the process. I have tried using a different needle in case the eye had a sharp area that might be causing it but the same thing happened with the other needle too so I am assuming it is my technique that is causing it. I keep the open point of the needle facing the direction I am punching. Does the needle have to be exactly straight up and down?
June said
Pretty much, yes – as I said above, “The punchneedle should be held upright so it is almost perpendicular to the fabric”. If you try doing that and the thread still breaks, I’d check the troubleshooting section of my Punchneedle Handbook – if you’re accidentally trapping the thread so it can’t flow freely, that could make it break as you punch down.
Ramya said
Hi,
I have tried once this.. Still I’m facing the issues with the back loops.. when we pull it, the entire patteren came out. Could you assist me to how to prevent this. I have Seaching the technique, unable to find the solution. Please help me.
Thanks in advance.
June said
Ramya, there could be several reasons for your problem (e.g. you
Barbara F said
Hi. Saw this technique at a craft fair, & it’s had me thinking for years. Finally found a tool, so I’m really glad to find this tutorial. Thank you so much. Shall have to look out for your book.
June said
You’re welcome, Barbara! My Punchneedle Handbook is an ebook, so you can only buy it from www.planetjune.com/punchneedlehandbook 🙂
Karen said
Hi June,
I’m outside of the US (South Africa) and I had to order my kit online, as it’s not available in my country. I’m also having problems locating Weavers Cloth locally, most suppliers don’t even know what I am talking about? Is there an alternative I can use? I’ve tried various fabrics that I had lying around, but they don’t seem to hold the thread properly – I am very new to this, so it could also be I am not doing it correctly, but I’m pretty sure the correct fabric should make a difference?
June said
Karen, please see my previous answer to this question, here 🙂
I also recommend the Troubleshooting section of my Punchneedle Handbook if you’re having difficulties forming the stitches.
Bluejay said
Hi, I have a question, If I have a cross stitch pattern, could I use a punch needle to embroider the outline? I wanted to know because it looks like it would be more defined and quicker.
Thank you!
June said
Bluejay, please see my previous answer as to why you can’t punch onto Aida (cross stitch) fabric.
Ann Zahorik said
I’m new to punch needle and would like all the info I can gather before proceeding. What k7nd of thread or yarn is used? Can the same needle be used for yarn and thread?
June said
Ann, please see my main Punchneedle info page for more information on punchneedle. (And my page on punchneedle tools, linked from there, gives details about the size of thread/yarn you can use with each needle size.)
Lisa said
I am interested in making chenille designs, would I be able to use your techniques to accomplish this? Thank you
June said
Hi Lisa, I’m not quite sure what you mean by chenille designs – do you mean using chenille yarn? If so, yes. I’m demonstrating ‘miniature’ punchneedle using embroidery floss, but the same technique applies to punching designs with any thickness of thread/yarn – you just need to use the appropriate size of punchneedle! See the section of my Punchneedles article on tool sizes for more details.
susiehale said
Hi, I bought a kit. Carefully followed the instructions. I’m using the thread needle and fabric from the kit. I punch, I make a loop, I slide forward,punch again and my last stitch pulls out. Please tell me you know what I’m doing wrong. 🙁
June said
Susie, there could be several reasons for your problem (e.g. you’re holding the punchneedle facing the wrong way or you’re sliding the needle too far between stitches). If you’d like further assistance, my Punchneedle Handbook explains the correct punching technique with close-up photos and has a detailed troubleshooting section for when things go wrong like this. Good luck!
Josvi said
que cosas bonitas haces con la aguja m
Alexandra said
I would like to try out this craft. I have seen a person doing it, its quite easy.
I want to ask if you cut the threads once you finish all image, as the person I have seen, as soon as she finished she cut the thread from the front side of the pattern. The threads remained in place, do you know if this is correct and what is the difference if you do not cut .
June said
Alexandra, please see my previous answer to this question here – and see my Punchneedle Handbook for complete instructions!
Dona said
I’ve always been a little hesitant to just snip off at the end. Now I backstitch and pull my thread through to the front, using a darning needle. I trim the threads on the right side. My work seems more secure. More work and uses a bit more thread, though.
June said
That’s interesting – I find that cut thread ends look darker than the surrounding loops of thread, so I prefer to leave the ends on the back where they won’t be seen. Provided the end is as long as the loop length, it never pulls out to the front of the fabric, in my experience.
Tammy said
I really want to try this it looks fun. Does your book come with pug design that is at the end of your tutorial??
June said
The Punchneedle Handbook is an instruction manual, so it doesn’t include any patterns; you can purchase all my patterns separately from my shop. I do have a promotion at the moment where you can buy any of my punchneedle patterns (including the Pug!) for half price when you buy the book – you’ll see all the pattern options just above the ‘add to cart’ button – click here to go straight there 🙂
Ellen Lawrenson said
Hi June! I have enjoyed reading this post, and I’m eager to get started. I understand that the typical punchneedle requires the fine embroidery cotton, but I would like to know if there are larger needles that could be used with wool, as in crewel embroidery. I like the rustic look of rughooking, and I can imagine it working with wool if the needle were big enough, and the weave of the cloth, loose enough; for example, burlap?
June said
Yes, Ellen – I explain the sizes available at the end of my Punchneedle tool information page.
April Chambers said
Where do you get that punch needle? What type of threads can you use?
June said
Please see my Punchneedle info page: www.planetjune.com/punchneedle 🙂
Mak said
Hi I just wanted to know can you use the punch needle on a pair of blue jeans?
June said
It is possible, but denim isn’t the ideal fabric for punchneedle because of its thickness. A better solution would be to make a punchneedled applique patch (details in my Punchneedle Handbook) and stitch or fabric glue the finished applique to your blue jeans.
sarah said
Hi June!! This is so awesome! I’ve always wanted to do something crafty with needle and thread, so this looks pretty easy. I found a kit at Walmart today but didn’t buy it because I wanted to do some research first. Your website was very helpful to me! I do have a question though, if your in the middle of making a design but need to stop, what do you do?
June said
It’s best to stop when you reach the end of your length of thread. If you need to stop partway through, just cut the thread as though you were finishing off – see my Punchneedle Handbook for complete instructions!
Judy said
Hi!
You said not to make knots but to cut the thread close to the end.
What do you suggest with piece of thread left at the beginning?
Thanks
Judy
June said
It’s up to you: you can either leave it, or trim it down once you’ve finished punching with that strand of thread, just to keep the back neat.
Pamela Lee said
I’m having trouble with fine lines, like numbers and letters. Any advice?
June said
Yes, I’ve included tips for making clean, fine lines in my Punchneedle Handbook 🙂
Barb said
In 1970 (another lifetime), when in Japan, I purchased the punch needles and a yarn that looks like a fine silk cord, when you thread the needle you actually unwind the cord making a squiggly thread used to form your picture. Same process, different thread. Have you ever seen this?
Margaret Sigouin said
Thanks for the demo. I have been thinking of trying punch embroidery. Will give it a try now.
Gail said
How do you end the project? Do you knot the thread on the wrong side?
June said
Not necessary – you never need to tie any knots with Punchneedle! You can just snip the thread when you finish. See my Punchneedle Handbook for complete details and technique info 🙂
Sharon Craig said
This looks like fun.My be a little easier on the hands.Not good at needlepointing.I do believe I can do this.
Kamiko said
I had the punch needle hand held machine! i loved that thing so much, and because you could use any color thread, it was fun to use! i lost it years ago, but i recommend it, if you can still find it.
June said
Hi to everyone who is asking questions here! You’ll find the answers to all these and more in my eBook, The Punchneedle Handbook – there’s a link to purchase it at the end of the excerpt above 🙂
Laura said
Great tutorial! I’ve done needle punch pictures and such with floss before. Just did my first needle punch project using yarn – a pillow. The kit talked about using a liquid textile rug backing if you were making a rug and I’m wondering if I need to put any on the back for a pillow? I’m giving it for a Christmas gift. Thanks a lot for any info.
gina venus said
I’M HAVING TROUBLE MY THREAD STAYING IN AFTER PUNCHING I’LL BE DOING GOOD THEM IT JUST COMES OUT ITS LIKE THE PUNCH HAS TO BE TIGHTER WHATS WRONG, THANK YOU GINA
Erin Raatjes said
GREAT tutorial! Nice clear pictures and so glad to see another fan of the Cameo needle. 🙂
Jane De Bie said
I am struggling with this craft. I had success with the standard embroidery thread that comes in the wound packets. . .but when I tried a different thread (like Madeira’s Burmilana) the thread would not cooperate.
Why don’t different threads work? What do I need to do differently to make them work?
June said
It depends on your punchneedle tool as well as the thickness and smoothness of the thread. If the thread is too thick for your needle or too textured/bumpy, it could catch in the needle eye and not flow smoothly; this would make your loops pull back out of the fabric. If a particular thread doesn’t work with your needle and your punching technique is correct, all I can suggest is that you try a different thread or a different needle…
Mary Tribl said
Hi June, I’m wondering, I do a lot of standard cross stitching. Can you use this for that? The thread is Mouline Special Cotton A Broder, whatever that is. Tome standard embroidery thread. This would be such a big help to me if this can be used. Do you know what backing us use for cross stitching? Can that be used also. Anything you can tell me about this product and cross stitching would be highly grateful.
Thank you for your time.
Mary
June said
Mary, please see my Punchneedle FAQ for cross stitch/punchneedle info.
Karole said
June – thank you so much for posting a great tutorial. I am traveling to JoAnns tomorrow to purchase a punchneedle and threader (thanks also for the recommendation on Cameo brand — I have been a bit overwhelmed with the number of needles I’ve seen on line). I haven’t tried this needle art yet and have been looking for something other than cross stitch, handquilting, or knitting to take along when waiting for appointments. This art looks like just what I need (yep another addiction) and won’t require so much carry-along baggage!!!! Also, I really enjoy your animal patterns.
Natalie said
Thank you so much for this! I just bought a couple of punch needles from a street seller in Kathmandu – I didn’t know what they were, but he showed me how to use them. I haven’t got a hoop yet, so my practice stitches are all coming out, but now I understand what to do I think it’ll be okay when I get home and acquire a hoop. I can see this is going to be addictive!
Bri said
This looks so cool–I live in NS Canada, would you know of any places to buy punchneedles? I’d really appriciate it if you could give me some pointers where to find them!
June said
Bri, they used to be available in Michaels, but some time last year Michaels (or at least the branches in my area) decided to stop carrying punchneedle supplies 🙁
If you don’t mind online shopping, I know that Christine at Fairfield Road Designs sells the same Cameo punchneedle that I use (and recommend), and weaver’s cloth. (She’s based in Ontario, so you won’t have any import taxes!) You can buy the embroidery hoops and floss from Michaels or a local cross stitch/needlework store.
Otherwise, you can always buy punchneedles on eBay, although most of the sellers are US-based.
Wendy said
Hi June
Thank you from a right-handed person!!!
Thank you for a very clear tutorial.
I have just ‘re-discovered’ some old punch-needles that my mother must have used in the 1950’s.
Having recently returned to spinning, my interest in the fibre arts has been re-kindled.
Yours is the only punch-needle tutorial that mentions RIGHT AND LEFT HANDEDNESS!!!
Yes, I was doing it ‘backwards’!
Kind Regards
Wendy
June said
You’re welcome Wendy! I’m glad I could help. Punchneedle is very simple when you get the hang of it, but it must be very frustrating if you were punching backwards and all the loops were pulling straight out of the fabric!
June said
Jenn: YES! Working right to left is completely wrong for a left-hander. This is the reason why your loops were pulling out – no wonder you got frustrated and gave up! Left-handers should always punch from left to right. If the bevelled edge of the needle faces backwards (away from the direction of punching) all the loops WILL pull out. Please do try again – it’s very easy when you get the hang of it!
Shame about the bad instructions in your kit 🙁 It’s so frustrating when instructions (for anything, not just punchneedle) don’t even mention that many directions will need to be reversed for left-handers – that’s 10% of their market that they are ignoring!
Jenn said
Thank you thank you!! I bought a really cute punchneedle kit with cupcakes and was super excited about it. But somehow I got messed up (I think maybe I made the distance between stitches too long, and my loops kept pulling out) and I kept getting frustrated in my attempts. I’m left handed as well, but I followed the instructions which said to work right to left. Would that have made a difference? I ended up pulling it all out and just embroidering the design with a regular needle and thread.
maybe I’ll get up the nerve to try again though! After seeing your pictures it looks much less intimidating.
Mrs. Herbie said
I have a collection of sewing, embroidery ….. craft books from the 50’s 60’s and 70’s that show punch needle work. I have been interested in trying this but my books show projects and do not break it down as well as you did. Thanks, I will definitely be giving this a try.
June said
Claudia: you can easily pull the stitches out from the back, but the tension of the fabric holds the loops in place from the front – the embroidery hoop stretches the woven fibres of the fabric open while you’re punching, and when you remove the hoop the fibres lock back down around the loops. This is why you can only punch onto a woven fabric!
Claudia said
Amazing! I think I understand the concept of that needle, but I wonder what keeps the loops in place? Like, doesn’t it unravel when you pull a loop (accidentally)?
jen said
…i recently bought a set of these needles to use in a bookmaking process i was working on. i had no idea what they were actually for – i just saw them in the knitting aisle and knew it was the piece of equipment i needed…now i know what they are for and it is totally something i want to try out! thanks!
peppernys said
Thanks for the sample tute, really interesting to see what the process is like. I sent the link to a few friends who i thought my be interested 🙂 love the completed picture of the pug!
Chelle said
That’s really cool! I saw a kit once, but I never bought it because I wasn’t sure what it was. I’m going to go buy one soon 🙂