how to take up trousers
A note before I begin: British trousers = American pants. I may use the terms interchangably in this tutorial after living in Canada for the past 4 years 🙂
As I am all of 5′ 2″ tall, it’s very rare that I find trousers that aren’t too long, and yet the petite ranges are typically just slightly too short for me. So, as I have to shorten my pants every time I buy a pair, I thought you might like to see how I do it.
The ‘regular’ way of taking up trousers involves ‘invisible’ stitching (i.e. only catching a couple of threads of the outside fabric). This is tricky, time-consuming, and if you’re not very careful, you can still see the stitches on the outside.
My method leaves a visible hem on the outside, but I don’t see anything wrong with one neat line of stitching, and for everyday or casual trousers, it can even leave a nicer finish than the hidden method. Maybe you won’t want to use this method for your best interview suit, but I use it for everything else!
You will need:
- sewing machine
- thread that matches the colour of your trousers
- seam gauge (if you don’t have one, a measuring tape or ruler will do)
- scissors
- straight pins
- sewing needle
- marking pen/pencil
- iron
Method:
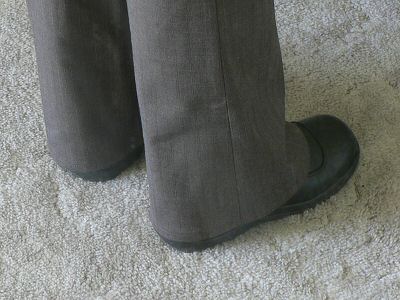
- Try on your trousers so you can see how long they need to be. Note: remember to wear shoes while you do this, or your trousers will look too short when you wear them with shoes!
- Fold up the trousers to the length you want them to be (it helps if you have a mirror so you can see where they will fall when you are standing up straight). Adjust until you’re happy that they don’t scrape the floor but aren’t going to be too short either. Remember different heel heights will affect the apparent length, so keep that in mind.
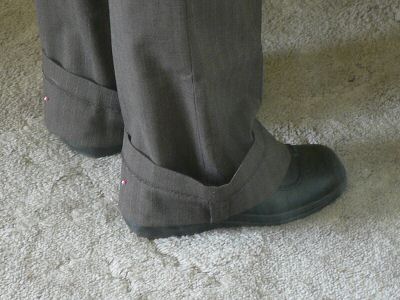
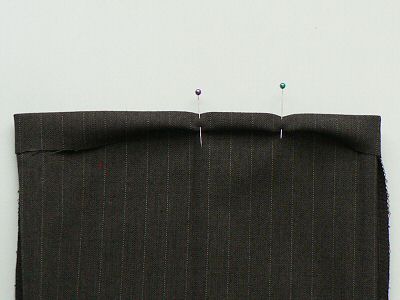
- Pin the turn-up to the back of each trouser leg (just one pin) to stop the turn-up from falling down when you take off the trousers. This is just to give you the required length, so don’t worry about being neat. Have a final length check after pinning. Looks good? Okay, now you can get changed into something more comfortable (and don’t prick yourself on those pins!).

Pinned to length at the back
- Measure the length of the turn-up on each leg. They should be the same, but if they aren’t, pick a measurement midway between the two.
Comparing the turn-up lengthsIf they are very different, you should probably try the pants on again and check which one is right! Make a note of your measurement (for these trousers, mine is 9cm).
- Remove the pins and turn the trousers inside out.
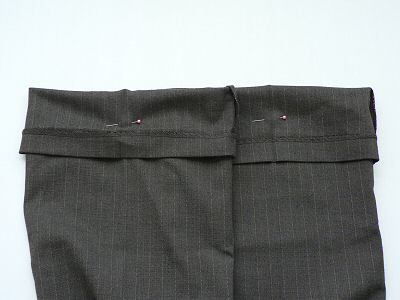
- Fold up the bottom of each leg, to the length you measured above, and pin in place.
Pinned 9cm turn-up
- Iron the fold so it is pressed into a crease.
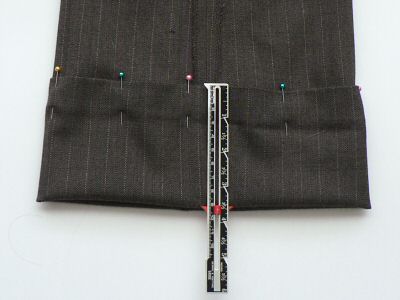
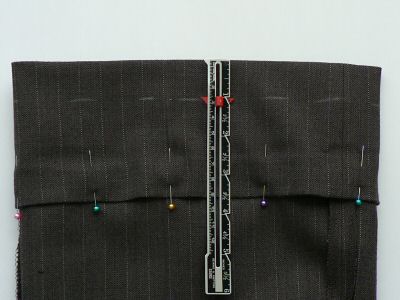
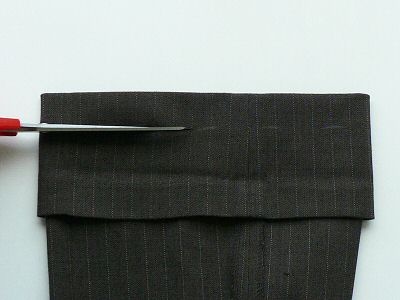
- Mark 1 inch above the fold, all the way around both legs, then remove the pins.
1 inch marked in white pencil
- Be brave – this is the scary part! Cut the turn-up around the lines you have just drawn, but be careful not to cut through both layers of fabric – just the turned up part – otherwise you’ll end up with capris!
Starting to cut
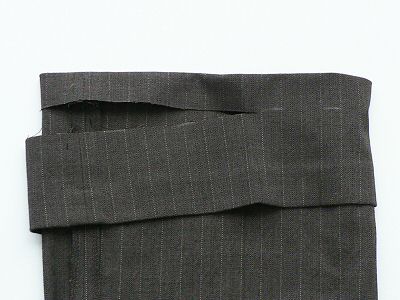
Partially cut
After cuttingHandy hint: you can even use the cut-offs to make hairbands.
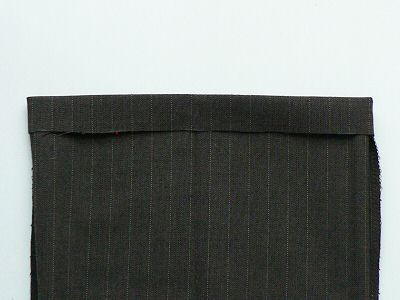
- With your remaining 1-inch turn-up, begin to fold the raw edge inside, so you end up with a 1/2 inch turn-up with no raw edges visible. Pin in place as you go.
Starting to fold in the raw edge and pinContinue folding and pinning all around the bottoms of both legs. You can iron this fold in place before sewing (I like to; it makes the sewing part easier) or just sew it at this point.
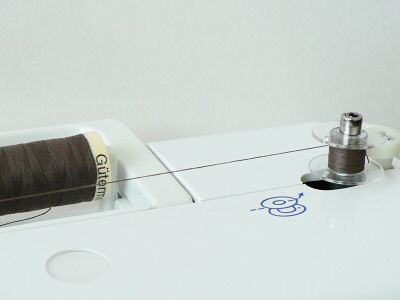
- Set up your sewing machine with a thread colour that matches the main colour in your fabric, for both the top and bobbin threads. Set it to a medium length straight stitch.
Winding a matching bobbin
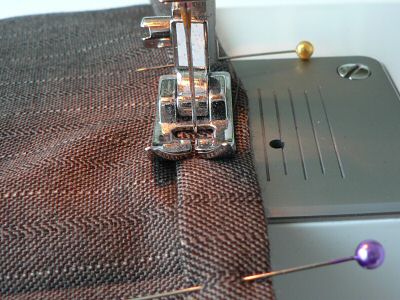
- Using the 1cm guide on your sewing machine (or whichever guide is just less than 1/2 an inch) sew around the bottom of each leg.
Ready to start sewing
When you get back to the start, sew over your first couple of stitches and then finish off.
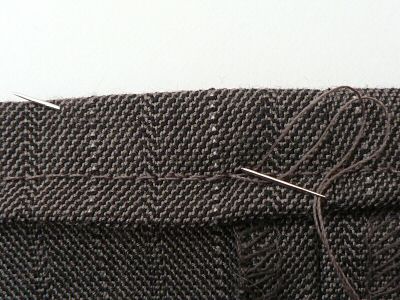
- Pull the loose threads to the wrong side of the fabric. You can knot them together for added security, if desired, then thread them through a sewing needle. Push the needle into the turned up fabric, and out a couple of inches further along.
Hiding the thread ends
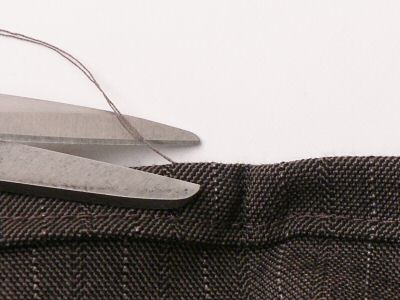
Pull the thread ends to make fabric scrunch up slightly, then snip off the threads flush with the fabric, so they disappear inside the fabric when you pull it flat.
Snipping the ends
- Turn the trousers right side out and admire your handiwork!
The finished seam as it appears on the outside of the trouser legs – crisp and neat.
Perfect!


Tracey said
Thank you for this. It was so helpful and clearly explained. I am only 4ft 9in and length of clothes are always a problem, even petite length at times. My husband just got me my first ever sewing machine and had no idea what I was doing but this I feel I can do as a starting point. Thanks again.
Shirley said
Thank you for the very informative tutorial! I got a bit confused at the part with the thread and needle.
Did you finish sewing the entire leg cuff with the machine, pull thread from the machine (still attached to trouser) and thread a needle to that same thread to do a hidden seam of sort?
I think I might have answered my own question but I
June said
Shirley, all you need to do is cut the threads when you’ve finished sewing using the thread cutter on your machine (as usual), which will leave a few inches of loose thread attached to the trousers. Then follow the instructions in Step 13 (pull all those ends to the wrong side of the fabric, then thread them onto a sewing needle so you can hide the loose ends inside the fabric of the seam) – it’s just a standard method for securing and hiding the ends of thread once you’ve finished sewing!
Sophia said
I’m graduating from university on Thursday and my trousers were way too long. Thank you so much for the tutorial, trousers came out perfect!
Leanne said
Thank you so much for this clear and easy to use guide! I’ve only just started sewing (too scared to touch a sewing machine for years!) and this was one of the skills I really wanted to pick up but wasn’t sure where to start. Thanks so much!
Tim said
Needed to shorten my son’s first pair of dress pants. Your guide made the job so much easier for me. Thanks.
Jamie-Rose Campbell said
Thank you, June! I’ve just taken up new linen trousers following your intructions with no hitches at all. I’m really happy with the result.
June said
Wow, I can’t believe I wrote this tutorial 10 years ago! I still refer back to it every time I buy a new pair of trousers or jeans, and it works perfectly every time 🙂
Susan said
Thank you , I am going to try your tutorial, I take my trousers up only being 5ft 1in , but I always seem to get them uneven but don’t use the method you are using so I will try.
I notice the material in your demonstration was quite thick, does the same method apply to silky types? As I find this type of material slippy and more difficult to get even.
Thank you in anticipation
June said
Yes, the only thing you need to watch for is that your fabric can be ironed! If not, skip the ironing, and just finger-press the folds (crease them as best you can with your fingers) to make it easier to sew. And using lots of pins helps to tame slippery fabric (although you do need to make sure that your fabric can take pins without leaving visible holes once the pins are removed – I recommend you test on a hidden area, or the part you need to cut off, first).
Lynne said
Thank you for the tutorial, absolutely great.
Not sewn since leaving school some 45 years ago, and have managed to hem a couple of pair of trousers.
Do you have any advise on where on the hem it is best to start and end when using the machine to sew the hem. My guess is at the side seam.
Thanks in advance.
June said
It doesn’t really matter where you start and end as the overlapped stitches are practically invisible provided you keep your stitching line straight so they really do overlap. I’d actually avoid starting at a side seam, as you’re sewing through multiple layers of fabric at that point so it’s already the most difficult area to sew straight, especially with a thick fabric such as denim.
Somerset Wedding Gal said
Brilliant, step by step guide, thanks so much for sharing!
Dixie said
To make it even easier, try on the pants inside out. When you pin for the hem, you won’t have to fiddle with turning them and re pinning.
Kathryn said
Very good tutorial! Well done
I think a simple way of not accidentally cutting yourself too short Capri pants is to Turn the pants inside out carefully as to not remove your chalk marks , flatten out the fabric so there is only one layer, so it is not possible to cut both layers. Then cut fabric on the chalk line.
Thanks for the confidence to take up my own pants.
Monica said
YAY! I must give this a try! I’ve hemmed my pants before (I’m 5’1″tall, I feel your frustration with long pants :D) But I’m going to try this tutorial to see if they will stay in place! Thanks so much for this tutorial June! Even a few years after you made it, it’s still helpful!!!
John Collins said
Thank you, this was really helpful. I am new to needlework and am looking forward to more of your excellent tuition videos!
Claudia said
Nice looking seam good work thumbs up
Georgina said
terrific I thoroughly enjoyed turning up my husband’s trousers instead of nearly breaking into tears
Suzanne said
Hi june
Thank you very much for doing this tutorial, I have nearly completed my first pair of turned up trousers, before i have always put it off, but your tutorial was very easy to follow!.
I have trouble myself with trousers I’m 4ft 11 and even found the petite too long it is really annoying!. I live in the U.K.
Well done for teaching a complete novice!!!
Rosie Holloway said
Thank you so much – just bought a sewing machine to take up my son’s school trousers and your instructions worked like a dream. No more sewing by hand!!! So confident now, at 5′ 13/4″, I feel like I can buy any pair of trousers now and alter them to fit me. No more shopping in the petite aisle for me!!
Liz Rose said
Thank you, I have just taken up my husbands jeans, after years of putting off taking up trousers because thinking it was too hard, they look fab! your instructions were perfect!
Tim Cinel said
Thanks for the great instructions 🙂 I just took up some hand-me-down jeans from my dad using this as my guide. Unfortunately, I forgot to fold over the raw edged though :\ We’ll see if it breaks.
Dickie said
Thank you so much, the pictures are a big help, I have the same issue when buying trousers. I now feel brave enough to give it a go.
Helen said
I’m so pleased I found your site. I’ve just managed to used my brand new sewing machine (never owned or used one before) to take up the hems on my son’s denim jeans. Only problem I had was the bulkyness around the seams so I just stitched as close as I could to them. I’m very proud of myself. Thanks.
Clara81 said
Great tutorial June! Now my son won’t be tripping over his trousers on his first day in Reception class!
katie_cardigan said
Great tutorial, June. My pants are the perfect length now! Cheers, Katie
Katie, Dunstable said
ps. and this stunning use of my sewing machine that has been in the loft 3 years means that he not going to force me to sell it on Ebay!!
Katie, Dunstable said
Thank-you so much for posting this June.
My husband is so impressed that I was able to take up his uniform trousers. It’s a rare ‘wifey’ thing that I have managed to achieve thanks to you. Very well written and pictured.
Matt Gibson said
Thanks for this! I just took up my first pair of trousers. Made a bit of a hash of it here and there (my mini sewing machine was too small to travel over the folded seams, so I cut the seam out of the way, re-folded and re-sewed…) but I got the job done and they don’t look bad for my first attempt!
Cele said
I’ve just used your tutorial for two pairs of trousers I had been posptponing to…
Thanks a lot, it was really helpful and the results were stunning!
Cheers,
Cele
judy said
I’ve just read through your tutorial and thought it was great, very comprehensive, and funny as well. I particularly liked the comment about capri pants as this is exactly the sort of thing that could happen! Well done for taking the time to share this. Thankyou.
Jill said
Excellent! Thank you soooo much : )
Best instructions I’ve come across!!
sammi said
Thaaaaank you!! Very easy and clear instructions. I manage to fix up my trousers at long last! Thank you for sharing.
Gillian - Norfolk UK said
Thanks for the tutorial. Really helpful and pics good too. Have just taken up some trousers and they look great!
Nicky said
June,
You are the answer to my prayers, my hubby is a shortie and has saved up 7 pairs of trousers for me to take up!
I’ve never done it before and it can’t be too hard, but unsure of where to start I got searching on the internet.
I found your tutorial and am now feeling confident to have a go this afternoon.
Many thanks,
Nicky in North Norfolk (UK)
Ben C said
Cheers for the Tut, was a great help for my first time. Only problem I had was setting the bottom bobbin (as I haven’t used a sewing machine since I was in year 8, which is a good few years ago). Thankfully, I had my mum around to help me out. Cheers mum, and thanks June!
June said
Rina, pull out each pin just before your needle runs over it. That way the hem fabric stays in place but you don’t risk breaking the sewing machine needle if it hits the pin. (This is the voice of experience and many broken needles speaking here – just don’t risk it!)
Rina said
Thanks for the tut! the pics are very helpful. All this time I didn’t know you were supposed to place the pins that way, but of course it makes perfect sense. One question: do you leave the pins in while you run the hem through the sewing machine?
Felicia said
I’m sitting here at 5′ 1″. Your tutorial was fabulous! Thanks for sharing it.
Mindy said
Thank you so much for this! This is certainly a tutorial that I will use!