PlanetJune by June Gilbank: Blog
PlanetJune Craft Blog
Latest news and updates from JuneDaffodils
© June Gilbank 2008
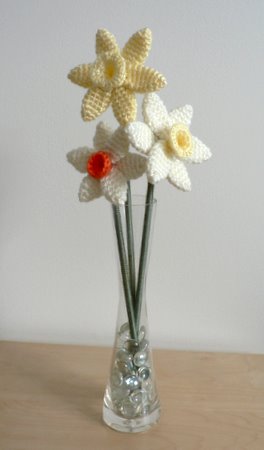
Crochet your own daffodils – perfect for spring! Make a bouquet of yarn flowers, or try one in thread as a beautiful pin or accessory. The pattern includes two different designs for petals and centres – mix and match colours and designs to create your own custom bouquet!
This Daffodils pattern is Donationware – the pattern is available for free, but if you like it please consider sending me a donation to show your appreciation:
Send me a donation and receive the easy-to-print PDF version of the pattern as a thank you!
Donations of any size are much appreciated. Just add the amount you wish to donate, and, once you have checked out and paid, your pattern will instantly be available to download from your PlanetJune account.
The complete pattern and instructions are available below, regardless of whether or not you choose to pay for them 🙂
This is a PlanetJune original crochet pattern. Feel free to use items made from this pattern however you wish, but I’d appreciate credit as the pattern designer. Please do not reproduce the pattern anywhere else; instead post a link to www.planetjune.com/daffodils
Not ready to make it yet? Add it to your Ravelry queue: 
Terminology
| ch | chain |
| invdec | invisible decrease Note: If you prefer, you may use a standard sc2tog decrease in place of each invdec. |
| sc | single crochet (double crochet for UK/Aus) |
| sl st | slip stitch |
| st | stitch |
Notes
- Do not join at the end of each round; rounds are worked in continuous spirals.
- Use a stitch marker to mark the beginning of each round. Move the marker up each time you start a new round.
You will need…
- E US/3.5mm crochet hook
- Small amount of worsted weight yarn in yellow, orange, cream or white, plus green
- Yarn needle
- Stitch marker
I used worsted weight yarn and a size E hook, which produced a large 4″ diameter flower (3.5″ for the smaller flower). Try using a finer yarn or crochet thread with a correspondingly smaller hook to give a more compact flower.
Crochet Instructions
For each flower, you will need:
- 6 petals (choose large petals or small petals)
- 1 centre (choose large centre or small centre)
- 1 green backing
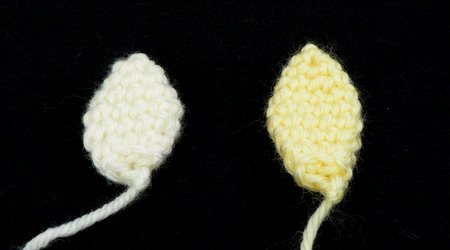
Left: small petal; Right: large petal
Large Petal
Make a magic ring, ch 1.
Rnd 1: 4 sc in magic ring. (4 st)
Rnd 2: (2sc in next st, sc in next st) twice. (6 st)
Rnd 3: (2 sc in next st, sc in next 2 st) twice. (8 st)
Rnd 4: (2 sc in next st, sc in next 3 st) twice. (10 st)
Rnds 5-7: sc in each st around. (10 st)
Rnd 8: (invdec, sc in next 3 st) twice. (8 st)
Rnd 9: (invdec, sc in next 2 st) twice. (6 st)
Join with sl st to next st. Fasten off and weave in ends.
Small Petal
Make a magic ring, ch 1.
Rnd 1: 4 sc in magic ring. (4 st)
Rnd 2: (2sc in next st, sc in next st) twice. (6 st)
Rnd 3: (2 sc in next st, sc in next 2 st) twice. (8 st)
Rnd 4: (2 sc in next st, sc in next 3 st) twice. (10 st)
Rnd 5: sc in each st around. (10 st)
Rnd 6: (invdec, sc in next 3 st) twice. (8 st)
Rnd 7: (invdec, sc in next 2 st) twice. (6 st)
Join with sl st to next st. Fasten off and weave in ends.
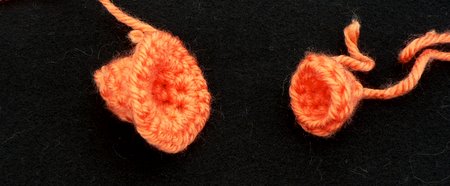
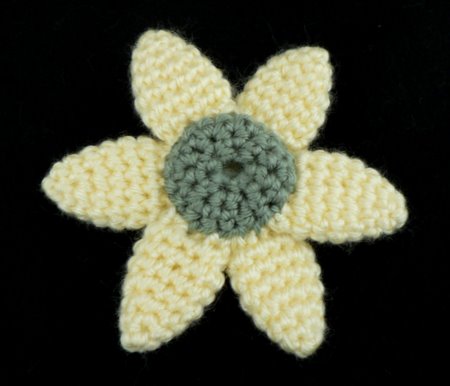
Left: large centre; Right: small centre
Large Centre
Ch 8.
Rnd 1: sc in 8th chain from hook, to form a circle. Sc in each st around the circle. (8 st)
Rnds 2-3: sc in each st around. (8 st)
Rnd 4: 3 sc in each st around. (24 st)
Join with sl st to next st, fasten off and weave in ends.
Small Centre
Ch 8.
Rnd 1: sc in 8th chain from hook, to form a circle. Sc in each st around the circle. (8 st)
Rnd 2: sc in each st around. (8 st)
Rnd 3: (2 sc in next st, sc in next st) four times. (12 st)
Join with sl st to next st, fasten off and weave in ends.
Backing
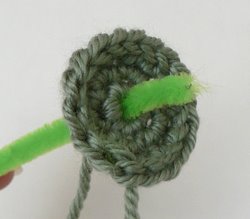
With green yarn, make a magic ring, ch 1.
Note: if you’re going to attach a stem to the daffodil, leave a hole for the stem in the middle of the magic ring when you pull the ring closed (see picture, right).
Rnd 1: 6 sc in magic ring. (6 st)
Rnd 2: 2 sc in each st around. (12 st)
Rnd 3: (2 sc in next st, sc in next st) six times. (18 st)
Join with sl st to next st. Fasten off, leaving long end of yarn.
Assembly Instructions
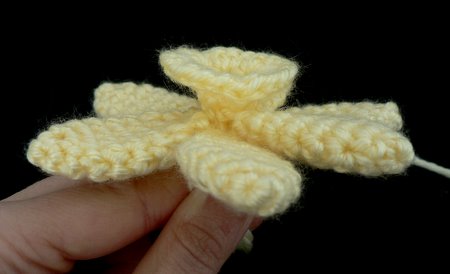
Petals
Flatten out each petal. Arrange each group of three petals with their open ends together so they form a trefoil shape:
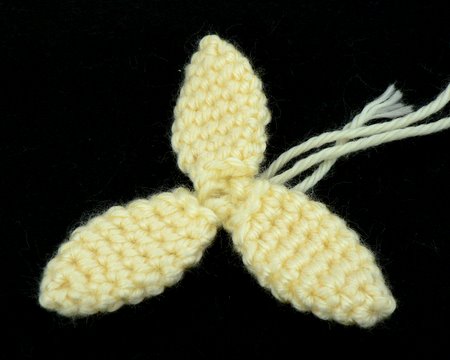
Use a yarn needle and a length of the yarn you used for the petals to join each group of three petals together in this position with a few stitches at the centre of the trefoil. The three petals will still be able to flop about – you don’t need to secure them rigidly together.
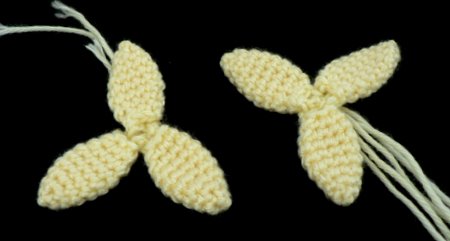
Rotate one trefoil to offset the petals and place it on top of the other, so all 6 petals are visible and equally spaced.
Use a yarn needle and a length of the yarn you used for the petals to stitch the petals together in this position.
Note: Your stitches will not show in the finished daffodil provided you keep them near the centre, so you don’t need to be too concerned with being neat. An effective method is to pass the needle down through the right edge of a top petal and the left edge of a bottom petal, then back up through the right edge of the same bottom petal and the left edge of the next top petal, and continue around in this fashion until all the petals are attached together. Feel free to use any method that makes sense to you – just keep the stitches close to the centre so they will be covered up later.
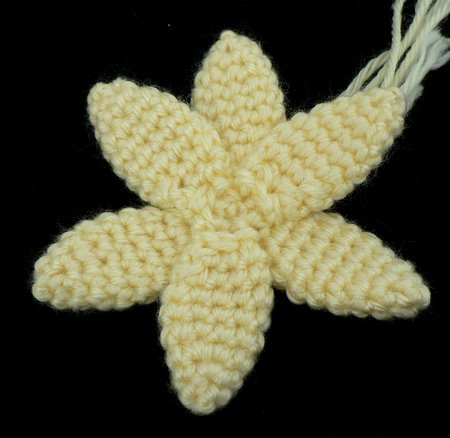
Pull any loose yarn ends through to the back and fasten off.
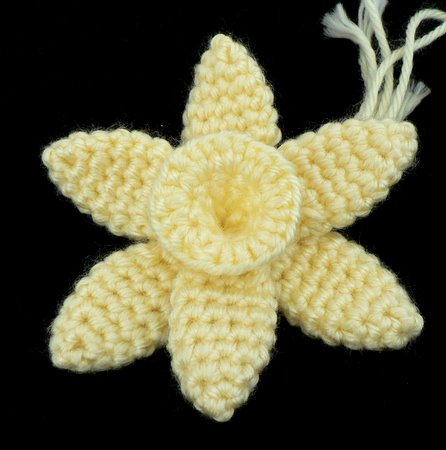
Centre
Place the centre over the middle of the flower.
Using a yarn needle and a length of the yarn you used to make the centre, stitch the centre down to the petals. Don’t worry if your stitches show on the back – the back will be covered in the next step. Pull the ends through to the back and fasten off.
Backing
Place the green circle over the middle of the back of the flower. It should cover any exposed ends. Using a yarn needle and the long yarn end from the backing, stitch the edges of the backing to the petals.
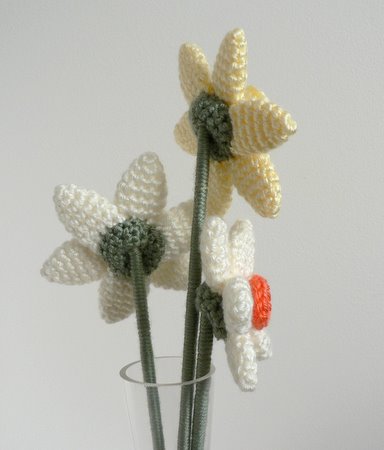
Stem
Adding a stem is optional – you could add a pin back instead, or make several daffodils into a floral wreath with some crocheted leaves.
You could make the stem for a thread daffodil from a pipe cleaner, but, as I discovered during this project, a yarn daffodil is too heavy to be supported by a pipe cleaner. My old-school solution was to buy a 3/8″ wooden rod from the hardware store, cut it to length, and then wrap it with green yarn. I spread a little white glue on the rod every couple of inches to anchor the yarn in place. Easy!

Poke the top of the rod through the hole in the middle of the green flower backing, then angle it so the flower is vertical. If desired, you can tie it in place with more green yarn wrapped through the flower backing and around the stem, but my flowers stay in place without additional support.
I hope you enjoy this pattern. Please leave me a comment below if you do, and consider leaving me a donation. Thanks!
46 Comments »
Leave a Reply
Quick Links: Crochet

Quick Links: Crafts


Welcome to PlanetJune!
Hi, I'm June. Welcome to my world of nature-inspired crochet and crafting. I hope you enjoy your visit!
If you'd like to get in touch, you can contact me here.


Narciss said
woooooow i am really exited. these are very cute. thank you so much
Martha said
Thank you, this is great for gifts to a nursing home…thank you thank you
Penny Daniels said
Hello, June! Greetings from Maine, USA. I just made a very cheerful daffodil, thanks to you! Thank you for sharing the pattern. I’m wondering if twisting two or even three green pipe cleaners together would make a sturdy enough stem…I like the idea of being able to “pose” the flowers. Happy crocheting!!
Penny
June said
It might be worth a try, Penny – it’d depend on how heavy your flower head is and how strong the wires in the pipe cleaners are. Let me know if you try it and have any success 🙂
Elaine said
Hello June
Thank you so much for your daffodil pattern. I am involved in The Cancer Council Relay For Life program in Victoria, Australia, and the daffodil is our ‘patron’ flower. I am donating $20 AUD to this cause in your name as my thank you. I hope you will understand and again accept my thanks. Elaine.
June said
Thanks Elaine, that’s a lovely idea and for a very good cause!
Alison Storey said
Hi June
Would it be possible to make these daffodils to sell in aid of Marie Curie charity- they provide nurses to nurse the terminally ill at home free of charge. If so I will also be happy to make a donation for the pattern.
Alison
June said
Hi Alison, and what a lovely idea! Yes, I allow sales of any items made from my patterns, for any reason (charitable or profitable). I do ask that you give me credit as the designer if that’s possible, but don’t worry if not – you still have my permission 🙂
Isabel said
Gracias,un placer ver sus trabajos,pondre en practica estas flores..gracias..
Umberta said
Gorgeous! And also your other patterns and items are beautiful. I think you are one of the best crochet artists I have ever seen.
kim l said
Very very nice!!
Colleen said
very cute! I plan to make some for ponytail holder for my nieces! thanks!
Ms. Marty said
What a wonderful pattern. I was looking for a pen/pencil topper flower & I found one here. I’ve made quite a few. I dropped the centre, just making the backing without a hole for the front & attaching it by the center. After searching for a rubber ring to mount the pens on I found pencil grips that I cut to size. A friend suggested, since daffodil colors are so limiting, that I could make the petals any color so I’m having fun creating wonderful color combinations. Thank you for getting me started.
tamarque said
must say how well done these are. have looked at many flowers and these are really impressive. would like to make them for a display –is that acceptable to you.
June said
Of course you may! Enjoy my pattern 🙂
Ms Honey said
Hi June
Good day!
Your all work is really really very appriciated.i like all and i want to work over it and learn all.
If you want to help me,please contact with me via msn.
Your early respoce will be highly appriciated,
Thanks a lot,
Ms Honey.
Paula said
Muy lindo!! me encant
penny said
ok i got itand you are right i probabl wont go back to the old way thanks a lot
penny t said
When I go to start a daffodil petal it tells me to make a magic ring but doesn’t tell me how many stitches I should have when I am done make the ring cups you help?
June said
Penny, the magic ring itself is just the loop – the stitches of Rnd 1 are worked into the ring and then you pull the ring closed after completing Rnd 1.
Coco said
I love these!! made a batch for my grandmother last time we visited her,, they came out really well! U’r instructions are great, and easy to follow. Thanx!!
medha devdas said
wow……………….super
Sarah Moore said
Just a quick FYI to let you know we included you in our Spring Carnival on craftcritique.com
A Carnival only works if you share it! Please tell your readers all about it!
Thanks for playing along!
maira said
I love the daffodils, I’m linking you up in my new blog if it’s ok with you!
love
Denis said
Thanks for the tutorial.Great job
Marianne said
Thank you so much for this beautiful pattern. It is the best I have seen. Do you have a pattern for a” little Bluebird motif” I could make and sew onto a round crochet PotHolder? My sister loves bluebirds and I thought I would try and make one , but it did not look to good.
I will leave a donation.
Christine Chipman said
This pattern is so wonderful I just had to leave you a donation. I wish I could have afforded more because your efforts certainly deserve it. Thanks for making it available to us. Keep up the great work you are doing.
Have a great day!
Christine
Kenly said
this is a super-cute pattern. i bet they’d make wonderful hair-stick toppers.
Ana-Lucia said
thanks for getting me interested in something that I thought was unimpressive. The daffoldils are certainly a delight since I have one on my window sill
Michelle said
What a lovely pattern, best I have ever seen of daffodils. . .England in the spring is a wonder to behold, and now making these delightful daffoldils I can have spring all the time. . . I am teaching 9 people in work how to crochet during our lunch hour, and we are making items for charity. . . I hope you do not mind me using your pattern for charity. . . .thank you
Michelle Young, Plymouth, Devon, England 08/09/2008
CAROLINA said
Hello, June, thanks for sharing, Daffodils are one of my favoirite flowers. I
June said
Karen, the best I can offer is a Google translation of the site. It doesn’t all make sense, but at least you will get a better idea of what the site is about! translate.google.ca/translate?u=http%3A%2F%2Fwww.haekelclub-muelsen.de%2F&sl=de&tl=en&hl=en&ie=UTF-8
Karen said
Re: Jessi Said, May 14, 2008
The site Jessi refers to is truly a German site, as it is in the German language. The flowers there are beautiful, but I cannot read any of the words. Any ideas on German/English translation of this site? Thanks for anything you can provide.
Leanne said
Thanks for the beautiful pattern I really like it 😀 Do you have any patterns for Lilacs? I havent found any on the net yet.
Jessi said
Thanks a lot for this beautiful pattern. I found a german site where are also very very cute end ellegant flowers. Perhaps you want to look at the side. Have a nice day, and again thanks June!!!!
The address: www.haekelclub-muelsen.de/
Shelly said
I love this pattern! I used it for my DD’s teacher apparition day. Please have a look!
mycrochetcreations.wordpress.com/2008/05/06/teacher-apparition-flower/
Thank you for offering this for us!
Lutine said
Very beautiful
Robin said
Just beautiful – what a great job!
Manisha said
Thanks for the tutorial. These daffodils are great!
Sumathy.K said
I like this daffolids flower. This crochet daffodis make me good time. Thank for your pattern instructions.
rosy_cheek said
gorgeous
Teeheenah said
I just love daffodils! Fantabulous job and thank you sooo much for sharing!
T-
daisychaindaisychain said
these daffodils are just gorgeous thank you for sharing and I too have made a donation! Cheers
Nathalie said
YOU ROCK!!!!!!!! I LOVE these!!!! Thank you so much!!!
Nathalie
Jana said
Thanks, June!
I have so many projects waiting in the wings, but I may just have to put them on hold to make at least ONE of these beauties! I think I will keep it short (and small!) and sweet, and just make myself a thread pin for now!
Jana
PS I will be your FIRST customer for a Great Dane Pattern! 🙂
marykz said
just what I needed today- a little sign of spring. small donation sent!! Thanks for sharing the pattern/tutorial!!