Christmas Pudding crochet pattern
© June Gilbank 2007
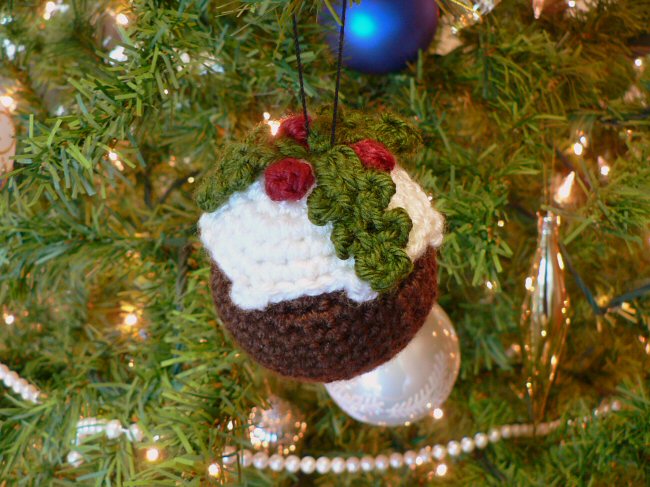
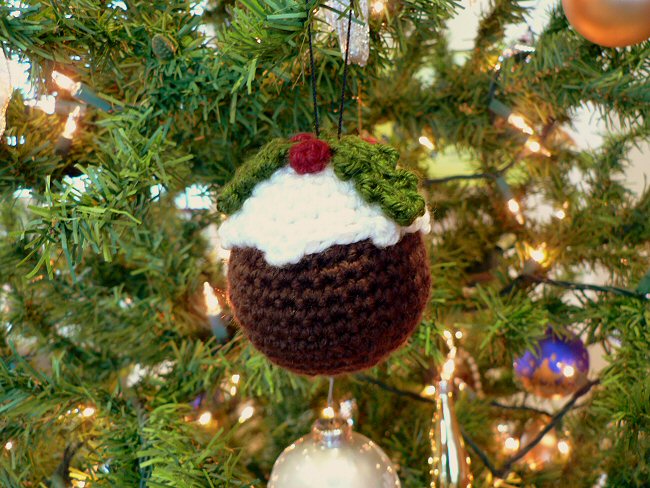
Here’s a quick project to crochet: a little Christmas Pudding (aka Plum Pudding) in time for Christmas. Hang it on your Christmas tree, or sit it on your mantelpiece or as a decoration on your Christmas table! This amigurumi xmas pudding pattern comes complete with white sauce and is topped with a sprig of holly leaves and berries.
This Christmas Pudding pattern is Donationware – the pattern is available for free, but if you like it please consider sending me a donation to show your appreciation:
Send me a donation and receive the easy-to-print PDF version of the pattern as a thank you!
Donations of any size are much appreciated. Just add the amount you wish to donate, and, once you have checked out and paid, your pattern will instantly be available to download from your PlanetJune account.
The complete pattern and instructions are available below, regardless of whether or not you choose to pay for them 🙂
This is a PlanetJune original crochet pattern. Feel free to use items made from this pattern however you wish, but I’d appreciate credit as the pattern designer. Please do not reproduce the pattern anywhere else; instead post a link to www.planetjune.com/christmaspudding
Not ready to make it yet? Add it to your Ravelry queue: 
Terminology
| ch | chain |
| invdec | invisible decrease Note: If you prefer, you may use a standard sc2tog decrease in place of each invdec. |
| sc | single crochet (double crochet for UK/Aus) |
| sl st | slip stitch |
| st | stitch |
Notes
- Do not join at the end of each round; rounds are worked in continuous spirals.
- Use a stitch marker to mark the beginning of each round. Move the marker up each time you start a new round.
You will need…
- E US/3.5mm crochet hook
- Small amount of worsted weight yarn in brown, cream (or white), red and green
- Yarn needle to weave in ends
- Stitch marker
- Fibrefill stuffing
Finished size
Approx 3″ tall by 2.5″ wide

Crochet Instructions
Base
With brown yarn, make a magic ring, ch 1.
Rnd 1: 6 sc in magic ring. (6 st)
Rnd 2: 2 sc in each st around. (12 st)
Rnd 3: (2 sc in next st, sc in next st) six times. (18 st)
Rnd 4: (2 sc in next st, sc in next 2 st) six times. (24 st)
Rnd 5: sc in each st around. (24 st)
Rnd 6: (2 sc in next st, sc in next 3 st) six times. (30 st)
Rnds 7-11: sc in each st around. (30 st)
Rnd 12: (invdec, sc in next 3 st) six times. (24 st)
Join with sl st to next st. Fasten off and weave in ends.
Top
With cream/white yarn, make a magic ring, ch 1.
Rnd 1: 6 sc in magic ring. (6 st)
Rnd 2: 2 sc in each st around. (12 st)
Rnd 3: (2 sc in next st, sc in next st) six times. (18 st)
Rnd 4: (2 sc in next st, sc in next 2 st) six times. (24 st)
Rnd 5: sc in each st around. (24 st)
Rnd 6: (sc in next 3 st, [sc in next st, ch 3, sc in same st]) six times.
Join with sl st to next st. Fasten off, leaving long end of yarn.
Holly Leaf (make 3)
With green yarn, ch 8 loosely, sl st in 2nd ch from hook.
Sl st in next ch. Sl st in next ch, ch 3, sl st in same ch.
Sl st in next ch. Sl st in next ch, ch 3, sl st in same ch.
Sl st in next ch. 3 sc in last ch (to turn the corner).
Working into the other side of the starting chain:
Sl st in next ch. Sl st in next ch, ch 3, sl st in same ch.
Sl st in next ch. Sl st in next ch, ch 3, sl st in same ch.
Sl st in next ch. Sl st in last ch.
Fasten off, leaving long end of yarn.
Holly Berry (make 3)
Make a magic ring, ch 1.
Rnd 1: 4 sc in magic ring. (4 st)
Join with sl st to next st. Fasten off, leaving long end of yarn.
Assembly Instructions
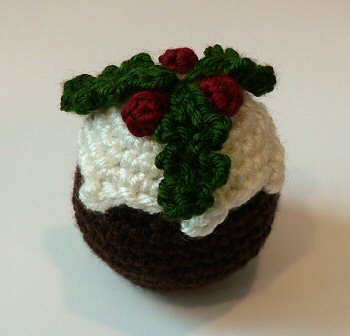
- Arrange the three holly leaves on the top of the pudding. Using the yarn needle, thread the long yarn end from each leaf through the centre of the top, to the inside. (Optional: also stitch each leaf to the top about halfway along the leaf, to keep the leaves in position.) Knot all the ends together on the wrong side.
- Arrange the three holly berries between the leaves on the top of the pudding. Using a yarn needle, pull the yarn ends through the top to the wrong side. Knot all the ends together on the wrong side.
- Stuff the bottom of the pudding.
- Using a yarn needle and the long yarn end from the pudding top, stitch the top to the bottom.
I hope you enjoy this pattern. Please leave me a comment below if you do!


Mary Morris said
I will make a donation to our local Air Ambulance if that’s OK.
Joyce said
Thank you for the pattern I have tried to get patterns from you know who impossible only get lots of pictures no patterns.
Will give it a try for our craft stall for Melanoma awareness
vicky said
thanks so much for this great easy pattern
i just made mine around styrofoam ball instead of using fiber fill stuffing so its perfectly round will always hold its shape and weighs nothing 🙂
jo tunley said
I love this it’s so cute. I’ve change the top a little bit it’s so easy. ??
Sarah said
Fantastic pattern. The first time that I have read and used a crochet pattern. I did change the leaves to something easier as I couldn’t get the leaves to look like yours in the picture. Thank you for posting this fab pattern.
Dorothy GULLIVER-DAVISON said
Hi. I have been given the Christmas pudding with a card today. Imagine my surprise when inside the bottom was a Ferrero rocher chocolate. Of course these can be hung on the tree but how about using a paper clip and hanging from the plain old net curtain?
Hanging baubles from net is a family tradition but I think the children would love this idea as a different kind of advent calendar.
Bye for now
Dot
Michelle said
What a cute pattern for Christmas. I featured it in a roundup on my blog today! bookpeoplestudio.wordpress.com/2013/12/13/collinktion-a-christmas-carol/
nanou said
merci beaucoup
amiti
Joan said
Thank you for such a cute pattern, I’m gonna try and make a large Christmas Pudding. I just love this pattern.
littlegemm said
Many thanks for this fab tute, I’ve featured it on my blog. 🙂
Tamara said
So sweet! I love it! I linked to the pattern for an ornaments roundup on my site this morning. 🙂
Khamporchai said
This is cute and super amazing!!! Great for a Christmas decoration, ornament!
Stephabee said
Just what I’ve been looking for :). Thank you! This looks great, though I think I may be staring at the Holly leaf part of the pattern for quite some time! I’ve only ever crocheted in the round. Wish me luck :)!
crystelle50 said
Very beautiful, thank you so much
Julia Lynne said
I made this decoration for my own tree, and have already had three requests from friends and family for their trees! Thank you so much for such a cute and fun pattern!
Deathway said
Hey,
I love this pattern! I didn’t realise how fiddly the holly leaves were but I’ve got a close approximation of a christmas pudding now 😀 The only thing is, I don’t have a yarn needle. Is there an alternative way to thread stuff through? Can I use my hook?
June said
It’s possible: you can insert your hook where you want the yarn to come out so it comes out where you want the yarn to go in, hook the yarn end and pull it through, to make each ‘stitch’. But I would highly recommend you buy a yarn needle – they are very inexpensive and useful for any crocheting – there are always ends to weave in, even if you’re not joining pieces together!
LadyLovelace said
Hey, just wanted to drop a note to say that I love this so much I’ve featured it on my website!
tara said
thank you so much! i’ve just made it!!!so cute! thanks!!!!!!!!!!!!
Megan said
That is seriously a cute pattern! I am going to make one of these for my tree, for sure! Thanks for sharing!
Mandy said
This is such a cute pattern. I love making it!
MaryEllen Stover said
Wonderful pattern!