PlanetJune by June Gilbank: Blog
PlanetJune Craft Blog
Latest news and updates from JuneTiny Yarn Eyes for Amigurumi
If you’ve ever struggled to find the perfect eyes for your smaller amigurumi, you’ll love my technique for making tiny yarn eyes. In this video, I’ll show you my foolproof method for making a pair of perfectly matched tiny child-safe yarn eyes with a lifelike sparkle.
This technique is an embroidery-free foolproof method for making tiny yarn eyes, spots and dots for amigurumi. It works especially well for amigurumi that are too small for safety eyes. Yarn eyes are a child- and pet-safe alternative to plastic eyes, and this method gives you more control than embroidering French knots, so you can make sure you have a perfectly matched pair of eyes.
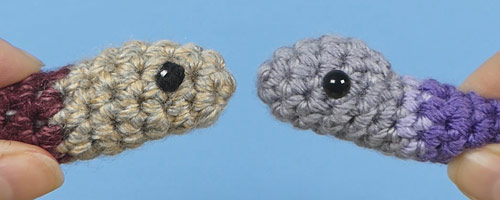
L: tiny yarn eyes, R: plastic eyes
Note: although there’s no actual crocheting in this video, I’ve made right- and left-handed versions anyway, so you can see how I use the needle exactly as you’ll see it when you do it yourself!
Video Tutorial (right-handed)
Video Tutorial (left-handed)
Note: The videos may look a little small embedded in the blog: if so, you can fullscreen them or click through to YouTube (links: right-handed; left-handed) to watch them full-sized 🙂
Baby Snake Pattern
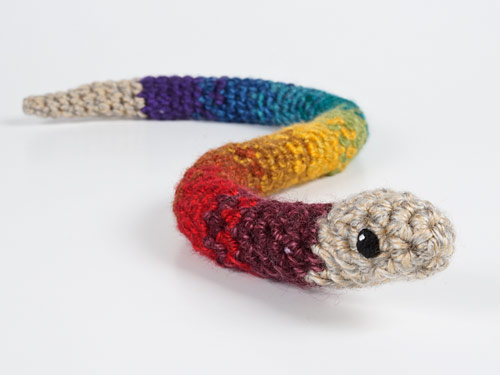
Wondering about the pattern you saw in this video? You can find my FREE Baby Snake crochet pattern, used to make the samples in this video, here:
Baby Snake amigurumi crochet pattern >>
Basic Text Instructions
This technique is basically a French knot without the needle! You can form each eye (or other spot) from a length of yarn, then attach them to the head after you’re happy with the shape you’ve made. It’s a bit more work than French knots, but you can make sure the eyes match perfectly before you attach them, and you have more control when you position the eyes, to make sure they end up nestled down securely against the surface of your amigurumi.
Cut a 12″/30cm length of black yarn, make a loop in the middle, and pass one end through the loop three times (below, left). Slowly pull the ends of the yarn and you’ll see the loops start to align (below, right)…
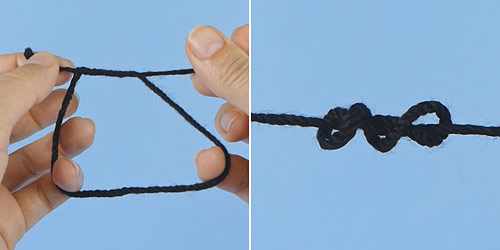
As the knot shrinks, push the sides together to encourage it to form a nice rounded shape (below, left). Note: Don’t pull the knot tight! You want to keep the yarn wraps plump, so the eye looks soft and rounded.
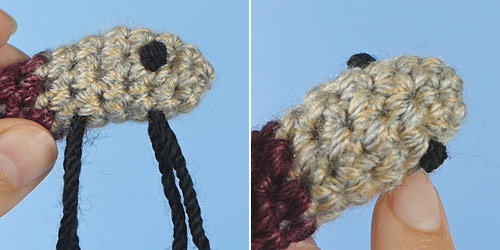
Once you’re happy with your eye, make a second one to match, drawing the second knot down to the same size and shape as the first (below, right).

Use the yarn ends to secure the eyes to the amigurumi. The easiest way to do this securely is to bring out one yarn end from each eye at the same gap between stitches (below, left), then tie each pair together. Pass the ends through the amigurumi and pull them tight so the knots disappear inside, then snip them close to the surface so they retract back inside. See the video to see this in action – it’s easy, and works very well!
I highly recommend adding a lifelike sparkle to all yarn eyes, as I briefly showed at the end of the video, by using a length of white embroidery floss and a sharp needle to add a tiny white stitch to an upper corner of each eye as a catchlight and avoid that dead-eyed look you get with matte yarn eyes (compare the progress photos above with the finished snake below – the glint adds such a spark of life!) See my Glinting Eyes for Amigurumi tutorial for more details on how to position the glints correctly to give a realistic effect!
Bonus Tips
- Yarn Ends Getting Stuck? If you struggle to pull both yarn ends through the amigurumi at once when you’re losing the yarn ends, you can thread each one individually onto the yarn needle and pass them through separately.
- Larger or Smaller Eyes: With worsted weight yarn and 3 wraps – as shown in my video – the eyes are comparable to 6mm plastic eyes. You can vary the size by using 2 wraps in the knot for a smaller eye, or 4 wraps for a slightly larger eye (any more than 4 and the eye will look elongated). If you’d like to make a significantly larger yarn eye, I recommend crocheting a circle (see my Gingerbread Man as an example).

Loved this tutorial? I have so many more amigurumi tips and tricks to share with you!
Boost your amigurumi skills with my latest book, The Essential Guide to Amigurumi, your comprehensive guide to amigurumi techniques and tips.
Do you find my tutorials helpful? If so, please consider making a contribution towards my time so I can continue to create clear and concise tutorials for you:
Thank you so much for your support! Now click below for loads more crochet video and photo tutorials (and do let me know what else you’d like me to cover in future tutorials…)

5 Comments »
Leave a Reply
Quick Links: Crochet

Quick Links: Crafts


Welcome to PlanetJune!
Hi, I'm June. Welcome to my world of nature-inspired crochet and crafting. I hope you enjoy your visit!
If you'd like to get in touch, you can contact me here.


Ellen Preston said
Wow, this is such a cute tricks for the eyes. I love it. Thank you so much.
Amy said
You are amazing! Thank you for all the tips and expertise you offer that so enhances my crocheting! This is so simple – and looks so much better than my French knots!
June said
Thanks Amy! I came up with it because I was never completely happy with my French knot eyes, but this way you can really make them look good (and maybe even better than plastic eyes if you get the glint just right!)
RuthL said
That’s awesome June, thank you so much. 😀
June said
Thanks Ruth, and you’re very welcome!