PlanetJune by June Gilbank: Blog
PlanetJune Craft Blog
Latest news and updates from JuneInvisible Decrease
If you’ve been making amigurumi, you may be lamenting the gap or bump that forms when you decrease. The standard methods of decreasing are to sc2tog, which can leave a bit of a bump and a small gap, or to skip a stitch, which leaves an obvious gap. There has to be a better way… and there is! The invisible decrease really is as good as its name claims – it’s almost impossible to see, even if you know what you’re looking for. (See my blog post for a comparison of these three methods.)
The invisible decrease method will probably take a few attempts to master, but, just like the magic ring, it’s one of those techniques that’s so good, you’ll wonder how you ever crocheted without it!
How do I make an Invisible Decrease?
Choose your preferred learning method! I have video and step-by-step photo tutorials, all for right- and left-handers. Continue to:
- Invisible decrease video tutorial (right- and left-handed versions)
- Tips for perfecting your invdec stitches
- Invisible Decrease for right-handers (photo tutorial)
- Invisible Decrease for left-handers (photo tutorial)
Invisible Decrease for right-handers
Before we begin:
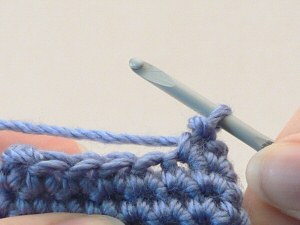
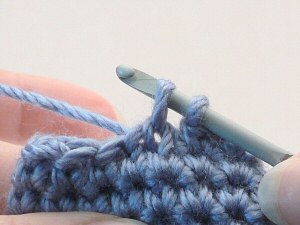
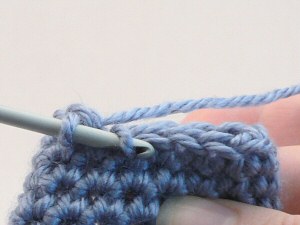
Insert the hook into the front loop of the first stitch (2 loops on hook). DO NOT YARN OVER:
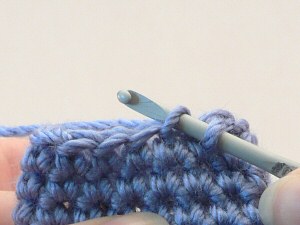
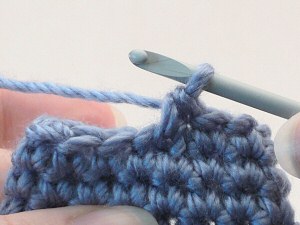
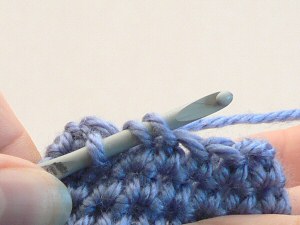
Insert the hook into the front loop of the next stitch. To do this, you’ll need to swing the hook down first so you can insert the hook under the front loop. (3 loops on hook):
Swing hook down…
…then up through the front loop of the next stitch
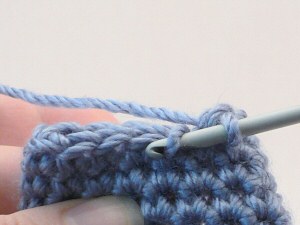
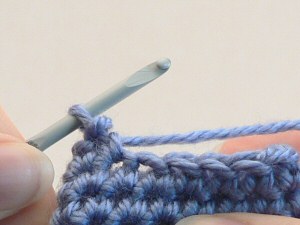
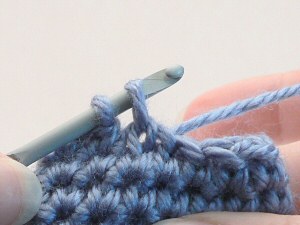
Yarn over and draw through the first two loops on the hook. (2 loops on hook):
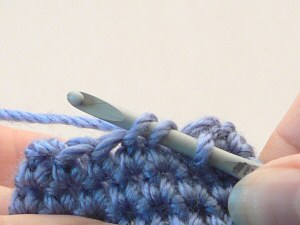
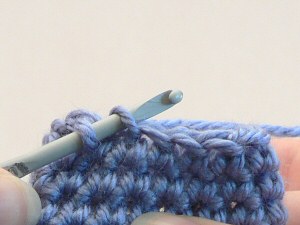
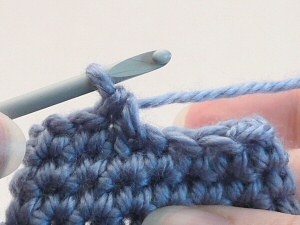
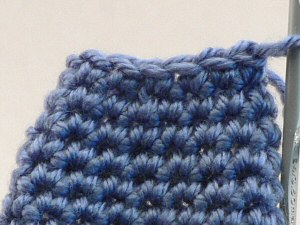
Yarn over and draw through both loops on the hook. Invisible decrease completed:
Now let’s play a game: spot the decrease…

Good, huh? Give it a go with your next ami – I promise you won’t regret it…
Invisible Decrease for left-handers
Before we begin:
Insert the hook into the front loop of the first stitch (2 loops on hook). DO NOT YARN OVER:
Insert the hook into the front loop of the next stitch. To do this, you’ll need to swing the hook down first so you can insert the hook under the front loop. (3 loops on hook):
Swing hook down…
…then up through the front loop of the next stitch
Yarn over and draw through the first two loops on the hook. (2 loops on hook):
Yarn over and draw through both loops on the hook. Invisible decrease completed:
Now let’s play a game: spot the decrease…
Good, huh? Give it a go with your next ami – I promise you won’t regret it…
Do you find my tutorials helpful? If so, please consider making a contribution towards my time so I can continue to create clear and concise tutorials for you:
Thank you so much for your support! Now click below for loads more crochet video and photo tutorials (and do let me know what else you’d like me to cover in future tutorials…)

176 Comments »
Leave a Reply
Quick Links: Crochet

Quick Links: Crafts


Welcome to PlanetJune!
Hi, I'm June. Welcome to my world of nature-inspired crochet and crafting. I hope you enjoy your visit!
If you'd like to get in touch, you can contact me here.


Tania said
I found this helpful morsel via crochetme from Kim Werker….thanks so much! I am going to try this out for my next project. It looks terrific.
OT….what is the best yarn to use for amigurumis? I love that yarn you are using above..and I have only used yarns I have on hand..as I have to budget. If you need to point me in the right direction to read more on that, that’d be fabulous. 🙂
June said
Hi Tania, I don’t use any ‘special’ (i.e. expensive) yarns for my amigurumi. Most amigurumi are made with worsted weight yarn. I like the ‘soft’ acrylics best; you can find them in any big craft store and they aren’t too expensive (especially if you have a coupon, or wait for a sale): Bernat Satin, Red Heart Soft and Caron Simply Soft all have that nice sheen to them, are nice and soft to work with, and make very pretty amigurumi.
The other yarn I like, even though doesn’t have that sheen or softness (although it’s still softer than traditional ‘cheap & nasty’ acrylics) is Lion Brand Vanna’s Choice. It comes in amazing colours and it’s a little thicker than other worsted weight yarns, which makes for a good firm structure. You can see the difference if you compare, say, my AmiDogs (Bernat Satin) with my Dinosaurs (Vanna’s Choice).
I’ve just written a whole book of amigurumi information like this; if you’re interested, it’s called The Complete Idiot’s Guide to Amigurumi 🙂
Jessica said
This is a revelation – thank you so much June! My amigurumis will all be done using this technique now 🙂
Frida said
I LOVE YOU! Thank you for helping me with something that will make my amigurumis beautiful so that I won’t ever get tired of them looking awkward!
You just saved the Fridagurumi species! ?
Leah said
When I read an internet blip somewhere that said ‘invisible decrease for amigurumi’ I thought Yeah! Right! We will see about that! (I am a natural skeptic btw) I do have to admit, you have done it. This is great. I have always disliked the way the traditional decreases look and this definatly solves that. And thanks for posting the left handed version (I do get tired of having to look at things backwards). Thank you for proving my sarcastic, snide comments wrong! Now I just have to go back and rip appart and redo all the Amigurumi I have made before learning your technique.
Nata said
This method is amazing – the best ever for making a decrease!! Thanks for sharing with us 🙂
Sally said
Hi June
Thought I was doing something wrong with the invisible decrease, just didn’t look as if it was invisible!!!!
Should of checked your fantastic tutorial sooner ( pictures say a thousand words don’t they)
I now know where I went wrong.
Thanks also for the great designs, here in England were lucky to find ANY crochet patterns,( they’re either 1970s or baby cardigans) never mind up to date ones.
THANKS AGAIN Sally
Ashley said
Wow! That’s pretty incredible! Thanks for sharing! I’ll definitely give it a shot next time =D
allierwill said
Oh, my gosh! I love that you put the pictures in. I’ve seen directions and other tutorials for this technique and couldn’t figure it out. you make it so much less confusing. Thanks!
Shippymolkfred said
Thanks for this great tutorial.
I will test this immediately!
Greetings from Scotland
Schippymolkfred
Ann Byron said
Let me add my thanks too. I also appreciate the clear instructions
Akua said
THANK YOU THANK YOU THANK YOU! Love it. looks so much better on my dolls!
Sonja said
I love you! I just discovered that my past attempts at invisible decrease were wrong-oh so wrong! Now thanks to you, I have seen the light and got it. No stopping me now. Thanks so much.
Tana Goen said
Been crocheting for years, never used the invisible decrease….it is the best thing I have ever learned.
Bibbi said
WoW! That’s great! Thanx a lot!
Inbaliya said
Thanks for a very good tutorial. With your blog, crochet seems easy than ever!
Estella said
Thank you for such a detailed tutorial. You have saved me from so many frustrations. I’ve always hated how you could see the stuffing using the other techniques.
liz shinagawa said
Brilliant…this makes all the difference in the world to the finished look of my work. Thank you for sharing.
Liz
Brandon said
Thanks very much! This problem has been vexing me for weeks; this front-loop decrease technique works beautifully!
Artesanica said
que bueno lo explicas yo no lo sabia hacer y me daba bronca cuando disminuia que queden esos huecos.
Gracias.
Reba said
I am so thankful for this. I’ve always hated the space you can see in the skipping a sc! THANK YOU, THANK YOU, THANK YOU!!!!!
beadfreak said
Loved this and your tut for the magic ring. These are my new new replacements for slip stitch to form a ring and sc2togs!!!!! THANK YOU, THANK YOU, THANK YOU!!!!
pomarrancza said
Thank You soooo much!!!!!!!!!! I hated the decrease loops.
sukigirl said
I had just finished ripping back part of a head on an amigurumi (since I wasn’t happy with the decreases) when I remembered this tutorial.
I tried it and I’m so happy with the difference it makes to my project!
Thanks so much!!!
Jen said
WOW WOW WOW Thanks so much! Pure GENIUS! 😉
June said
Izzy, no it doesn’t mean that 🙂 Crochet in both loops as usual; it’s just the decrease stitches that you make in the front loops. Think of it like this: you’re still going through 2 loops as with a normal stitch; it’s just that the loops are side by side instead of one behind the other: that’s what makes this decrease stitch so invisible.
Izzy said
oh, ok then. does that mean i have to crochet in the front loops for my entire project?
June said
Izzy, when you try it you’ll see it’s actually a lot easier if you go through just the front loops to make this stitch. Flipping the hook down to go up through the second stitch would be pretty difficult to do if you’ve gone through both loops, plus it would make the stitch bulkier and less ‘invisible’!
Izzy said
i was wondering, do you have to put it through the front loop or can you put it through both loops (by it i mean the hook)]
other than that….omg! i always have GIANT holes at the bottom of my projects!! yay!! i can fix that now
Maryangela said
Hi, June!
Thank you so much for this tute. It’s like you’ve changed my life =D
So I’m a linking to your post and hope other people will be as happy as I am after learning how to invisible decrease!
Hazel Furst said
Wow!
curegirl0421 said
Thanks June!! I’m about to get started on a Cthulu (because why not, I ask you) and this will be so handy! Plus, getting through that font loop when it’s down to just a few stitches is so much easier than trying to wrestle into both parts of the stitch…
Of course my gauge is like IRON, so that could just be me. 😉
Bethel King said
Thanks so much for including the left-handed directions as well as the right!
Annessa said
Thanks alot. Just try it out, is so great, no more big and visible holes!!!
Me a leftie, really appreciate extra tutorial for leftie.
XOXO
Izabela said
thank you for this fantastic tutorial, I just can`t believe this is so easy… just used your explanation to do a decrease with double crochet stitches and it looks so much better! great! thanks again!
Krista said
I found your blog yesterday. What a find. 🙂
futuregirl said
This is wonderful! I’m so happy to learn about this technique! Thank you for taking the time to put together such a thorough tutorial for us.
becky said
oh my this is amazing i have been wondering how to hide my decreases, this would also work for when I am making beanies and things.. so amazing
Maryann said
Thanks for the decrease, and THANKS for showing a lefty version! It’s nice not having to reverse the photos in my head.
Samantha said
:O *stares in amazement*
i wish i had known about this when i crocheted my boyfriend a big big heart for valentine’s day! the bottom came out looking like swiss cheese, there were so many decreases! i guess next time it’ll look a lot better 😀
June said
Lola: yep, it’s just a straight substitution. 1 dec/sc2tog = 1 invdec. Easy peasy!
lolagurumi said
Great idea! Look forward to using it
How would you replace this in a pattern written using dec/sc2tog?
Would one invdec equal one of those? Usually I eyeball that kind of stuff, because the pattern direction never turn out nicely. note: i haven’t used one of your patterns yet 😉
Thanks
Lola
eve said
What can I say! GenioUs..
xox
Tirzah said
This is wonderful! Thank you so much!
Aveen said
In all the time I’ve been crocheting I’ve never even heard of this but I really wish I had! I can’t wait to try it out. Thanks 🙂
laughing purple goldfish said
hmmmm…. it all seems a bit too easy really, doesn’t it?
thanks for sharing this method, I’ll certainly be using it from now on… and will be linking to your blog when I do
much appreciated 🙂
Anna said
I love you.
EclatDuSoleil said
Thank you June! A really interesting solution, I make a link from my blog.
Anonymous said
I recently made some hearts using both usual metods, and I wasn’t pleased with results. Then I start looking for something invisible 🙂
Thank you for this!
Sonia said
This is my favorite “aha!” thank you thank you for this great tutorial :o) no more strange loops in my yarny friends (does that word exists? I don
Josefin said
Oh, this was easy! I mean, hello! Where have my brain been all this time?!
Thank you for a good tut June, I will do this next time I make an amigurumi! 😀