PlanetJune by June Gilbank: Blog
PlanetJune Craft Blog
Latest news and updates from JuneCrochet Basics (left-handed)
Looking for the right-handed version? If not, read on:
Basic stitches for Amigurumi
To learn to make amigurumi, you only need to know a few very basic crochet stitches. This brief guide will teach you all the basic stitches you’ll need to be able to follow an amigurumi pattern and start to crochet your own toys!
Note: This guide, as with all my patterns and tutorials, use standard (US) crochet terminology.
Contents
- Slip Knot (starting loop)
- Chain (ch)
- Single Crochet (sc)
- Single crochet increase (2 sc)
- Single crochet decrease (sc2tog)
- Slip Stitch (sl st)
- Crocheting in the round
For more advanced techniques, e.g. magic ring, colour changes, joining pieces, see the main Amigurumi Help page.
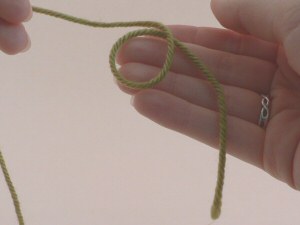
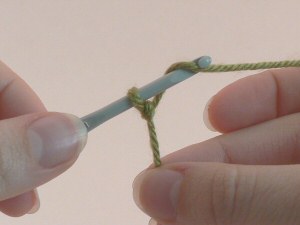
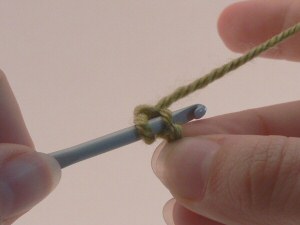
Slip Knot (starting loop)
Make a loop about 6” from end of yarn:
Insert hook through loop and hook the long end of the yarn:
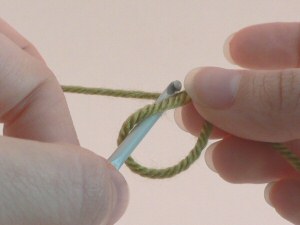
Use hook to draw yarn through loop:
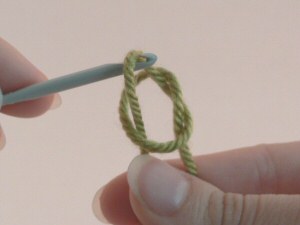
Pull loop tight:
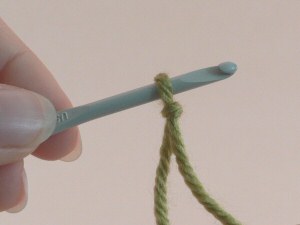
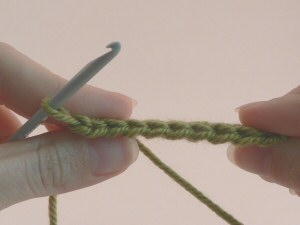
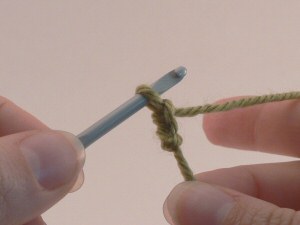
Chain (ch)
With starting loop on hook, yarn over:
Draw hook back through loop on hook (1 ch completed):
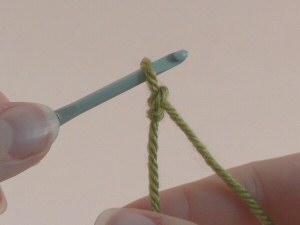
Repeat the steps (yarn over, draw hook back through loop on hook) to make each ch st:
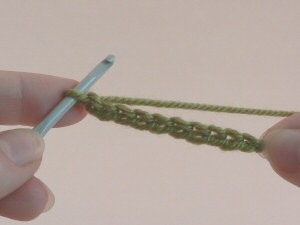
Single Crochet (sc)
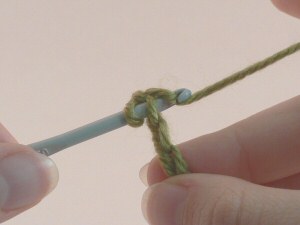
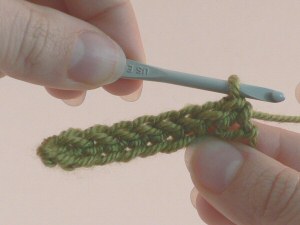
Single crochet into a chain (usually first row/round only)
Insert hook into 2nd ch from hook.
Note: loop on hook does NOT count as a chain:
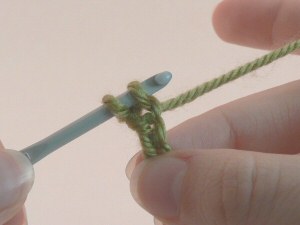
Yarn over:
Draw yarn through chain (2 loops on hook):
Yarn over:
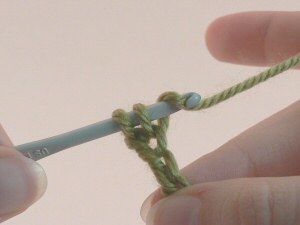
Draw yarn through both loops on hook (1 loop on hook, 1 sc made):
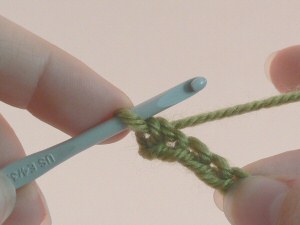
Make a sc in each ch (or as specified in pattern):
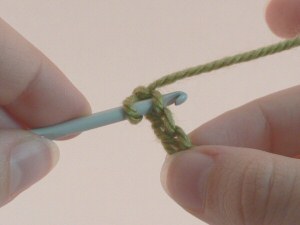
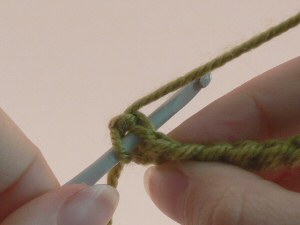
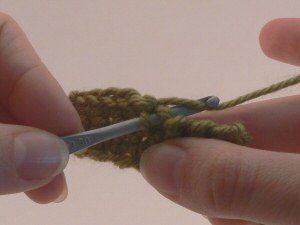
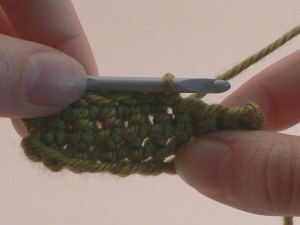
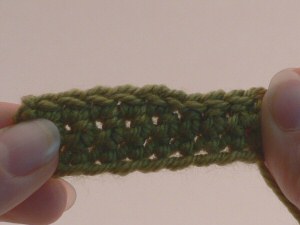
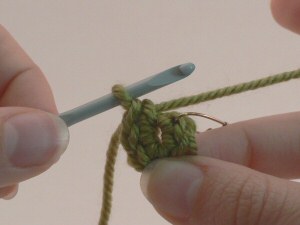
Single crochet into a single crochet (usually all rows/rounds except first)
From the top, each crocheted stitch looks like a ‘V’ shape:
Unless otherwise specified in a pattern, insert your hook under both top loops to begin the stitch, as shown below:
Complete the stitch as shown for single crochet into a chain: yarn over, draw up a loop (2 loops on hook), yarn over, draw yarn through both loops on hook.
Single crochet increase (2 sc)
To increase in single crochet, make the first stitch as usual:
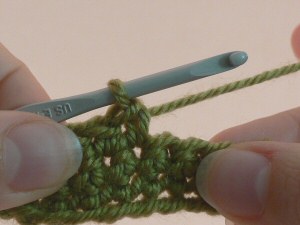
Insert hook back into the same stitch to form the 2nd sc:
Complete the sc as usual:
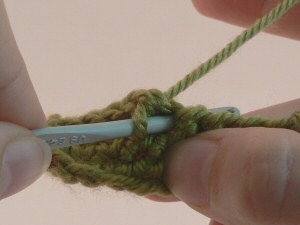
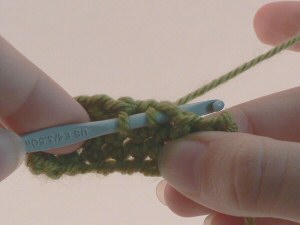
Single crochet decrease (sc2tog)
Insert hook into stitch:
Yarn over and draw up a loop:
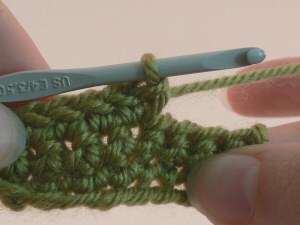
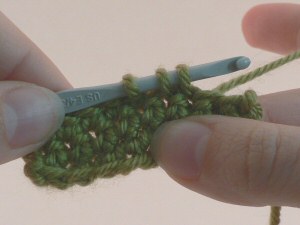
Insert hook into next stitch:
Yarn over and draw up a loop:
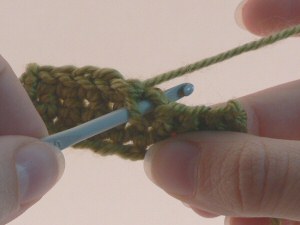
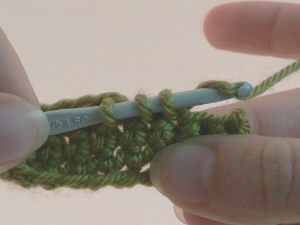
Yarn over and draw through all three loops on hook:
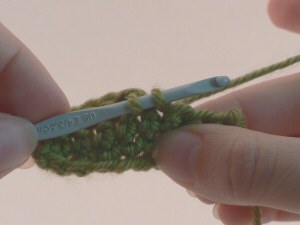
1 sc decrease completed:
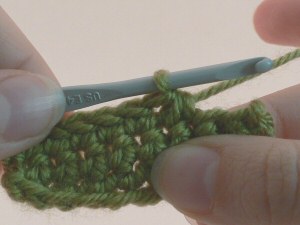
Once you are comfortable with this method for a basic decrease, try learning the Invisible Decrease to make your decreases practically invisible!
Slip Stitch (sl st)
Insert hook into stitch:
Yarn over and draw up a loop; draw through loop on hook:
1 sl st completed:
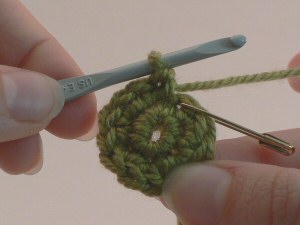
Crocheting in the round
Ch 2:
Insert hook in 2nd ch from hook:
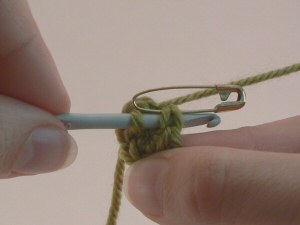
Complete sc and place stitch marker into the top of this stitch:

Continue to make sc into the same space (number as specified in pattern). Stitches will form a circle:
To begin the second round, insert hook into the first st of the previous round (as marked by the stitch marker). It is easier to first remove the stitch marker, then make the stitch:
After completing the first stitch, place the stitch marker into this stitch:
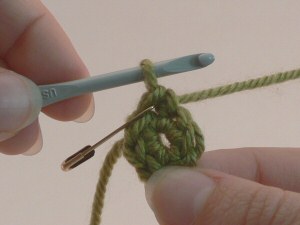
Continue to crochet around the circle as specified in pattern. Picture below shows end of Rnd 2; to begin Rnd 3, remove stitch marker, make first stitch then place stitch marker into this stitch:
Once you are comfortable with this method, try the Magic Ring method to avoid leaving that hole in the middle of your starting round.
Now you should know everything you need to know to be able to crochet your first amigurumi! Have fun!
Do you find my tutorials helpful? If so, please consider making a contribution towards my time so I can continue to create clear and concise tutorials for you:
Thank you so much for your support! Now click below for loads more crochet video and photo tutorials (and do let me know what else you’d like me to cover in future tutorials…)

35 Comments »
Leave a Reply
Quick Links: Crochet

Quick Links: Crafts


Welcome to PlanetJune!
Hi, I'm June. Welcome to my world of nature-inspired crochet and crafting. I hope you enjoy your visit!
If you'd like to get in touch, you can contact me here.


Megan said
Thanks so much for these tutorials. I am right handed but have been searching for good information so I can teach left handers. I have been teaching myself to crochet left handed using your instructions as an exercise to see what it is like to be a learner again. I have noticed that the same row is worked from a different side of the piece depending which hand I crochet with. ie. To work a row from right to left (right handed) I put the hook in from front to back. To work the same row from left to right (left handed) I still put the hook in from front to back. But the opposite side is in front in each case. I can’t quite get my head around the concept to determine whether it makes any difference so long as I stick to one or the other consistently. Does it? It seems to me that it might matter if you are working front or back posts. It does explain why stitches lean differently depending if I use my left or right hand. And I have worked out that it is definitely a bad idea to switch between the two in the middle of a row!
June said
Actually, the fronts of your stitches are always on the same side – the side that faces you while you crochet – but your stitches should be a mirror image of each other depending if you’re crocheting right- or left-handed. That’s why your stitches lean differently – a right slant becomes a left slant and vice versa.
If you’re following a pattern, you should always work the complete piece without switching hands. Unless the piece is asymmetrical, you’ll end up with the same shape no matter which hand you crochet it with. But a pattern for e.g. crocheted letters (designed for/by right-handers) would generate backwards letters if a lefty followed the pattern.
Post stitches etc are always worked the same (but mirror-reversed) – a front post stitch is a front post stitch no matter which hand you work it with. All you ever need to switch are the words ‘right’ and ‘left’ (and ‘clockwise and ‘counter-clockwise’) to adapt instructions to be left-handed – ‘front’ and ‘back’ are never switched. Try watching the right- and left-handed versions of one of my videos to see the stitches in action from both perspectives!
Megan said
Thanks so much June.
I think I was trying to do a right handed front post stitch but with my left hand, and that doesn’t look right at all! I’ve worked out that is the problem one of my left handed friends was having – trying to do right handed crochet with her left hand, – just like left-handers have to do right handed writing, only with their left hand. So she needed a to hold the hook a very strange way and everything was very awkward.
Can you give any tips about using charts – I understand what you are saying about following written patterns exactly except for changing left and right and clockwise and anticlockwise. So theoretically a left hander should read a pattern diagram in the direction it was written to be read. Which means reading from right to left when you are actually working left to right. Does it work if you just read in the same direction you are working (i.e. the opposite way it was written) and just change the turning chains to a different end of rows (if that makes any sense at all). And will it work out correctly if I get charted patterns and flip them horizontally in a graphics program on my laptop then work them as they then appear?
Mary Turrill said
At the risk of sounding like a complete dingbat, is Amigurumi another name for crochet? Or is it a specific style?? I just stumbled upon your site as I was looking up info on left-handed crochet. Now I am intrigued…thanks!
June said
Mary, amigurumi are 3-dimensional crocheted stuffed toys; see my FAQ for more information 🙂
Nicole said
I wanted to thank you for making this site, and your various tutorials and patterns so widely available. They have probably been my biggest go-to resource for learning to crochet. As a lefty, I am extremely grateful, and consider myself fortunate to have found your blog.
Susan Ertel said
I’m a lefty crocheter and I learned and teach righties by sitting opposite them ,not next to them. Then you are getting the mirror image we need. My only problem with a new pattern is going in the other direction starting each row, especially when following a chart. Thanks for the help always looking to learn more
Reine said
I am beside myself with delight! Thank you. As a fellow lefty, I have spent years trying to crochet and trying to do calligraphy, and although I can do both, I am clumsy at them. With your instructions for a lefty, I’ll get better at it. I have ordered your book, by the way, but not from your site. I ordered from www.loot.co.za. I can’t wait for it to arrive. Thanks ever so much.
Rachel said
Thanks so much for the left handed instructions, I am 11 and left handed and wanted to learn crochet, but everyone i know who crochets is right handed. Thanks again!
nicole said
thankyou for the tutorial and for sharing your beautiful work
nicole said
awesome tutorial thanks for sharing
Nora said
I am a left-handed crocheter and have been crocheting for years. (my mom, also left-handed taught me). Until now I have crocheting simple things, potholders, dishrags, etc…
I have been trying my hand at hats and am getting frustrated because if the hat has ear flaps they don’t “land” where they should. I’ve read I need to “reverse” the pattern but don’t understand how to go about this or even why I would need to “reverse”.
Can you help me?
June said
Crocheting left-handed without altering the pattern will just give a mirror-image of the original design. As a hat is symmetrical, you shouldn’t need to make any changes – looking at the hat in the mirror would show you the same design! The only difference would be if the hat has a patterned design: a left-leaning stripe would become a right-leaning stripe, and vice versa.
So, if your hat shape isn’t working properly, there’s either a mistake in the pattern, or you’re misreading the instructions somehow. You should be able to follow a pattern exactly as written and end up with a mirror-image of the original design; I’m a lefty too, and I can attest that, as a lefty, you don’t need to change patterns at all!
(One caveat: if the pattern uses ‘left’ and ‘right’, or ‘clockwise’ and ‘counterclockwise’, you will need to switch those words wherever you see them. So ‘fasten on 3 stitches to the right’ would become ‘fasten on 3 stitches to the left’, etc.)
Carly said
Hi June, I wonder if I could pick your brain on this point – you mentioned that you don’t need to convert patterns for a left-handed (except clockwise vs anti-clockwise etc). However just recently I’ve found a few patterns that I want to do but they don’t work properly for me, as a left-hander, which I think is because they use increases and decreases non-symmetrically in order to ‘shape’ the amigurumi. Due to the way that crochet stitches mis-align when crocheting in the round (eg amigurumi), ie for a left-hander the second round stitch will be slightly to the left of the stitch below, I think the shaping doesn’t work. I’d be really interested to get your thoughts on this! Thank you
June said
This shouldn’t be a problem – everything about the pattern (the direction in which your stitches bias, the slope of the decreases, any asymmetry in the shaping, etc) should be a mirror image for a left-hander. So unless you’re making e.g. a crocheted globe (in which case the continents would all be reversed east to west) or an alphabet (in which case the ‘b’ would become a ‘d’, for example, and certain letters just wouldn’t work at all!) a pattern should just work for everyone. If the patterns you’re using don’t work like that, you should contact the designer for further assistance – maybe they are using a non-standard technique that isn’t mirror-reversible (although I don’t know of any such techniques), in which case they should make it clear that their patterns are for right-handers only.
All I can tell you is that all the techniques I use – no matter how detailed and asymmetrical the shaping – are all fully mirror-reversible, and guaranteed to give a perfect result, whether you’re right- or left-handed. (And that’s also why I haven’t designed a globe pattern, even though I’d love to – as I’m a lefty myself, I’d have to also design a mirror-world one for right-handers, and that seems like too much work!)
Nicole said
What would we do if a pattern includes the letter “b” in the design? New baby on the way in my niece’s family, so this isn’t just an abstract question. Would flipping the pattern as a mirror image of itself do the trick?
If so, if the pattern also contains front or back post symbols, they’d appear swapped. Do we then treat them as they appear on the mirror-image pattern, or as they were originally written? [My brain hurts… but once I get this, I’m golden!]
June said
For a lefty to work an asymmetrical colourwork design designed for right-handers, you need to flip each row from left-to-right (but not front-to back, so don’t change any stitches, only the order of the stitches!). That means you’ll start each row at the end and work the stitches back to the beginning of the row as written in the pattern (this is much easier to visualise if the pattern is charted, as you always work every other row in the wrong direction with a chart anyway).
A couple of caveats:
Angela said
I am a left handed and when following patterns I have trouble with the back and front post only stiches. Should I switch these two when following a pattern?
June said
No, the only things a lefty should switch in a pattern are the words left and right and the words clockwise and counter-clockwise. Everything else in the pattern should remain the same – the front and back sides of your work will still be the same as a right-hander would make; your work will just end up as a mirror image (left to right).
CATHERINE said
SPENT A FORTUNE ON CLASSES. ALL MEMBERS RIGHT HANDED. I WAS LOST,BUT YOU RESTORED MY FAITH IN MYSELF,. LOVE HOW SIMPLE YOU MAKE IT, AND EASY TO FOLLOW THANK YOU
Kate said
It has been so hard learning to crochet while trying to do everything backwards too.
Thanks for the lefty help! It a relief to do it the same as the pictures.
sally said
thankyou for years i have been looking for someone who could show me how to crochet lefthanded
Teresa said
Thank you so much. I taught myself the basics from a pamphlet (had left and right instructions)..but some of the extras I have learned from you. Thank you SO much for the lefty instructions!
Carolyn Coughran said
Thank you so much for all the left handed tutorials. I do crochet but I have been guessing how the stitches should be when reversed. Following your clear diagrams make it so much easier and have shown me I have been doing some stitches wrong for years. I am grateful I can now learn how to do each stitch correctly.
Emma said
Thanks for the easy to follow pictures.
I really want to be able to make amigurumi but im struggling being a lefty.
I have been able to pick it up so much easier with your explainations.
Thanks again
Emma
Blanca Vides said
June,
Thanks so much of this tutorial. I am a righty trying to teach my left handed son how to crochet. This is by far the best tutorial, the pictures really help my son visualize how he is supposed to hold the yarn and the hook. He was getting frusterated and discouraged and your web site has helped.
Once again thanks.
Bee
Carmel said
Hi June! Howie from WooWork.com directed me to your blog, and I couldn’t be more grateful!! I’m a knitter and left-handed. I’ve tried on several counts to add crocheting to my abilities, but have had all sorts of trouble finding good resources teaching left-handed crocheting. Not only is this tutorial awesome and looks extremely user-friendly, it’s so motivating to see a left-handed crocheter with such talent ^_^. Thank you again soo much for this!!
Carmel
June said
You’re very welcome, Carmel! I wish more people catered for left-handers. As a fellow lefty, I try to offer left- and right-handed instructions wherever I can (I don’t want the right-handers to feel left out either!). Happy crocheting!
Vanessa said
Thanks so much! It’s good to see another lefty doing it. I do have one question though, when I’m making amigurumi, the pattern always ends up inside out… And when I flip it right side out to finish it, I can’t seem to make the stitches look right… Does anyone else have this problem? Do you know how to fix it? Thanks again! Huge help!!
June said
Vanessa, I’m sorry – I don’t remember if I replied to this already by email! In case I haven’t, the backs of crochet stitches are wider than the fronts, so the piece will tend to be inside-out and you’ll have to flip it at some point to turn it the right way out (this applies to right-handers too!).
Your stitches will look a little different to right-handed stitches, because they are mirror-reversed. But that’s not ‘wrong’ – just left-handed 🙂
Paula said
Hi june
just wanted to stop by and say THNX again!
I have made my first Amigurumi’s and love doing it
So thnx again for the great explanation!!!
i27.photobucket.com/albums/c199/knurkie/PICT7213.jpg
i27.photobucket.com/albums/c199/knurkie/PICT7216.jpg
i27.photobucket.com/albums/c199/knurkie/PICT7208.jpg
i27.photobucket.com/albums/c199/knurkie/PICT7205.jpg
So no dog or bunny yet but they wil follow soon 😀
Best regards Paula
Paula said
Thnx so much for this picture left handed explanation so much better to understand than with the drawn things i found so far!
im a crochet dummie 😀 just started yesterday
soon real soon i’ll be alble to make a little bunny or dog or whatever
THNX!!!
Rachel said
this is great! i taught myself out of a book and it’s wonderful to see it left handed, rather than seeing it right handed and trying to figure out how to do it the other way.
Izzy said
thanks so much!! i have a left handed friend who is trying to learn crochet (me as the teacher) and i am right handed so it really helped me picture a lefthanded crocheter!!
p.s.
are you ambidexterous?
June said
Izzy: You’re welcome, and no, I’m not ambidextrous – I’m a lefty!