Crochet Tutorials
Link easily to this page in your patterns: www.planetjune.com/help
I’ve collected all my crochet and amigurumi tutorials into this master list! My tutorials take two forms: videos or step-by-step photos with written instructions.
 |
All video tutorials include both right- and left-handed versions on the same page. |
  |
As photo tutorials take up more screen space, some are split into separate right-handed (RH) and left-handed (LH) pages, and you’ll see both links below, in those cases. |
Scroll down through the tutorial list, or jump to a specific section:
- Amigurumi Essentials – To make great amigurumi, you need these techniques!
- Basics – New to crochet or amigurumi? Start here first.
- Perfect Finish – Tips to get a neater result from any amigurumi pattern.
- Embellishment – Add features to your amigurumi.
- Speciality – Advanced or less common techniques.
Note: If you’re having a specific problem, check my Amigurumi Troubleshooter first, to find out which of these tutorials many solve your problem!
Amigurumi Essentials
To make great amigurumi, you need these techniques!
A tip for you: check out my series of basic information posts too: Yarn for Amigurumi, Crochet Hook Styles and Crochet Terminology.
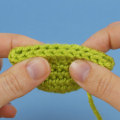
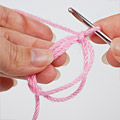
Magic Ring for Crochet
Start crocheting in the round with no hole in the middle.
Start crocheting in the round with no hole in the middle.
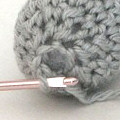
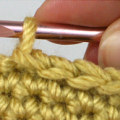
Invisible Decrease for Amigurumi
Decrease without leaving any bumps or gaps.
Decrease without leaving any bumps or gaps.
Ultimate Finish for Amigurumi
Close up the remaining hole neatly with a smooth, gap-free finish.

Close up the remaining hole neatly with a smooth, gap-free finish.
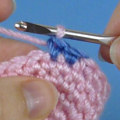
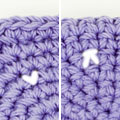
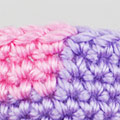
Changing Colour
Clean colour changes for crochet.
Clean colour changes for crochet.
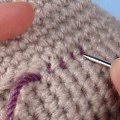
Amigurumi Seamless Join
Create a smooth, almost invisible join when you stitch an open-ended piece to a closed piece.
Create a smooth, almost invisible join when you stitch an open-ended piece to a closed piece.
Basics
New to crochet or amigurumi? Start here first.
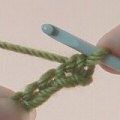
Crochet Basics
Basic crochet stitches for amigurumi.
Basic crochet stitches for amigurumi.
Which is the ‘Right’ Side?
Which side of your work should face outwards? (And does it matter?)
Which side of your work should face outwards? (And does it matter?)
Front, Back, Both Loops
Which loop(s) should you work into to make a crochet stitch?
Which loop(s) should you work into to make a crochet stitch?
Stitch Tension
How to get perfect neat small stitches (without hurting your hands by crocheting extra-tightly!)
How to get perfect neat small stitches (without hurting your hands by crocheting extra-tightly!)

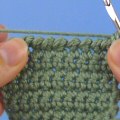
Using Stitch Markers
How to use stitch markers in amigurumi, to mark the first stitch of your round or to mark a specific point.
How to use stitch markers in amigurumi, to mark the first stitch of your round or to mark a specific point.
Yarn Over
How exactly should you wrap the yarn over your hook for crochet?
How exactly should you wrap the yarn over your hook for crochet?
Fastening Off
How to fasten off open and closed pieces in amigurumi.
How to fasten off open and closed pieces in amigurumi.
Flattened Pieces
What does it mean when a pattern says to flatten a piece of an amigurumi after crocheting?
What does it mean when a pattern says to flatten a piece of an amigurumi after crocheting?

Joining Amigurumi
The basic method for stitching open-ended pieces to closed pieces.
The basic method for stitching open-ended pieces to closed pieces.
Chains and Slip Stitches
Are your chs and sl sts difficult to work into? Learn how to avoid this.
Are your chs and sl sts difficult to work into? Learn how to avoid this.

Worsted Weight Yarn Comparison
What is ‘worsted weight’ yarn, and are all worsted weight yarns the same? I’ve compared dozens of ww acrylic yarns for you!
What is ‘worsted weight’ yarn, and are all worsted weight yarns the same? I’ve compared dozens of ww acrylic yarns for you!
Perfect Finish
Tips to get a neater result from any amigurumi pattern.
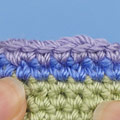
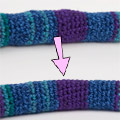
Ultimate Stripes for Amigurumi
The ultimate method for making perfectly seamless joined rounds for striped amigurumi.
The ultimate method for making perfectly seamless joined rounds for striped amigurumi.
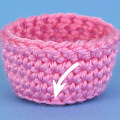
Crochet into the Back Bumps of a Chain
This technique gives you a very neat bottom edge, with a row of Vs across the bottom of your piece.
This technique gives you a very neat bottom edge, with a row of Vs across the bottom of your piece.
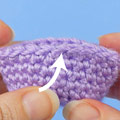
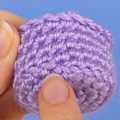
Invisible Finish for Open Edges in Amigurumi
How to make an invisible join at the end of the last round of an open-ended piece in amigurumi.
How to make an invisible join at the end of the last round of an open-ended piece in amigurumi.
Better Back Loop Only Details
A better way to make back loop only details in amigurumi, eliminating the holes below the BLO stitches.
A better way to make back loop only details in amigurumi, eliminating the holes below the BLO stitches.
Jogless Back Loop Only Round
A simple modification to minimise the jog between the start and end of a back loop only round.
A simple modification to minimise the jog between the start and end of a back loop only round.
Attaching Legs Evenly on a Standing Amigurumi Animal
Attach legs neatly and evenly so the animal can stand straight, with all four feet touching the ground.
Attach legs neatly and evenly so the animal can stand straight, with all four feet touching the ground.
Double Ring
A more secure version of the magic ring for crocheting in the round.
A more secure version of the magic ring for crocheting in the round.

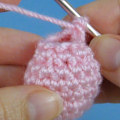
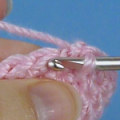
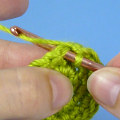
Invisible Increase
Reduce the size of the hole created by your sc increases with this optional technique.
Reduce the size of the hole created by your sc increases with this optional technique.
Perfect your Invisible Decreases
Are your invdecs not as ‘invisible’ as advertised? Let’s fix that!
Are your invdecs not as ‘invisible’ as advertised? Let’s fix that!
Changing Colour: Managing the Yarns
How to deal with the other yarn when you work with more than one colour.
How to deal with the other yarn when you work with more than one colour.
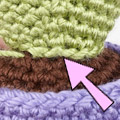
Amigurumi Clean Edge Join
How to make a neat join with a straight, clearly defined edge between two pieces (even if they’re different colours).
How to make a neat join with a straight, clearly defined edge between two pieces (even if they’re different colours).
Fix lumpy stuffing
My pinch-and-push technique to make your stuffing more smooth and even.
My pinch-and-push technique to make your stuffing more smooth and even.
Embellishment
Add features to your amigurumi.
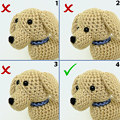
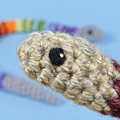
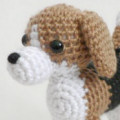
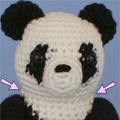
Positioning Amigurumi Eyes
Guidelines for positioning eyes on your amigurumi animals to give a realistic result.
Guidelines for positioning eyes on your amigurumi animals to give a realistic result.
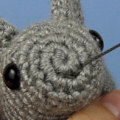
Amigurumi Faces: Secure Stitching
Easily hide the starting and ending tails of your thread and keep your stitches secure when embroidering noses etc onto amigurumi faces.
Easily hide the starting and ending tails of your thread and keep your stitches secure when embroidering noses etc onto amigurumi faces.
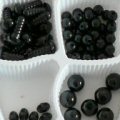
Eyes & Noses
A rundown of options for creating eyes and noses for your amigurumi.
A rundown of options for creating eyes and noses for your amigurumi.
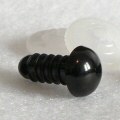
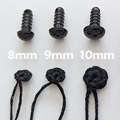
Eye Sources
Online sources for two-part animal eyes (aka safety eyes or craft eyes) for amigurumi.
Online sources for two-part animal eyes (aka safety eyes or craft eyes) for amigurumi.
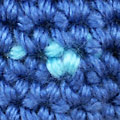
Glinting Eyes for Amigurumi
A technique that brings your amigurumi to life when you don’t use shiny plastic eyes.
A technique that brings your amigurumi to life when you don’t use shiny plastic eyes.
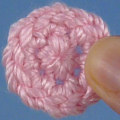
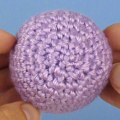
Crocheted Eyes for Amigurumi
Crocheted eyes can be a great child-safe (and pet-safe) alternative to plastic eyes.
Crocheted eyes can be a great child-safe (and pet-safe) alternative to plastic eyes.
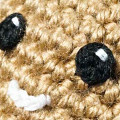
Tiny Yarn Eyes for Amigurumi
An embroidery-free foolproof method for making tiny yarn eyes, spots and dots for amigurumi.
An embroidery-free foolproof method for making tiny yarn eyes, spots and dots for amigurumi.
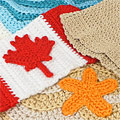
Crocheted Embellishments
How to securely attach multiple embellishments so you can make custom accessories (appliqués, brooches, hair decorations, etc).
How to securely attach multiple embellishments so you can make custom accessories (appliqués, brooches, hair decorations, etc).
How to Attach Crochet Appliques
How to make strong, decorative yarn-wrapped stems that match the look of your crocheted flowers, so you can display them in a vase or bouquet.
How to make strong, decorative yarn-wrapped stems that match the look of your crocheted flowers, so you can display them in a vase or bouquet.

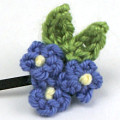
Easy Yarn-Wrapped Stem for Crochet Flowers
How to make strong, decorative yarn-wrapped stems that match the look of your crocheted flowers, so you can display them in a vase or bouquet.
How to make strong, decorative yarn-wrapped stems that match the look of your crocheted flowers, so you can display them in a vase or bouquet.

How to Design and Arrange a Crocheted Wreath
A wreath can be a lovely way to display small crocheted amigurumi, appliques and other embellishments, to celebrate an occasion or just to look pretty.
A wreath can be a lovely way to display small crocheted amigurumi, appliques and other embellishments, to celebrate an occasion or just to look pretty.
Speciality
Advanced or less common techniques.

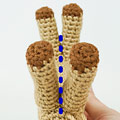
Narrow Pointed Tubes for Amigurumi
My tips for making thin pointy bits on amigurumi, such as spikes, legs, horns and tails.
My tips for making thin pointy bits on amigurumi, such as spikes, legs, horns and tails.

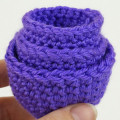
Yarn Colour Swatch Box
If you have lots of amigurumi yarns, try making a box of yarn swatches so you can see at a glance all the yarns you have available.
If you have lots of amigurumi yarns, try making a box of yarn swatches so you can see at a glance all the yarns you have available.
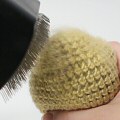
Brushed Amigurumi
How to create a fluffy crocheted animal with regular yarn by brushing the pieces after crocheting.
How to create a fluffy crocheted animal with regular yarn by brushing the pieces after crocheting.
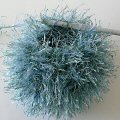
Fuzzy Yarn Tips
Advice on how to crochet amigurumi toys using fuzzy (aka eyelash or novelty) yarns.
Advice on how to crochet amigurumi toys using fuzzy (aka eyelash or novelty) yarns.
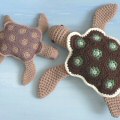
Resizing Amigurumi
How to adjust a pattern to scale the finished amigurumi up or down in size while keeping it in proportion.
How to adjust a pattern to scale the finished amigurumi up or down in size while keeping it in proportion.
Make ‘Baby’ Amigurumi Animals
How to convert almost any animal pattern to make a baby version – with no pattern modifications.
How to convert almost any animal pattern to make a baby version – with no pattern modifications.
Needlesculpting
Improve the shape of your amigurumi with this finishing technique, using only a yarn needle and length of matching yarn.
Improve the shape of your amigurumi with this finishing technique, using only a yarn needle and length of matching yarn.
Crochet Loop Stitch
Loop stitch (aka fur stitch) is a decorative stitch with an added long loop of yarn formed on the back of the work.
Loop stitch (aka fur stitch) is a decorative stitch with an added long loop of yarn formed on the back of the work.
Reverse Single Crochet
Reverse single crochet (aka crab stitch) makes a decorative twisted cord edging for your crochet.
Reverse single crochet (aka crab stitch) makes a decorative twisted cord edging for your crochet.
Crocheted i-cord
Non-knitters can create i-cord (typically knitted) with a crochet hook – it’s an easy way to make fine tubes.
Non-knitters can create i-cord (typically knitted) with a crochet hook – it’s an easy way to make fine tubes.
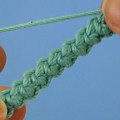
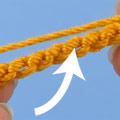
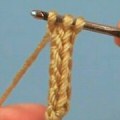
Basic Crochet Cord
This decorative cord makes a strong flattened non-stretchy braid. It’s easy to crochet as it uses only single crochet stitches!
This decorative cord makes a strong flattened non-stretchy braid. It’s easy to crochet as it uses only single crochet stitches!
Is something missing? I’m building this page into a reference library of crochet tips and techniques, and I’m always happy to hear your requests and ideas for new tutorials I can make! Let me know if you have requests for additional technique or stitch tutorials.
Try more free PlanetJune content!


Janet Clark said
Dear June, your WEB Site is fantastic. I am left-handed and now at age 79 am finally learning how to crochet, never had anyone to help me.
Your wideos are great, but might it be possible to have all thhe Left Hander videos together. I have to keep seaching, as those for right handers just confuse me.
June said
Hi Janet! If you’d like to see all my left-handed videos on one page, I have a playlist on my YouTube channel that you can save and come back to whenever you want: PlanetJune Crochet Tutorials (left-handed) 🙂
Lina said
Hi.
I have crocheted a lot of things in the past and have always seen people around me make their own unique patterns. I have mastered the basic 3d oval and sphere. However, no mattter how hard I try, I can’t seem to shape things the way other people do. I have tried to make outfits but have never turned out right due to the way I shaped them. I want to be able to make my own patterns but I can’t understand the method behind shaping… what’s the secret?
June said
This isn’t going to be a very satisfying answer, but the secret to shaping is… experimentation and practice! Look at other patterns that have shaping and try to see how they work. Then pick up your hook and yarn and experiment – with time and practice, you’ll learn how to place your increases, decreases and other shaping stitches to create the shapes that you want. It sounds like you’re talking about making outifts in particular, but if you also want to make amigurumi, part 3 of my book, The Essential Guide to Amigurumi, is devoted to amigurumi design, and in there I explain how the locations of your shaping stitches will affect the shape you end up with – you may also find that helpful!
Marilyn said
Hi June!
I’m having trouble finding a tutorial for joining two closed pieces of an amigurumi dinosaur. The arms were started with a magic circle, then stuffed leaving the opposite end open to attach the hands.
Can you share how this is done? Sure would appreciate your help.
Thank you!
June said
There isn’t a single way to do this – it depends on what the pattern designer intended you to do. If you’re following a pattern, it should explain how to attach the limbs, either so they are jointed (and can move in the finished amigurumi) or are stitched down into one position, and exactly how to do that. If your pattern doesn’t explain that, you can try contacting the designer for assistance 🙂
Bo said
In 70 years of crochet, I’ve never done amigurumi. What do I need and where do I start?
June said
Welcome to the wonderful world of amigurumi, Bo! All you need is worsted weight yarn, stuffing and an E US/3.5mm hook. To get started, please see my beginner’s advice at www.planetjune.com/beginner 🙂
Clare Morgan said
I would like to see what you mean with crocheting around a pipe cleaner. I have the book but not understanding it…thank you. Suggestion for a tutorial
June said
It’s basically the same thing as crocheting into a magic ring. When you work into a magic ring, you’re actually crocheting around a strand of yarn to make the stitches of Rnd 1. So you’ll ‘insert your hook’ by passing it under the pipe cleaner, draw up a loop, then complete the stitch by doing your ‘yarn over and draw through both loops’ over the top of the pipe cleaner. In this way, the pipe cleaner will be encased inside each stitch. I hope that makes sense 🙂
Maria Veras de Lima Barros said
Armadura corporal do Tatu – Parte 1(ombro a cauda).
O que significa deixar uma extremidade de 6″
June said
The yarn ends need to be long enough for you to weave them in later (in ‘Armour – Stage 1’ on p10). If you don’t have a long yarn tail to thread onto your yarn needle, it’ll be much more difficult to weave in the end.
Madeleine Kannemeyer said
Hello June, I’ve been crocheting for a while now and am terribly keen to start learning Amigurumi! ☺
Which of your patterns would you recommend I start with to familiarise myself properly? I’d so appreciate your advice.
Thanks again and hope you’re still loving your new home
Madeleine xx
June said
Hi Madeleine! Take a look at my FAQ: ‘I’m a beginner – which patterns are most suitable for me?’ should answer your question. And for the essential amigurumi tutorials, start at www.planetjune.com/essentials 🙂
David Grindel said
June, I working on a pattern in-the-round which uses slip stitches at the end of the round instead of doing a spiral. I’m having some problems with getting the correct round counts. Do you have a tutorial on this method ? A confusion with the slip stitch, chain one then SC in next stitch. Is the next stitch the slip stitch ? I’ve been putting the stitch marker in just like you show in the spiral round. I have a feeling that might be my problem. Hope you are feeling better.
Thanks much,
Dave
June said
Dave, it depends on the pattern. Typically with sc, you don’t count the ch 1 as a stitch, so you’ll either make a sc in the same stitch as the sl st at the beginning of the round, or sc back into the sl st at the end of the round (the latter is more common, in my experience). But some amigurumi patterns may use a different method, to try to minimise the appearance of the seam – it’s all up to the designer. You can see my description of most of the standard methods in my investigation of how to make the cleanest stripes in amigurumi. I’d recommend you check with the designer if it isn’t clear from their pattern which technique they intend you to use!
Chris w said
to answer the question, is the next stitch after slip stitch the slip stitch,the answer is no.the slip stitch comes first then a single stitch abbbreviated sc.hopethis helps.
Linda Lee Sims said
Thank you for the fast response. i purchased the “kitten” patterns because I have two adorable Calico sisters – they are part Siamese. 5 months old.
Jacqueline Poisnel said
j
June said
I’m afraid all PlanetJune patterns are available in English language only: www.planetjune.com/faq/translations/are-your-patterns-available-in-my-language/
Krisandra Harbison said
Could you demonstrate how to sew a closed end arm/leg to body for amigurumi?
June said
Krisandra, there are several ways you could do this, depending on what the reason for making a closed arm/leg was in the first place. The limb may be designed to be jointed so it can move; it may be a special shape or feature that the designer came up with – or it may just be a poorly-designed pattern! Unless it’s the latter, the designer should explain in detail within the pattern how to attach the limb – if they don’t do that, your best bet would be to contact them directly for assistance.
Margaret said
Thank you so much for your videos. They are easy to follow and understand, and you make some of the most difficult skills work out so much better than other ways I’ve tried. I really appreciate the time you’ve put in to help the rest of us!
Charlotte Kidwell said
Charlotte Kidwell said
October 14, 2018 @ 12:45 am
Hi June:
I apologize for my recent question regarding which yarns you use in your amigurumi. I found all that information under your FAQ’s. Thank you for such an in depth article regarding yarns and your comparison between them. Great resource!
Charlotte Kidwell said
Hi June:
Can you please tell me what yarn you use in your amigurumi creations? I love their clean and crisp appearance! I’ve read that you like to use a 3.5mm hook and 4 ply worsted weight seems too thick to me. Do you use a mercerized cotton? Any advice would be appreciated. ?
Beverly said
Love your tutorial for the basic crochet cord. I made 2 bracelets today after practicing.
I wonder if there is a way to add beads to your basic crochet cord as you work (no pre-stringing– that just drives me batty!). I have a full set of steel hooks I use to add beads as I knit and I would love to create beaded cords using a crochet technique too. Thank you.
June said
You can add a bead to your crochet at any point – just remove your hook from the working loop, thread a bead onto the steel hook, hook the working loop with the steel hook and push the bead down onto the yarn, then reinsert your regular hook in the working loop to continue the stitch. You’d have to experiment to see which loop of this stitch gives you the nicest effect when you add a bead to it!
Jayde said
Thank you so much for your easy to follow instructions and tip’s and tricks! The “invisible decrease” and color change tips especially! I’ve been crocheting and making amigurumi for a few years now, (I guess I’d be intermediate level) and nowhere else have I seen these tricks. I’ve always had issue with the hole size when doing normal decreases in amigurumi even though I crochet very tightly.
Anyway, thank you for all your help!!!!
Jacky Hopton said
Hello June
I am fairly new to amigurumi (about 1 year) but have been a crocheter for many, many years. I found your site by chance and your excellent tips for perfecting your amigurumi. I have ordered your Idiots Guide for Amigurumi from Amazon. Thank you so much, your skill amazes me.
Jacky
Renee Kinsey said
I’m trying to find out how to make a magic circle
June said
Renee, my magic ring tutorial is the very first one listed at the top of this page 🙂
melissa thraller said
Awesome! I love it, your content ir very cool, and i’ve learned many others good things with you that i
Alison Fogg said
Hi I’m new to amigurumi and I can do the stitches but for some reason I never get the right amount of stitches in each round. I think I am counting the right amount as I go round but still end up wrong. I’m using a stitch marker. I think I’m having trouble knowing which stitch to start on.
Thanks
Alison
June said
Alison, take a look at my Amigurumi Troubleshooter for some tips on this.
Sandie O'Connor said
Hi June I was wondering if you could give me some tips on embroidering on eyelashes please?
Thank you
Sandie
June said
Not really, I’m afraid, Sandie – I have a more minimalist aesthetic when it comes to embellishment. I don’t really do details like eyelashes, so I don’t have any expert advice I can share with you!
Tina Hamelton said
I’m making Peppa Pig for a little girl I take care of and I can’t seem to get the arms done right I end up with a narrow end and than I can’t do the hand. Thank you for any help you can give me.
June said
Tina, I don’t know why so many people keep asking me questions about this Peppa Pig pattern (did the designer link to me within the pattern as a place to go for help?)
I’m sorry I can’t help, but this is not one of my patterns, so you’ll have to contact the designer for assistance.
If you could let me know who the designer is, I’d appreciate it (there are dozens of Peppa Pig patterns listed on Ravelry, and I have no idea which one is sending people here to ask for help!) I’d like to ask them to modify the pattern so it’s clear that I’m not the designer and am not the right person to ask for pattern support – thanks.
Brenda Waltman said
Hi June,
I have been working on many Amigurumi patterns for my grandchildren. I have been finding your tutorials very helpful. I haven’t been able to find one to show me how to crochet in a circle and not have a ridge down the back where I do the slip stitch to join each round. Do you have anything that could help me do an invisible join for each round.
Thank you for any advice you have to offer,
Brenda
June said
Brenda, I don’t use joined rounds in my patterns for just this reason – amigurumi look much better when worked in a continuous spiral, so there’s no joining and the finished pieces are smooth and seamless. But, if you have to work in joined rounds, the techniques I developed for my Perfect Stripes tutorial (www.planetjune.com/stripes) will give you better results (even if you aren’t changing colours in stripes!)
Karen Robbins said
I love your tutorials. Thank you or sharing. I do have a question. I’m working on a project that calls for joining the front and the back pieces of the body down the length of both sides. The pattern just says to join them together. I am assuming I use a whip stitch. My question is, should I put the right sides together while I stitch, the wrong sides together or lay them flat next to each other to stitch them together?
June said
I can only advise on my own patterns (and, if it were mine, I’d have given detailed instructions in the pattern to begin with!) You’d have to ask the designer of the pattern what they intended, or experiment to see what gives the best result for the stitch pattern you’re using and how the piece will be used.
blanca rosa said
tuturial en espa
June said
I’m afraid I’m only fluent in English, so my patterns and tutorials are available in English language only.
Pamela Hargreaves said
Thank you June for the patternI love it even though I hav’nt made it yet
I intend to make something flor my great grandaugher
Having parkinsons desease I an a little slow .
GThank you once more
Regards Pamela
Kathleen Hart said
I love your tutorials and have used them often and shared them frequently and now I have a question…if you are doing an amigurumi with a teardrop shaped head (with the narrow part of the drop as its nose) how would you join it to a rounded body if both are closed shapes? Is there a tutorial somewhere? TIA
June said
I recommend you don’t join two closed pieces together, as it’ll never give a smooth join like adding an open-ended piece to a closed piece, where you can make a practically invisible join. If you have to do it, the best way is to smush the two pieces together so they make good contact, and then sew them together around the entire edge where the two pieces touch.
Michele McIntyre said
Hi June:
I just found your site and it is really awesome and so full of information.
Thank you for sharing your talent.
Cec said
Hello
My name is Cec
Brenda said
Thank you for sharing so much – I think you’ve provided a tutorial for every question I have about crochet!
Paula Doan said
I am having trouble doing the open wings. Could you please help.?
June said
Hi Paula, I’m afraid I’m not sure what you’re asking. If you need help with a specific PlanetJune pattern, please email me with which pattern you’re stuck on, and what the problem is, and I’d be happy to help you figure it out 🙂
Rachel said
So I just started learning how to make amigurumi, and I find the only area I’m struggling in is increase. I’ve checked out your picture tutorial about invisible increase, but I can’t seem to get the hang of it. I end up with tubes rather than spheres. If you could give me a couple tips or point me in the right direction, that would be amazing.
Thank you so much. 😀
June said
Rachel, the increase should actually be the easiest technique to grasp – I wonder if you’re overthinking it..? You don’t need to use my invisible increase: a standard increase involves just making 2 stitches into the same stitch of the round below – see my basic sc increase instructions here. And I suggest you try one of my patterns that I recommend for beginners (including lots of free options) – it’ll be easier to see if you’re doing it right if you learn all the basics on a simple project first, before trying to move on 🙂