Ultimate Stripes for Amigurumi
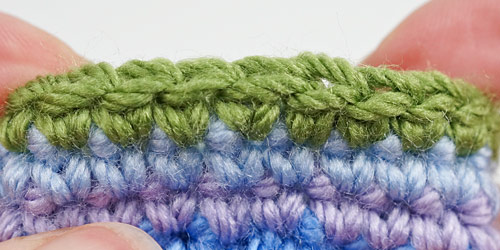
I’ve developed this Ultimate Stripes method to make the most perfect stripes in amigurumi. There is absolutely no seam or colour jog, and no way to tell where the join is in the finished piece – it’s completely perfect!
If you’re looking for those methods, you can find the tutorial here 🙂
Or see why I believe Ultimate Stripes are better and compare all three methods for yourself in my amigurumi stripes comparison post.
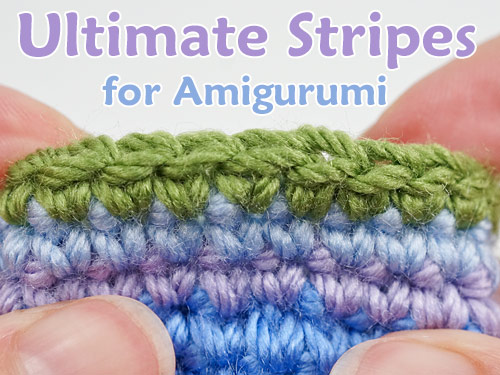
Where’s the seam, you ask? (In the green round, it’s exactly in the middle of the photo. In the round below, the join is also somewhere in the photo, but I can’t even remember where it is!)
I recommend you watch the video to see the Ultimate Stripes method in action, but in case you prefer text or want something visual to refer to, I’ve also made a photo tutorial version for you.
Quick finder:
- Video Tutorial (right- and left-handed)
- Step-by-Step Instructions (right-handed)
- Step-by-Step Instructions (left-handed)
- FAQ: Additional Notes
- Use in Amigurumi Patterns
Ultimate Stripes for Amigurumi – Video (right-handed)
Click to watch this video on YouTube.
Ultimate Stripes for Amigurumi – Video (left-handed)
Click to watch this video on YouTube.
Note: The videos may look a little small embedded in the blog: if so, you can fullscreen them or click through to YouTube to watch them full-sized 🙂
Step-by-Step Instructions (right-handed)
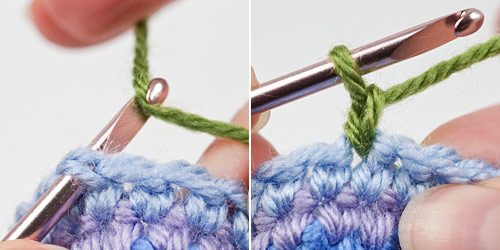
Fasten on by drawing up a loop in any stitch (below, left). Ch 1 (below, right).
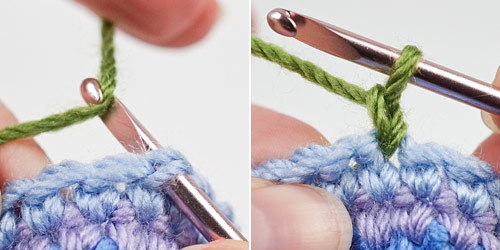
Single crochet in the next stitch (below, left), crocheting over the starting yarn tail to lock it in place. Single crochet in each remaining stitch around (below, right).
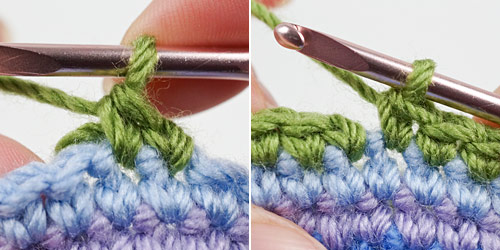
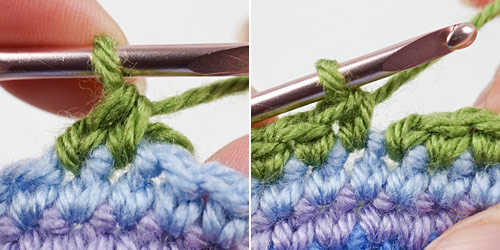
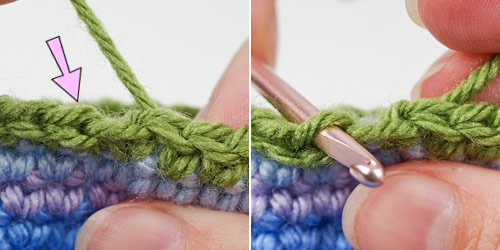
Cut yarn leaving a 2″ tail. Draw up last loop to pull cut end through to the top (below, left – arrow marks first sc, for next step.) Insert your hook from back to front under both loops of the first single crochet (the second stitch) of the round (below, right).

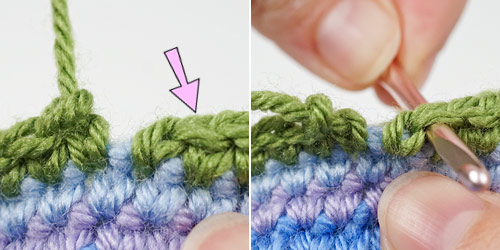
Yarn over and draw the cut yarn end through to the back (below, left – arrow marks last sc, for next step). Insert your hook from back to front under the back loop of the last stitch of the round (below, right).
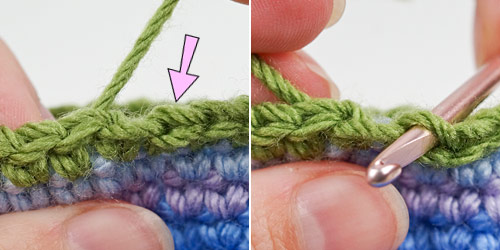
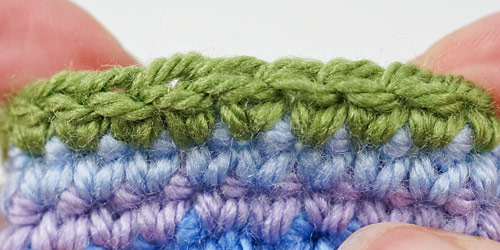
Yarn over and draw the cut yarn end through to the back to complete the join (below). (In the next round, work over the remaining yarn tail to lock it in place.)
Step-by-Step Instructions (left-handed)
Fasten on by drawing up a loop in any stitch (below, left). Ch 1 (below, right).
Single crochet in the next stitch (below, left), crocheting over the starting yarn tail to lock it in place. Single crochet in each remaining stitch around (below, right).
Cut yarn leaving a 2″ tail. Draw up last loop to pull cut end through to the top (below, left – arrow marks first sc, for next step.) Insert your hook from back to front under both loops of the first single crochet (the second stitch) of the round (below, right).
Yarn over and draw the cut yarn end through to the back (below, left – arrow marks last sc, for next step). Insert your hook from back to front under the back loop of the last stitch of the round (below, right).
Yarn over and draw the cut yarn end through to the back to complete the join (below). (In the next round, work over the remaining yarn tail to lock it in place.)
FAQ: Additional Notes
How Do I Make Thicker Stripes?
It doesn’t matter if your stripes are 1 round high or 10; the technique is always exactly the same. For this technique to work so perfectly, you have to cut the yarn at the end of every round, whether you’re changing colour or not.
How Do I Count my Stitches?
If you’re counting your stitches to check your stitch count, you should make one fewer sc stitches than you need in the round, because the ch 1 at the start (plus the finishing steps at the end to create the top of the stitch) counts as the first sc of the round.
What Do I Do About Increases & Decreases?
If your pattern rounds include increases or decreases, you can work them as written, unless the round starts with an increase (2 sc in next st) or decrease (invdec). This is because the first stitch of the round (the ch 1) will be the fake sc stitch, so it can’t form part of an increase or decrease.
The easiest way to fix that is to move the increase or decrease to the end of the pattern repeat, so instead of e.g. (2 sc in next st, sc in next X st), rewrite the part in parentheses as (sc in next X st, 2 sc in next st) – and remember that the fake stitch counts as the first of those X sc stitches!
Note: The above advice assumes a basic amigurumi pattern with a simple repeat that places increases or decreases evenly around the round, e.g. “(invdec, sc in next X st) six times”. A pattern with more complex shaping would need careful modification to make sure you aren’t disrupting the shaping – that’s beyond the scope of this tutorial!
How Do I Make an Amigurumi with a Striped Section?
If you’re making an amigurumi that starts out with a solid colour and then has a striped section, you can make the first part of the amigurumi in a continuous spiral as usual. When you reach the end of the solid-coloured part, join with a slip stitch to the next stitch and fasten off. From here on, you can work in joined rounds using the Ultimate Stripes technique.
How Do I Return to Spirals After Finishing the Stripes?
Once you’ve completed the entire striped section of your piece, you can resume working in continuous spirals. To do this, start the first round of the colour you’ll be continuing with as an Ultimate Stripes round. (If your piece has a back or bottom side that will be less visible on the finished piece, start this round on that side, as there’ll be a slight jog at the point where you transition from joined rounds to spirals.)
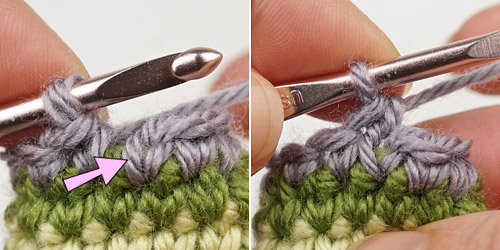
When you reach the end of the round, do not cut the yarn or finish the round. Insert your hook into the closest strand only (rightmost for RH, leftmost for LH) of the starting ch 1 of the round, then complete a single crochet. The stitch you’ve just completed is the first stitch of the second round, so you can place your start-of-round stitch marker in this stitch and then continue crocheting in a spiral. Here’s how that looks:
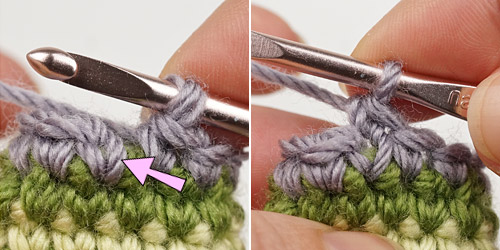
Right-handed. L: arrow shows the closest strand of the ch 1; R: the completed sc
Left-handed. L: arrow shows the closest strand of the ch 1; R: the completed sc
How Do I Make the Cleanest Transition Between Spirals and Stripes?
For the smoothest colour transitions between the spiral and striped sections, switch from a continuous spiral to Ultimate Stripes for the round before the first colour change, and return to working in a continuous spiral after the first round following the last colour change.
Do I Have to Move the Join?
You’ll see that in the video I recommend moving the join with every round of these stripes, so the joins don’t stack on top of each other. This will give the most perfect result, so I do recommend you do this if your pattern allows:
- If the pattern you’re using requires a start-of-round stitch marker so you’ll be able to line up the position of some asymmetrical shaping or colourwork at a later point on the piece, you can still use the marker to mark the position of the original start of the round, even though you’ll be starting the striped rounds in different place. Move the marker up each time you reach it, but otherwise ignore it while you’re working the stripes. Once the striped section has finished, you can start the next round in the marked stitch and continue from there.
- If your pattern has both stripes and asymmetrical shaping within the same rounds (so it matters exactly where you place the increases or decreases), you can use this technique without starting each round at a different point around the circle. The general Ultimate Stripes technique will still work, but, for security, I’d recommend that you tie the starting and ending yarn tails from the previous round together on the inside of the piece before you start the next round.
I Don’t Want to Cut the Yarn Each Round!
If you hate the idea of cutting the yarn and rejoining it for every round, my No-Cut Join is the best alternative option. It does leave a slightly visible seam at the end of each round, but there’s still no colour jog and you never need to cut the yarn!
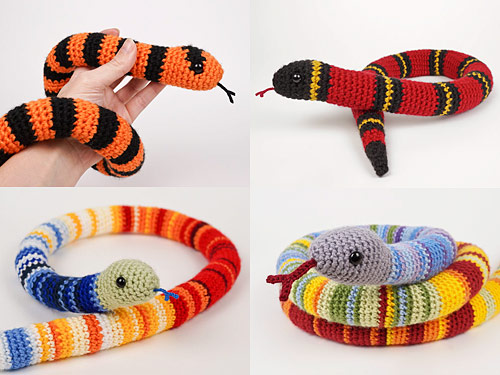
Use in Amigurumi Patterns
You can safely use the Ultimate Stripes technique for any of my patterns that use stripes in joined rounds, like my snake patterns:
…and others (e.g. Ring-tailed Lemur tail, Easter Eggs, Christmas Baubles, Ami Paint Set brush and paint tube, Red Panda tail, Iguana tail, African Violets pot, all pictured below).

You can also substitute this join for a normal join to give you neater stripes in any other amigurumi pattern, or to add stripes to any amigurumi (it’s the stripe equivalent of substituting invdec for a sc2tog: it will work in almost every case). This join will improve the appearance of striped hats too, or any other pieces single crocheted in the round!

Loved this tutorial? I have so many more amigurumi tips and tricks to share with you!
Boost your amigurumi skills with my latest book, The Essential Guide to Amigurumi, your comprehensive guide to amigurumi techniques and tips.
Do you find my tutorials helpful? If so, please consider making a contribution towards my time so I can continue to create clear and concise tutorials for you:
Thank you so much for your support! Now click below for loads more crochet video and photo tutorials (and do let me know what else you’d like me to cover in future tutorials…)


Leanne said
Hi June,
Thank you for all your incredibly well considered and clearly explained techniques! I’ve just treated myself to a couple of paid patterns too, and for anyone wondering they’re also very clear and comprehensive, worth the investment.
I’m commenting as I’m wondering whether there’s a way to make the Ultimate Stripes even more perfect? I’ve seen a tutorial on YouTube where they achieve a clean rather than jagged colour transition, by drawing through the first colour and completing the stitch with the second colour. I wanted to try combining that approach with your Ultimate Stripes. For context I’m planning a unicorn and want a clean line colour change between a purple hoof and white leg.
The best solution I could come up with has been:
– Fastening off the first colour one round _before_ the colour change is due, in order to switch from spiral to joined rounds.
– Then a round that restarts the first colour for the pull through and uses the second colour to complete the stitch.
– Cutting the first colour, and knotting to the tail from the start of the second colour.
– Cutting the working yarn of the second colour to complete the two colour round Ultimate Stripes style, to prevent the jog.
– Then restarting the second colour again, going back to spirals.
However that feels like it might be lots of unnecessary starting and stopping of the two yarns, and I wondered whether I’m over complicating things and you might be able to come up with a better solution that I could try?
Thanks!
Leanne
June said
Hi Leanne, I’m so glad you’re enjoying my work! That’s an interesting question… you’re mashing up my Ultimate Stripes with a Half-Colour Round to get a crisp horizontal line. I cover both of these and more in Chapter 14 (Technique Upgrades) of The Essential Guide to Amigurumi, by the way – and if you’re enjoying experimenting like this, I think you’ll love exploring all the tips I share in the book 🙂
Personally, I’d compromise and choose the best method for each situation: for a one-off crisp change like your unicorn hooves, I’d use a Half-Colour Round together with my jogless stripes tips from the book, and I’d use Ultimate Stripes for perfectly seamless, jogless, multiple-striped amigurumi. But if you want to combine techniques to get crisp, seamless and jogless, I don’t think there is a better way than yours: if you’re looking for absolute perfection, I think you likely do have to go to the lengths you describe!
Eraine Engelbrecht said
Hello June. I just one to thank you for your no cut join method. It took me a whole day to under stand what you where doing untill the video. Wow 😳 it is so easy and looks beautiful compared to all the years off doing it the old way. I accidentally came across your video. Thanks all the way from Pretoria South Africa.
Briana said
Hi! I am somehow ending up with an extra stitch while trying this method. My first color changing row involves 4sc, 1 invdec (repeated). By the time I make it back to the original chain one, I already have the required number of stitches from the pattern. So when I then attempt to do the cut/last stitch, I have an extra stitch. Am I misreading something?
June said
I’d get familiar with the technique before you try adding any increases or decreases – it’s easier to make sure you understood the method correctly when there are no other factors at play and the number of stitches should remain constant! I’d recommend you undo your round and redo it without the decreases as a test to see if you’ve misunderstood something in this technique, or if the problem occurred elsewhere in the decrease round you worked. (If it works, pull it out and redo it properly with the decreases – this is just a temporary test round!)
Lucy said
How would you do a seamless colour change on a decrease and increase stitch/round? Thanks for the help on the single crochet’s though 🙂
June said
Exactly the same way! It’s only the first stitch of the round that’s unusual (because you start the stitch at the start of the round and then complete it at the end of the round), so make sure you start the round at a position that doesn’t have an increase or decrease, and you can just follow your pattern for the rest of the round 🙂
Michelle said
Hi! This looks great. I do have a question/issue when I do a stripe that is 2 rounds instead of 1. On the second round I don’t know how to start it as our first stitch previously was a chain. If I just stitch in thats I get a weird jog. How can I prevent that? Thanks for any help ❤
June said
Exactly the same way as if you were changing colour – with this method, you cut the yarn at the end of every round, whether or not you’re changing colour. It’s slightly annoying, but it’s the only way to achieve an absolutely perfect result!
Tootsie said
I survived! In reviewing, I was not fastening off correctly. Thank you for your support to reveiw what I have done and directing me here instead of FB. Now for the next day row.
Rain in Astoria, Oregon
June said
I’m glad you were able to figure it out, Tootsie – well done!
Michelle Hall said
I have a question about this technique. First of all, I absolutely love it. It’s been working amazingly for my needs. My question: do you find that the stitches still lean like you are doing continuous rounds?
I’m asking because I would like to do a project where half the round is one colour, and the other half of the same round is another colour. However I’m afraid that That line of the colour change is going to lean and twist around the project like it would using a standard technique.
I hope that question makes sense and I thank you for any help or insight you might be able to give.
June said
Hi Michelle, yes, that’s right – using joined or spiral rounds makes no difference; each stitch still sits slightly behind the stitch on the round below, so your columns of stitches will always lean. That’s just the nature of single crocheting in the round without turning!
The only way to mitigate that would be to turn your work between rounds, but that would completely change the look of your work, as you’d see the fronts of the stitches of odd-numbered rounds (as usual), but the backs of the stitches of even-numbered rounds (i.e. the fabric would look the same as if you were working in rows – not at all like the stitches of an amigurumi).
It’s up to you which look you’d prefer, or if you need to rethink the project to make the biasing less obvious (that’s a design challenge I’m often faced with, and I’m afraid there’s no simple solution to it – or if there is, I haven’t found it yet!)
Rebecca said
Thanks for another great tutorial! I am making a colour change where I would like to use this technique to avoid the jump in colour. So not stripes per say, but two continuous blocks of colour joined. I notice in your stripe comparison page you say in a comment reply to go back to continuous rounds. When would you recommend this after using the ultimate round technique where you would need to cut the yarn to complete that new colour round? I’m also curious as in your previous stripe technique you suggested using a hybrid method to “prepare” for the colour change, using a no cut round before the invisible join round – it looks like there is no need for the preparation in the first colour and you can simply slip stitch after finishing the first colour block?
June said
Ultimate Stripes is a method for working in joined rounds, which you need when you’re making lots of stripes of colour. It sounds like you just want a block of one colour (worked in a continuous spiral), followed by a block of a different colour (also worked in a continuous spiral) without a jog? If so, your best bet might be to make a simple jogless spiral: change colour as usual, but make the first stitch of the new colour as a slip stitch instead of a single crochet. This minimises the jog while letting you continue to work in a spiral.
As for your second question, if you’re transitioning to Ultimate Stripes from a continuous spiral, there’ll always be some kind of visible transition when your rounds change from a sloped angle to horizontal. The absolute best way to do it would be to make the first Ultimate Stripes round in the old colour, and then continue with your joined Ultimate Stripes rounds from then on, to mask the transition to joined rounds in the round before the first colour change. I don’t think it’s necessary to do that if you hide that transition at the back or underside of your piece, but yes, if you want to get as close as possible to perfection, you can switch to ultimate stripes for the round before the first colour change. 😀
Rebecca said
Ah it worked perfectly!! Thank you so much for replying in such detail. As I’m making a leg with a coloured hoof on the bottom so nowhere to hide a join, I went with your absolute best suggestion. I did an ultimate round in the original colour, then in the new colour, then used your slip stitch suggestion on the next round to minimise the return to spiral. It looks great. Thank you for this and all the other tutorials, my crochet has come on so much since I found your site.
Debbie Smetherham said
You’re always a treasure trove of awesome tips and tricks! I’m also a perfectionist, so I will definitely be trying this new join. Thank you!
Bill Monroe said
Hi June.
Your videos are super as usual.
What is the yarn you are using in this snake video?
Cheers,
Bill
June said
Thanks Bill! I used a combination of all the lighter worsted weight yarns I have in my stash for the snakes: Patons Canadiana, Bernat Satin, Red Heart Soft and Caron Simply Soft.