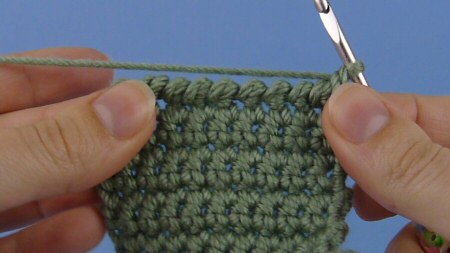
Today I’d like to show you my favourite technique for making a decorative crocheted edging. Reverse single crochet (also known as crab stitch) makes a twisted cord edging, and it’s very easy to achieve – it’s no more than a single crochet stitch, but you work in the opposite direction to usual (left to right for right-handers; right to left for left-handers). Provided you don’t work too fast and tangle up your stitches (which is easy to do when you’re working backwards) it’s an easy technique to master.
As it’s easier to show than to tell, I’ve put together a new video to demonstrate. I hope you’ll find it useful, if you haven’t already mastered this stitch.
(If you want to practice the technique, it’ll be featured in both of my next two patterns, and you’ll get a peek at one of them in the video – another new donationware pattern to be released later this week!)
Reverse Single Crochet (right-handed)
Click to watch this video on YouTube.
Reverse Single Crochet (left-handed)
Click to watch this video on YouTube.
Note: The videos may look a little small embedded in the blog: if so, you can fullscreen them or click through to YouTube to watch them in full HD resolution 🙂
I’ve been compiling a list of crochet technique videos that I plan to create over the coming months. If you have any suggestions you’d like me to add to my list, please let me know.
If you enjoy my crochet tutorial videos, please help to spread the word about them, and/or subscribe to the PlanetJune YouTube channel.

Loved this tutorial? I have so many more amigurumi tips and tricks to share with you!
Boost your amigurumi skills with my latest book, The Essential Guide to Amigurumi, your comprehensive guide to amigurumi techniques and tips.
Do you find my tutorials helpful? If so, please consider making a contribution towards my time so I can continue to create clear and concise tutorials for you:
Thank you so much for your support! Now click below for loads more crochet video and photo tutorials (and do let me know what else you’d like me to cover in future tutorials…)


Shiro said
I did what Katherine did (the thing that results in normal v shapes on top) but on purpose, as I’m working a mosaic crochet project and I like how it looks better. I came across this tutorial because I’ve been trying to figure out if what I’ve done has a proper name. What I’m doing is inserting the hook under both loops from back to front, but otherwise making normal sc stitches in the normal direction. It seems to have the same effect as left-handed crocheting, without needing to work left-handed or from the left. Is there a name for that?
June said
Yes! I know exactly what you mean, Shiro – that’s backward single crochet (or, at least, that’s what I’ve always called it) 🙂
Mary Lou said
Thank you very much for your tutorial. I am just finishing the first of 6 baskets I am making for my grandchildren for Christmas and was looking for a way to make them look finished. The RSC gives just the look I have been looking for. It was easy to follow the video. Thanks again Mary Lou
Gillian said
How do you finish a round of RCS ?
June said
Gillian, my Gift Boxes pattern has a round of RSC around the edges and explains how I make a clean finish with written instructions and a photo tutorial 🙂
Nancy Rea said
I can do the rsc for a border. My problem comes if I have to do several rows. Where does my hook go for subsequent rows. If I put my hook between the first rsc and the next rsc I don’t get the roll. Thanks and I hope you can understand my question the way it’s written…..I’m not sure I can and I wrote it. LOL
June said
Nancy, rsc is designed to be the final row of a border – it’s not meant to be worked back into. If your border has multiple rows, make all the other rows in sc (or another stitch), and save the rsc edging for the final row!
LuckyLady said
I’m okay at doing the RSC and love the look. The only question I have would be this… how do you end the row when you are doing the RSC on a round piece? The last RSC meets the first RSC and how do you blend in the stitch so it takes on a smooth finish? I can’t find the instructions for this anywhere. Thank you.
June said
My Gift Boxes pattern has a round of RSC around the edges and explains how I make a clean finish with written instructions and a photo tutorial 🙂
maggie born said
Thank you! I’ve been trying to ‘get’ this stitch for a week and bam–you made it clear. I’ve been crocheting for over 50 years (very young when I learned…!?) and have never run into this stitch but I just love the look.
Nancy said
Last week I finished a shawl except for the RSC. My friend who is left-handed watched a video, learned and tried to teach me, but mine looked like the previous writer-a loop stitch along the top border. I watched over a dozen videos and written instructions with many steps, one called for rotating the hook and some were so quick. Finally I found yours. Your instructions and method are clear and easy to follow! I was happy to learn from your video. I finished the edging and it looks very neat. I see this would keep it from getting out of shape, and will use it on future projects.
The shawl instructions also call for embellishing using a smaller hook and surface chaining my own pattern of leaves, flowers, etc. Can you explain surface chaining? Would it not be on the underside of the shawl? I used a varigated yarn for my shawl.
Thank you! Nancy
Katherine said
I cannot seem to get this right for the life of me. I’m trying to do the edging on your gift box pattern and no matter what I do, it just seems to look like a single crochet stitch with the loop at the top. I’ve watched your video at least 10 times and several others on YouTube and I can’t figure out what I’m doing wrong! So frustrating!
June said
Katherine, I’ve been playing around to see if I can replicate the problem you’re having, and I think I’ve figured out what you’re doing wrong! The key is how you pull the hook back up through the crocheted fabric when you draw up a loop. The way you’re doing it, you must be keeping the hook turned to angle backwards while you pull up the loop. Only the first step (insert hook into previous stitch) should have your hook held at a different angle to normal. What you need to do is rotate the handle back to your usual crocheting position before you pull up the loop.
In effect, what you’ve been doing is crocheting left-handed, but with your right hand (or vice versa if you’re a lefty). By pulling up the loop with the hook in the normal position, you’ll twist the yarn which will stop the ‘v’ shape showing at the top of your stitch!
Please watch the video again with this in mind, and then pay close attention to the angle of your hook as you draw the yarn up through the previous stitch – I think this will fix your problem. Good luck!
Katherine said
Hi June – thanks for your follow-up message. When I left you that message, I was trying to finish a gift box for my niece’s birthday. Now I’m back to finish a gift box for my other niece’s birthday! I think I’ve got the hang of it now! Thanks so much!
Angie said
Also I forgot to add, working with the double ended crochet hook would be the tutorial that I would request!
Angie said
This technique was so difficult for me to get at first, I always ended up just turning the work around and making a normal SC without even noticing it. Then one day it just made sense to me what to do and it quickly became my favorite technique for edgings around hats! Thanks for the help.
Jackie Bunting said
Hey June, Thanks so much for getting rid of my awkwardness in working the RSC stitch. You do make it look sooo easy and that really made it less intimidating for me. I was so glad to find your tutorial. I would love to see a tutorial on the Broomstick Lace and Tunisan stitches also as Lynn suggested. Those are 2 that I’ve avoided also, not knowing where to even begin. I’ve been crocheting for years and have enjoyed learning many stitches but those are the 2 that I really would love to learn. I LOVE all your patterns and I am looking forward to learning the Punchneedle patterns too. Thanks again June, God bless and keep up the good work. OH, do you have any patterns for sweaters for us (big) girls? Sincerely, Jackie B.
June said
Jackie, I’m glad you liked the tutorial! I’m afraid I’m not a garment designer, so I can’t help you with patterns for sweaters; I suggest you check out www.ravelry.com – it’s free to join and you can browse through countless patterns and see projects other people (of all sizes!) have crocheted from those patterns, so you can get a better idea of what might work for you before you invest time/yarn/money in the pattern 🙂
Erin said
Thanks for the clear tutorial! Is this a stitch that only works when crocheted through both loops? I was wondering what an rsc through the front loop only or the back loop only would look like. I’m still mastering this technique, so I’d love to hear your expert opinion before I try any variations. 🙂
June said
Erin, if you rsc through the back loops only, the unworked front loops would form a horizontal line below the edging on the front of your work, and if you rsc through front loops only you’d have a horizontal line of unworked loops on the back of your work. There’s no reason you have to work through both loops, if you want to create that effect with the unworked loops. The easiest thing to do is make a small swatch (maybe 15 stitches across), just a couple of rows, and try 5 stitches each of rsc in both loops, FL only and BL only, and see which you like best.
Erin said
Thank you! I’ll be swatching tonight. 🙂
futuregirl said
Great video! I’ve never used this stitch. I want to now, though! xoxo!
K. Wagner said
Wow, great job! It literally took me seconds to successfully master this stitch with your simple instructions – and I was intimated to try it too! Thank you 🙂
Lynn said
Thank you. This was a stitch I have had trouble with. Your tutorials are great and I am amazed that you can crochet right and left handed. Is it hard for you to crochet with both hands? I recently came across a pattern which called for the loop stitch. I kept having trouble until I came across your tutorial on it. Then I had my ahh moment. Thank you for explaining and demonstrating in such a clear manner. As for future tutorials, how about the broomstick stitch or Tunisian stitch. Also, any tutorials on cable crochet stitches would be helpful. Thank you.
Jana said
Thanks, June! I have tried the RSC before but could NEVER get the hang of it! Anytime I see it in a pattern, I shy away from it! But you make it look SO easy. I will have to give it a try again. I think my problem has been in where the yarn should be in relation to the hook when I insert it into the previous stitch. It makes it much easier to have a visual. 🙂
As for tutorials, I would love to see some on post stitching! I am making a cabled scarf using fp and bp stitches, but at times I am not exactly sure WHERE I should be putting my hook through.
June said
Okay! Post stitches are going on the list (it’ll give me a good excuse to design a new pattern that uses them too!)
Kathy said
Your tuturials and patterns are always so easy to follow! Thank you!
Aslo, were you aware of this: insidecrochet.wordpress.com/2011/11/15/its-time-to-vote-crafty-blog-of-2011/
Patti Jo said
I have been crocheting a long time, since I was a child. Over the years I’ve utilized numerous sources to learn or re-familiarize myself with techniques and/or stitches. You have the best little tricks that take crochet projects up a notch. The way you explain and demonstrate the techniques always seems so clear and easy to duplicate! (I just love your amigurumi book!) Thank you for sharing your knowledge! My crochet projects have taken a step up in quality and beauty by using techniques you have shared.
Stocki said
You make it look so easy June! Thanks for this… I find your videos so easy to follow :)x